How to Connect Cameras
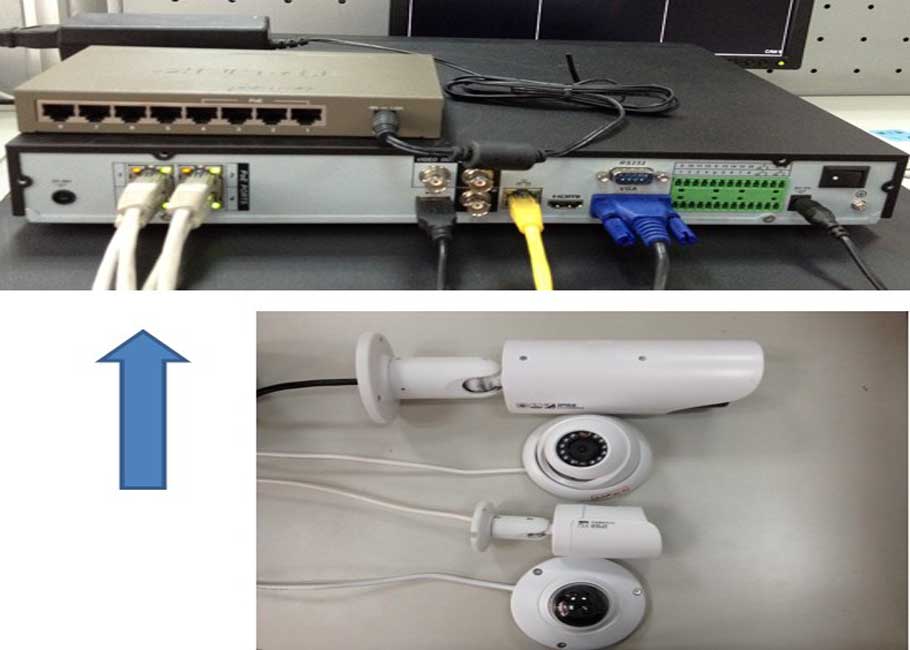
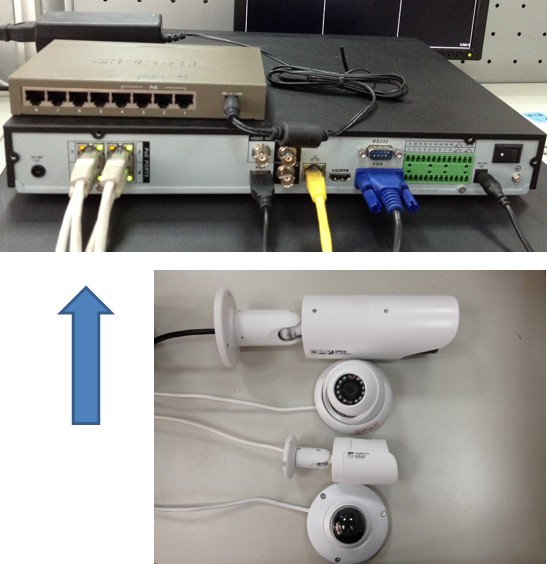
IP Camera to NVR’s PoE
How to Setup a Dahua IP camera and PoE NVR
1. You want to connect a CAT5 network cable to your IP camera.
2. Connect the other end of that cable to the back of your NVR. (Be sure to use one of the ports that looks like this.)
IP Camera to NVR’s Switch
How to Add a Dahua IP Camera and NVR to a Switch
How to add IP Camera to Dahua NVR (Same LAN, using POE switch)
Requirements
- 1. Powered NVR or HCVR
- 2. PoE Switch
- 3. PoE IP Camera
- 4. 2 Ethernet Cables
Step by Step Setup
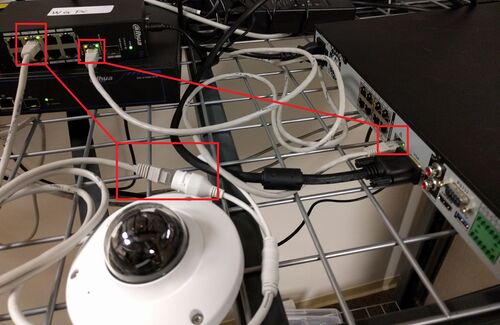
1. Plug the Ethernet cable into the powered NVR or HCVR, then plug the other side into powered PoE switch. Now plug the second Ethernet cable into IP Camera’s harness and plug the other side of the cable into the PoE switch. Make sure if you are using new cameras to plug them in one at a time to avoid an IP conflict since most cameras out of the box come with a 192.168.1.108 address. Having several devices on the same address disables any IP functionality, therefore you cannot change the IP address in order to gain functionality.
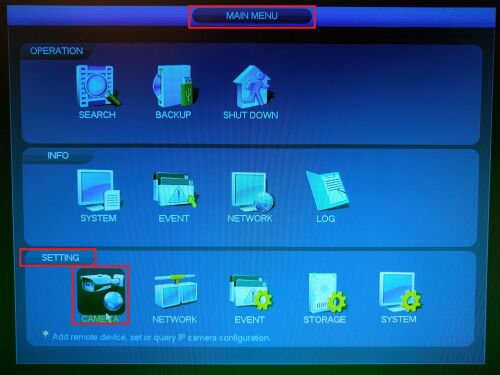
2. Now go into the NVR or HCVR’s MAIN MENU and select CAMERA under SETTINGS.
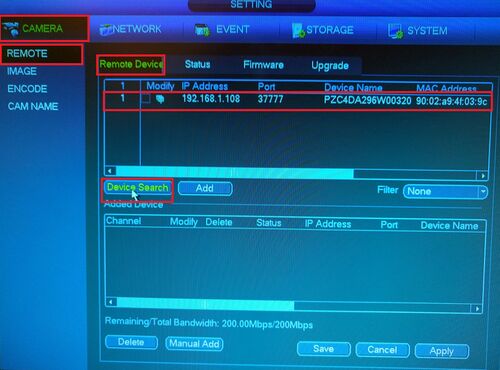
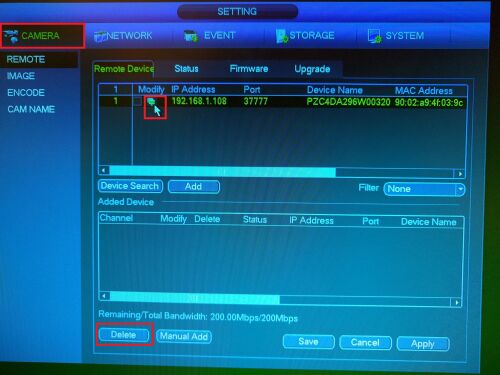
3. Under REMOTE on the left hand column, and the Remote Devices tab select Device Search. Notice that if you are connecting a new IP camera into a PoE switch the IP address should be 192.168.1.108.
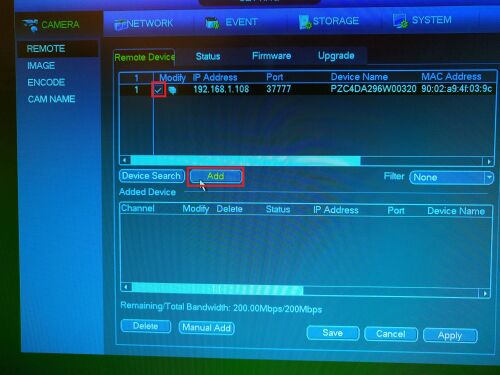
4. Try to add this camera
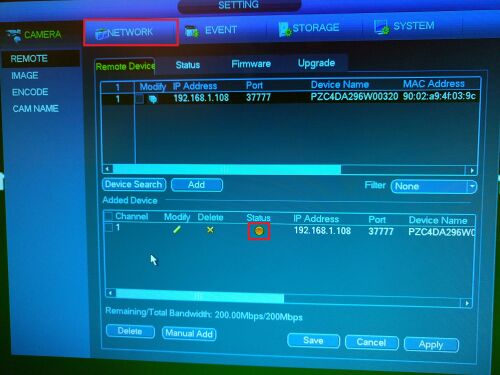
5. If the NVR is on another Default Gateway IP then you will notice that the camera feed will not be online. Now Select the network tab under SETTINGS. If the feed is online skip to step 10.
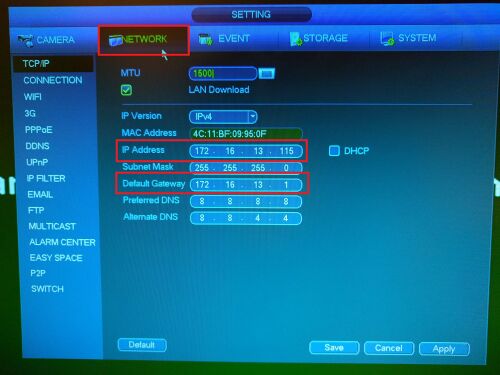
6. Notice on this page the IP settings for the NVR are different than the IP Camera. This is why the IP camera has a red status symbol:
- IP Camera – 192.168.1.108 (default gateway 192.168.1.1)
- NVR – 172.16.13.115 (default gateway 172.16.13.1)
The default gateway and the first 3 segments of the IP addresses do no match.
7. Delete the camera from Added Device(s). Now select the modify icon.
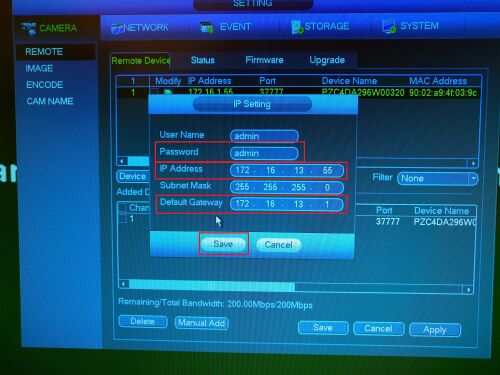
8. In the IP Settings menu match the IP Camera’s settings with the NVR or HCVR’s IP Settings:
- Default user name – admin
- Default password – admin
- IP Camera – 172.16.13.55
- Subnet Mask – 255.255.255.0
- Default Gateway – 172.16.13.1
Now click save.
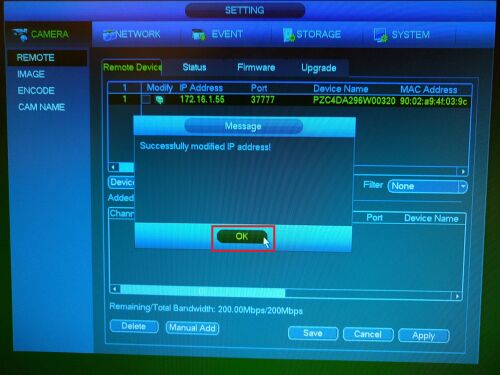
9. The Message should prompt a successful IP modification, click OK.
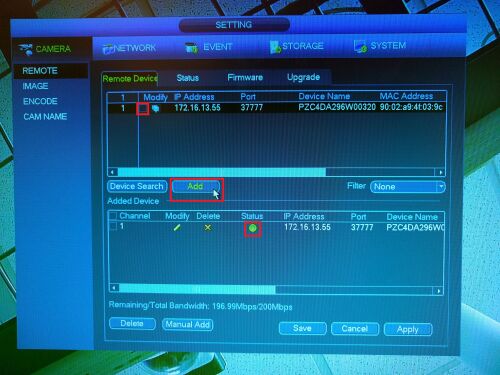
10. The IP camera is now working with the recorder. The default gateway and the first 3 segments of both device’s IP addresses now match. At the end of the IP address you can select any number from 2-254 if it is not already taken. Although, if there is a DHCP server on the LAN, you will need to match it’s default gateway and IP addressing settings.
11. Check if the camera feed is live.
Encode Settings
Overview
How to Setup Encoding
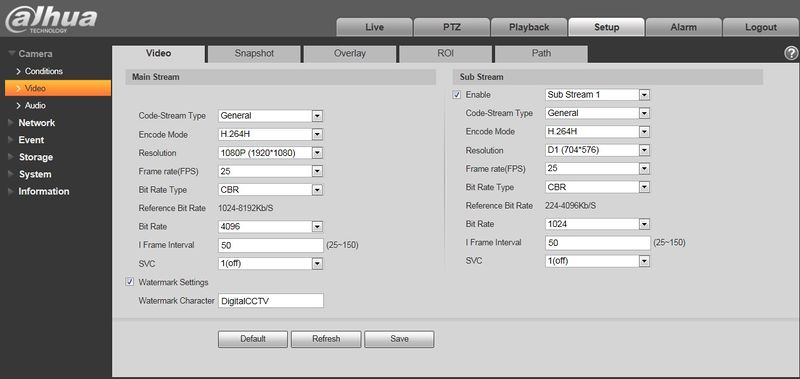
Camera Video Configuration
| Parameter | Function |
| Sub Stream Enable | Please check the box here to enable extra stream function.
This function is enabled by default. |
| Code-Stream Type | ACF means using different fps to record.
There are two options: VBR and CBR. Please note you can set video quality in VBR mode. Note: WEB interfaces don’t support motion detect and alarm code stream setting. |
| Encode mode | There are five options: H.264 (main profile standard, H.264H (high profile standard), H.264B (Baseline Profile), H.265 (main profile standard) and MJPG encode.
|
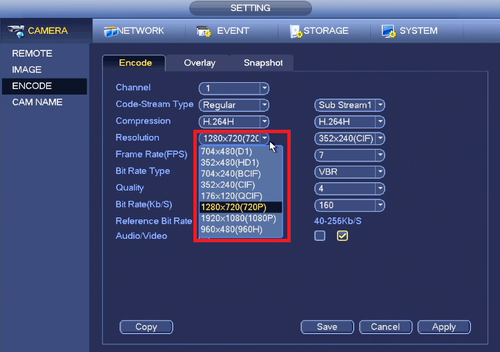
| Resolution | There are multiple resolutions. You can select from the dropdown list.
For each resolution, the recommended bit stream value is different. Note: When video is under rotating status, you cannot set resolution higher than 1080P (excluding 1080P). |
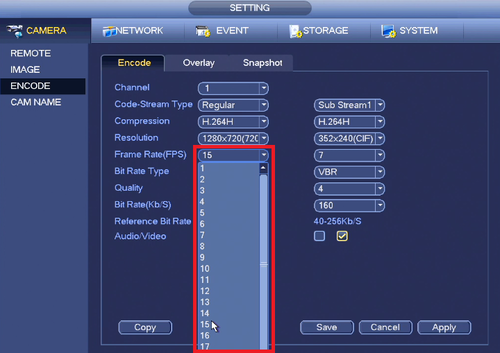
| Frame Rate (FPS) | PAL: 1~25f/s,1-50f/s NTSC: 1~30f/s or 1~60f/s.
The frame rate may vary due to different resolutions. |
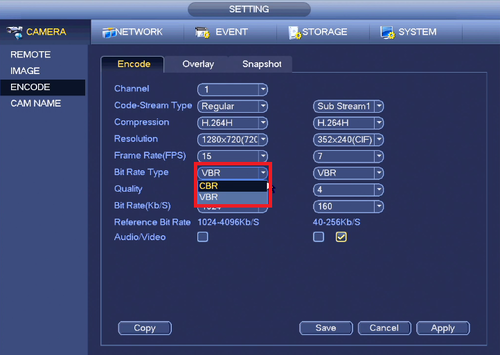
| Bit Rate Type | There are two options: VBR and CBR.
Please note, you can set video quality in VBR mode. Under MJPEG mode, only CBR is available. |
| Recommended Bit | Recommended bit rate value according to the resolution and frame rate you have set. |
| Bit Rate |
|
| SVC | Frame rate can be encoded by layer. It is a flexible encoding method. By default, it is 1 as 1 layer. You also can set 2/3/4 layers. |
| I Frame | Here you can set the P frame amount between two I frames. The value ranges from 1 to 150. Default value is 50.
Recommended value is frame rate *2. |
| Watermark Settings | By calibrating watermark, to see if video is modified. Select Watermark function. Default watermark is Digital CCTV.
Watermark character can only be number, letter, _, – within 128 characters. |
Making the Most of Bit Rate
Need More Recording Space
Record storage period is not enough
If your storage drive is filling up quickly and you want to maximize on the time you are recording please consider the following:
1. HDD capacity is not enough, so you might need more storage space or The HDD is damaged or the space is fragmented and unusable. Depending on how many cameras, resolution, scene, frame rate, bit rate etc. it is recommended to use a storage calculator to determine the appropriate HDD capacity.
2. You could set the resolution to a lower setting, but the ratio of bit rate to resolution is not always 1:1. Also some cameras process lower resolutions better than other, and the same goes for higher resolutions. Although the ratio can vary from 0.6:1 to 2:1 (bit rate : resolution)
3. Recording a scene that is constantly busy can cause higher storage usage (or recorded bit rate over time). Objects such as plants moving in the wind, vehicle traffic, or public areas are often a cause of higher bit rates. This is directly related to the compression used on the stream since still images are easily reduced by repeating pixels in still areas.
4. The compression method might not be optimally set to the best suited compression. When you ask for a higher amount of compression (lower bit rate) you are inherently going to sacrifice the quality of the image. Most configurations use H.264 compression, if you want the least amount of loss in quality use MJPEG. Some of our cameras support H.264B (higher compression and lower quality than H.264), and H.264H (lower compression and higher quality). Also a new standard on the horizon is H.265, which is mostly used for high resolution applications, and they require both an encoder (i.e. a camera) and a decoder (i.e. a NVR) to be complaint with the H.265 standard.
6. Recording constant image noise will cause higher storage usage. Image noise is caused by vibrations on the camera itself. The cause for this can range from high winds, vibration on the wall (sometimes cause by a mechanical device mounted to the same wall i.e. an air conditioner), or mounting a camera to a moving object (i.e. a tree). There are some remedies to this such a dampening the vibration with an image stabilizing lens and/or a chip set feature embedded into the camera.
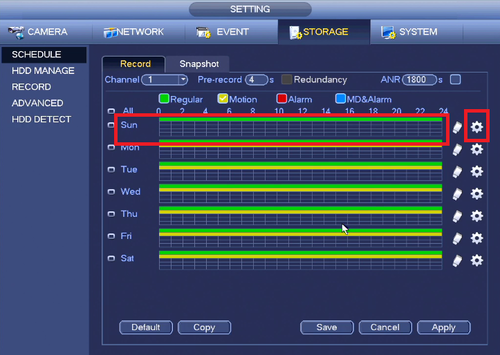
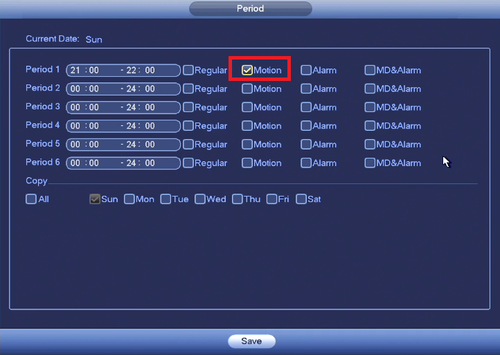
7. Instead of constant recording you can set the record schedule to motion detect which will make the video file shorter, however depending on how you set the camera up you might miss fast moving objects.
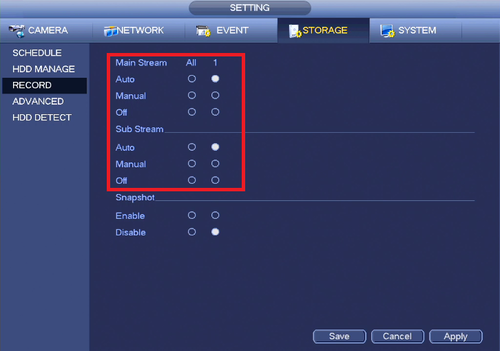
8. You may set the record to sub stream instead of main stream, this will have the same effect as lowering the resolution. In addition it defeats the purpose of having the higher resolution main stream. You may also disable the sub stream from recording, however this can cause problem with viewing the sub stream while viewing multiple cameras on one screen.
9. The Bit rate can also be set too high. Changing the bit rate from CBR (Constant Bit Rate) to VBR (Variable Bit Rate) can save space on the HDD. CBR prioritizes that specific feed over other cameras and sends a larger amount of data through, so setting all feeds to CBR can be an issue is some cases. Using VBR you can set the quality of detail higher or lower from 1 to 6 (1 being lowest quality) in order to also get a lower bit rate.
10. The frame rate could be too high resulting in bigger files. Frame rate is the rate of capture over a second, and exposure time is how long that individual capture takes in that second. A typical frame rate in the security industry ranges from 7 to 10 frames per second (FPS). However when you need to record fast moving objects quickly you will probably want 10fps or more, and also a well lit area with a faster shutter speed to prevent motion blurring.
11. Lighting scenarios can be a problem when it comes to low light noise being recorded. When in low light or total darkness the sensor sometimes tries to allocate information it cannot see, or an image that is not fully lit. This means the camera has to recognize areas of total darkness as a still image, and then compress it, which can be problematic. If the CCD or CMOS sensor is not designed for low lighting settings (specified by lux rating) and lacks IR then you will have a larger file recording since the picture will be generating a random grainy picture. There are technologies that do help process data better, such as starlight cameras, and cameras with infrared light emitters.
12. Wide Dynamic Range better known as WDR, is a post processed image that scales several exposures into one image. The result of using WDR is a picture with dark and light areas seeming to have even or clear exposure to them. Turning up WDR causes more processing and noise in an image, which in turn will increase the bit rate of the stream. WDR levels are measured in DB, the higher the DB the more displacement of lighting WDR can handle, but also it includes a higher bit rate and lower contrast of the image.
13. Over saturation of a picture, or bumping up the color settings can cause false readings on a color and create image noise, which would increase the bit rate of your stream. Try to keep the colors as true as possible using a camera test chart and a properly calibrated monitor.
14. The field of view also has an influence on the bit stream rate. Field of view is how wide of an area the camera see’s from it’s point of view. With a fish eye camera you will have a large field of view, and with a 20x optical zoom lens you will have a narrower field of view. Since the bit rate is influenced by movement, inherently a wider field of view will yield more movement captured as intended, causing a higher bit rate.
15. Increasing the sharpness on a camera will also yield more detail, therefore once the details change there will be more movement simulated, causing the bit rate to go up.
Understanding the Condition Settings
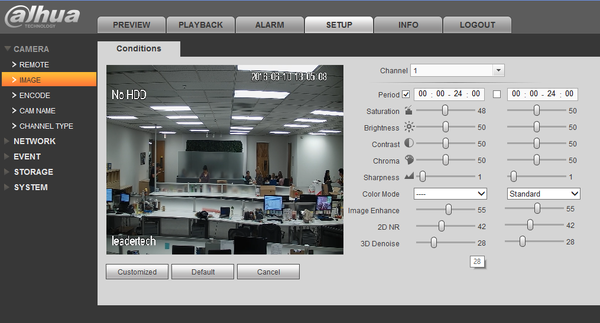
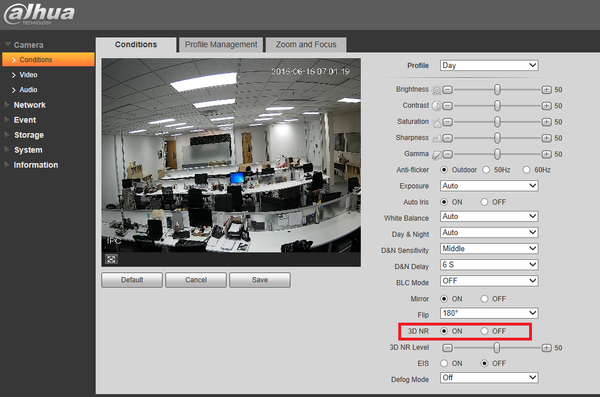
Some of these settings are better left alone in order to keep a consistent image quality; Brightness Contrast, Saturation, Sharpness, and Gamma. Using a monitor calibration tool can help offset the native settings that might give you mixed results with the monitor you are viewing on if you want the optimal image quality. Try using the settings at the bottom of the page first before altering the cameras standard settings.
In order to get the optimal use out of your IP camera(s) first review and understand the following areas:
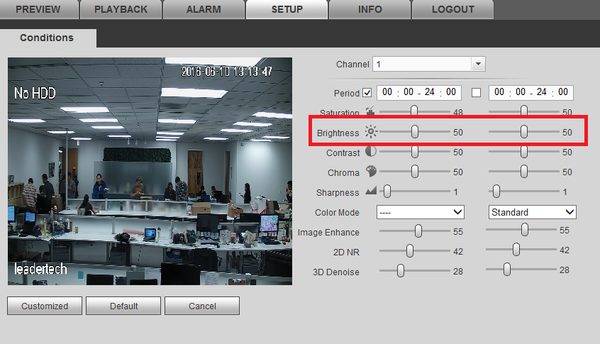
Brightness
Makes the video feed brighter or darker. Use this when the whole picture is dark, or bright. Make sure the other lighting settings are where they are supposed to be before setting the brightness higher or lower.
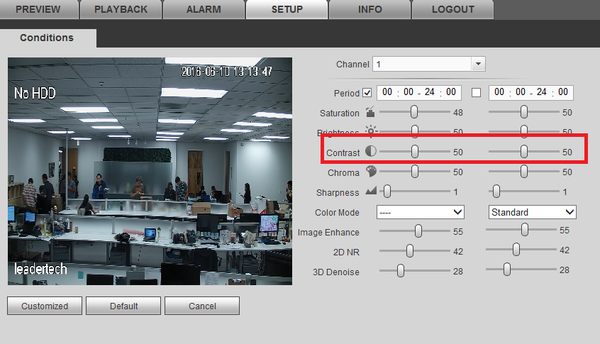
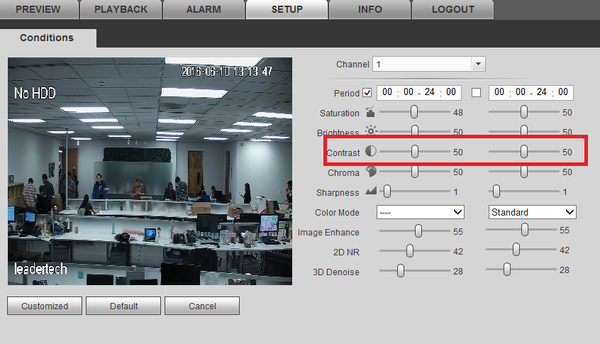
Contrast
Difference in luminescence or color that makes an object distinguishable, this varies from blending to separating hue.
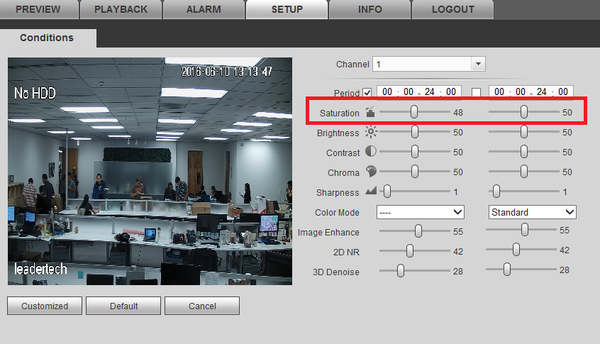
Saturation
Difference in black and white to full color. This can cause issues when compressing an image since it takes more information to process colors.Also if the picture is over-saturated then it will also cause blurry or artifacting pixels which will cause less compression in the image to occur.
Sharpness
The edge contrast among its surroundings, this can blur or define details in an image. The sharper the image the more noise it will create in a moving image. This causes the compression to render more of the image which results in a larger bit stream and saved file size.
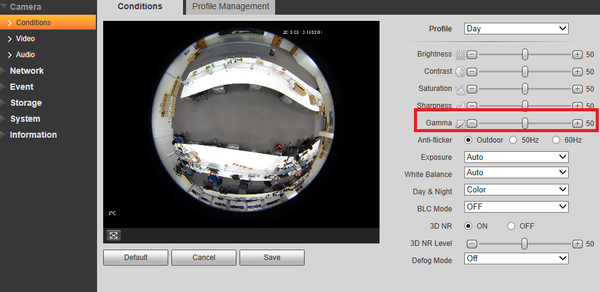
Gamma
A nonlinear lighting adjustment used to eliminate blinding whites and absolute dark areas. Think of this like brightness with contrast included, and use it to accent darker areas as a fine adjustment.
Anti-Flicker
Used for lights (mostly florescent lights) to sync up the rate at which they pulse. This is used if you see indoor lights flickering on the camera
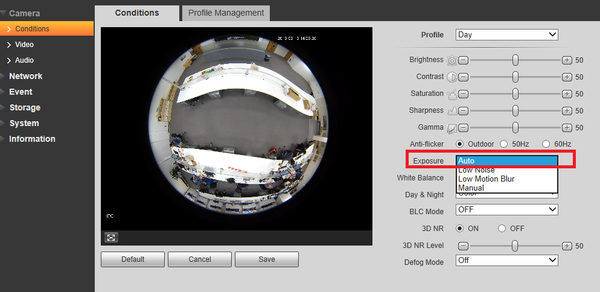
Exposure
- Auto – this will automatically adjust the exposure time and the gain (aka ISO) for the average lighting setting in the area.
- Low Noise – This setting will maximize the gain for the ideal exposure. Low Noise Basically turns up the ISO to the best setting without sacrificing exposure timing.
- Low Motion Blur – This setting will maximize the fastest shutter speed, and will sacrifice the gain in return.
- Manual – This setting lets you select your shutter speed and have the gain adjust automatically. Selecting customized range will let you both the shutter speed an adjust the gain manually.
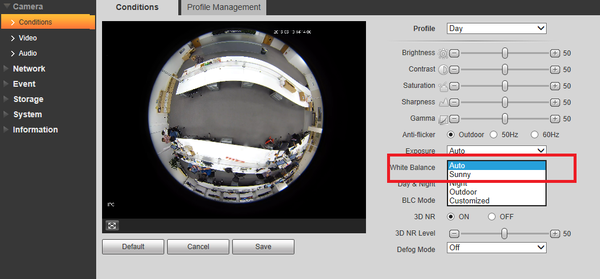
White Balance
The process of removing unrealistic color casts. It is an adjustment so white colors seem white in certain warm or cool lighted areas:
- Auto: adjusts for the best setting of the whole picture.
- Sunny: adjusts for very bright environments like a sun lit area.
- Night: adjusts for a darker environment
- Outdoor: adjusts for outdoor lighting settings
- Customized: lets you balance out the blue and red color yourself
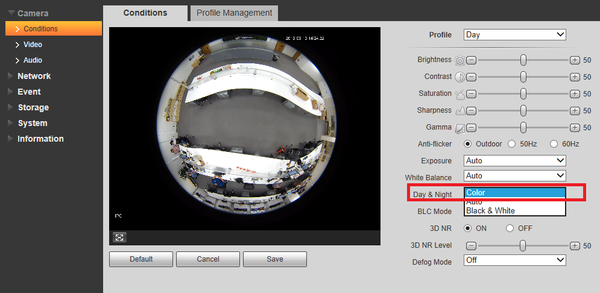
Day and Night
Used to determine when black and white mode is turned on in a dark environment.
- Color: always represents picture in color, does not use IR or black and white mode. Performs poorly in dimly lit areas unless you are using the Starlight series cameras.
- Auto – Uses D&N Sensitivity setting to change between color mode and infrared
and black and white mode.
- Black & White – Always sets picture to black and white, however when
illumination is too dark it switches on IR mode.
If you selected Auto in the above setting you will see:
D&N Sensitivity
- Low, Middle, and High modes are light thresholds to change Day and Night settings automatically.
D&N Delay
The delay in seconds (2-10) when lighting conditions change for Day and Night.
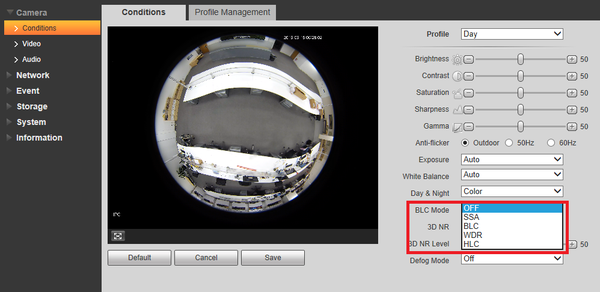
BLC Mode
Backlight compensation is a feature that camera companies have been utilizing for some time now. To read more about BLC modes http://www.dahuawiki.com/Troubleshoot/What_Is_WDR_AWB_AGC_BLC_HLC
- OFF: BLC render mode is off
- BLC: backlight compensation: Default will use the whole image to balance the lighting settings, and Customized will allow you to balance the lighting settings from the target area.
- WDR: Wide Dynamic Range makes multiple scans of a scene to provide one balanced and unwashed image that is clear for the user.
- HLC:Highlight compensation is a feature that came out of necessity due to overexposure from strong light sources like headlights or spotlights.
- SSA: automatically lowers the brightness of bright area and increases the brightness of dark area according to the environmental lighting.
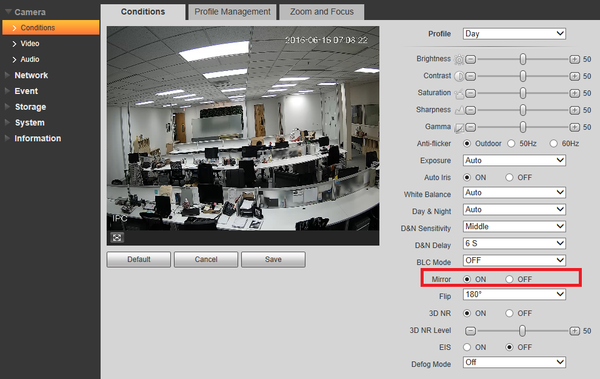
Mirror
- Mirrors image on the vertical axis
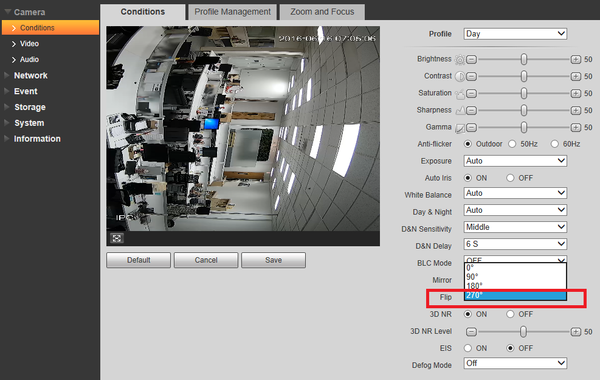
Flip
- Flips the screen clockwise, 90, 180, or 270 degrees
3D NR
This threshold is mainly for multi-frame (at least 2) image processing. It reduces noise with info between a frame and previous frame. The higher the value, the better NR will be. NR level ranges from 0 to 100. The recommended value to from 40 to 60 where the default value is 50.
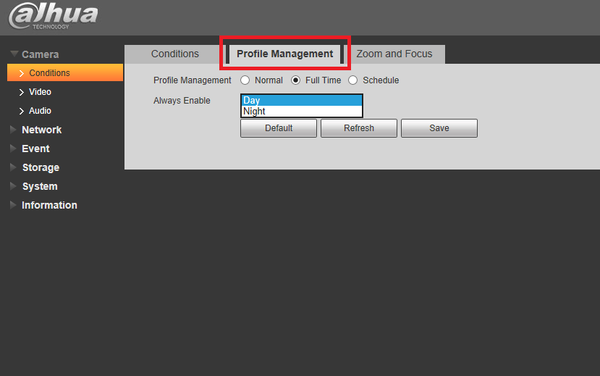
Profile Management tab
- Normal which applies the day and night settings automatically
- Full time which lets you choose day or night time.
- Schedule which you can set day and night on the camera by time.
OSD Camera Settings on PTZ’s
You can access the PTZ’s on screen display menu by clicking menu in the web 3.0 browser, or in live view on the NVR or HCVR. The settings are as follows:
Select the CAMERA SETTING area of the menu:
WB Setting
The process of removing unrealistic color casts. It is an adjustment so white colors seem white in certain warm or cool lighted areas:
- Auto: adjusts for the best setting of the whole picture.
- Manual: Manually adjust the R Gain and B Gain
- ATW: Auto Tracing White Balance
- Outdoor: adjusts for outdoor lighting settings
- Indoor: adjust for indoor lighting
- Outdoor Auto: adjust for outdoor lighting automatically
- NA Lamp Auto: This setting is for automatically adjusting to an auxiliary lamp
- NA Lamp: This setting is for an auxiliary lamp
Exposure Setting
- Auto Exposure Modes:
  *Auto: The best iris and shutter combination
  *Manual: Shutter and Iris to be set manually
  *Iris Priority: Prioritizes the iris setting (aka F Stop) and automatically adjust the shutter
  *Shutter Priority: Prioritizes the shutter setting (aka F Stop) and automatically adjust the iris
- Shutter: Time in seconds it takes for an exposure
- Iris Setting: a scale of 1-18 for the aperture
- Exposure Compensation: Compensates for under or over exposed picture
- Slow Auto Exposure: Sets auto to expose the slowest, mostly for night time
- BLC: back light compensation mode
- Slow Shutter: turns on the lower limit for the shutter
- Slow Shutter Limit: Setting for the slowest shutter speed desired
- AGC Gain Limit: Sets the limit on auto gain
- NR: Brighter picture with less noise only 2 dimensional
- Camera 3D NR: Brightens picture with less noise rendering 3 dimensions
- High Light Reduction: Reduces bright spaces
- AE Recovery: a period of time after which the camera’s exposure will reset
- WDR Setting: Turns wide dynamic range on or off
Day / Night Setting
- Day / Night:
  *Light: Lighted area
  *Night: Night mode with IR
  *Day: Outdoor day mode
  *Auto: Auto adjusts
  *Time: Set timer to switch modes
- Type: Mechanism uses a light sensor,
  *Electron:Day / night switch-over is determined by camera software. This is recommended
   if the camera switches its viewing mode at around the same time every
   day (for example, sunset or sunrise in an outdoor location).
  *Day / night switch-over is determined by a light filter. This is recommended
   if the camera is in a location with fluctuating light conditions (for example,
   indoors with lights turning on and off throughout the day).
Focus Setting
- Focus Mode:
  *Auto: The camera automatically adjusts the focus after it performs a Pan-TiltZoom
   function
  *Manual: The camera must be manually put into focus using the DVR menu.
  *Semi Auto: The camera automatically adjusts the focus after Zoom functions only
- Focus Limit: a focus limit of 1M means that the camera will focus on objects
further than a meter away
- Auto Focus Sensitivity: Low, normal, or high sensitivity to focusing
- Auto Focus Trace: Focuses around the image until a focal point is found
- IR Correction: Corrects for bright IR light causing focusing problems
Image Adjust
- Hue:
- Saturation:
- Chromaic Suppress:
- Gamma:
