This article provides instructions to install your Lorex 2K Wi-Fi camera with Smart Deterrence (W482CAD).
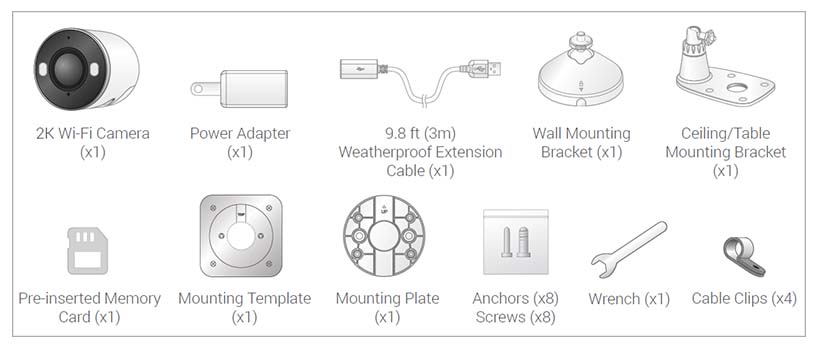
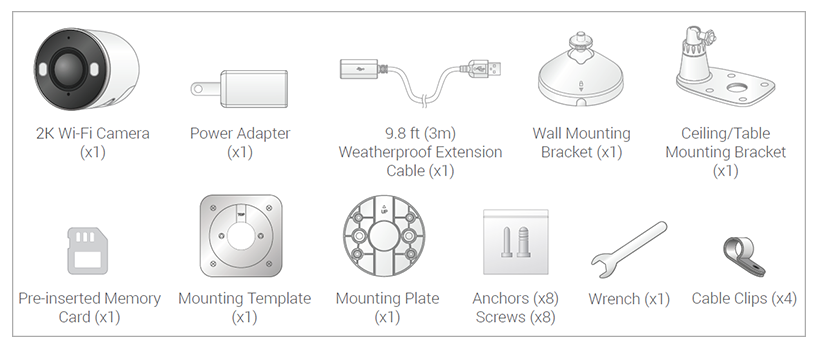
What is included in the box?
![]() The above contents are based on one camera.
The above contents are based on one camera.
How to connect with Lorex Home app
- Attach the provided power adapter to the camera. The device is ready for setup as soon as the status indicator is flashing green and chimes.
Note: Ensure your camera is plugged in and powered ON throughout the setup.
Optional: Attach the weatherproof extension cable to the camera. - Download the Lorex Home app by scanning the following QR Code. You can also visit Google Play or Apple Store to download Lorex Home app.

- Open the Lorex Home app and create an account or login with your credentials.
- Tap
 icon to add a new device, then follow the in-app instructions to complete the device setup.
For full instructions on Lorex Home app setup, see Connecting with Lorex Home app.
How to mount 2K Wi-Fi Camera to the wall
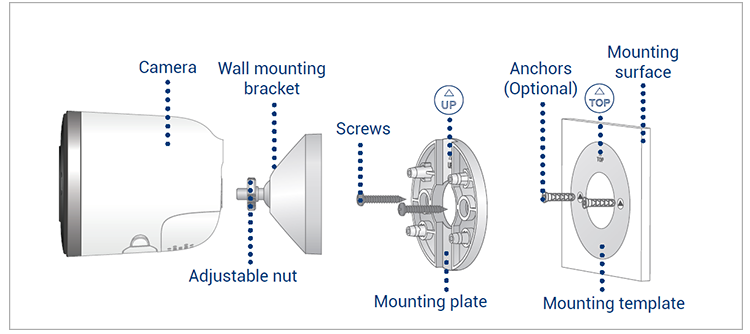
- Place the mounting template onto the desired location.
Note: Ensure an outlet is nearby, and keep in mind the cable lengths. - Using a 15/64″ (6mm) drill bit, drill 2 holes over the triangle symbols on the template.
Optional: Drill 15/64″ (6mm) holes for the anchors. - Align the arrows of the mounting plate and template.
Using a screwdriver and provided screws, secure the mounting plate to the surface.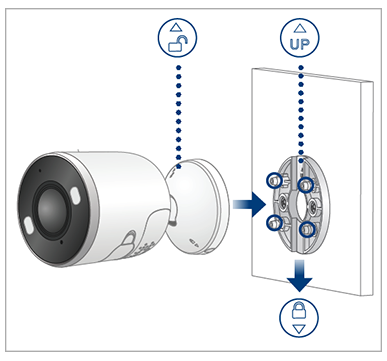
- Align the arrows between wall mounting bracket and plate. Push the bracket in to install, then slide down to lock in place. You will hear a ‘click’ when the bracket is installed.
- Attach the camera to the mounting bracket using the threaded insert at the rear of the camera. Rotate the camera clockwise until attached, then tighten into place with an adjustable nut.
- Adjust the camera into desired angle.
Note:
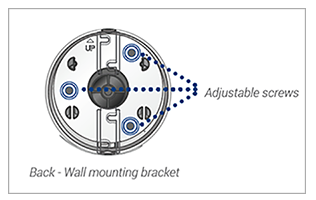
- If the camera is not holding in place or difficult to adjust, unplug the camera and slide the bracket up to detach from the mounting plate.
- Tighten or loosen the 3 screws at the back of the mounting bracket to adjust accordingly.
- Repeat steps 4-6 to re-install.
How to mount 2K Wi-Fi Camera to the ceiling
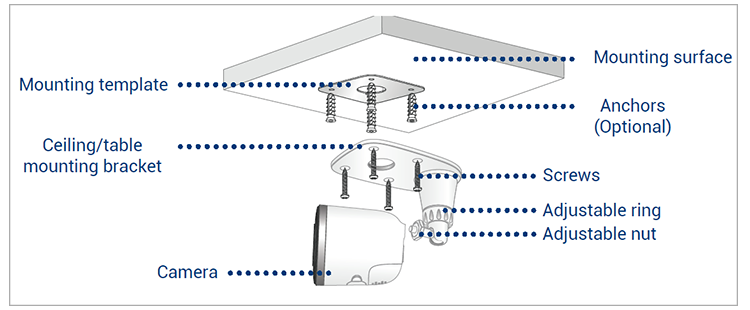
- Place the mounting template onto the desired location.
Note: Ensure an outlet is nearby, and keep in mind the cable lengths. - Using a 15/64″ (6mm) drill bit, drill 4 holes over the X symbols on the template.
Optional: Drill 15/64″ (6mm) holes for the anchors. - Remove the 4 pre-inserted plugs from the ceiling/table mounting bracket.
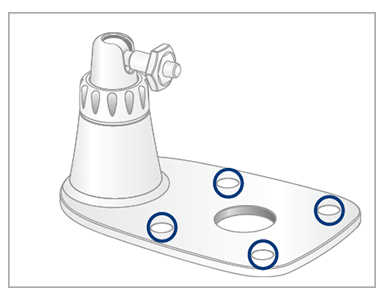
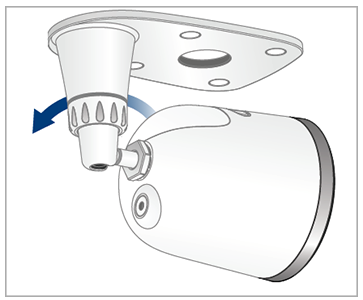
- Attach the camera to the ceiling/table mounting bracket using the threaded insert at the rear of the camera. Rotate the camera clockwise until attached, then use the wrench to tighten the adjustable nut in place.
- Place the bracket over the drilled holes. Using a screwdriver and the provided screws, secure the bracket to the surface.
- Rotate the adjustable ring counter-clockwise to loosen and adjust the camera to the desired position, then tighten to secure.
Optional:
- Feed the camera cable through the hole at the base of the bracket or the mounting surface.
- Open the camera’s settings in the app and enable Image Rotation to flip the camera image. To configure camera settings, see Device Settings.
Wi-Fi Security Camera – Device Settings
You can configure settings for your security camera from anywhere using the Lorex Home app.
Device Settings Overview
From the Devices screen, tap ![]() icon to configure device settings.
icon to configure device settings.
Note: Device settings differs between products. Your device settings may not include all the settings from the example below.
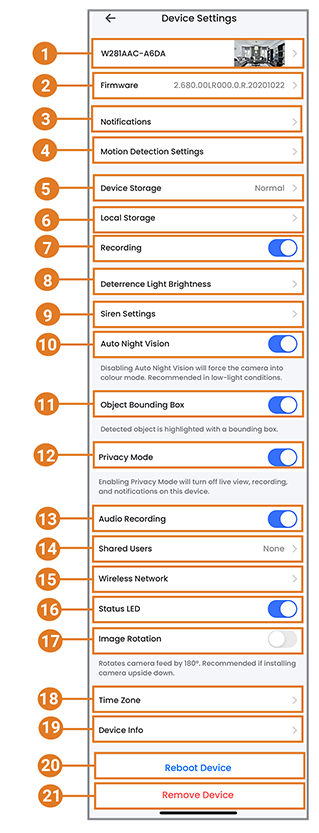
- Basic Information: Tap to change the device password, set device name, change thumbnail photo, or view device ID. For full instructions, see Basic Device Settings.
- Firmware: Tap to view the current and latest firmware version.
- Notifications: Enable/disable notifications. For full instructions, see Notification Settings.
- Motion Detection Settings: Enable/disable motion detection and person/vehicle detection per channel on supporting platforms. For full instructions, see Motion Detection Settings.
- Device Storage: Tap to view or format your device storage. For full instructions, see Device Storage.
- Local Storage: Tap to change the streaming quality or enable/disable General Record Storage. For full instructions, see Local Storage.
- Recording: Tap
 icon to disable recording. Tap again to enable.
 - Deterrence Light Brightness:
- Enable/disable to automatically activate camera’s deterrence light whenever motion or person is detected.
- Adjust the level of brightness for the warning light.
- Siren Settings: Enable/disable to automatically activate camera’s siren whenever motion is detected.
Note: The siren is loud and should only be activated if necessary. - Auto Night Vision: Tap
 icon to disable Auto Night Vision. Tap again to enable.
Note: Disabling Auto Night Vision will force the camera into color mode. Recommended in low-light conditions. - Object Bounding Box: Tap
 icon to disable highlighting detected object with a bounding box. Tap again to enable.
 - Privacy Mode: Tap
 icon to enable privacy mode. Tap again to disable.
 - Audio Recording: Enable/disable audio recordings per channel. (audio-enabled cameras required)
- Shared Users: Tap to send an invitation to another Lorex Home account to access the selected device. For full instructions, see Shared Users.
- Wireless Network: Change the Wi-Fi network that is associated with the camera.
- Status LED: Tap
 icon to disable the status LED on the camera. Tap again to enable.
 - Image Rotation: Tap
 icon to rotate the camera feed 180°.
Note: Recommended if you are installing the camera upside down. - Time Zone: Tap to change the time zone or to configure Daylight Savings Time.
- Device Info: View the device’s model number, device ID, IP address, and MAC address.
- Reboot Device: Reboot your Lorex device remotely. Wait a few minutes before connecting to the device after restarting.
- Remove Device: Remove device from Lorex Home app.
Note: Removing your device will not affect recordings or snapshots on your mobile device storage.
