To access the web client, please use a Windows based PC and use Internet Explorer as the web browser.
Access the recorder’s web interface by typing in the IP address on the address bar of Internet Explorer. The path should look like the following: “http://xxx.xxx.xxx.xxx” (Note: If the HTTP port has been changed from default, you will need to add the port number after the ip address by inserting a colon “:” in between the address and port number).
Install all requested web plugins that are prompted by Internet Explorer. Once installed, you may need to refresh, or restart the web browser. You may install the plugin by selecting “Run”.
Select “Function Panel” on the main page after logging in. After selecting “Function Panel”, select “Motion” underneath the Camera option.
On the motion page, make sure that motion is enabled (set to “ON”), and the sensitivity and duration are set respectively. Default sensitivity is “4” and duration of a motion event is “20 seconds”. In the camera image, anywhere the image has a green grid will be the area where motion detection is active. One can customize the area to keep certain movement from recording on the system (ie. trees, traffic, etc.). Easiest way of creating new area is to remove the grid, then click and drag in areas that motion detection is wanted.
*** Please note to have the motion detection schedule set up accordingly so the system will record under the motion detection parameters.***
Additional Setup Instructions:
Note: After confirming motion detection parameters are set accordingly from above instructions, users may use the motion detection to trigger certain alarms. This can be found under the Function Panel > Alarm link.
Under the “Event Notification” menu and sub-menus, you will be able to trigger alerts and alarms, such as email notifications, audible buzzers, and pop-up video (on recorder GUI), and alarms out to a security system when there is a motion alert.
Under Motion Alarm > Alarm Handling Settings, you will be able to adjust each camera with greater detail. You will be able to set motion detection schedules, configure snapshots of each camera, as well as having other cameras record simultaneously when there is motion on a single camera. You can also modify event notifications for each camera individually on this page.
Setting Up Intrusion Detection
To access the web client, please use a Windows based PC and use Internet Explorer as the web browser.
Access the recorder’s web interface by typing in the IP address on the address bar of Internet Explorer. The path should look like the following: “http://xxx.xxx.xxx.xxx” (Note: If the HTTP port has been changed from default, you will need to add the port number after the ip address by inserting a colon “:” in between the address and port number).
Install all requested web plugins that are prompted by Internet Explorer. Once installed, you may need to refresh, or restart the web browser. You may install the plugin by selecting “Run”.
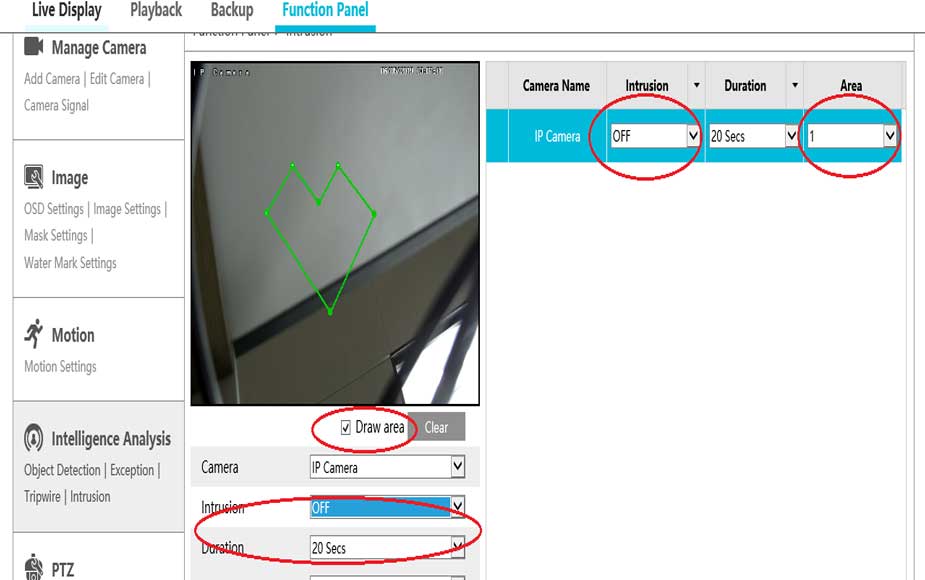
After logging into the system, select Function Panel and then Select Camera.
After selecting Camera, Select “Intrusion” under “Intelligence Analysis”
After Selecting Intrusion, You will be able to set the intrusion area, marking the intrustion on or off (enabled/disabled), and the duration of the trigger. There are two areas to do the same functions, one to the right hand side of the camera image, and directly below it as well. You may do up to four zones of intrusion detection. You can create up to 6 points within an area to make up an intrusion zone.
