Bosch Cloud-based Services (CBS) supports to connect 3rd party cameras from version 2.11.0 onwards. Depending on the cameras’ capabilities, there are different ways of adding such cameras to Bosch Cloud VMS.
Overview:
1. Add 3rd party camera with VX Cloud Agent app
1.1 Axis platforms ARTPEC-5, ARTPEC-6 & -7
1.2 Vivotec Schubert platform
1.3 Connectivity
2. Add 3rd party ONVIF camera
2.1 Port forwarding
2.2 Add 3rd party ONVIF camera
2.3 Cloud VMS ONVIF compatibility
3. VX Video Control
Step-by-step guide
1. Add 3rd party camera with VX Cloud Agent app
1.1 Axis platforms ARTPEC-5, ARTPEC-6 & -7
For these Axis cameras, the VX Cloud Agent app needs to be installed in the camera to establish the connection to Bosch Cloud VMS. The Access Token authenticates the connection from the camera to Bosch Security Cloud.
Please perform the following steps:
1. In the local network, find the related camera with AXIS IP Utility.
2. Open the camera’s website
3. Select Settings
4. Select Apps
5. Select “AXIS Video Motion Detection” app, start the app and configure motion detection
6. Add and install the “VX Cloud Agent” app.
Note: currently there are different app versions available depending on camera platform and connection w/o and w/ proxy.
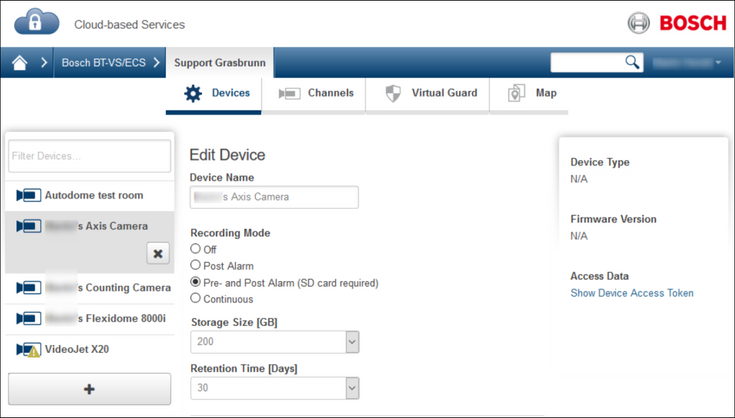
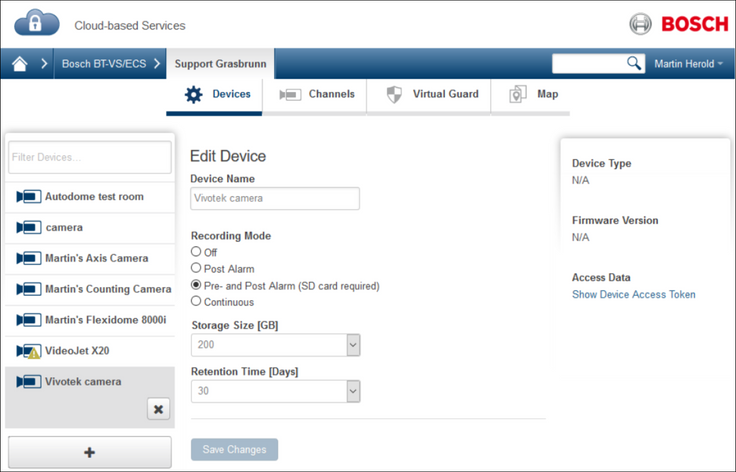
7. Open CBS Configuration, add a 3rd Party camera, select VX Cloud Agent App
8. Then copy the Access Token.
Note: Proxy connection is only recommended for corporate managed networks in critical industry with restrictive outgoing firewall rules and without need for load balancing video connections.
Proxy connection is not recommended for large-scale installations.
9. In Axis camera Settings > Apps > VX Cloud Agent app
a. Select checkbox Apply default settings
b. Unselect checkbox Ignore cloud settings
c. Add user name, password and Access Token and click Save.
10. Start the VX Cloud Agent app.
11. In CBS Configuration, configure Recording Mode and Cloud Storage.
Now your AXIS camera is set and you should be able to see video from the camera in the CBS Live View.
1.2 Vivotec Schubert platform
For Vivotec Schubert cameras, the VX Cloud Agent app needs to be installed in the camera to establish the connection to Bosch Cloud VMS. The Access Token authenticates the connection from the camera to Bosch Security Cloud.
Please perform the following steps:
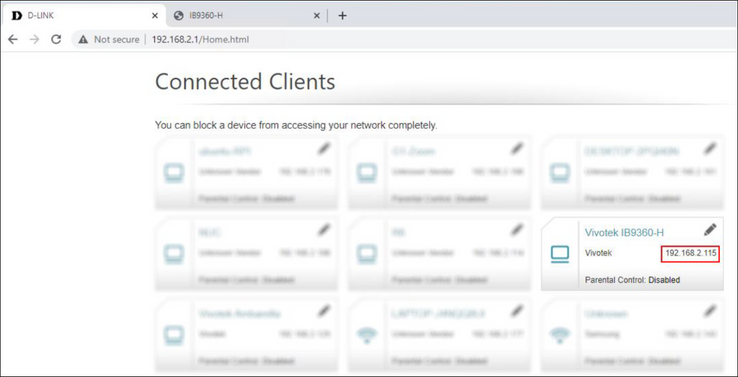
1. When you have connected a new camera to your router, you need to open its web interface – just type in the local IP address of your new camera in a web browser – you can find this local IP address (usually in format 192.168.x.x) in your router among other connected devices.
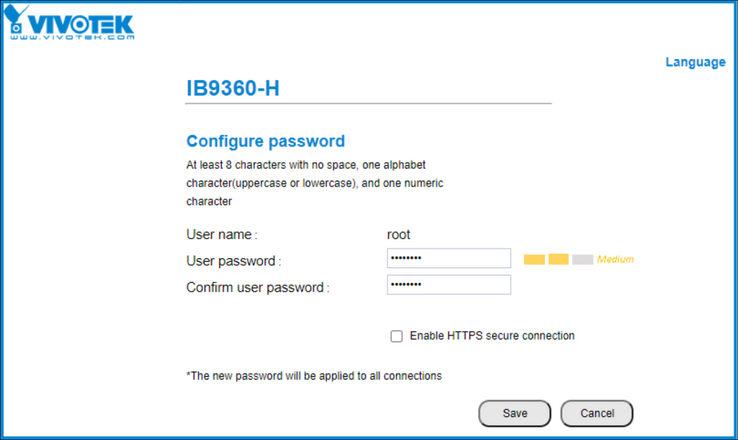
2. When you have opened the camera’s web interface, you need to activate it first by setting up a password:
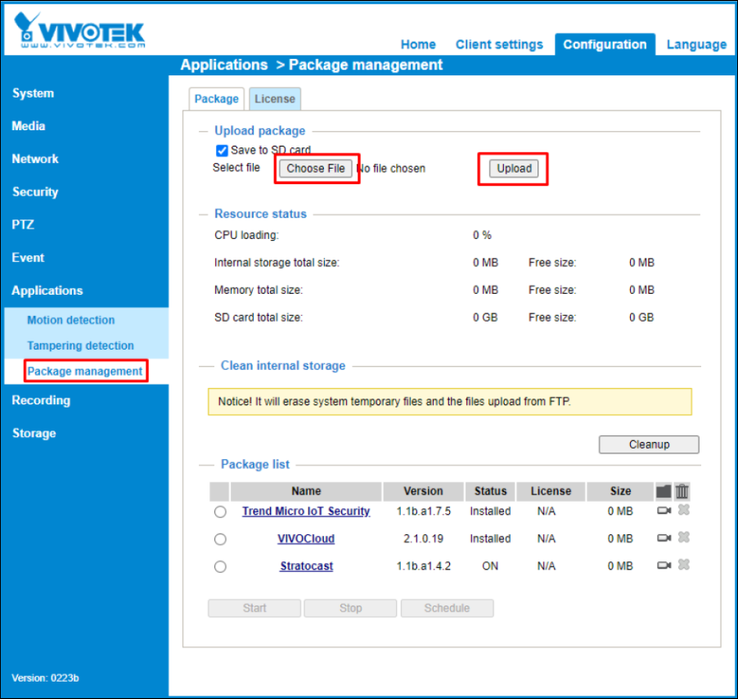
3. Login to the camera using the password and navigate to Configuration > Applications > Package management and upload the application package:
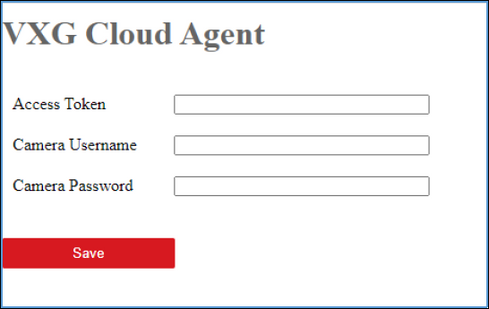
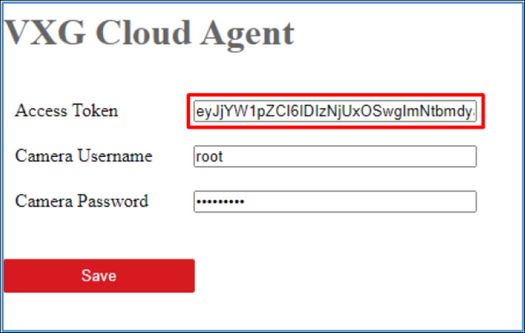
4. Wait until installation ends and refresh the page. You will see “VXG Cloud Agent“ appeared in the Package list. Click on it to open the app settings page:
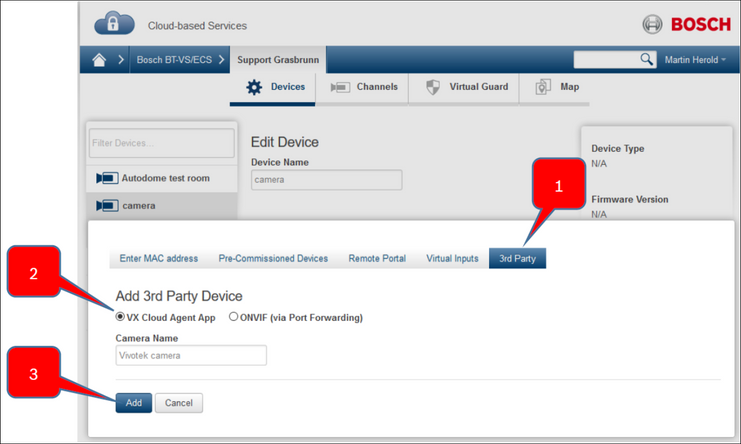
5. Open CBS Configuration, add a 3rd Party camera, select VX Cloud Agent App
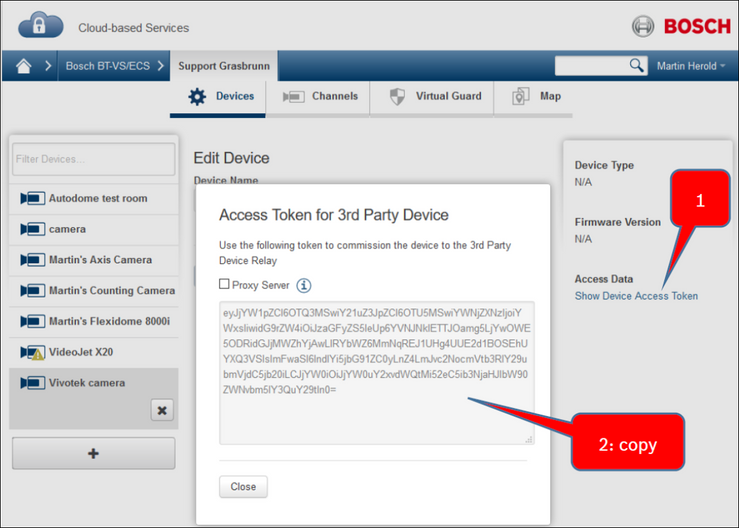
6. Then copy the Access Token.
Note: Proxy connection is only recommended for corporate managed networks in critical industry with restrictive outgoing firewall rules and without need for load-balancing video connections. Proxy connection is not recommended for large-scale installations.
7. Then go back to the camera’s app settings page and enter the following information:
• Access token – the one you have copied on the Dashboard
• Camera login & password – your camera credentials
8. Save changes.
9. In CBS Configuration, configure Recording Mode and Cloud Storage.
1.3 Connectivity
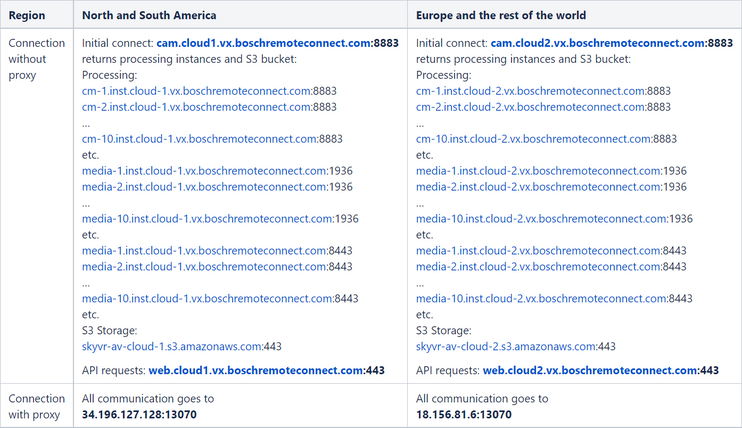
Outgoing connections usually are not blocked by a router, however in a corporate network with proxy server, firewall, etc. involved, the IT dept might open the needed ports.
The following domains and ports are used for connectivity:
Note:
Proxy connection is only recommended for corporate managed networks in critical industry with restrictive outgoing firewall rules and without need for load-balancing video connections.
Proxy connection is not recommended for large scale installations.
2. Add 3rd party ONVIF camera
2.1 Port forwarding
To add a 3rd party ONVIF camera, port forwarding needs to be configured for each camera in the Internet router.
The following ports need to be forwarded:
- HTTPS port (default 443) for communication
o optional HTTP port (default 80), if the camera does not support https
- RTSP port (default 554) for video streaming
Note: To change the used ports from default, if requested by the customer, please refer to the camera’s manual.
Example:
- Public IP = 62.225.116.122
- Public domain: mydomain.com
- External HTTPS port to be used = 15000
- External RTSP port to be used = 15001
- Camera’s LAN address = 192.168.2.43
- Camera’s HTTPS port = 443 (default)
- Camera’s RTSP port = 554 (default)
Port forwarding with public IP address:
- HTTPS: In the router, forward public 62.225.116.122:15000 -> to internal 192.168.2.43:443
- RTSP: In the router, forward public 62.225.116.122:15001 -> to internal 192.168.2.43:554
Port forwarding with public domain:
- HTTPS: In the router, forward public mydomain.com:15000 -> to internal 192.168.2.43:443
- RTSP: In the router, forward public mydomain.com:15001 -> to internal 192.168.2.43:554
To configure port forwarding is individual per router manufacturer and model. Please refer to the router’s manual.
2.2 Add 3rd party ONVIF camera
Please perform the following steps:
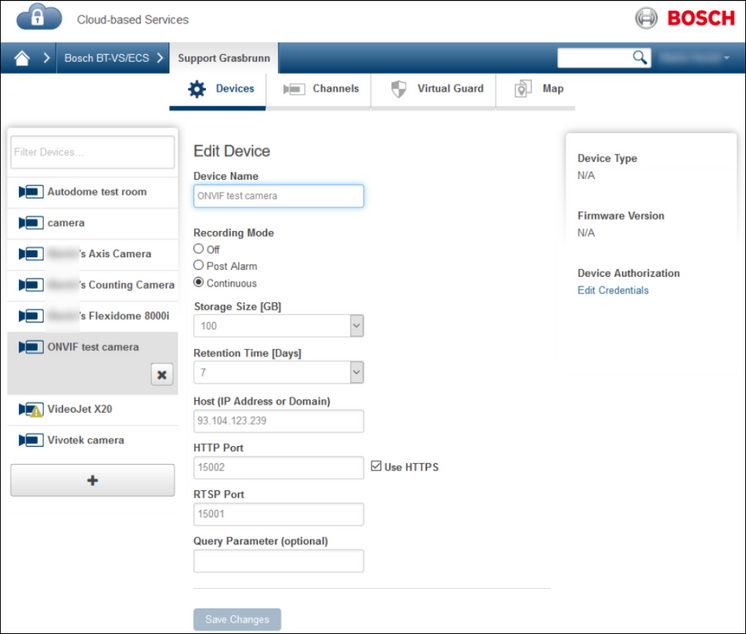
1. Open CBS Configuration, navigate to Accounts > Sites > Devices.
2. Add a 3rd Party camera, select ONVIF (via Port Forwarding)
3. Enter device name, host (public IP address or domain), HTTPS and RTSP ports, and camera credentials (user name and password).
Note: Some camera brands need to configure an ONVIF user to activate ONVIF communication. Please refer to the related camera manual.
4. Click Add.
5. Then configure Recording Mode and Cloud Storage.
Note: Pre-alarm recording is not available for ONVIF cameras.
Now your 3rd Party ONVIF camera is set and you should be able to see video from the camera in the CBS Live View.
2.3 Cloud VMS ONVIF compatibility
Basically all ONVIF Profile S and T compatible cameras can be connected to the VX Platform (see https://www.onvif.org/conformant-products/), supporting minimum:
– H.264 base or main profile
– G711 or AAC audio encoding
– ONVIF motion events in case of event recordings & alarms, when the camera supports the Real-time Pull-Point Notification Interface
– http and/or https
A quick test in one of our demo cloud accounts on the compatibility for
– a certain camera model,
– firmware version
– specific configuration (stream, recording, local system, etc.)
– network router settings
– image quality and bandwidth needs
gives results within minutes.
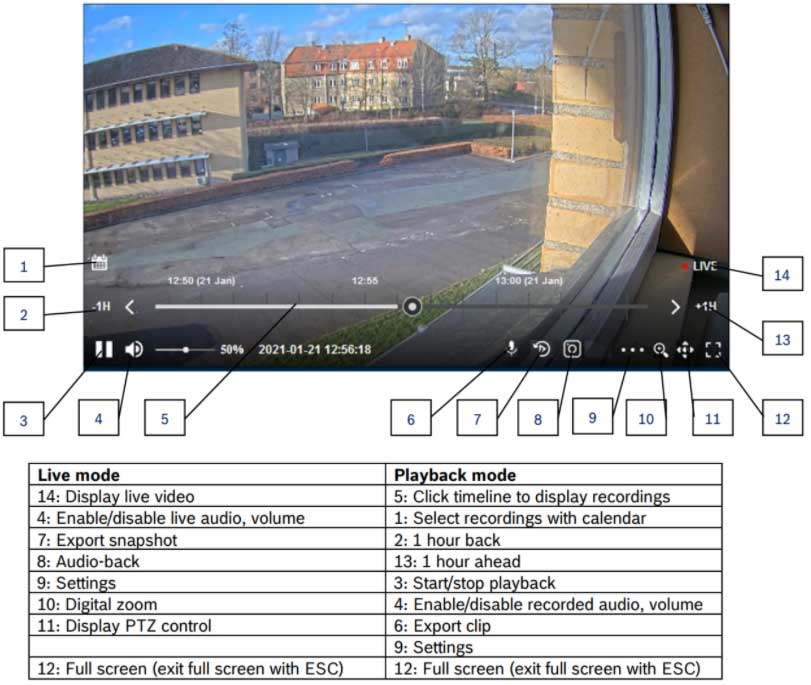
3. VX Video Control
The VX Video Control provides the following functionality for live video and playback.
Live mode details:
4: Enable Audio Verification from the camera and control the volume
8: Enable and confirm audio-back to perform Audio Intervention.
- Audio Intervention disabled:
- Audio Intervention enabled: > allow audio-back:
9: Settings:
- Preferred format:
o WebRTC: low delay (UDP)
– for audio and PTZ control
– might be not available in corporate network
o HLS: bit-rate adaptive streaming (TCP)
– no audio, no PTZ control
o JPEG: JPEG polling
- Dewarping
o Off
o On (e.g. for fisheye camera)
11: Display in-window PTZ control
Playback mode details:
1: Calendar:
- Days with recordings are displayed in a circle
- Click to select the date
2: Enable audio playback from the recordings and control the volume.
3: Select pre- and post alarm recording to be exported.
4: Settings:
- Speed:
o Replay speed
