Uniview Camera Setup Guide 2023 This Surveillance guide will focus on the
Uniview Camera Setup
configurations found on the Camera tab which includes Camera, Updating Credentials, Updating Firmware, On-Screen Display, Image, Schedule, Motion Detection, Video Loss Detection, Tampering Detection, Privacy Mask, Snapshots, and Human Body Detection.
This guide was written for Uniview NVR users who prefer to change settings remotely using a mobile or desktop browser (Internet Explorer). Remote and local configurations share many similarities and only the locations and availability of each feature may vary. The Uniview NVR Manual can provide more information if what you are looking for is not found in this simple guide.
Content :
- Camera
- Updating Credentials
- Updating Firmware
- On-Screen Display
- Image
- Schedule
- Motion Detection
- Video Loss Detection
- Tampering Detection
- Privacy Mask
- Snapshots
- Human Body Detection
Camera
Navigation: Setup > Camera > Camera

- Auto Switch to H.265: Determines whether the NVR will switch the connected camera to H.265 if they are capable.
- Auto Switch to U-Code: Determines whether the NVR will switch the connected camera to Ultra H.265 if they are capable.
- Uniview Ultra 265 Technology: Uses Intelligent Region Perception to detect motion in each frame. Hence, scenes containing valuable information is preserved, while the other relatively static areas such as lawns, white walls are compressed to save storage space. Significantly decreases the network load and storage consumption.
- Camera Access: Remotely access your camera configurations by clicking on the corresponding Access link at the last column. This allows you to modify your camera and alter the default login credentials.
Updating Credentials
Navigation: Setup > Camera > Camera
Note: This step is only necessary if you have modified the camera login credentials or if the camera you are using does not adhere to the standard default login credentials.
Warning: Please consider that failure to remember a security camera’s password is a difficult issue to resolve. To prevent tampering and unauthorized access, most security cameras do not have a physical reset button. If a password is lost, you will have to contact our technical support team and undergo a time-sensitive verification process to retrieve a device ID specific key which is valid for only 24-hours upon generation.
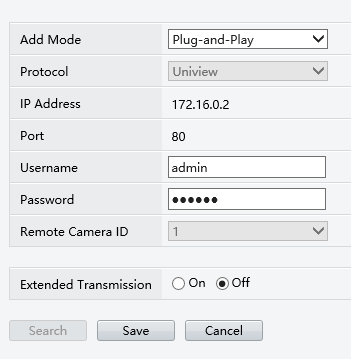
Once a camera’s login credentials have been changed, it will need to be updated on the NVR to allow the devices to communicate. Click the row where the camera is located on the table, then click Modify on the buttons above it.

Add Mode: Determines which networking mode will the NVR use with this camera.
- Plug-and-Play: Allows the NVR to assign IP/Port. Default.
- IP Address: Allows you to specify which IP/Port to assign.
- EZDDNS: Allows EZDDNS configuration. (Remote)
- Domain Name: Allows Domain Name configuration. (Remote)
Username: Update Credentials
Password: Update Credentials
Extended Transmission: Enables or Disables the Uniview Extended Transmission feature. When enabled, this triples the reliable length of the network cable between Uniview NVR and Uniview PoE cameras by increasing the power output supplied by the NVR to the PoE. The default and the industry standard is 100 meters (330 feet), this setting allows the distance of up to 300 meters (990 feet) and still maintain data and power stability.

Load More :
Updating Firmware
Navigation: Setup > Camera > Camera > Advanced

To update the firmware of all connected cameras, select all Cameras and then click on the Check New Version button.

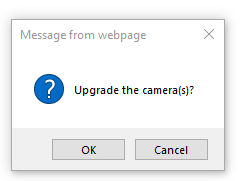
You will be prompted to confirm this. Select OK and the NVR will locate all available and compatible updated versions.

Check the Firmware Version (Current) and the Latest Version (Update). Click on the icon under By Cloud to begin downloading the update and uploading it to your cameras.

Once the process is completed, your Firmware Version (Current) should match with the Latest Version (Update). During the upgrading process, your camera will lose connection for a few minutes to install the update and restart.
On-Screen Display
Navigation: Setup > Camera > OSD
- Select Camera: Select which camera to configure.
- Camera Name: Sets the Camera Name. 0 – 40 Characters. Case-Sensitive.
- Sync OSD Camera Name: If enabled, will lock the OSD Camera Name to the Camera Name.
- OSD Camera Name: Sets the OSD Camera Name if Sync OSD Camera Name is not enabled.
- Show Time: Displays the current system time on the display.
- Show Name: Displays the camera name on the display.
- Count People: Displays the current value of the People Counting feature on the display.
- Date Format: Sets the date format used on the display.
- Time Format: Sets the time format used on the display.
- Font Size: Sets the font size used on the display.
- Font Color: Sets the font color used on the display.
- Content: This tab allows five more On-Screen display items should there be a need for it.
Image
Navigation: Setup > Camera > Image
- Select Camera: Select which camera to configure.
- Image Scene: Select which Image Scene preset to use. Choose custom to create your own.
- Default: Click this to restore the selected Image Scene to its default values.
Schedule
Navigation: Setup > Camera > Schedule
- Select Camera: Select which camera to configure.
- Pre-Record: Determines the duration (in seconds) of the pre-record footage to be included in the saved recording.
- Post-Record: Determines the duration (in seconds) of the post-record footage to be included in the saved recording.
- Recording Schedule: Enables or disables the recording schedule feature.
- Edit: Click this to set up your own scheduling.
- Copy To: This option allows you to copy the current configuration into the other cameras.
Configured to the settings above where Pre-Record and Post-Record values are at 60 seconds and 300 seconds respectively and using motion detection as a trigger, here is how it will play together. The camera is monitoring the road. At 10:26:30 PM, a running car entered the scene and left after 30 seconds at 10:27:00 PM, this triggers the motion detection event and fires up the recording. Footage from the camera from 10:25:30 PM which is 60 seconds prior to the event (determined by the Pre-Record) will be included in the saved recording data. Since our motion detection does not have a delay, let us determine that the motion detection event ended when the car left the scene at 10:27:00 PM. Since the Post-Record is set to 300 seconds or five-minutes after an event, the system will include footage from the camera up to 10:32:00 PM. When the camera owner checks the recorded events the next day, he will find footage of a motion detection event which starts at 10:25:30, 60 seconds before the car enters the scene, and ends at 10:32:00 PM, 300 seconds after the car left the scene. The final video will be 06:30 in length. 60 seconds pre, 30 seconds event, and 300 seconds post.
The setup that is shown on the screenshot above can be interpreted this way. During weekdays, from 7:00 AM to 5:00 PM, the system will monitor and record all footage into memory. The rest of the day, the system will not record anything unless a motion trigger or an alarm event is detected. During weekends, the system will not record anything except for motion-triggered events. During holidays, the system will not record anything unless an event is triggered.
Motion Detection
Navigation: Setup > Camera > Motion
- Select Camera: Select which camera to configure.
- Motion: Enables or disables the motion detection feature.
- Sensitivity: Determines the sensitivity of the detection feature.
- Draw Area/Finish Drawing: Allows editing of the scene area where motion detection is enabled.
- Clear All: Removes the current drawing.
- Arming Schedule: Determines when the feature will be active.
- Trigger Actions: Determines the actions once this feature is triggered.
- Copy: Parameter: Check parameters to copy its changes.
- Copy: Camera: Check cameras to send the current configuration to those.
Video Loss Detection
Navigation: Setup > Camera > Video Loss
- Select Camera: Select which camera to configure.
- Video Loss: Enables or disables the video loss detection feature.
- Arming Schedule: Determines when the feature will be active.
- Trigger Actions: Determines the actions once this feature is triggered.
- Copy: Parameter: Check parameters to copy its changes.
- Copy: Camera: Check cameras to send the current configuration to those.
The Video Loss protection feature creates an EVENT when a camera stops streaming video information into the Network Video Recorder.
Tampering
Navigation: Setup > Camera > Tampering
- Select Camera: Select which camera to configure.
- Tampering: Enables or disables the tampering detection feature.
- Sensitivity: Determines the sensitivity of the detection feature.
- Arming Schedule: Determines when the feature will be active.
- Trigger Actions: Determines the actions once this feature is triggered.
- Copy: Parameter: Check parameters to copy its changes.
- Copy: Camera: Check cameras to send the current configuration to those.
The Tampering protection feature creates an EVENT when a camera is being blocked, redirected, or is out of focus.
Privacy Mask
Navigation: Setup > Camera > Privacy Mask
- Select Camera: Select which camera to configure.
- Privacy Mask: Enables or disables the privacy mask.
- Draw Area/Finish Drawing: Allows editing of the scene area where motion detection is enabled.
- Clear: Removes the selected mask.
- Clear All: Removes all the masks.
The Privacy Mask feature creates a mask that disables surveillance in a specified area.
Snapshot
Navigation: Setup > Camera > Snapshot
- Select Camera: Select which camera to configure.
- Schedule: Settings under this category will determine settings of the scheduled snapshots.
- Event: Settings under this category will determine settings of event snapshots.
- Resolution: Determines the resolution of the snapshots.
- Image Quality: Determines the quality of the snapshots.
- Snapshot Interval: Determines the interval of the snapshots.
- Copy To: This option allows you to copy the current configuration into the other cameras.
Human Body Detection
Navigation: Setup > Camera > Human Body Detection
- Select Camera: Select which camera to configure.
- Arming Schedule: Determines when the feature will be active.
- Trigger Actions: Determines the actions once this feature is triggered.
Human body detection alarms occur when the presence of human beings is detected in the specified area.


