Safire Smart XVR Full Guide, Visiotech is a leading company in the distribution of technological equipment in Europe. After more than 16 years of experience and constant growth, Visiotech is today one of the leading wholesale suppliers of Video Surveillance, Intrusion, Access Control/Presence, Smart Home, Fire, Networking, Video Door Entry Systems, Audiovisual and Outdoor, with presence in 75 countries, and with more than 300 employees.
The company has a great team, with a wide professional experience and a constant research of the latest developments in security, always trying to find or develop the most advanced and appropriate solutions for its customers.
Visiotech currently focuses its work philosophy on personalized attention to each customer, continuously expanding the product catalog according to the specific needs detected and incorporating the latest technological innovations. A total commitment to customers that guarantees the continuous renewal of products, as well as an excellent pre-sales advice and after-sales support service, among many other advantages.
Technology change in Safire Smart 4N1 cameras
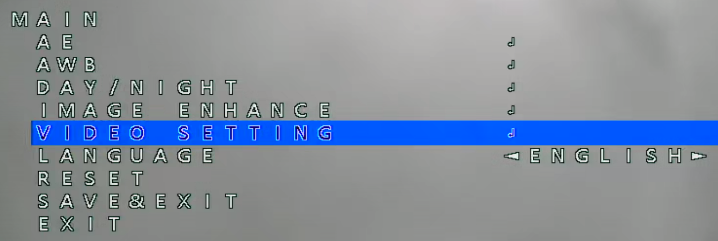
To change the technology of the Safire Smart 4N1 cameras, you have to access the OSD menu of the camera.
This modification can be done with any XVR of any manufacturer as long as we are in the appropriate technology for each one, otherwise the access may fail:
Once the technology has been modified, the changes must be saved.
IMPORTANT: In case of changing the technology to CVBS, the only way to access the OSD menu is through a Safire Smart XVR.
Safire Smart NVR – Add users / user group local / remote and add the XVR in the mobile app.
Safire Smart NVR – Add users / user group local / remote and add the XVR in the mobile app.
When there is an administrator and user that can have access to the Recorder.
For this, there are the following options:
Adding and editing permission groups
1. Local:
Via the recorder:
Adding user levels
Adding users
Via the recorder web interface:
Adding user levels
Adding users
2. Remote:
Via NAT https://www.autonat.com/ this without port forwarding:
Adding user levels
Adding users
Via Safire Smart VMS:
Adding users
Local via the recorder
Adding and editing permission groups
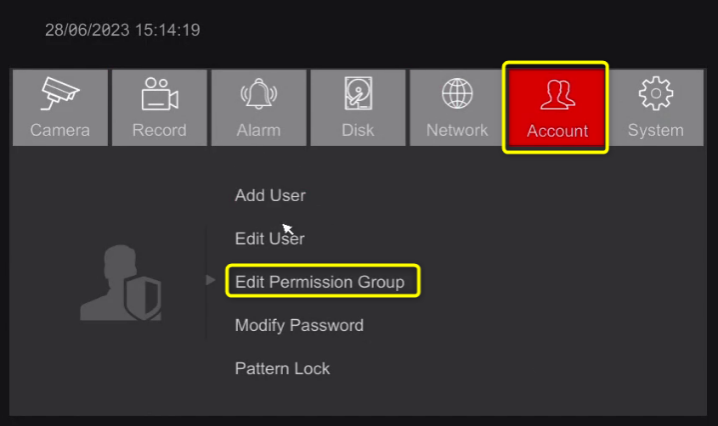
The first task is to check edit or add a user group
Via setting > Account > Edit Permission Group
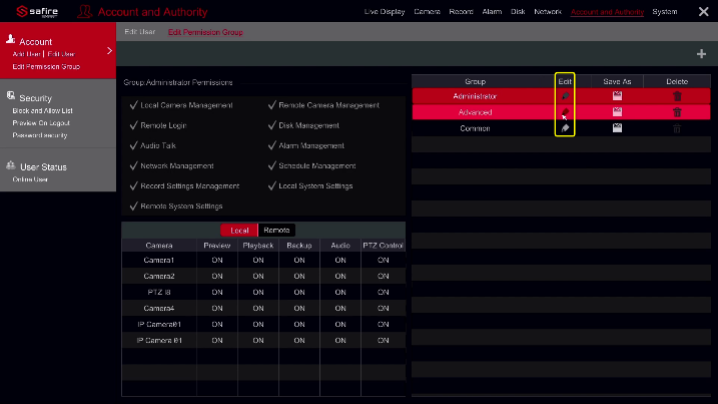
Click on the edit icon to edit the rights for that group
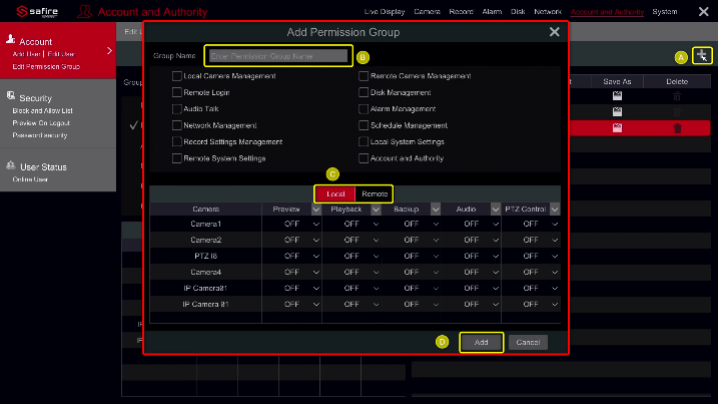
Adding a permission group:
A. Click on the plus icon in the top right
B. Give the group a name and set the basic permissions
C. Then for the camera via local access and remote access
D. When done, click on Add
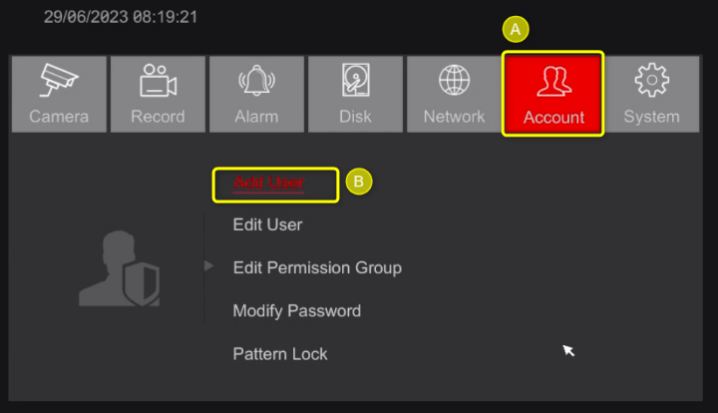
Adding new users
A. Go to account in the settings menu
B. Then Add User
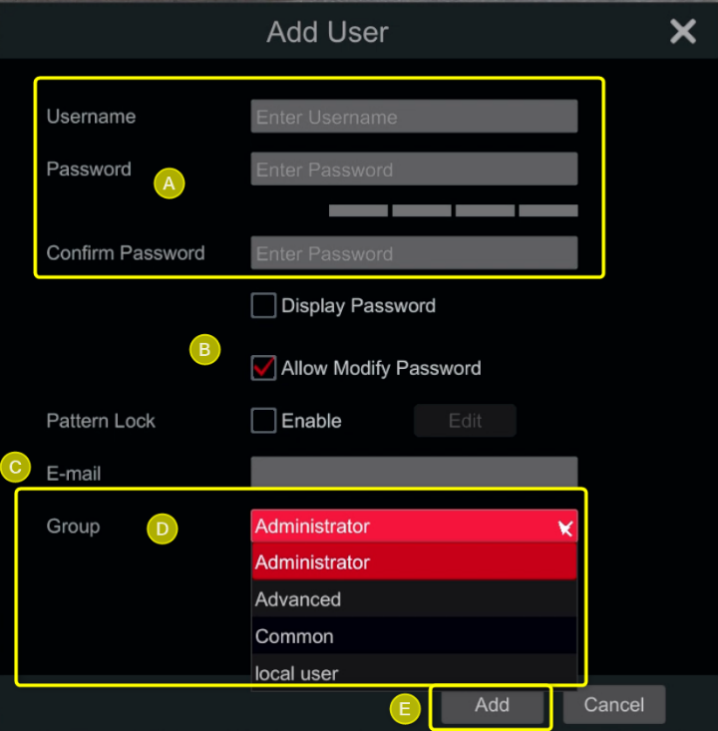
A. Enter a username and password
B. Select the options of choice
C. The e-mail address is not mandatory
D. Select the access group of permissions for this user
E. Click on Add to add and save
Local via the web interface:
Open the config page from the recorder in the web browser using the IP address from the recorder.
Then she same steps as in the instructions above.
Add user group via Web interface
Add users via Web interface
Remote
Via NAT https://www.autonat.com/ this without port forwarding
https://www.autonat.com/
Before using the P2P web interface, check if the NAT P2P is active.
A. Open the Network tab via the config menu
B. Select the NAT tab
C. Make sure it is Enabled
D. Then Apply to save
F. Below you can see the device serial number as well, write or save this serial number this is needed in the next step 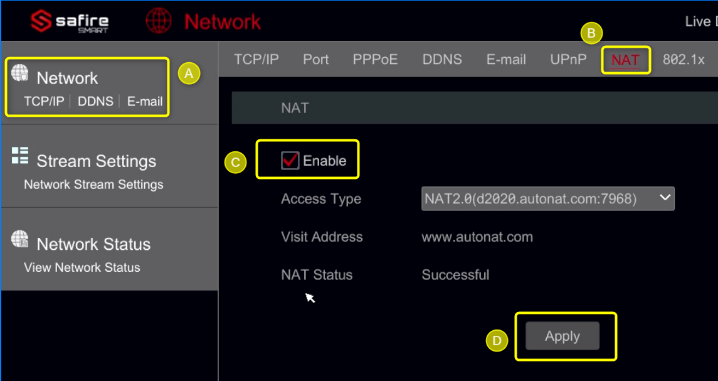
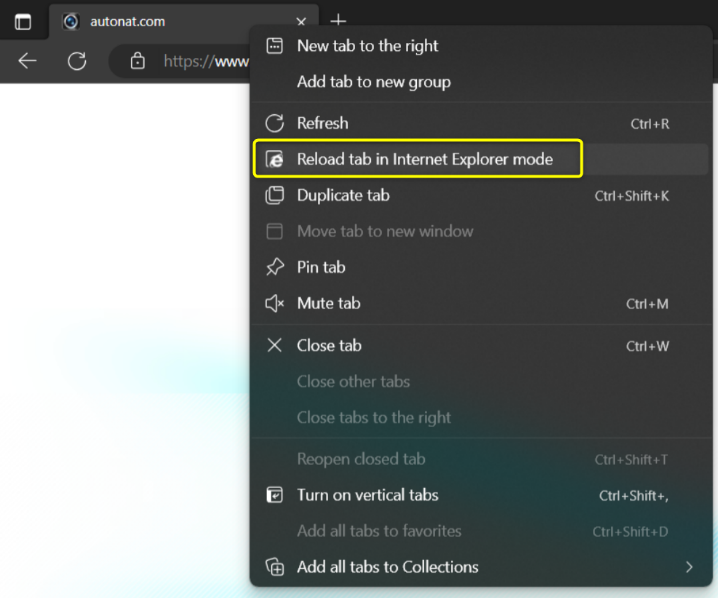
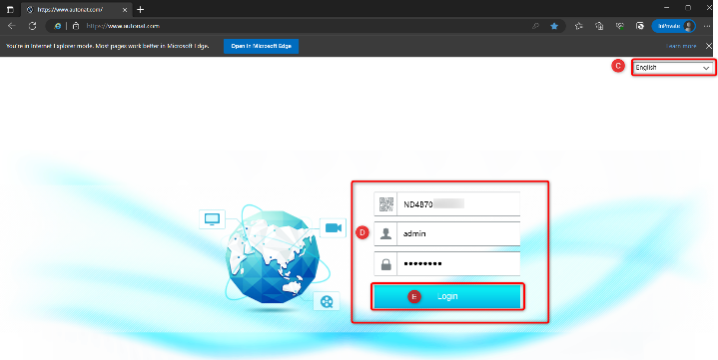
A. Open the https://www.autonat.com/ in MS Edge
B. Reload the tab in Internet Explorer mode
When connecting for the first time, you need to install the web components, follow the instructions in the web browser.
C. Select the language
D. Enter the XVR serial number username and password for that user
E. Click on Login
The rest is the same as the steps via local IP or the UI on the XVR
Via Safire Smart VMS
Download and installation instructions: – Installing Safire Smart VMS
First, the device needs to be added in the VMS this can be done via local IP address or serial number.
Now for remote we need to use the serial number.
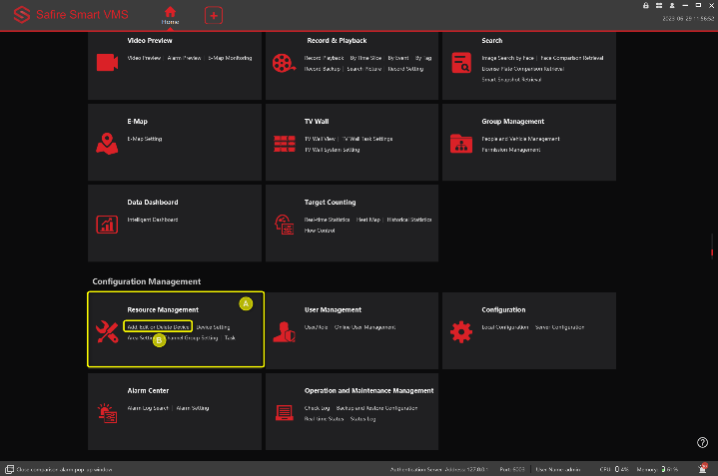
A. In the Remote Management B. Click on Add, Edit or Delete Devices
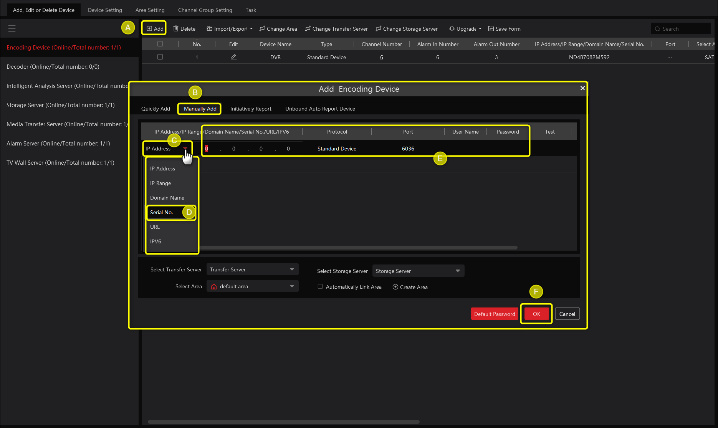
A. Click on Add and this will open the new window
B. Then Manually Add
C. Click on the down arrow next IP Address
D. Select the Serial No, option in the list
E. Add the Serial number Username and Password
F. Click on OK
Now adding new users.
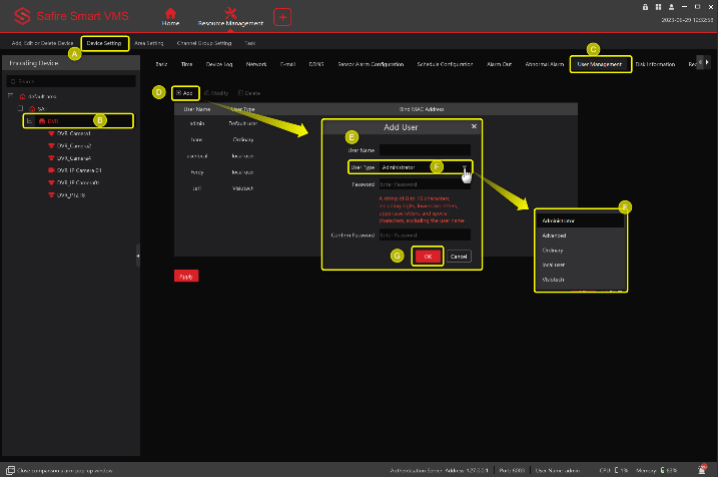
A. Go to the TAB Device Settings
B. Select the recorder
C. Go to the tab User Management
D. Click on Add to add the new user
E. Enter a username and password for the new user
F. Select the user type
G. Ok to save and add the user details
Now that we have created a user
We send the following instructions to the new user.
The Serial number or QR code from the XVR and the username and password.
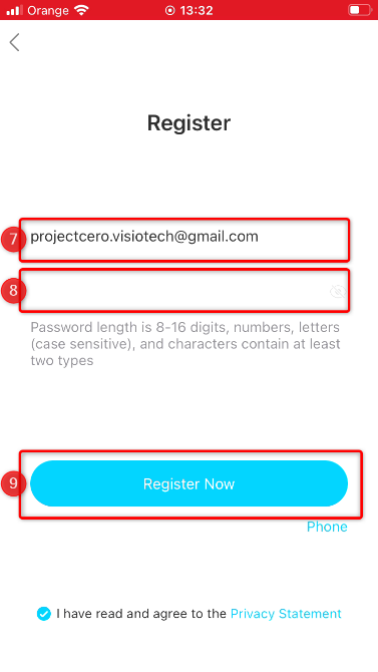
Dear new user, we have created an account so that you have direct access via the Safire Smart app.
Serial Number: ND4B7082AAD
Username: user44
Password: 1234qwerz
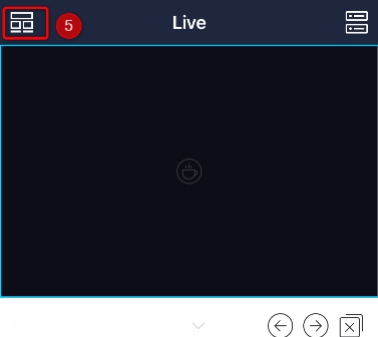
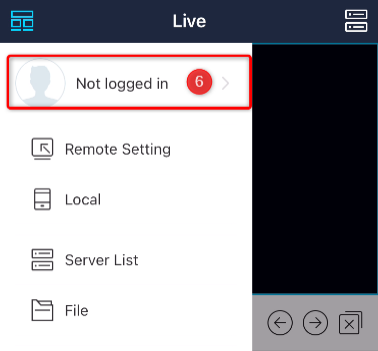
Now the app is ready, the XVR can be added to this account.
Note:
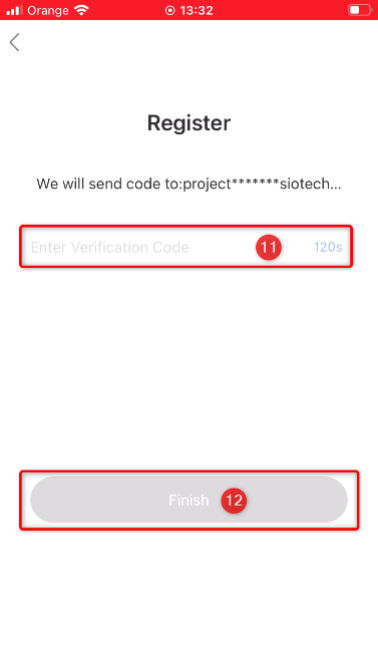
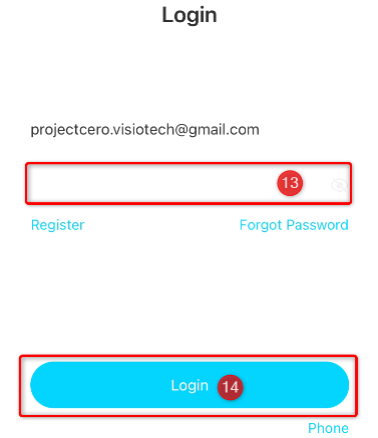
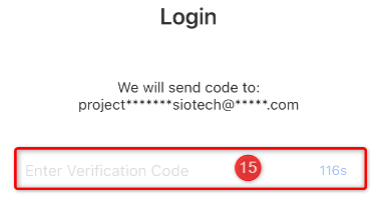
Each time you log out or log in on a different device, an email is sent with a verification code.
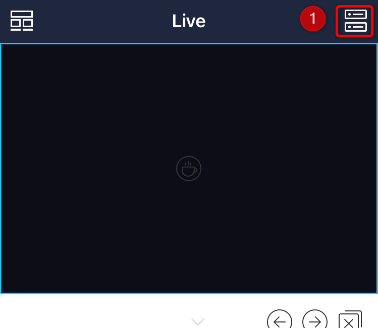
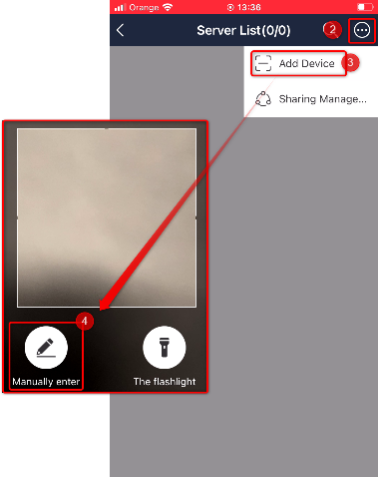
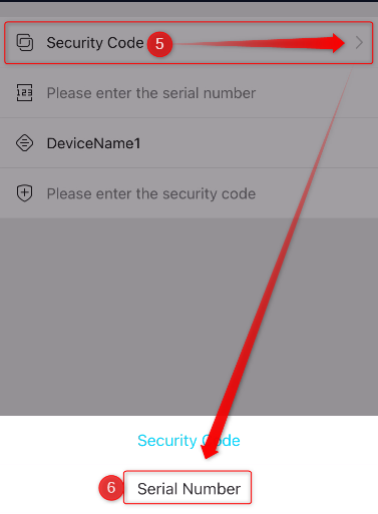
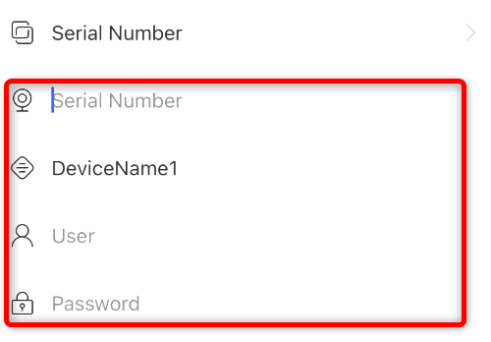
Adding a XVR in the Safire Smart app.
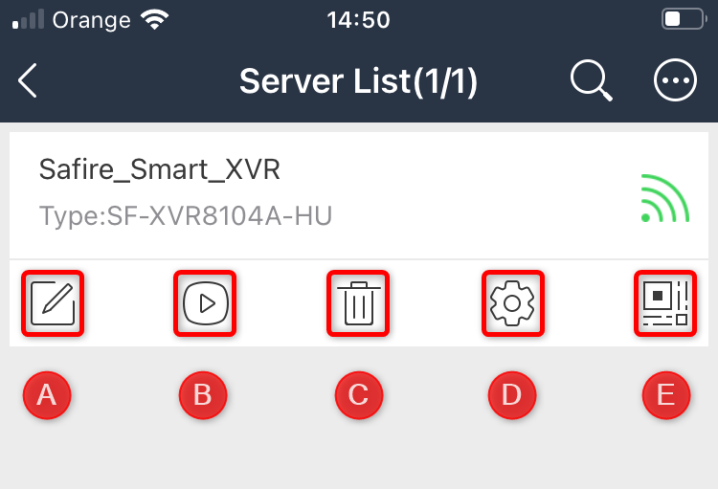
Now the XVR has been added in the app.
A. Edit
B. Play (for live images)
C. Delete the device
D. Limited configuration setting in the XVR
E. Display the QR code from the XVR
Safire Smart XVR – camera Smart LED settings
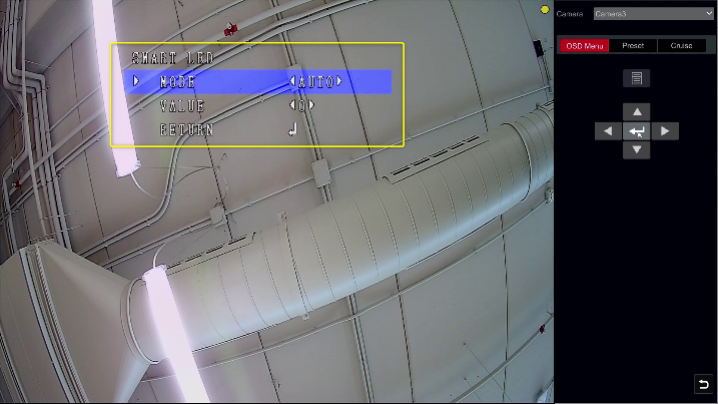
How to change the Smart LED setting from automatic to manual?
How to enter the camera OSD menu, please check the link below:
– Safire Smart XVR – How to enter the camera OSD menu
Mode Auto:
The auto mode will turn on the LEDs when it is getting dark.
The option of darkness level are 0 till 3
Level 3 will turn on the LEDs sooner when it is getting dark.
Level 0 will turn on the LEDs later when it is darker
Note:
To detect the light brightness, the image sensor is being used.
Be aware that on light reflection, the LEDs might turn on and off
Adjust the Level in auto mode or turn the camera so that light will not reflect in the camera
Mode Manual:
The manual mode is always off or on depending on the level.
The level options are 0 till 10
Level 0 is off
Level 10 gives the most light
Safire Smart XVR – How to enter the camera OSD menu
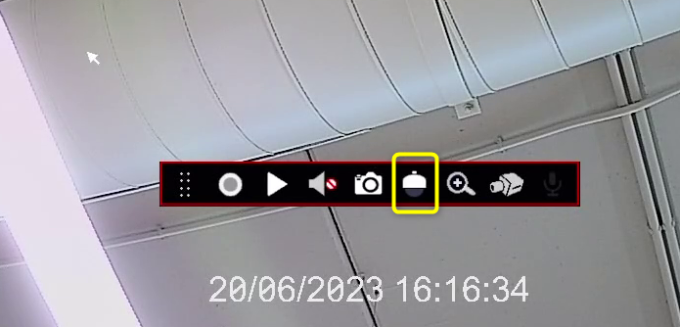
When using the monitor and mouse from the XVR select the camera and click on the PTZ icon.
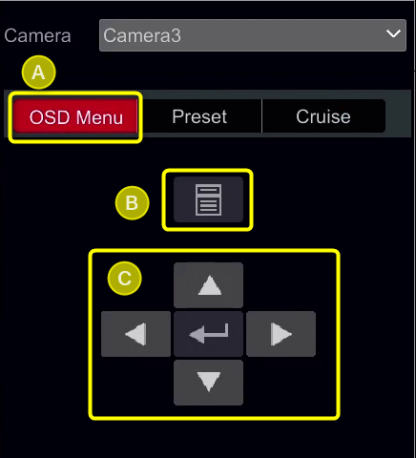
A. Select the OSD Menu
B. then the Menu button to enter the OSD menu for the selected camera
C. Use the arrows to navigate
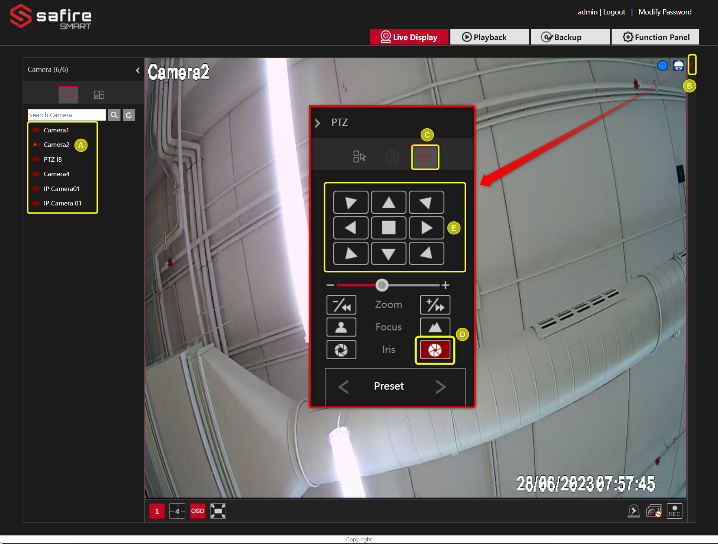
Now this is also possible via the web interface.
A. Select the camera
B. Open the side menu bar
C. Then select the PTZ icon
D. Click on the Iris+ to enter the OSD menu from the camera
The Iris+ button works as the enter button in the camera OSD menu
Safire Smart XVR – Enanble Audio over coax
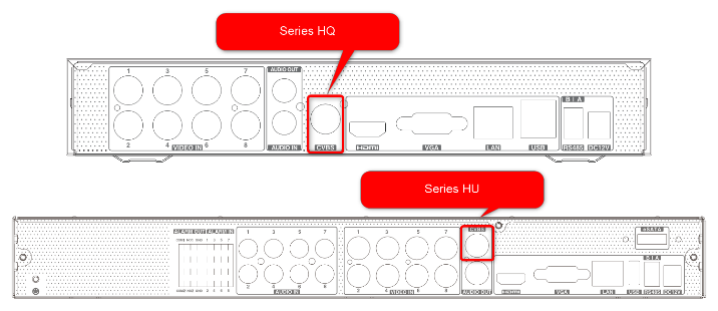
“The series HG and HQ have one RCA Audio in. The series HU has up to 8 RCA audio channels in.
By default, the RCA Audio in is always active. When the coax camera has the option audio over coax and the option is not active, see picture below.”
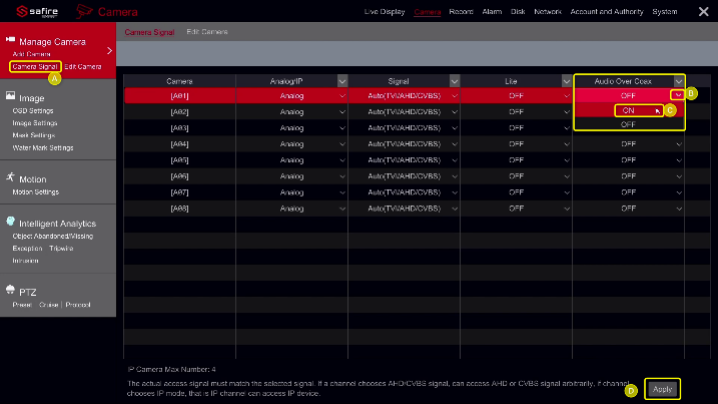
How to activate the audio over coax?
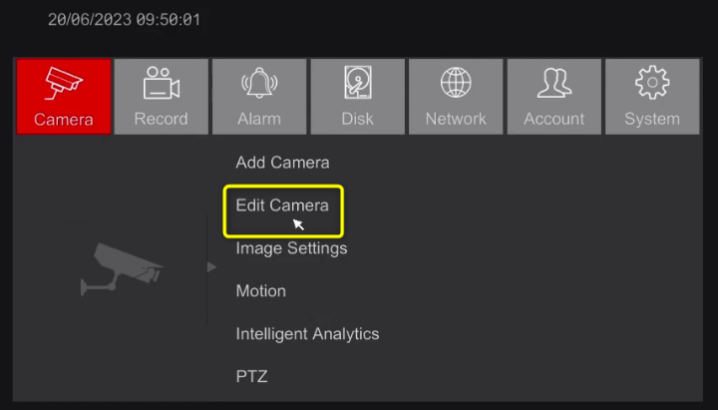
Open the setting option via start on the XVR menu.
Then select Edit Camera.
A. Click on Camera Signal
B. Click the option Audio Over Coax arrow down
C. And select ON (repeat on the rest of the channels)
D. Click on Apply to save
Safire Smart XVR – How to use the spot monitor?
Safire Smart XVR – How to use the spot monitor?
The series HQ and HU have a BNC spot monitor connector.
By default, the BNC video out will display the same as the HDMI and VGA video out signal.
How to enable the Spot monitor?
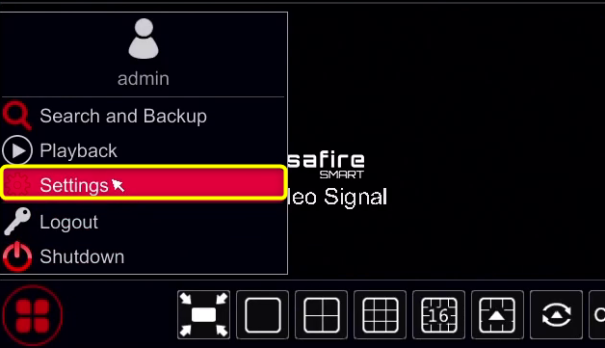
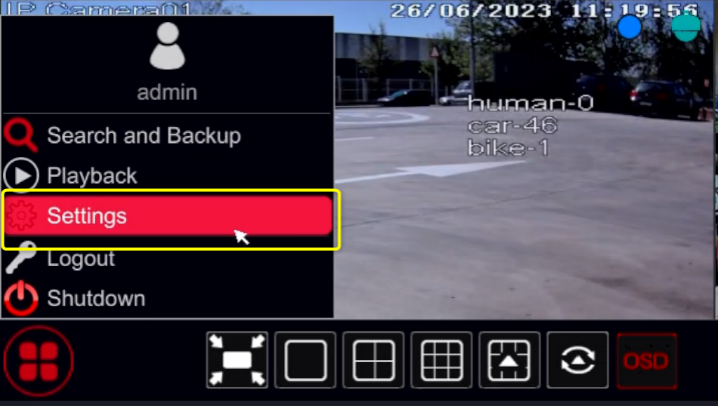
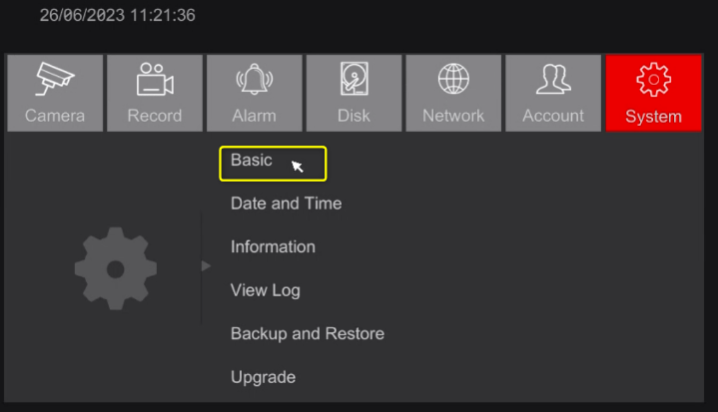
Open the start menu and click on Settings
Then click on Basic
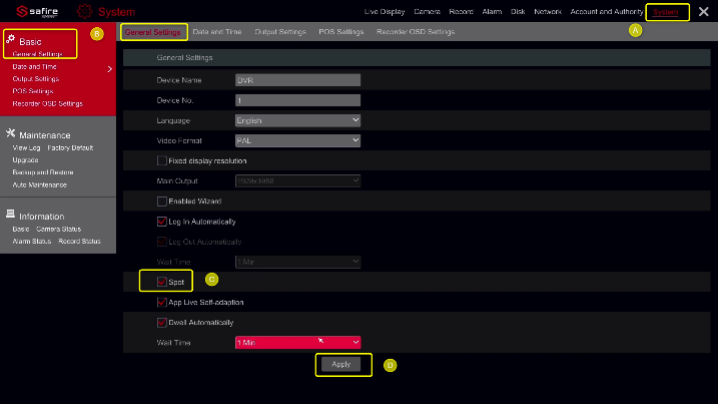
This will show the General settings.
A. System
B. Basic > General settings
C. Enable the Spot monitor
D. Then Apply the settings
Adding the cameras to display on the spot monitor
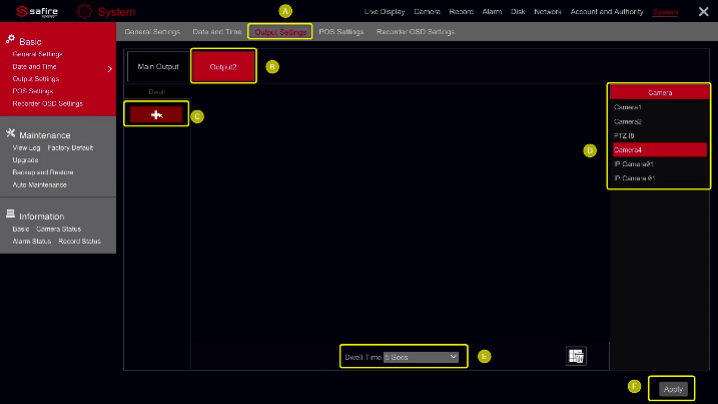
A. Open the Output Settings
B. Select the output 2
C. Click on the Plus icon to add a new window for the spot monitor
D. Double-click on the camera to add in the field
F. Select the Dwell Time
G. Then when ready Save click on Apply
Note:
The max windows to add for the spot monitor is the limit of the recorder max channels. Sample: a 4+2 IP = max 6 windows.
It is also possible to add a camera more than one time, and the dwell time is for all the cameras.
Safire Smart XVR – Quick Export / Backup video recordings to USB drive
In order to export a video file to a USB Drive, the drive needs to formatted in FAT23.
1. Insert the USB drive in the USB port of the recorder.
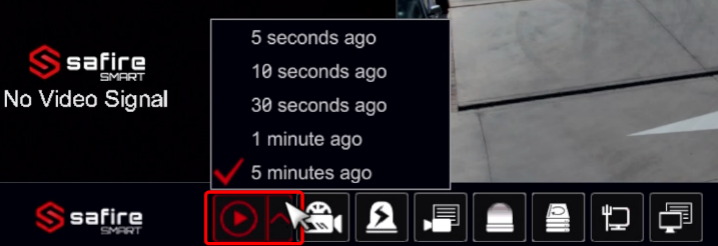
2. Select the quick playback icon
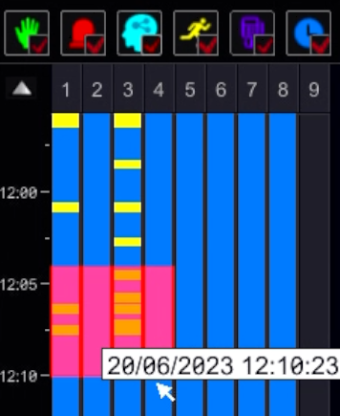
3. Use the zoom buttons to zoom in to select the time to copy
4. Select the part that needs to be saved on the USB drive
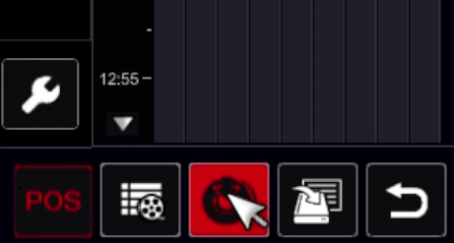
5. Then on the backup icon
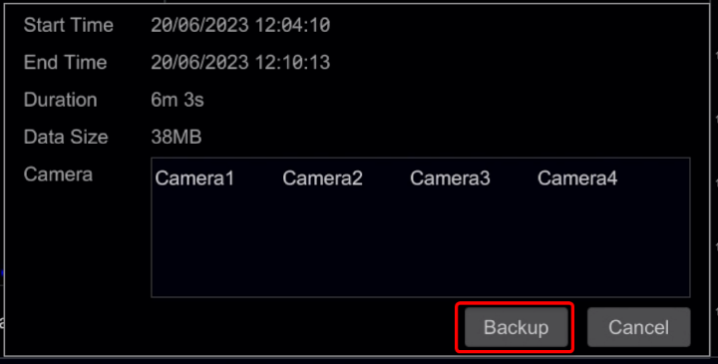
6. Confirm to click on Backup
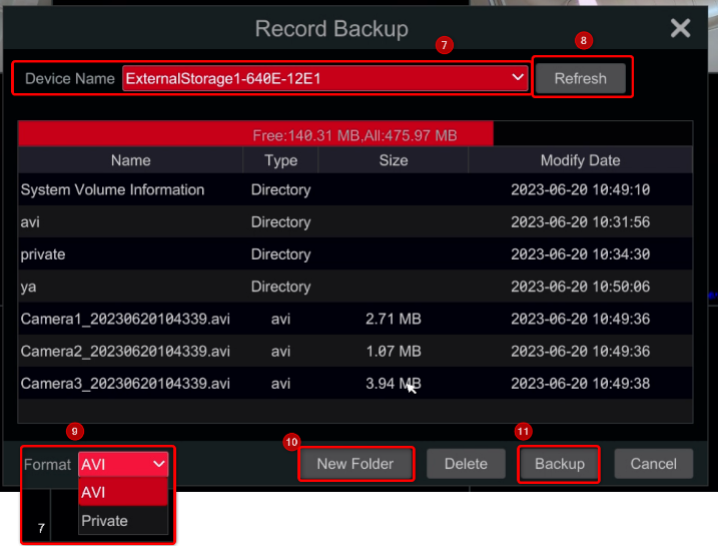
7. Select the external storage device
8. When the Storage drive doesn’t show, click on Refresh or check the USB drive in the PC and format the drive to the FAT32 format
9. Select the Format to export
Note:
When Exporting in the Private format for some models, (that can be mandatory in legal cases) Create a New Folder or select an existing folder so that the Recorder can create a folder for the player and video files.
When select the other format, this is not needed.
10. Create a new folder when needed (read the note) then open the (new) folder
11. And click Backup export the files
Video Youtube:
Safire Smart XVR,
XVR guide,
Smart XVR tutorial,
Safire XVR setup,
Safire XVR review,
CCTV XVR,
IP camera XVR,
Security system XVR,
Safire security,
XVR features,
XVR installation,
XVR troubleshooting,
Safire XVR user manual,
XVR software,
XVR hardware,
Safire Smart XVR 16 channel review,
How to connect IP cameras to Safire XVR,
Safire XVR remote access guide,
Safire XVR motion detection setup,
Best practices for Safire XVR installation,
Safire XVR vs. other XVR brands,
Safire XVR firmware update
