lorex password reset all models If you restore your DVR / NVR system to default settings, the username and password will also be restored to default. If the default username and password above does not work, refer to your user manual for the model-specific default information for your system.
If you restore your DVR / NVR system to default settings, the username and password will also be restored to default.
Default login for most LHV / LNR Series systems:
- Username: admin
- Password: 000000
Default login for most LHA / LNK Series systems:
- Username: admin
- Password: 00000000
If the default username and password above does not work, refer to your user manual for the model-specific default information for your system.
If you are unable to log in to your DVR / NVR, client software or application due to a forgotten password, contact Technical Support for a password reset. For your security, passwords cannot be reset using the online support system.
Lorex password reset all models
How to Change or Reset Your Recorder’s Password (Compatible with Lorex Cloud App)
You can change your recorder’s password for security reasons or reset it if you’ve forgotten it.
Important: These instructions are for recorders that are supported by the Lorex Cloud app.
- For the full list of compatible recorders, please see the Product Compatibility Chart for Apps & Software.
- For recorder’s that are supported by the Lorex Home app, please see the article How to change or reset your recorder’s password (compatible with Lorex Home App).
Change or reset your recorder’s account password
- Retrieve your recorder’s Device ID. You can locate the Device ID in the following ways:
- On the side panel of your recorder, alongside the Device ID’s QR Code.
- In your recorder’s system, right-click then click Info.
- In the Lorex Cloud app, go to Settings > Device Info.
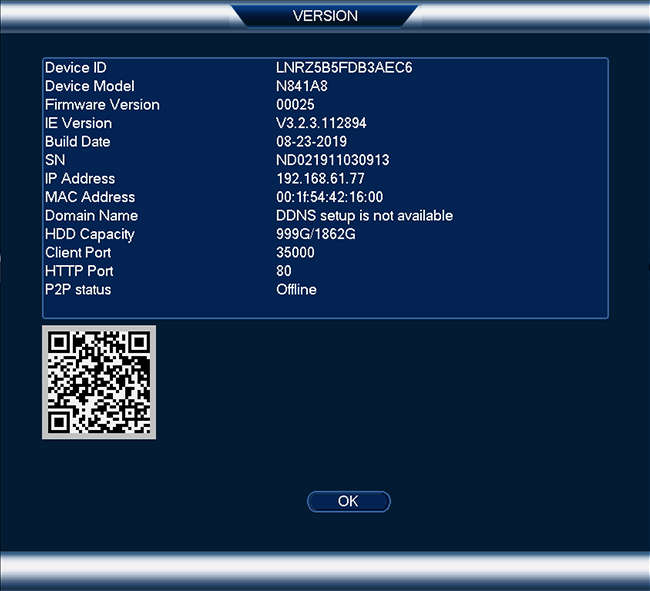
- Once you have the Device ID at hand, contact our technical support at 1-888-425-6739 and ask for a temporary password so that you can access your recorder and reset the password.
- Login to your recorder using the system username (default: admin) and the temporary password.
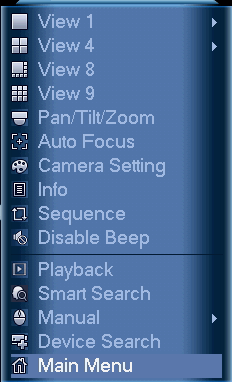
- Right-click, then click Main Menu.

- Click Settings > System > Account > User.
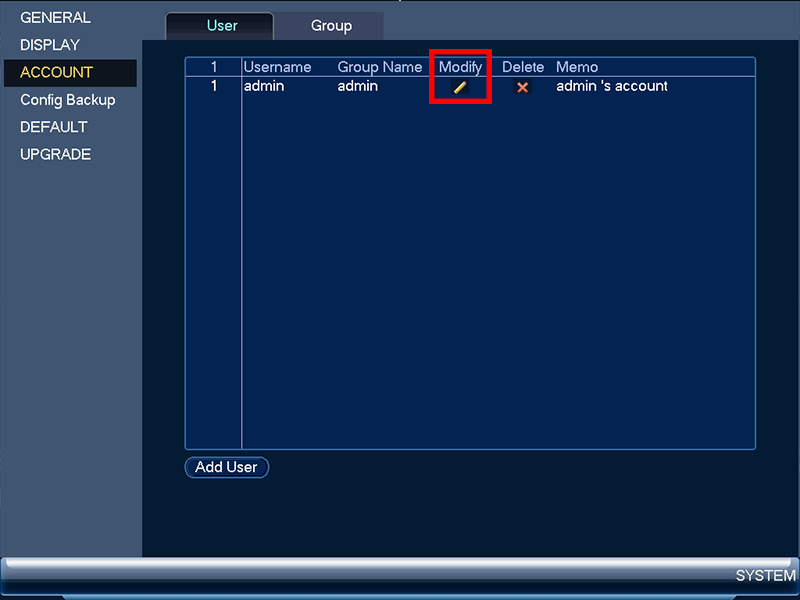
- Under the admin username, click the pencil icon to Modify.
- Configure the following settings:
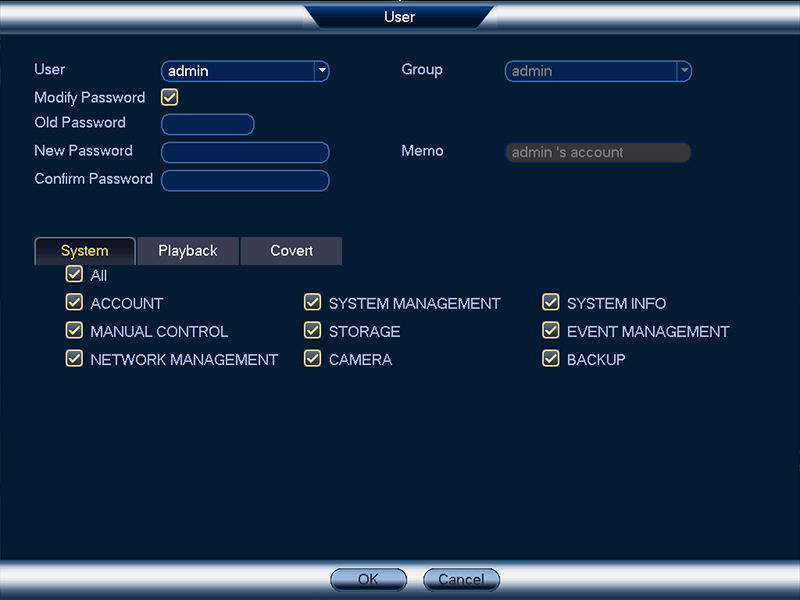
- Modify Password: Check to change or reset the password for the system.
- Old Password: Enter the temporary password.
- New Password: Enter your new, secure password.
Note: Passwords for the system must be a minimum of 8 characters, and must include at least 2 of the following character types: lowercase, uppercase, numeric, and special characters.
- Confirm Password: Re-enter your new, secure password.
- Click OK to save your changes.
You can now use your new account password to login to your recorder.
How to Change or Reset Your Recorder’s Password (Compatible with Lorex Home App)
The following article provides instructions on changing your Lorex recorder’s password for security reasons or reset it if you’ve forgotten it.
Important: These instructions are for recorders that are supported by the Lorex Home app.
- For the full list of compatible recorders, please see the Product Compatibility Chart for Apps & Software.
- For recorder’s that are supported by the Lorex Cloud app, please see the article How to change or reset your recorder’s password (compatible with Lorex Cloud App).
Table of contents:
- Change your recorder’s password (Lorex Home App)
- Reset your recorder’s password (Lorex Home App)
- Change your recorder’s password from the system (New Local UI)
- Reset your recorder’s password from the system (New Local UI)
- Change your recorder’s password from the system
- Reset your recorder’s password from the system
Change your recorder’s password (Lorex Home app)
Note: The recorder’s password can only be changed by the device owner. Shared users cannot change the password.
- Open your Lorex Home app.
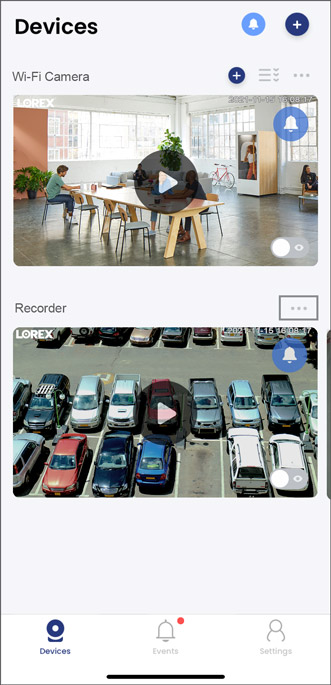
- Tap on your recorder’s device settings (•••) icon, then in the next screen tap it again.
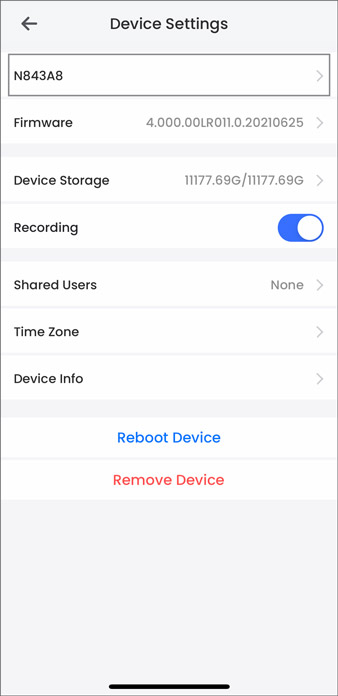
- Tap on your recorder’s device name.
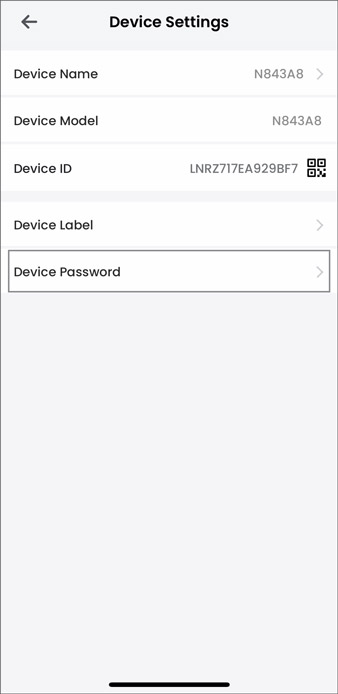
- Tap Device Password.
- Enter your current password in the Old Password field, then enter your New Password.
Note: Passwords for the system must be a minimum of 8 characters, and must include at least 2 of the following character types: lowercase, uppercase, numeric, and special characters.
- Tap Save.
You can now use your new password to login to your recorder.
Reset your recorder’s password (Lorex Home App)
Note: The recorder’s password can only be reset by the device owner. Shared users cannot reset the password.
- Open your Lorex Home app.

- Tap on your recorder’s device settings (•••) icon, then in the next screen tap it again.

- Tap on your recorder’s device name.

- Tap Device Password.
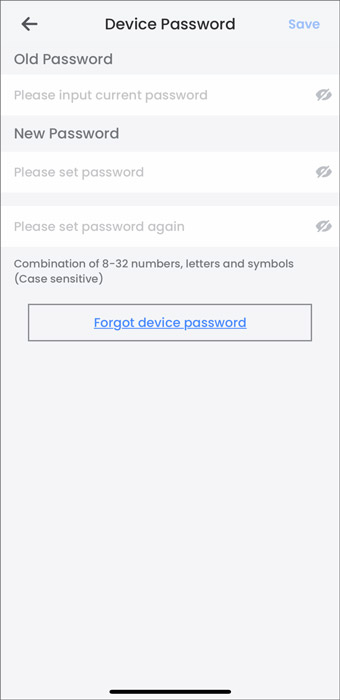
- Tap Forgot device password.
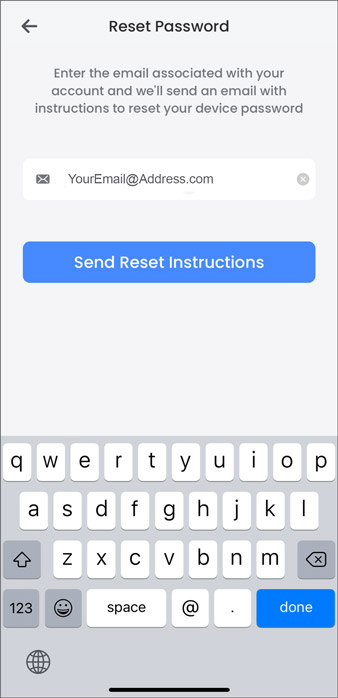
- Enter the email address associated with your account, then tap Send Reset Instructions.
- Get the temporary password from your email.
- Enter the temporary password in the Old Password field, then enter your New Password.
Note: Passwords for the system must be a minimum of 8 characters, and must include at least 2 of the following character types: lowercase, uppercase, numeric, and special characters.
- Tap Save.
You can now use your new password to login to your recorder.
Change your recorder’s password from the system (New Local UI)
Note: The recorder’s password can only be changed by the device owner. Shared users cannot change the password.
- Login to your recorder using the system username (default: admin) and your current password.
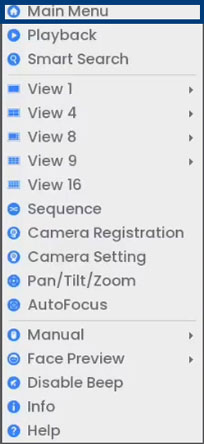
- From the Live View display, right-click to open the Quick Menu, then click Main Menu.
- Click Users, then the User tab from the side panel.
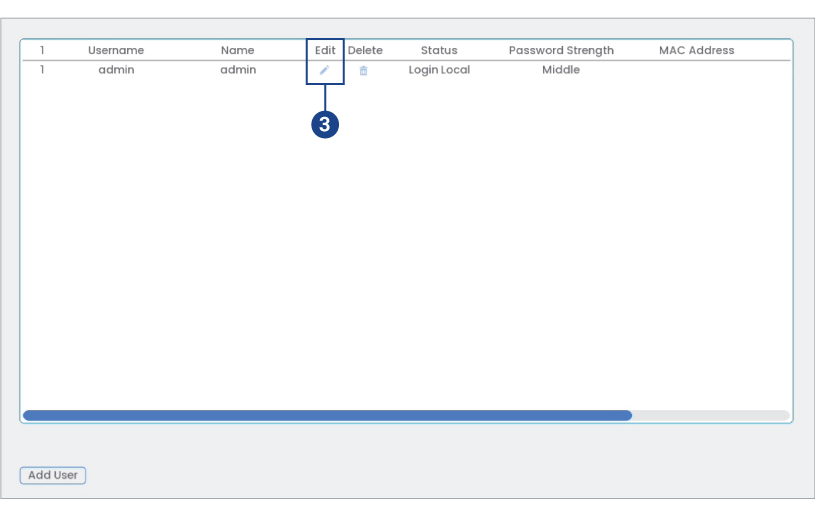
- Under the admin username, click the pencil icon to Edit.
- Configure the following settings:
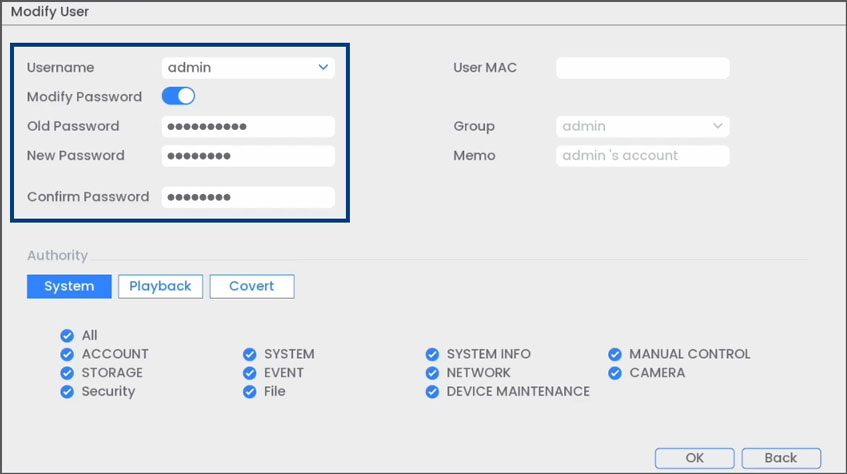
- Username: Select admin.
- Modify Password: Click to enable changing the password for the system.
- Old Password: Enter your current password.
- New Password: Enter your new, secure password.
Note: Passwords for the system must be a minimum of 8 characters, and must include at least 2 of the following character types: lowercase, uppercase, numeric, and special characters.
- Confirm Password: Re-enter your new, secure password.
- Click OK to save your changes.
You can now use your new password to login to your recorder.
Reset your recorder’s password from the system (New Local UI)
Note: The recorder’s password can only be reset by the device owner. Shared users cannot reset the password.
- Open your Lorex Home app.

- Tap on your recorder’s device settings (•••) icon, then in the next screen tap on it again.

- Tap on your recorder’s device name.

- Tap Device Password.

- Tap Forgot device password.

- Enter the email address associated with your account, then tap Send Reset Instructions.
- Get the temporary password from your email.
- Login to your recorder using the system username (default: admin) and your temporary password.

- From the Live View display, right-click to open the Quick Menu, then click Main Menu.
- Click Users, then the User tab from the side panel.

- Under the admin username, click the pencil icon to Edit.
- Configure the following settings:

- Username: Select admin.
- Modify Password: Click to enable changing the password for the system.
- Old Password: Enter your current password.
- New Password: Enter your new, secure password.
Note: Passwords for the system must be a minimum of 8 characters, and must include at least 2 of the following character types: lowercase, uppercase, numeric, and special characters.
- Confirm Password: Re-enter your new, secure password.
- Click OK to save your changes.
You can now use your new password to login to your recorder.
Change your recorder’s password from the system
Note: The recorder’s password can only be changed by the device owner. Shared users cannot change the password.
- Login to your recorder using the system username (default: admin) and your current password.
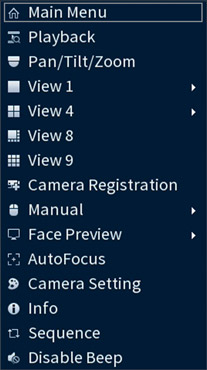
- From the Live View display, right-click to open the Quick Menu, then click Main Menu.
- Click ACCOUNT, then click the User tab on the side panel.
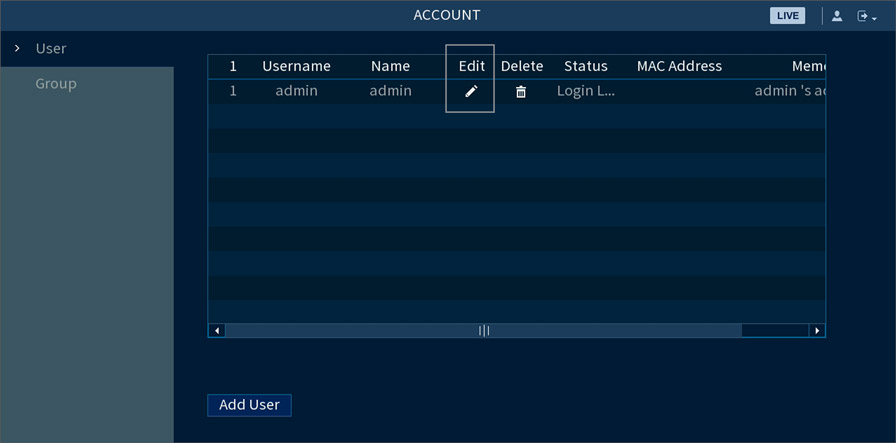
- Under the admin username, click the pencil icon to Edit.
- Configure the following settings:
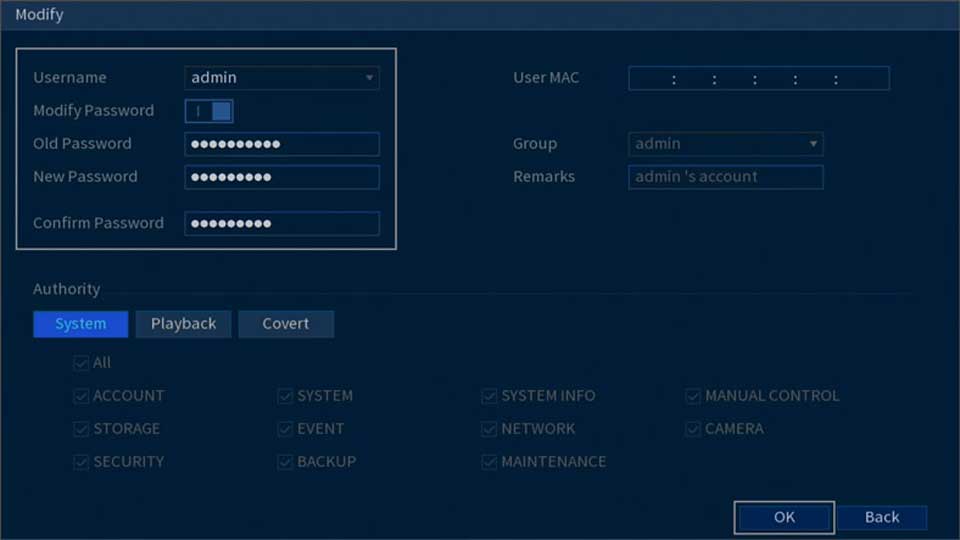
- Username: Select admin.
- Modify Password: Click to enable changing the password for the system.
- Old Password: Enter your current password.
- New Password: Enter your new, secure password.
Note: Passwords for the system must be a minimum of 8 characters, and must include at least 2 of the following character types: lowercase, uppercase, numeric, and special characters.
- Confirm Password: Re-enter your new, secure password.
- Click OK to save your changes.
You can now use your new password to login to your recorder.
Reset your recorder’s password from the system
Note: The recorder’s password can only be reset by the device owner. Shared users cannot reset the password.
- Open your Lorex Home app.

- Tap on your recorder’s device settings (•••) icon, then in the next screen tap on it again.

- Tap on your recorder’s device name.

- Tap Device Password.

- Tap Forgot device password.

- Enter the email address associated with your account, then tap Send Reset Instructions.
- Get the temporary password from your email.
- Login to your recorder using the system username (default: admin) and your temporary password.

- From the Live View display, right-click to open the Quick Menu, then click Main Menu.
- Click ACCOUNT, then click the User tab on the side panel.

- Under the admin username, click the pencil icon to Edit.
- Configure the following settings:
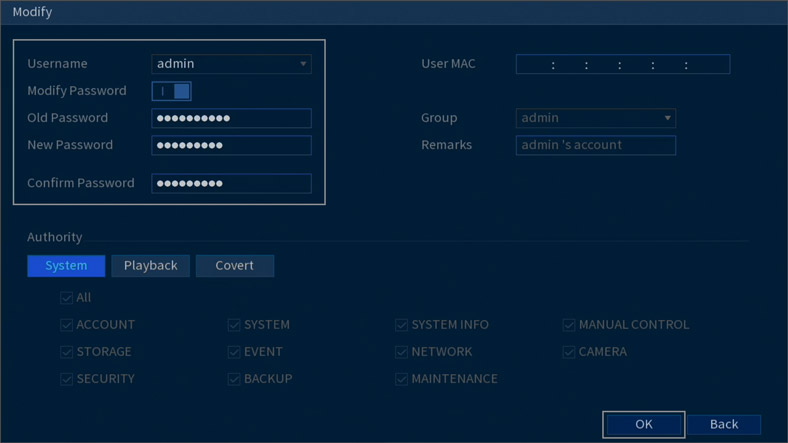
- Username: Select admin.
- Modify Password: Click to enable resetting the password for the system.
- Old Password: Enter the temporary password.
- New Password: Enter your new, secure password.
Note: Passwords for the system must be a minimum of 8 characters, and must include at least 2 of the following character types: lowercase, uppercase, numeric, and special characters.
- Confirm Password: Re-enter your new, secure password.
- Click OK to save your changes.
You can now use your new password to login to your recorder.
IP Cameras: Default username and password
When using Lorex IP cameras, it is always recommended to connect them to a compatible NVR. NVR installations are easier to view, manage, and maintain than stand-alone IP cameras, and require just a single login to view all cameras connected to the system.
For those who must connect to IP cameras directly without the use of an NVR, the login information below is applicable to most Lorex IP cameras.
Default login for most Lorex IP cameras:
- Username: admin
- Password: admin
NOTES:
- For security reasons, many new IP cameras with up-to-date firmware will ask you to change the default login information the first time you access the camera. In these cases, the default login information will not grant you access to the camera.
- Older IP cameras may not use the default logins above. If the credentials above do not work, refer to your user manual for your camera’s default username and password. Click here for downloads and documentation for your product.
Default system port settings for Lorex IP cameras:
- HTTP Port: 80
- Client Port: 35000
- UDP: 35001 (specific applications only)
- RTSP: 554 (specific applications only)
IMPORTANT: HTTP and Client Ports must be port forwarded to access to the system over the Internet. Click here for port forwarding instructions.
IP Cameras: Locked error message after changing password
If you have changed your IP cameras password and receive a Locked error message on your NVR, it is because your NVR is trying to access the cameras with an older password. When you change your password on your IP camera, update the password information on the NVR as well.
The following instructions require you to access your system using your DVR / NVR and a monitor.
To update your IP camera password on your NVR:
- Power cycle your IP camera. To power cycle your IP camera, please power it off and disconnect the power source for approximately 5 minutes. Reconnect, and power back on the IP camera.
- Right-click on the Live View of your NVR to access the Quick Menu, and then click Device Search.
- Log in to your NVR by entering your login information. Refer to your user manual for your default Username and Password.
- Click Device Search to search and display IP cameras connected to the local area network (LAN) or NVR in the Remote Device window.
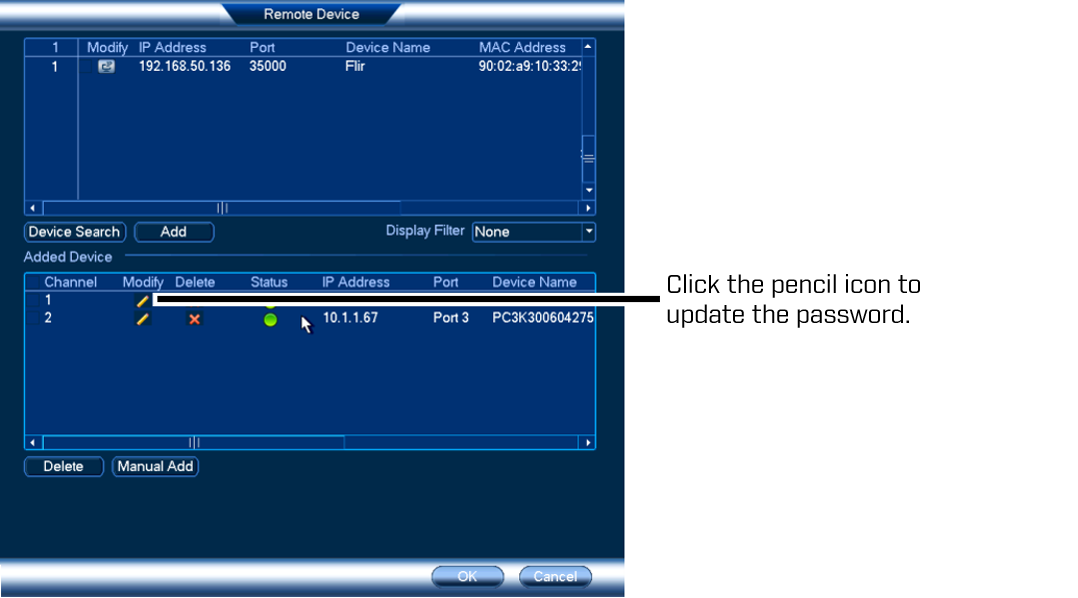
- Select the camera you want to change the password for, and then click the Modify icon (
 ).
). - Enter your updated password, and then click OK to save the settings.
RECOMMENDED: If you have power cycled your IP camera(s) and they are still showing a Locked error message, disconnect the camera(s) from power for 24 hours and repeat the steps above. You can also restore the camera to default settings. Refer to your user manual for model specific instructions on how to restore your camera. Click here for downloads and documentation on your product.
Accessing Device Passwords on Your Lorex Cirrus App
If you forgot your device’s password on the Lorex Cirrus app, use these steps to regain access.
NOTE: The following instructions are shown using an iOS (Apple) smartphone. There may be some differences in the user interface when using an Android smartphone or tablet.
To access your device’s password on the Lorex Cirrus app:
 Launch the Lorex Cirrus app on your smartphone or tablet.
 Tap the settings button
 ![]() on the top left corner.
on the top left corner.
 Go to the Devices tab.
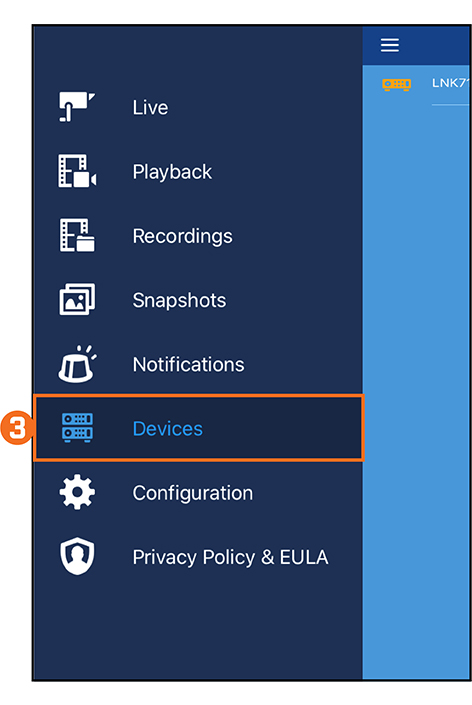
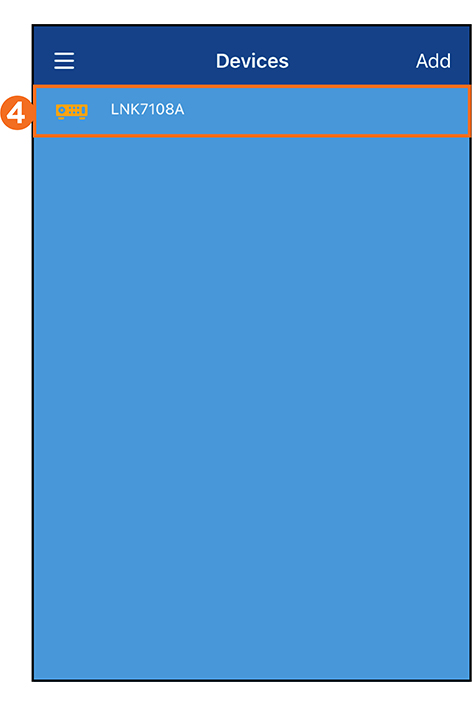
 Tap the device name.
 In the selected device’s setting, tap the password reveal button to see your password.
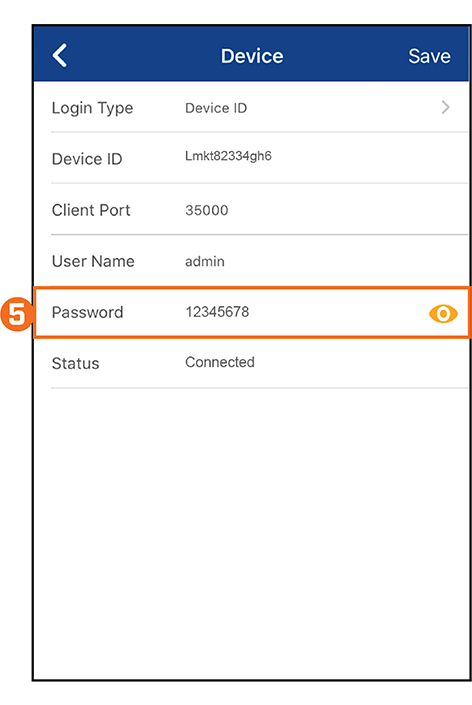
Follow these steps whenever you need access to your device’s password on the Lorex Cirrus app.
ECO Series: Creating a new user
You can create multiple user accounts on the ECO Series DVR in addition to the default administrator account.
The following instructions require you to access your system using your DVR and a monitor.
To create a new user:
- Right-click on the Live View to access the Quick Menu.
- Click the Main Menu icon (
 ).
). - Click System.
- Click the Users tab.
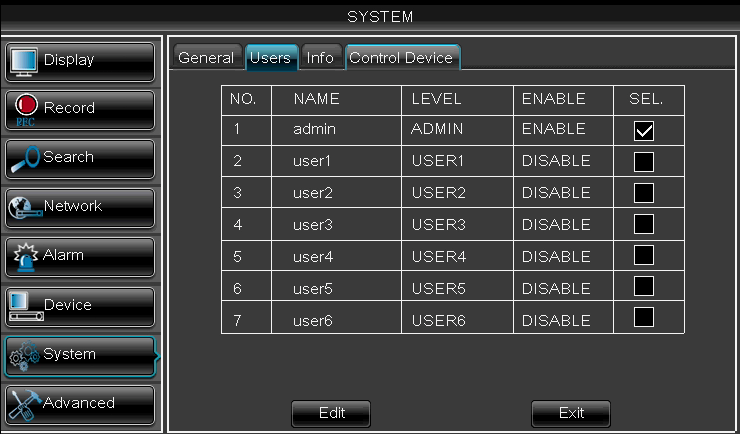
- Select a user to configure a new user account.REMINDER: There are six (6) configurable user accounts beneath the administrator account. Enable an user account to configure a new user.
- Click Edit.
- Configure the following:
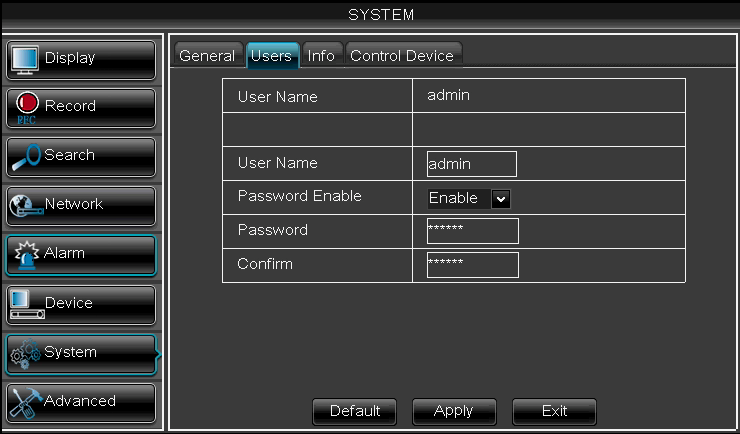
- User Name: Enter a user name of your choice.
- Password Enable: Select Enable.
- Password: Enter a password of your choice.
- Confirm: Re-enter the password.
- Click Apply to create the new user.
ECO Series: Modifying user permissions
You can set permissions for any user on your ECO Series DVR. The administrator account is the only account that can modify user account permissions. By editing user permissions, you can enable or disable access to menus and functions.
The following instructions require you to access your system using your DVR and a monitor.
To edit user permissions:
- Right-click on the Live View to access the Quick Menu.
- Click the Main Menu icon (
 ).
). - Click System.
- Click the Users tab.
- Select the user account you want to configure.
- Click Permission.
- Select the features that the user can access.

- Select the channels that the user can access with the selected features.
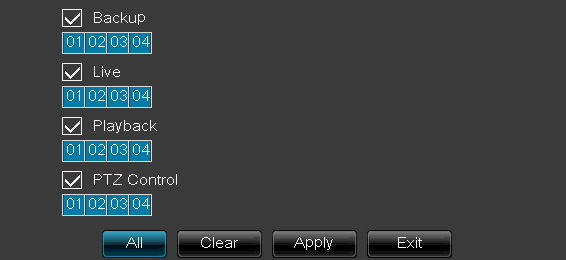
- Click Apply to save the settings, and then click Exit to close the window.
ECO Series: Setting up a mobile password
If your ECO Series DVR has a device ID, your mobile password is the same as your DVR password. Refer to your user manual for your default password.
If you DVR does not have a device ID, you can manually set your password. Depending on your model, you may require a separate password for smartphones and tablets in addition to the DVR password.
The following instructions require you to access your system using your DVR / NVR and a monitor.
To set up the mobile password:
- In your DVR, right-click on the Live View to access the Quick Menu.
- Click the Main Menu icon (
 ).
). - Click Network > Mobile.
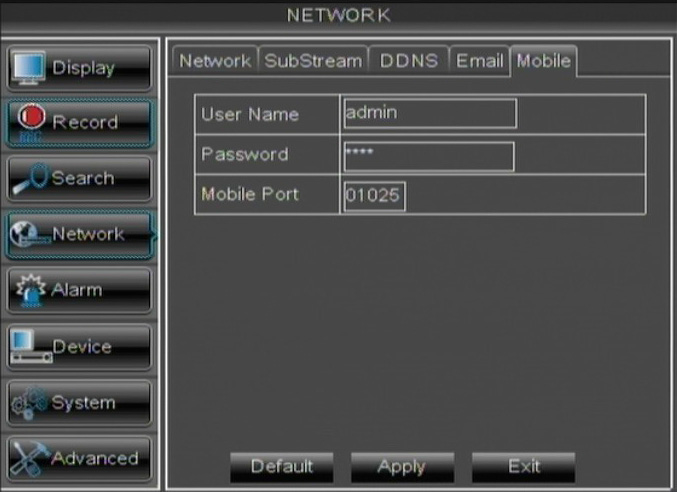
- Enter a User Name and Password of your choice.
- Leave the Server Port at the default (default: 1025) unless you are required to use a different port.
- Click Apply to save the settings, and then click Exit to return to Live View.
LHA / LNK Series: Creating a new user
Your LHA / LNK Series DVR / NVR system supports two account types:
- ADMIN / System Administrator
- The system administrator has full control of the system, and can change both administrator and user passwords, and enable / disable password protection.
- USER / Normal User
- Normal users only have access to live viewing, search, playback, and other functions. You may set up multiple user accounts with varying levels of access to the system.
The following instructions require you to access your system using your DVR / NVR and a monitor.
To create a new user account:
- In the taskbar, click the Main Menu icon (
 ), and then click System > Users.
 - In the Users tab, click one of the user accounts that is currently disabled.
- Click Edit.
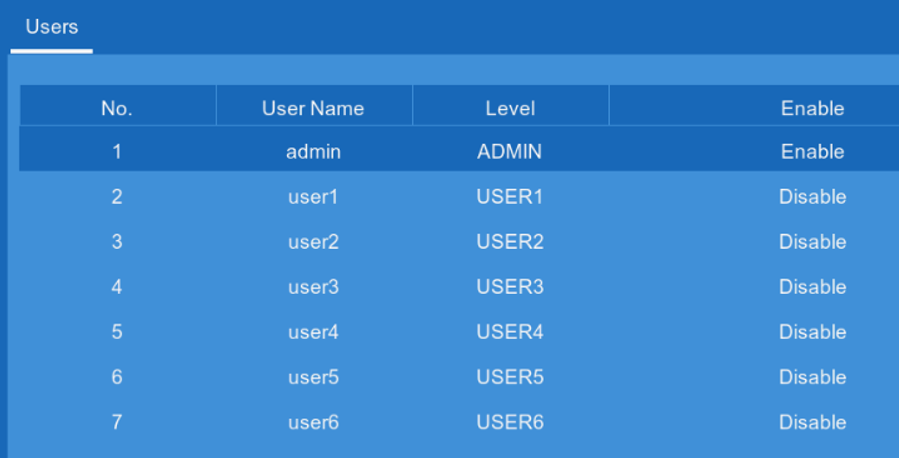
- In the User Enable drop-down, select Enable.
- Enter the account User Name.
- Enter the account Password.
- Reenter the password to Confirm.
- Click Save to enable the user account.
- Click OK.
Multiple normal user accounts can be created, but there can only one system administrator account.
LHA / LNK Series: Resetting Your Device’s Password
For a password reset on your device, contact Technical Support. For security purposes, passwords cannot be reset using the online support system.
Before contacting technical support, you will need to provide the following information:
- Your Device ID
- Your Device Model Number
- The Date on the system
NOTE: If you have previously disabled the date, some systems will display the date after a few password attempts.
To access your device information refer to the article LHA / LNK Series: Accessing system information.
To modify your password:
 Call Technical Support for the reset password.
NOTE: The reset password is valid for 24 hours.
 Login to your system using the reset password.
 In the Main Menu, press Users under the System tab.
 Go to the user admin name that you want to modify the password for.
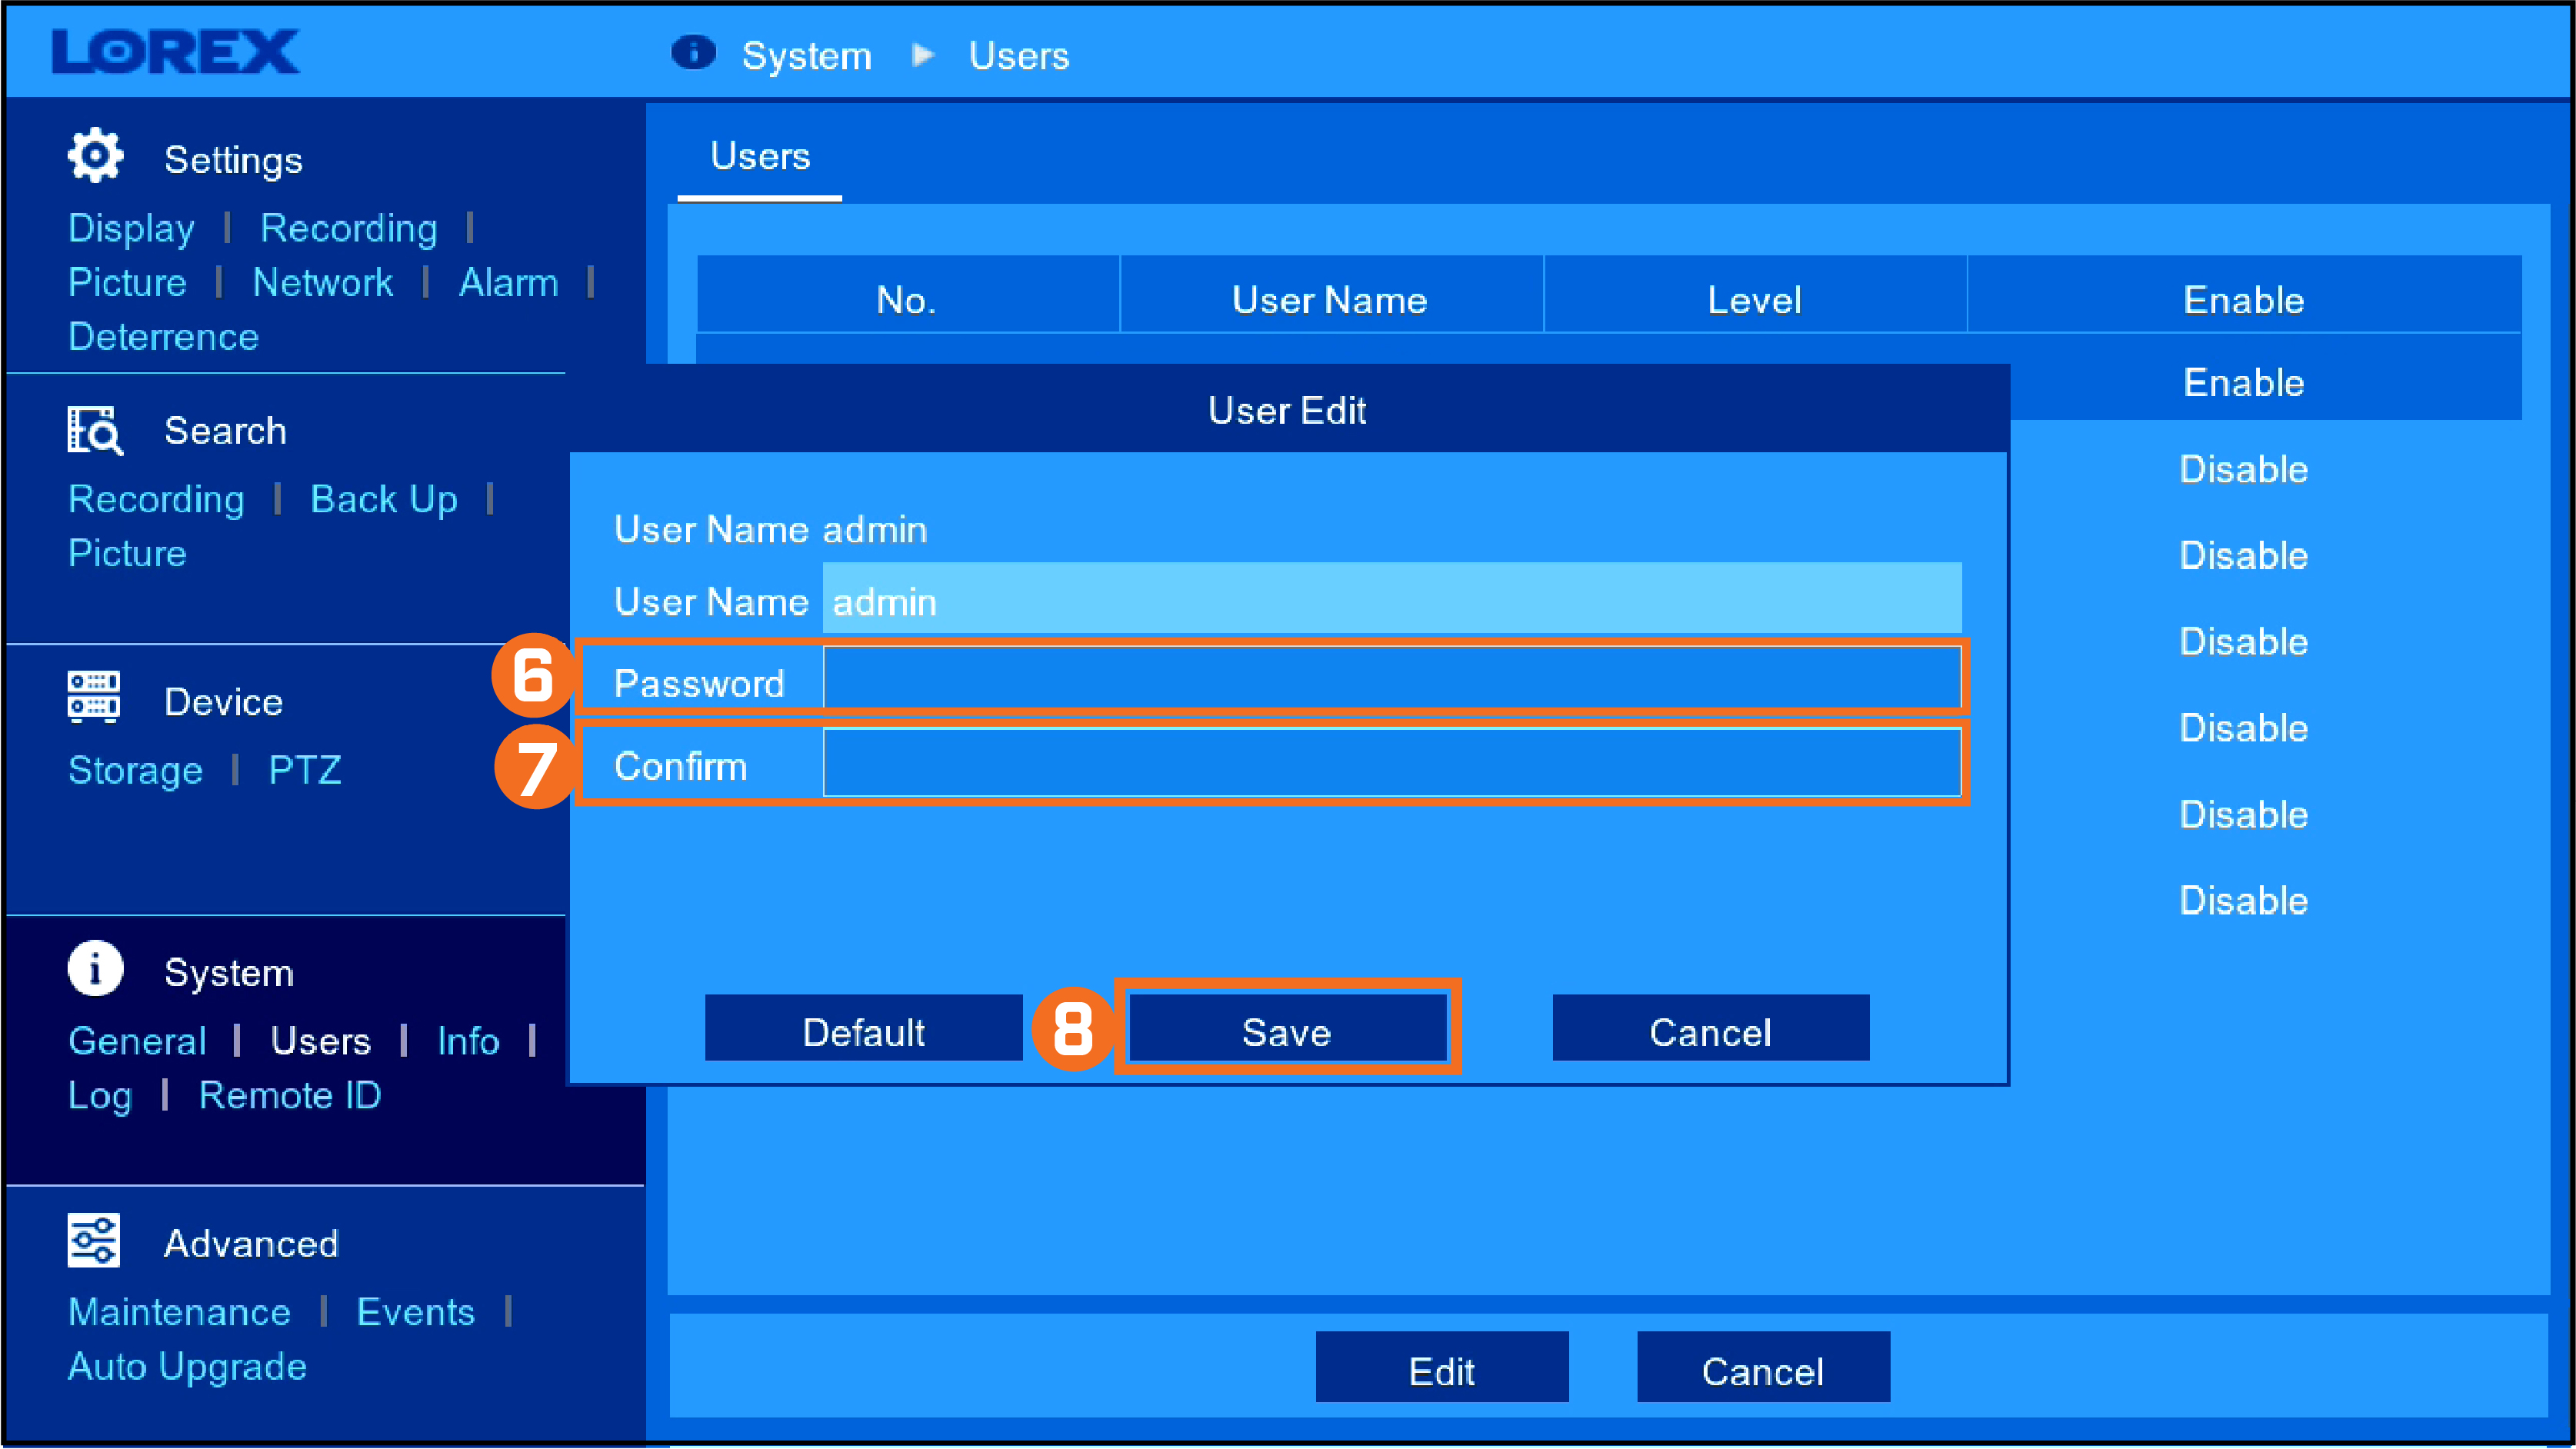
 Press Edit to pop up the User Edit window.
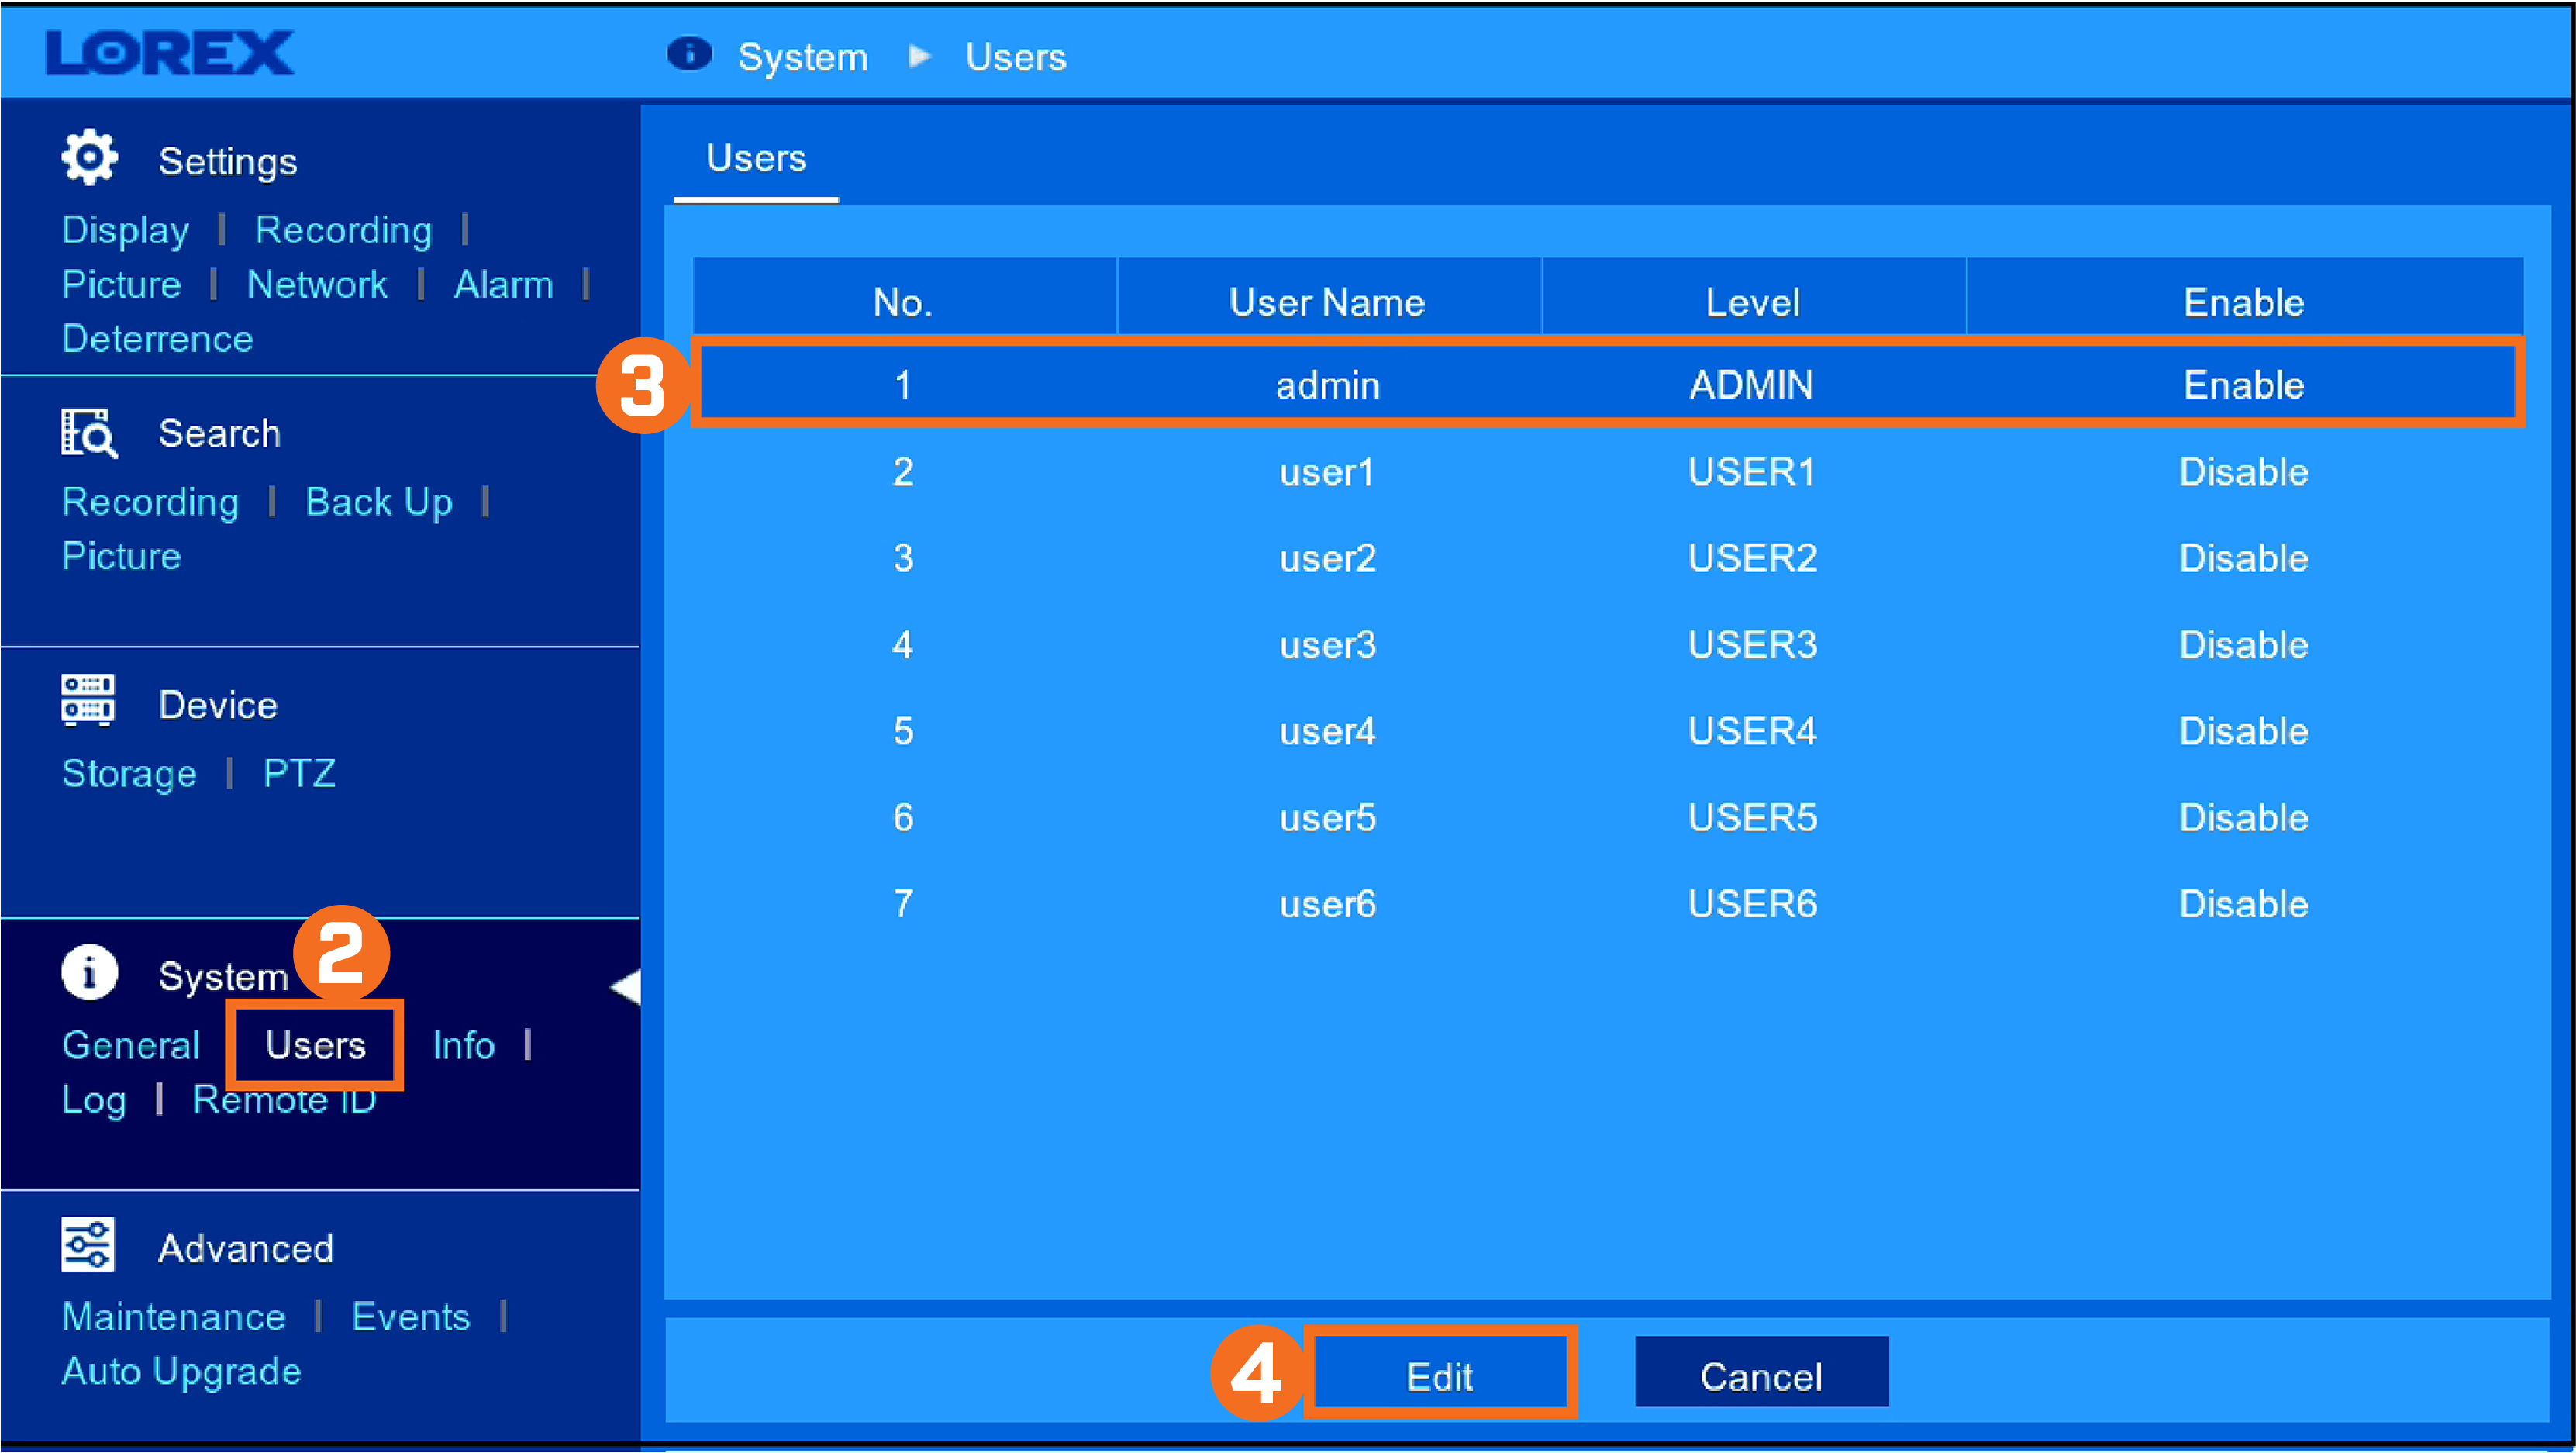
 Enter your new system password.
 Re-enter your new system password.
 Press Save.
This password will be used to connect to your system from now on.
Record your password and store it in a secure place.
LHV / LNR Series: Password requirements
Your LHV / LNR Series DVR / NVR password can be a combination of both letters and numbers, and can be only six characters in length.
IMPORTANT: If your password is longer or shorter than six characters, errors could occur when remotely accessing your DVR / NVR.
LHV / LNR Series: Resetting Your Device’s Password
For a password reset on your device, contact Technical Support. For security purposes, passwords cannot be reset using the online support system.
Before contacting technical support, you will need to provide the following information:
- Your device ID
- Your device model number
- The date on the system
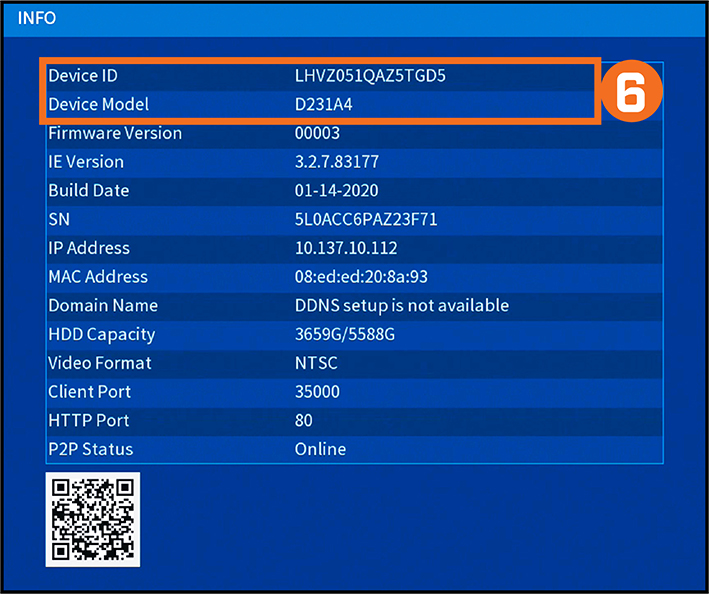
The Info window for your DVR / NVR system displays system information such as the IP address, MAC address, device ID, device model, and firmware version. You can access this screen through your PC / Mac client software or DVR / NVR menu.
To access your device information:
- Turn on your Lorex system.
- Note the date on the top right of your screen.
NOTE: If you have previously disabled the date, some systems will display it after a few password attempts.
- Press the Enter button or Info button located on your device.
If you cannot find these buttons, then proceed with the following steps:
- Click left to reveal the quick menu.
- Go to Info.

- Note the Device ID and the Device Model Number.
To modify your password:
- Call Technical Support for the reset password.
NOTE: The reset password is valid for 24 hours.
- Login to your system using the reset password.
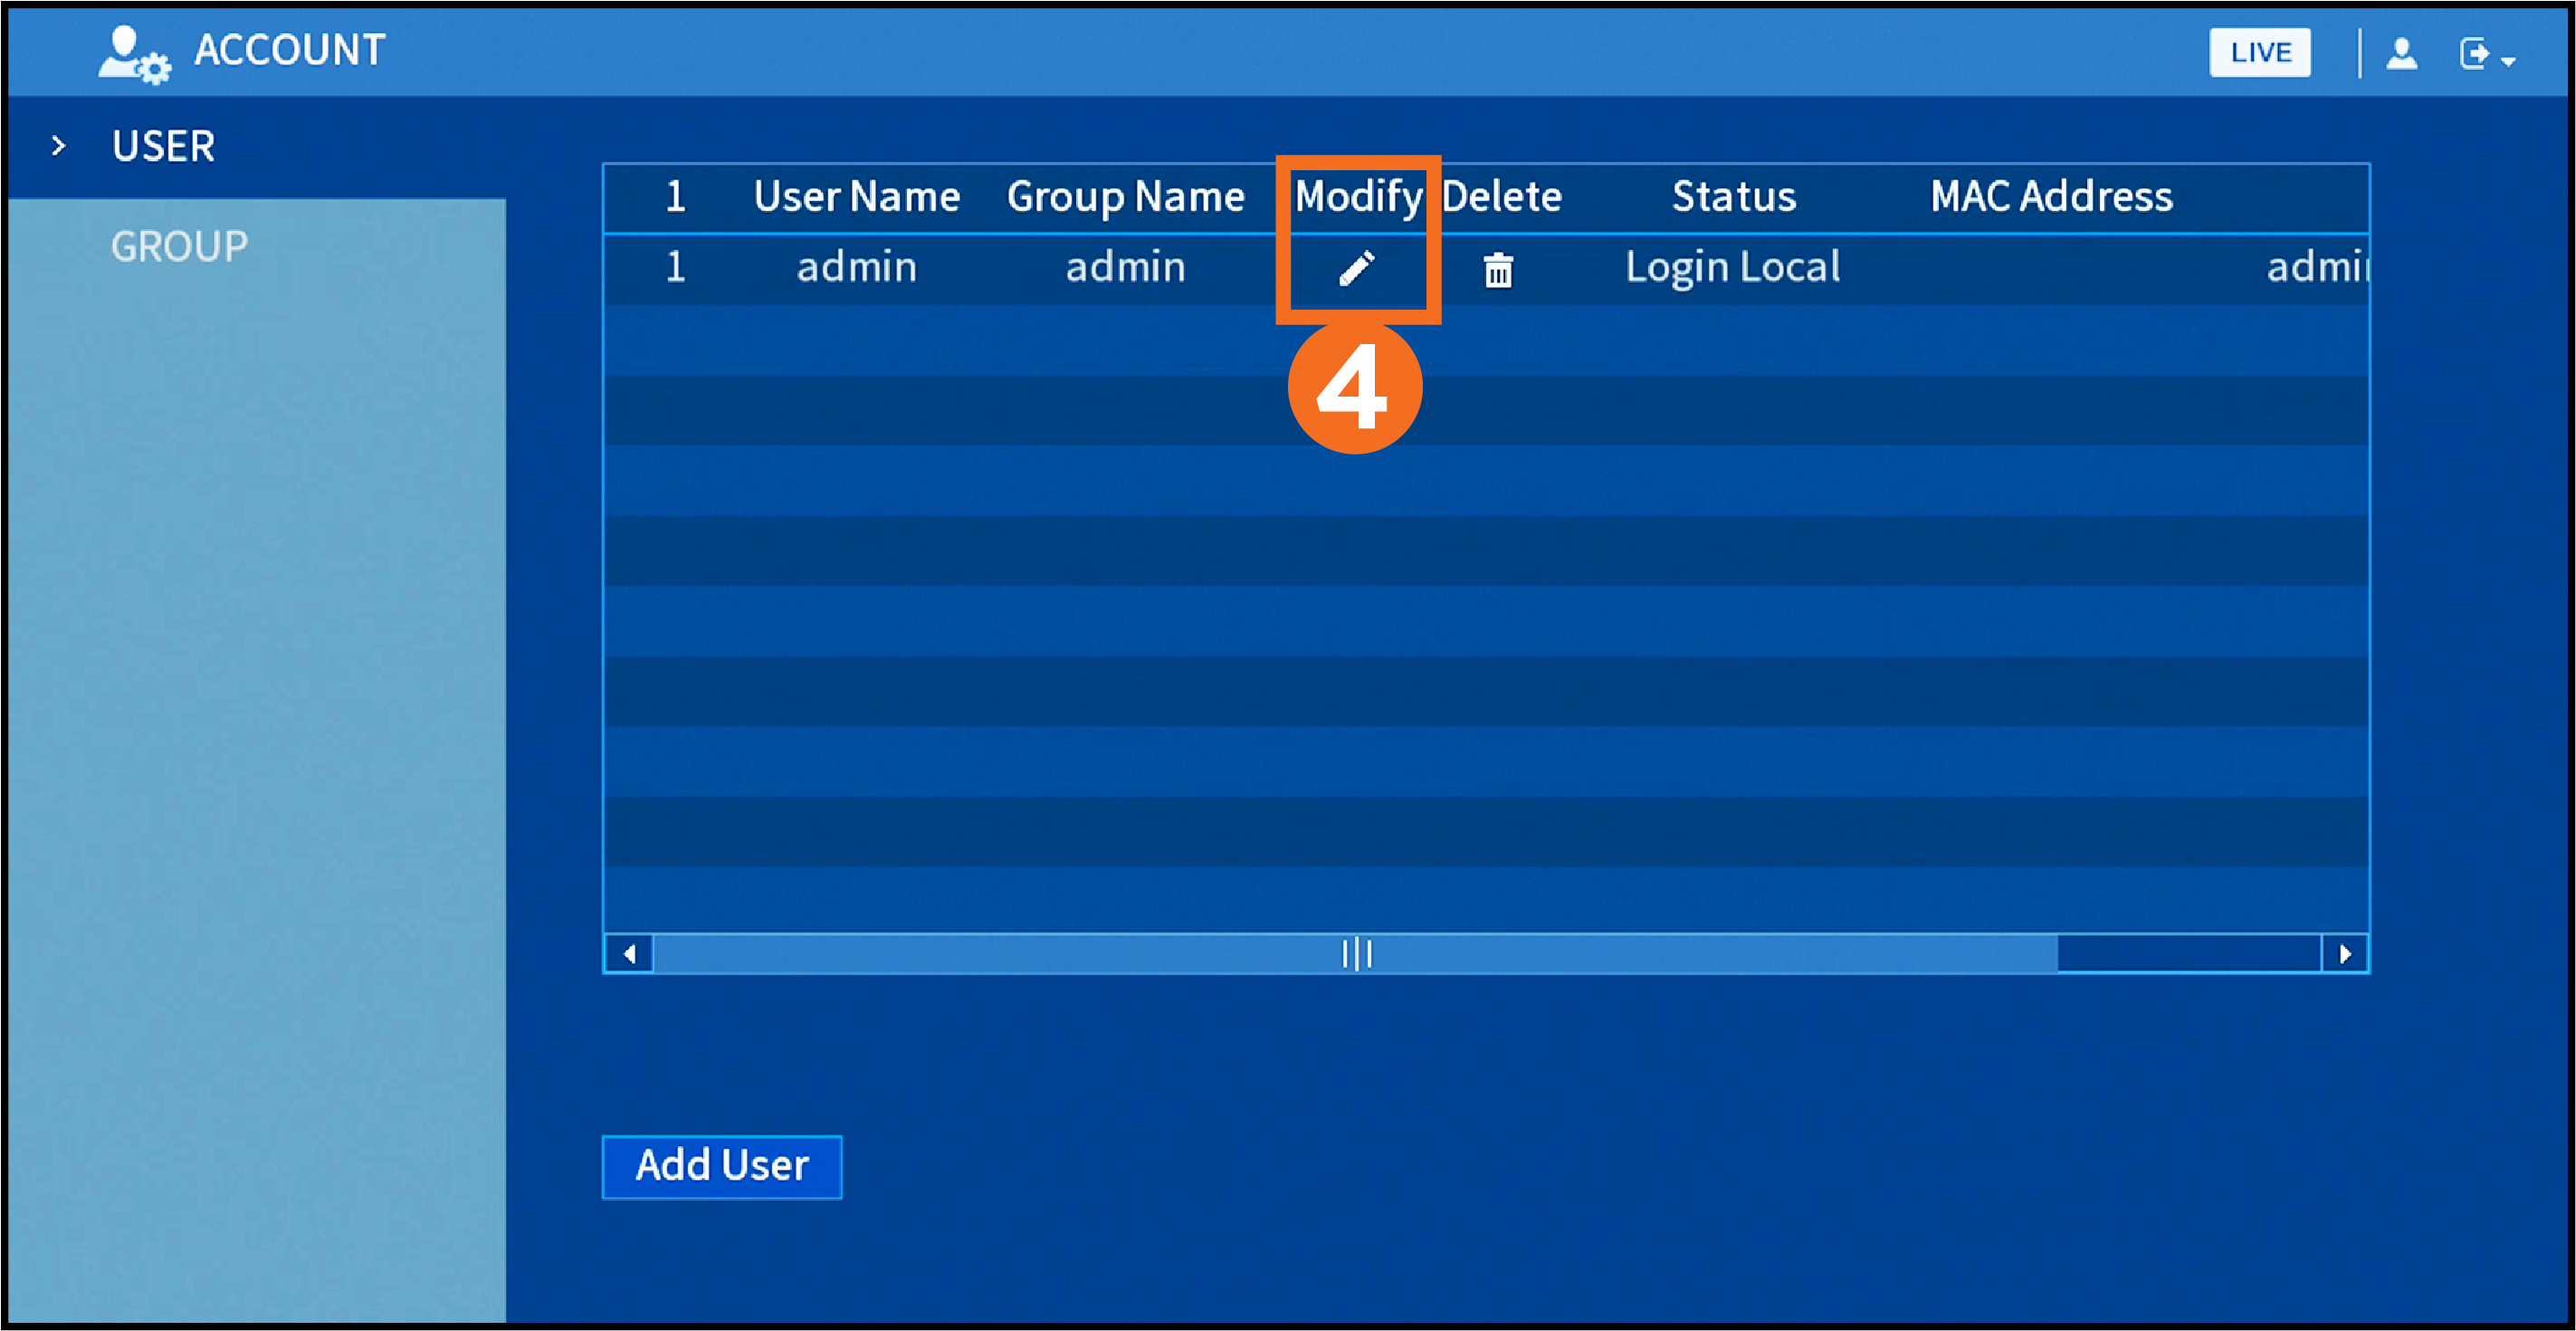
- In the Main Menu, press Account.
- Press the Modify icon.
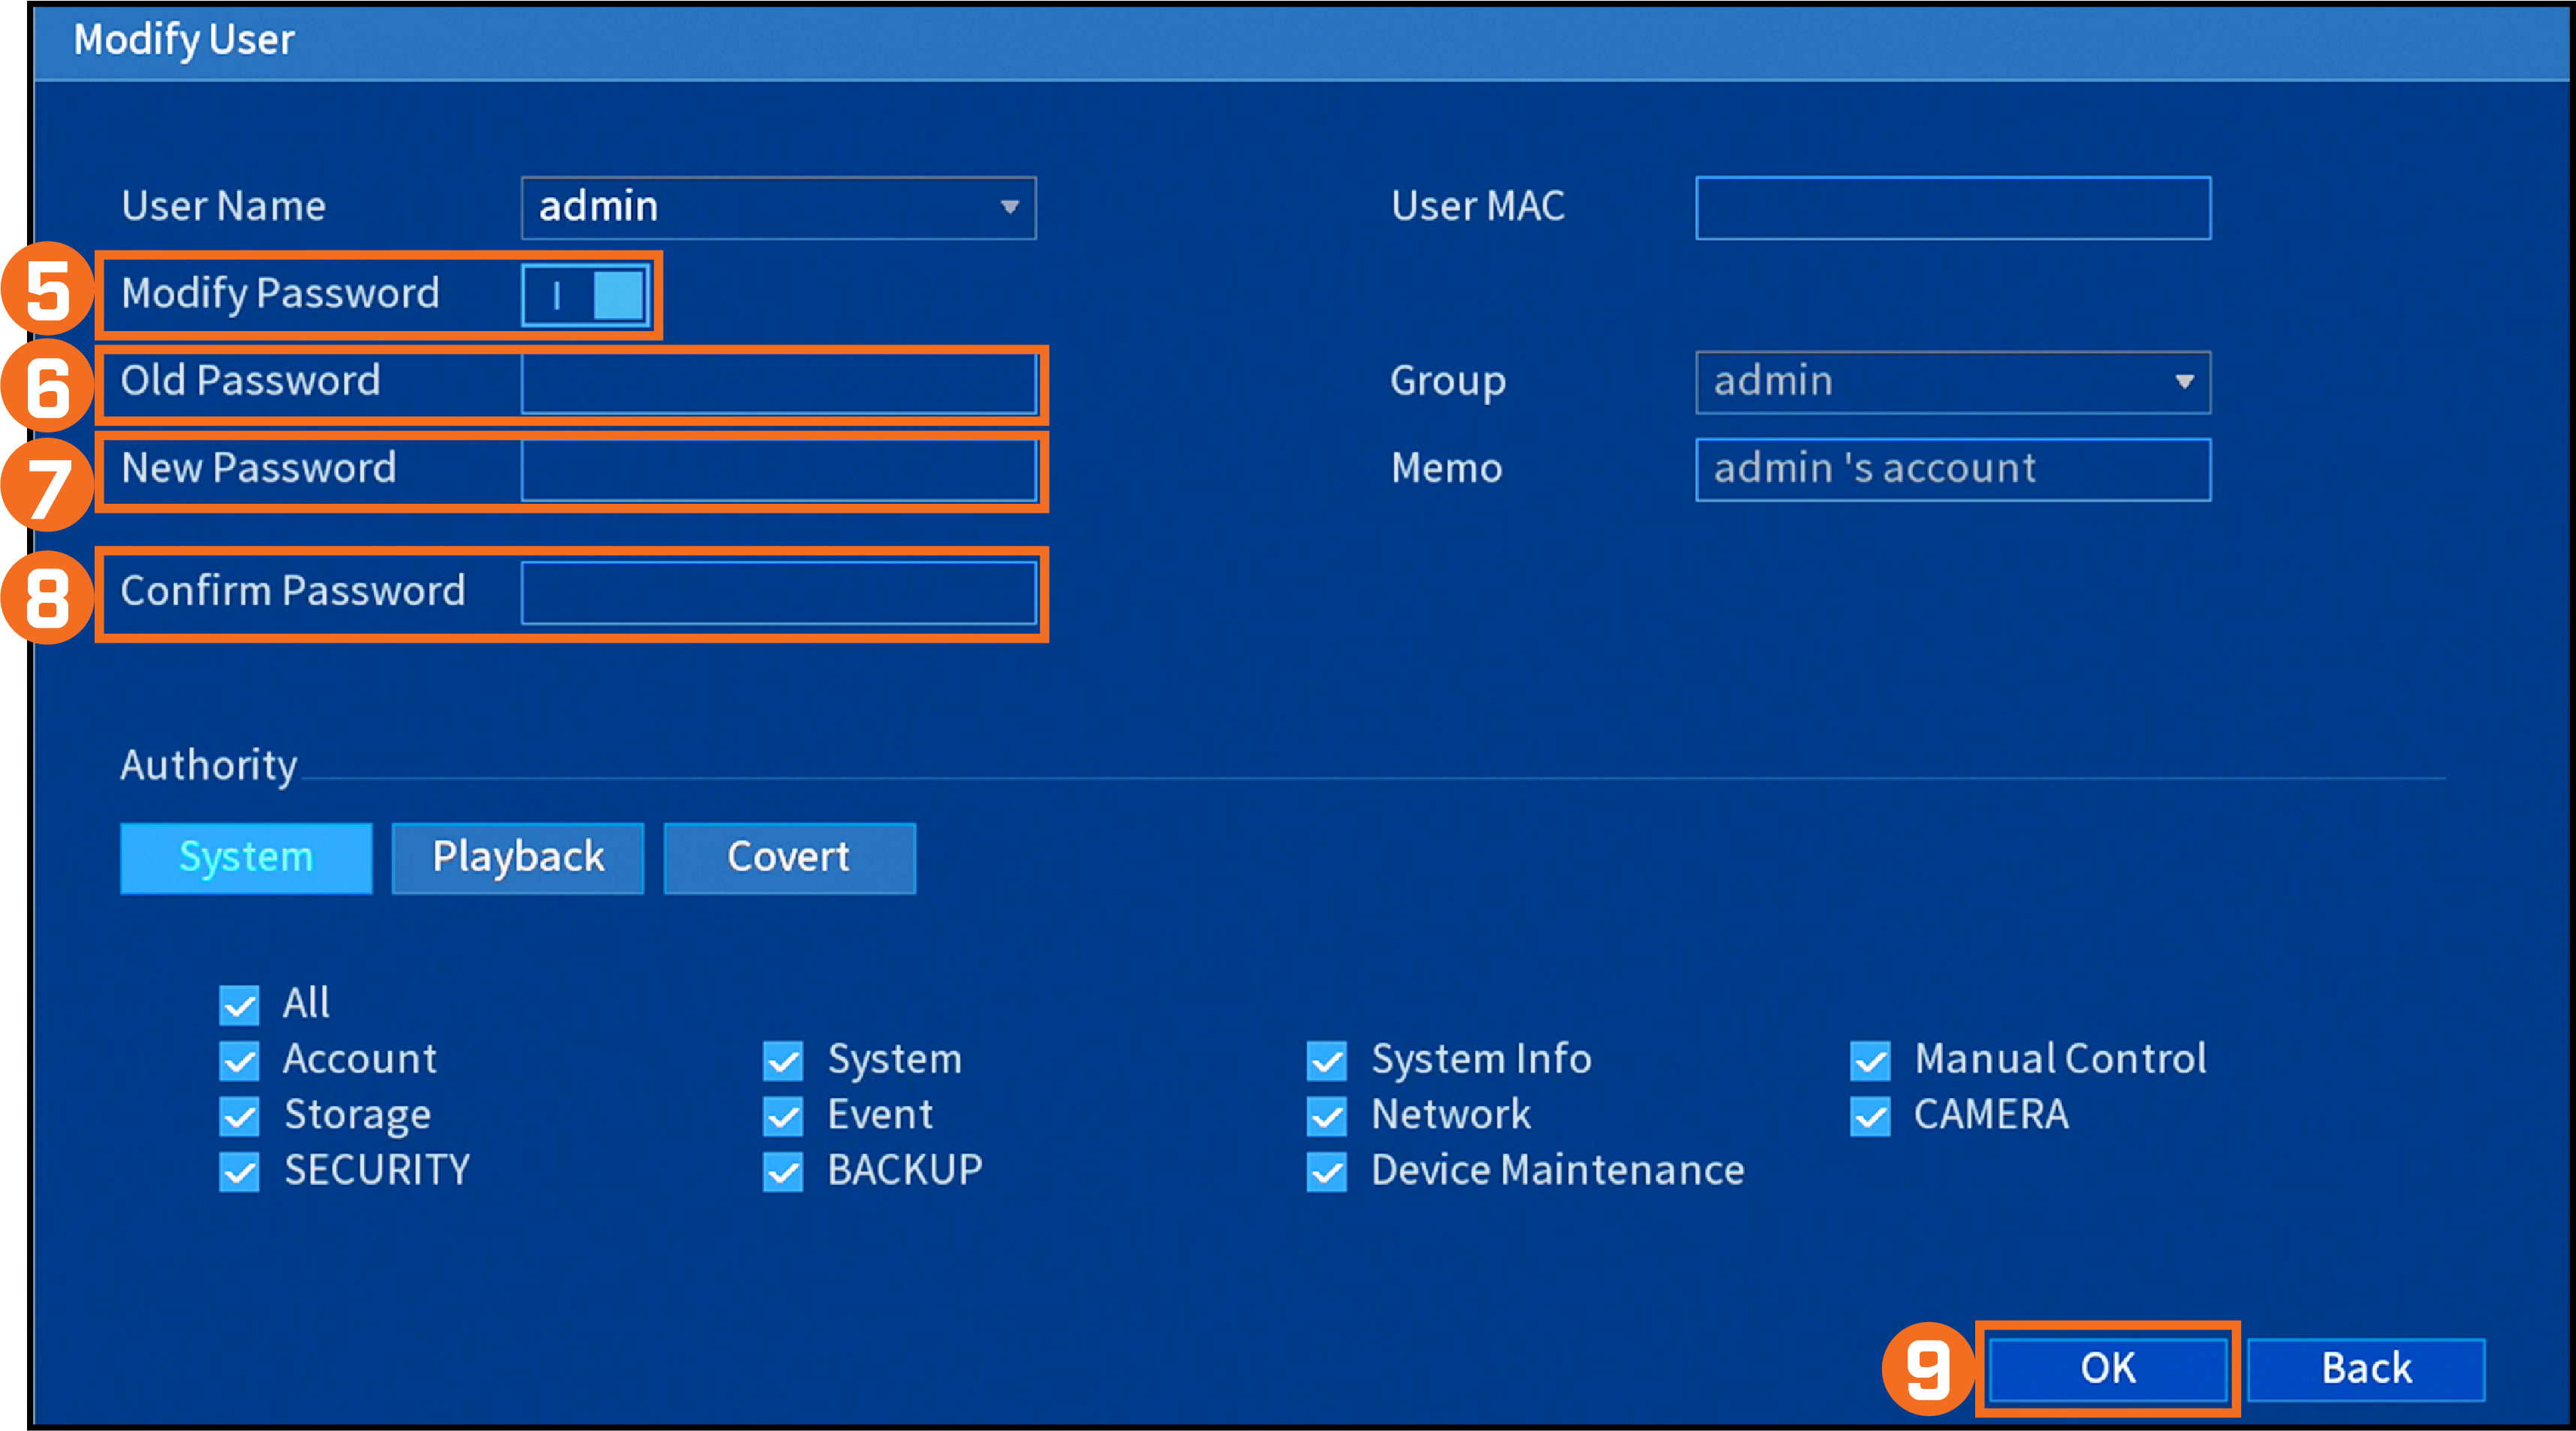
- In the Modify User settings, turn on Modify Password.
- In the Old Password field, enter the reset password.
- Enter your new account password.
- Re-enter your new account password.
- Press OK.
This password will be used to connect to your system from now on.
Record your password and store it in a secure place.
LNC Cameras / L-View Client Software: Resetting the passwords
A password reset can be performed for the L-View Client software or LNC Series cameras.
LIMITATION: Technical support does not have access to passwords for software.
To reset the password for the L-View Client software:
- Uninstall the L-View Client software from your PC or Mac.
- Download and reinstall the L-View Client software. Click here for for more information on locating software downloads.
To reset the LNC camera password, restore the camera to default settings.
IMPORTANT: Restoring default settings will erase any configurations or WiFi network connection on the camera.
To reset the password on the LNC camera:
- With the camera on, hold the reset button on the camera for at least 10 seconds using a pin or small object.TIP: Location of the reset button can vary depending on the camera model. Refer to your user manual for the location of the reset button. Click here for downloads and documentation for your product.
- Once the camera is restored to default settings, launch the L-View Client software on your PC or Mac.
- If prompted, install firmware updates. The camera will restart.REMINDER: If you are not prompted to install firmware updates, manually update firmware using the L-View Client software.
- Once the camera restarts, connect the camera to WiFi using your computer. Click here for instructions on connecting the camera to WiFi using a PC or Mac.
Locking Your Lorex Cloud App
If you would like to put a lock on your Lorex Cloud app, follow these steps to secure your app.
NOTE: The following instructions are shown using an iOS (Apple) smartphone. There may be some differences in the user interface when using an Android smartphone or tablet.
To turn on the User Code:
 Launch the Lorex Cloud app on your smartphone or tablet.
 Tap the settings button
 ![]() on the top left corner.
on the top left corner.
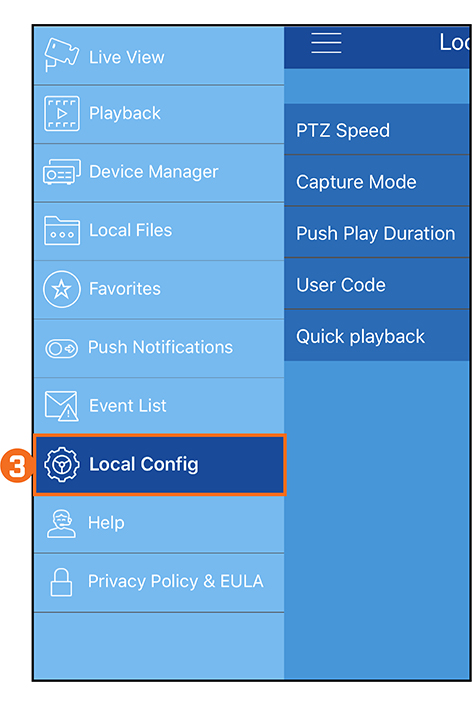
 Go to the Local Config tab.
 Tap User Code.
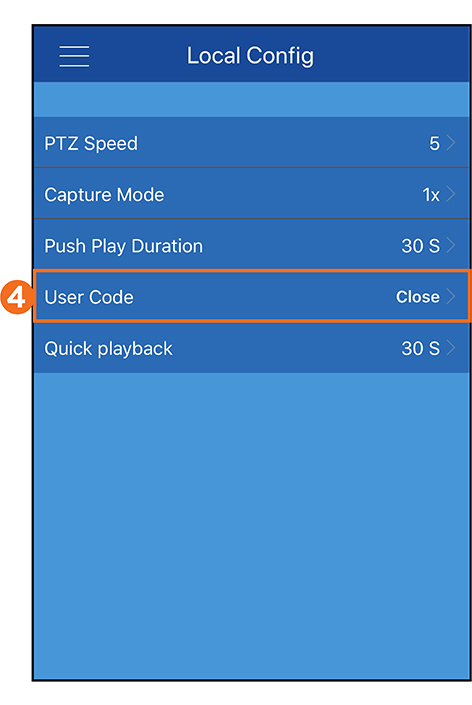
 Turn on User Code.
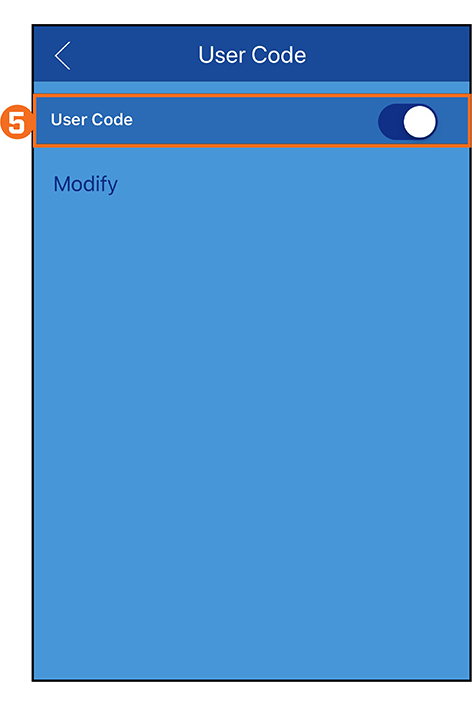
 Enter a 4-digit code.
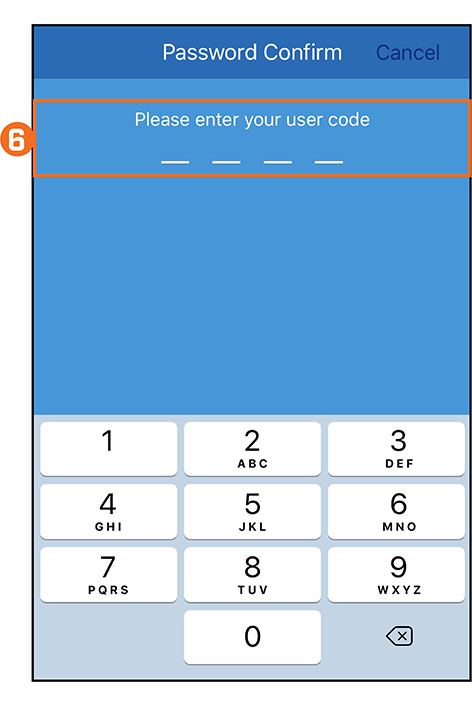
 Re-enter the 4-digit code to confirm.
Your User Code is now activated to access the Lorex Cloud app.
To turn off the User Code:
Follow the steps above from 1-4.
- Tap off User Code.
- Enter your 4-digit code to confirm.
If you forget the user code to your Lorex Cloud app, you will need to delete and then re-install the app.
Resetting Passwords on IP Cameras
If you forgot your IP camera’s password, try the current or previous NVR’s password on the camera. If this does not work, follow these steps to reset the password and regain access.
To change the password on an IP camera:
- Access the Info screen on the NVR and check for the local IP address.
- Open your IE web browser and input the IP address in the address bar, input the username and password of your NVR, then click Login to view your device.
- Drop down the Camera setting located on the left taskbar to access Remote Device settings.
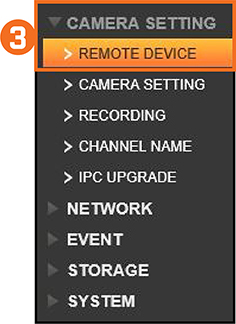
- All of the IP camera’s will be listed underneath the Added Device tab. Click on the WEB browse internet icon for the IP camera that you are trying to access.

- Enter a fake password when the login screen appears.
- The failed login attempt will reveal the IP camera’s serial number (S/N) and the date.
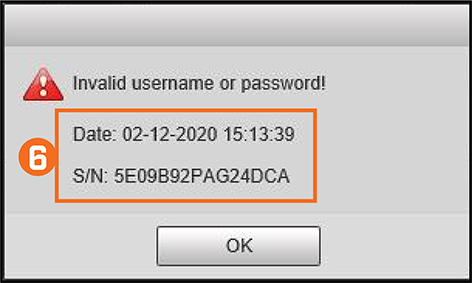
- Call Technical Support and provide the IP camera’s serial number and the date to receive a reset password.
- After logging in with the reset password, drop down the System setting on the taskbar to access the Default settings.
- Click on Default to reset your IP camera to factory settings.
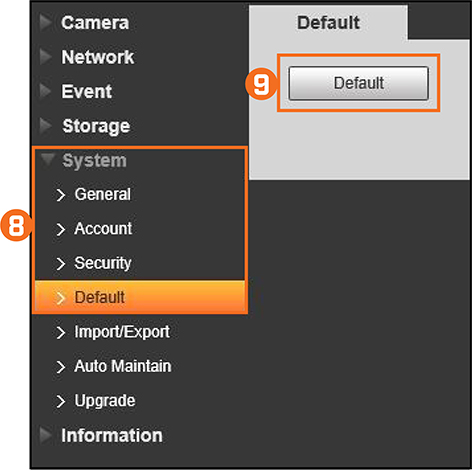
The default username and password will both be: admin.
If the camera is plugged into an external POE switch:
- Access the Info screen on the NVR to check for the local IP address and MAC address.
- Open your IE web browser and input the IP address to access the web interface.
- Enter a fake password in the login screen.
- The failed login attempt will reveal the IP camera’s serial number (S/N) and the date.
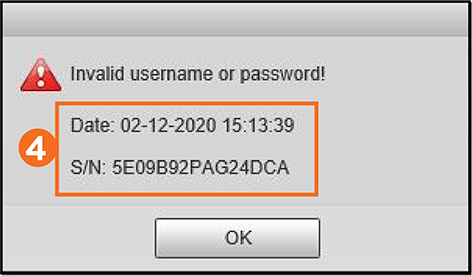
- Call Technical Support and provide the IP camera’s serial number, the date, and the MAC address to receive a reset password.
- After logging in with the reset password, drop down the System setting on the taskbar to access Default settings.
- Click on Default to reset your IP camera to factory settings.
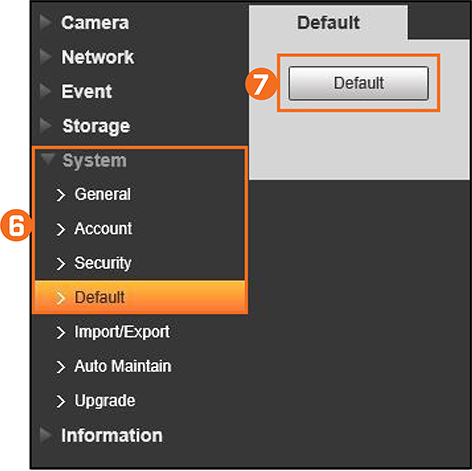
The default username and password will both be: admin.
Resetting Your Lorex Account Password
If you can not remember your Lorex password or are having trouble accessing your account, you can follow these steps to reset your password.
Reset Your Password Online
- From lorextechnology.com navigate to the Login page.
- Below the Login form, press Forgot your password.

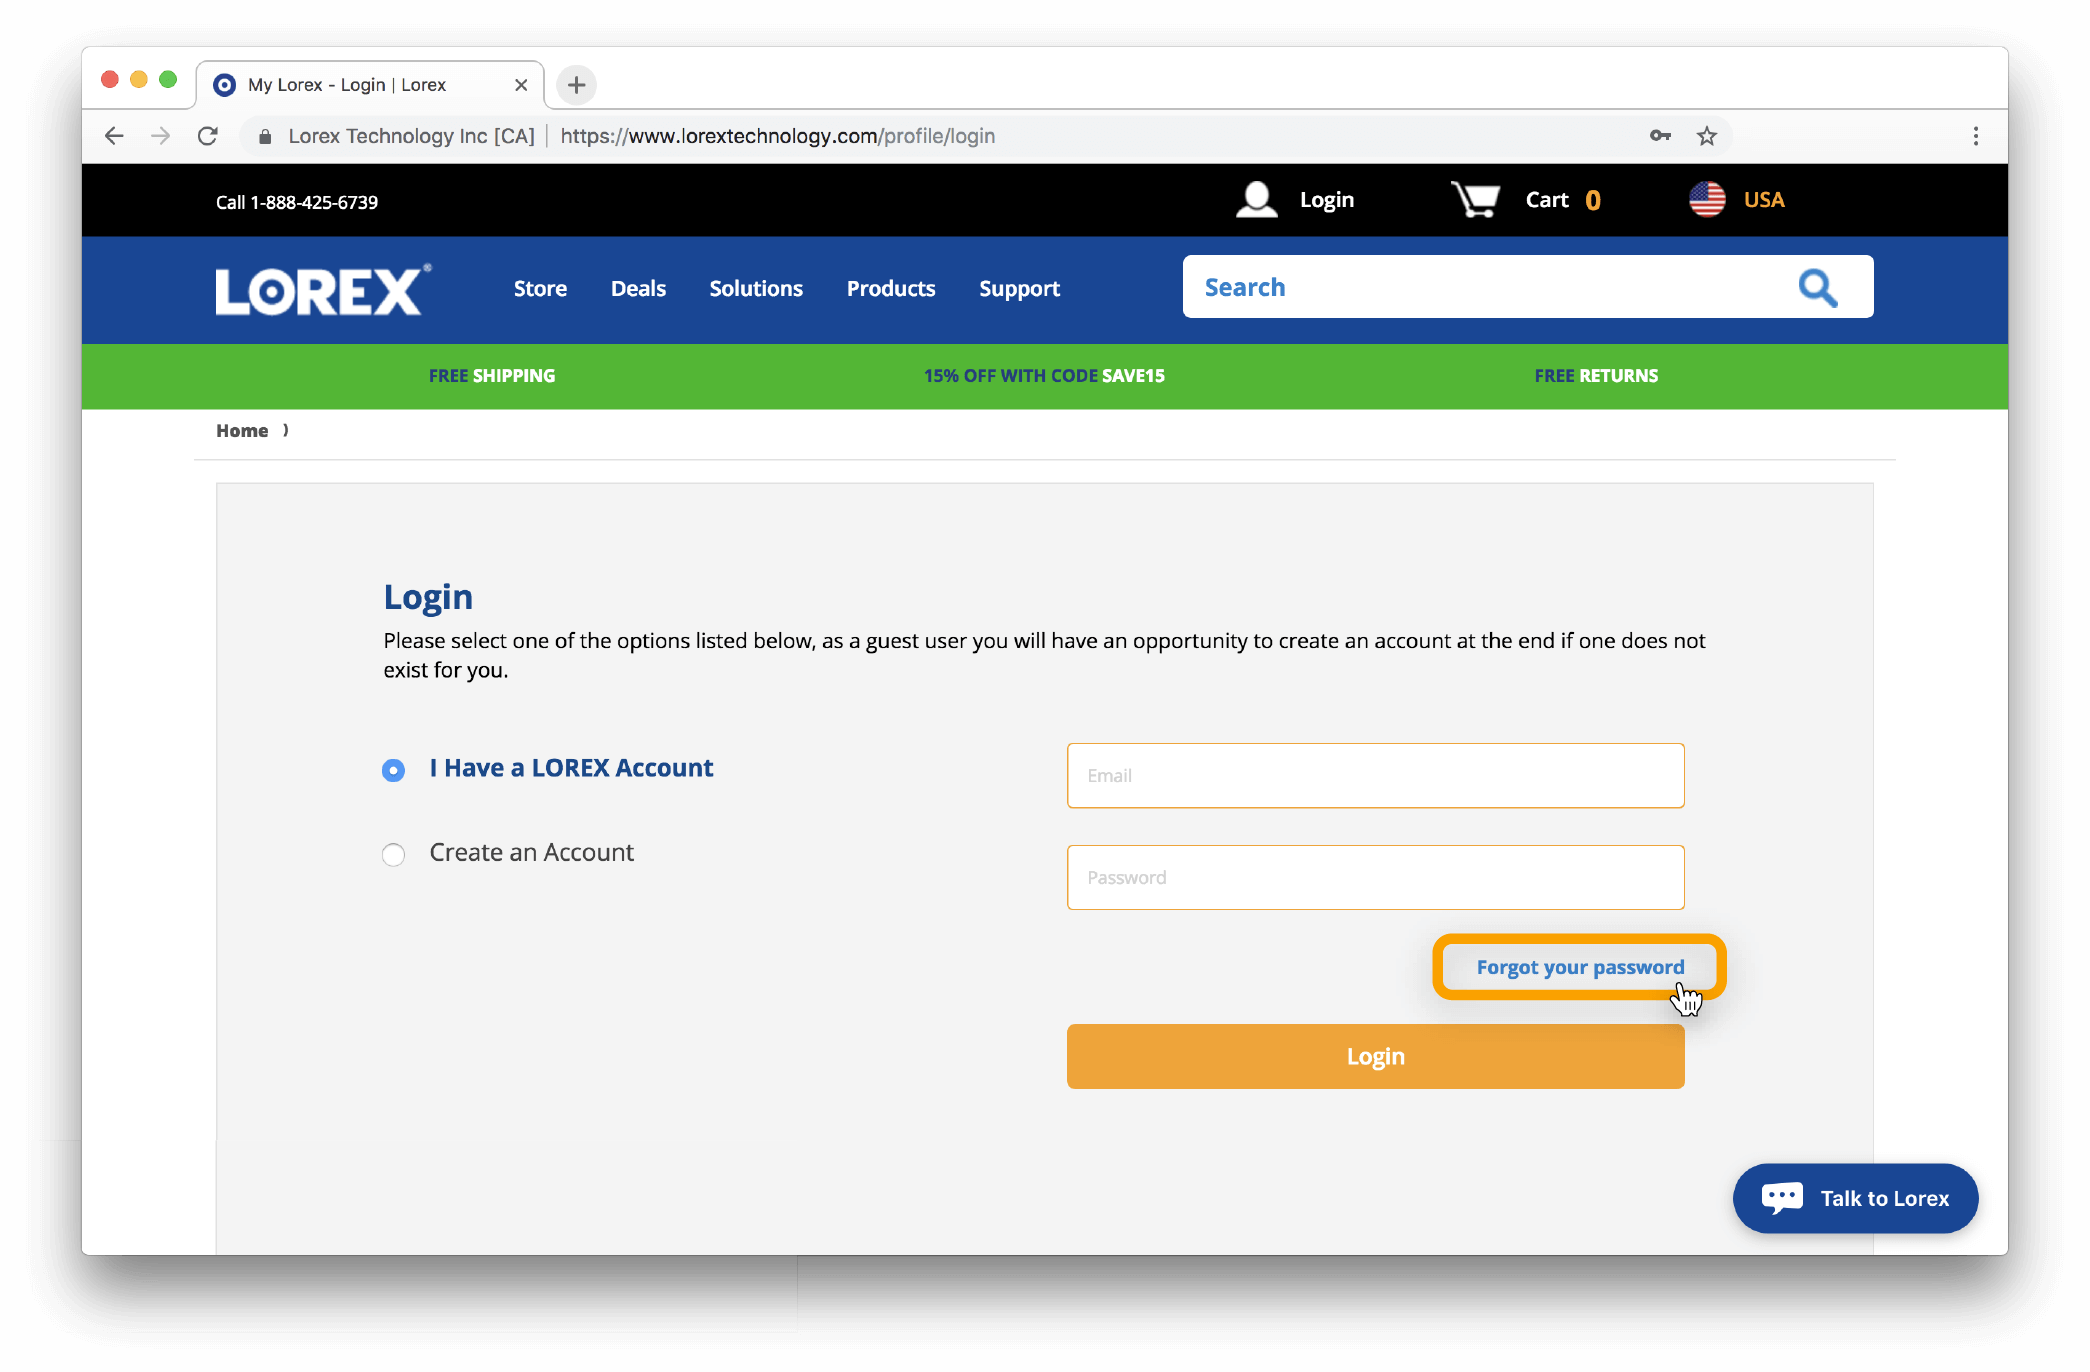
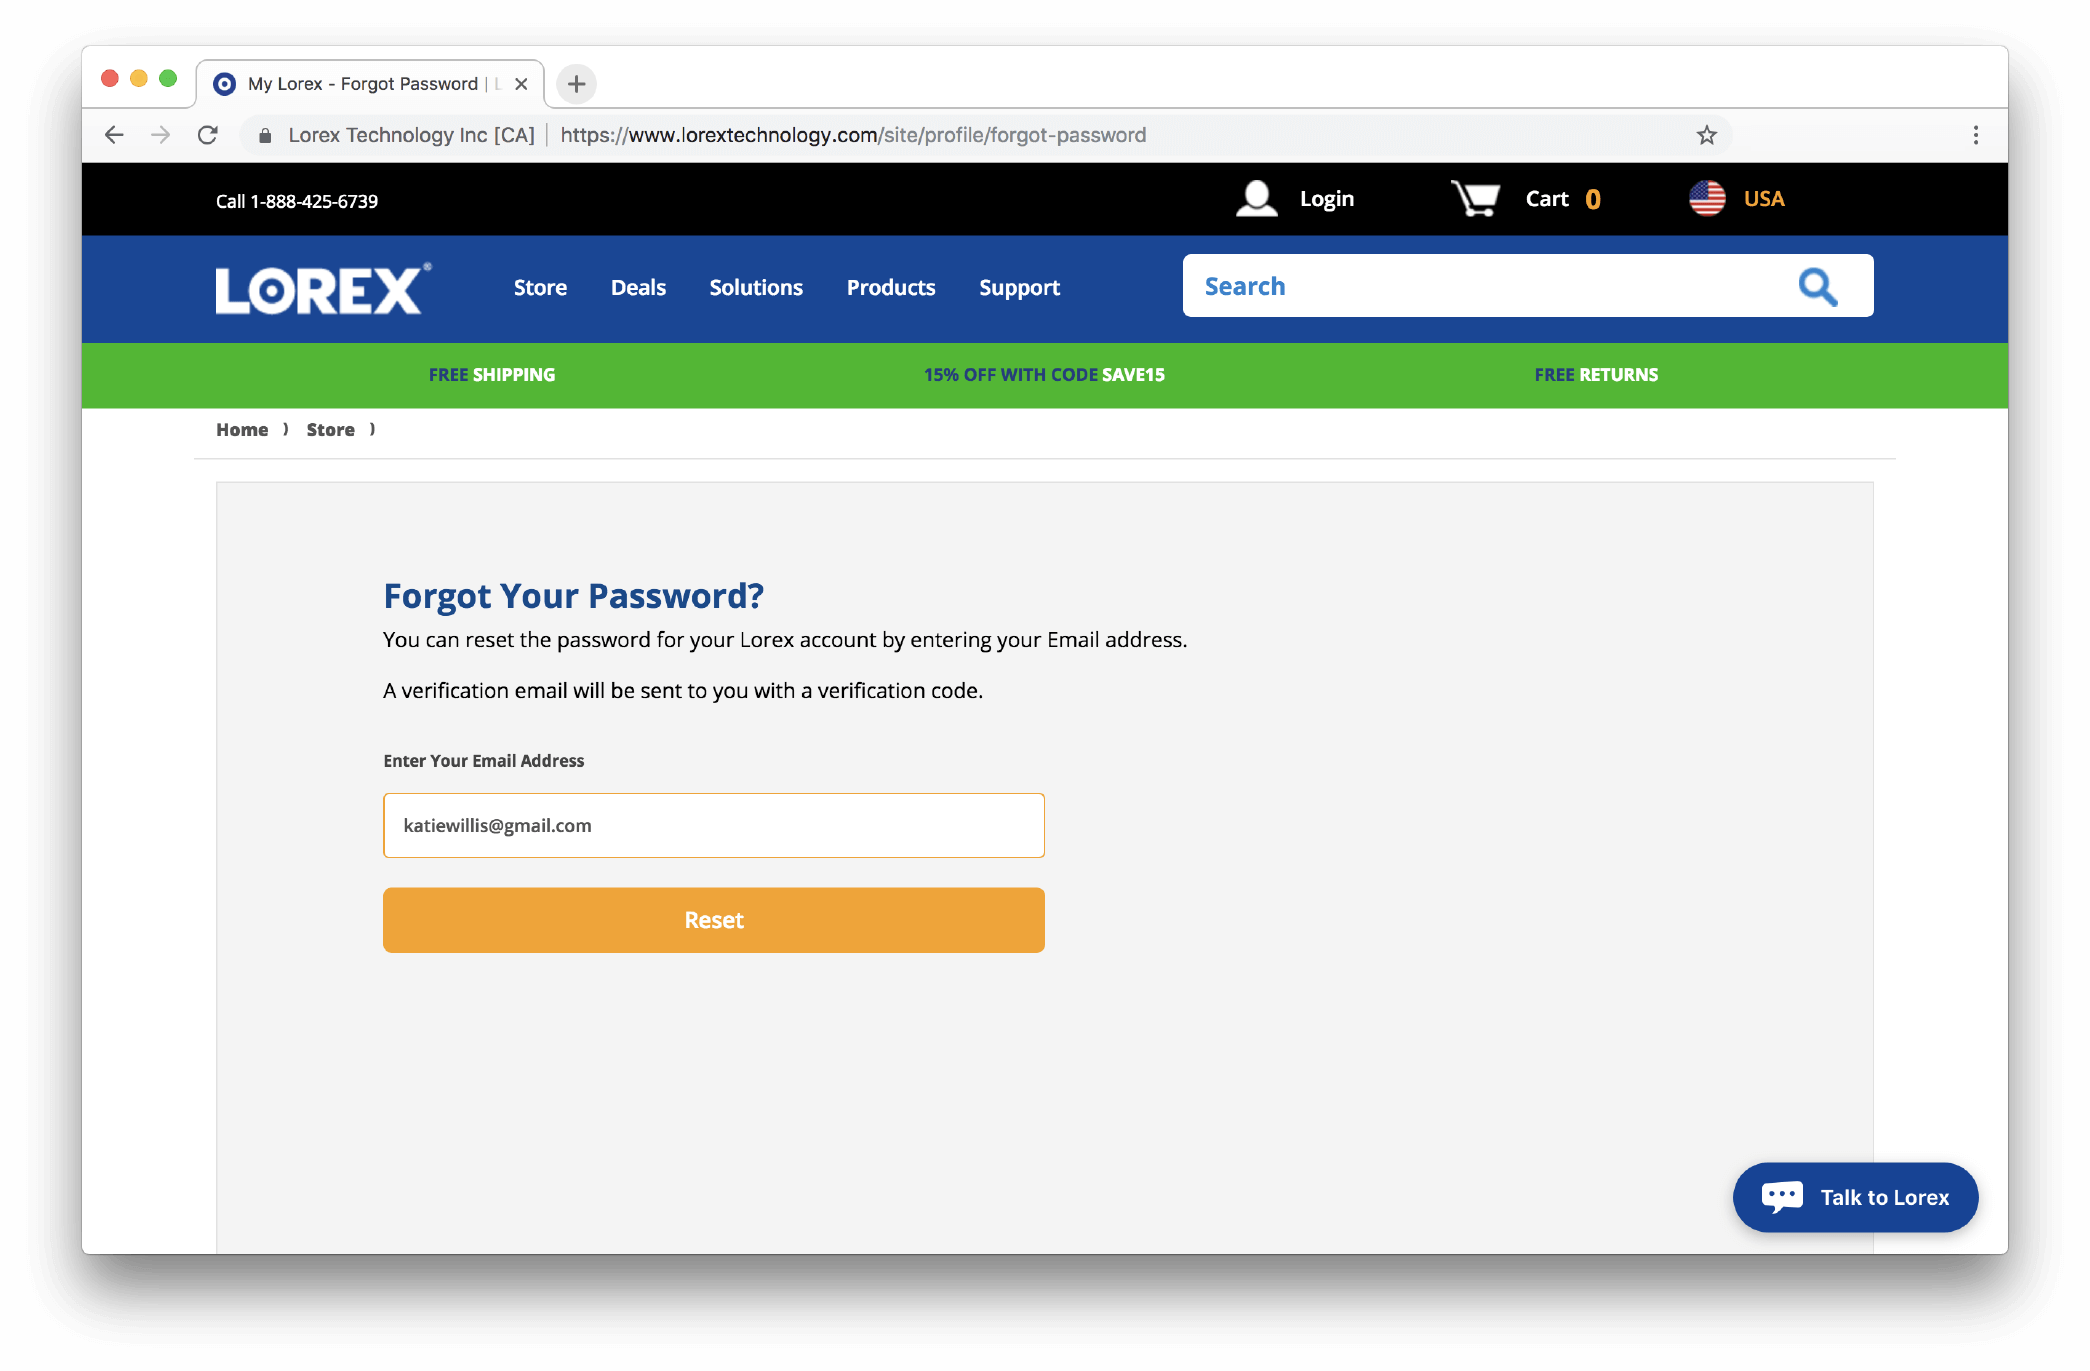
- Enter the email address associated with your Lorex Account to receive password reset instructions to your inbox.
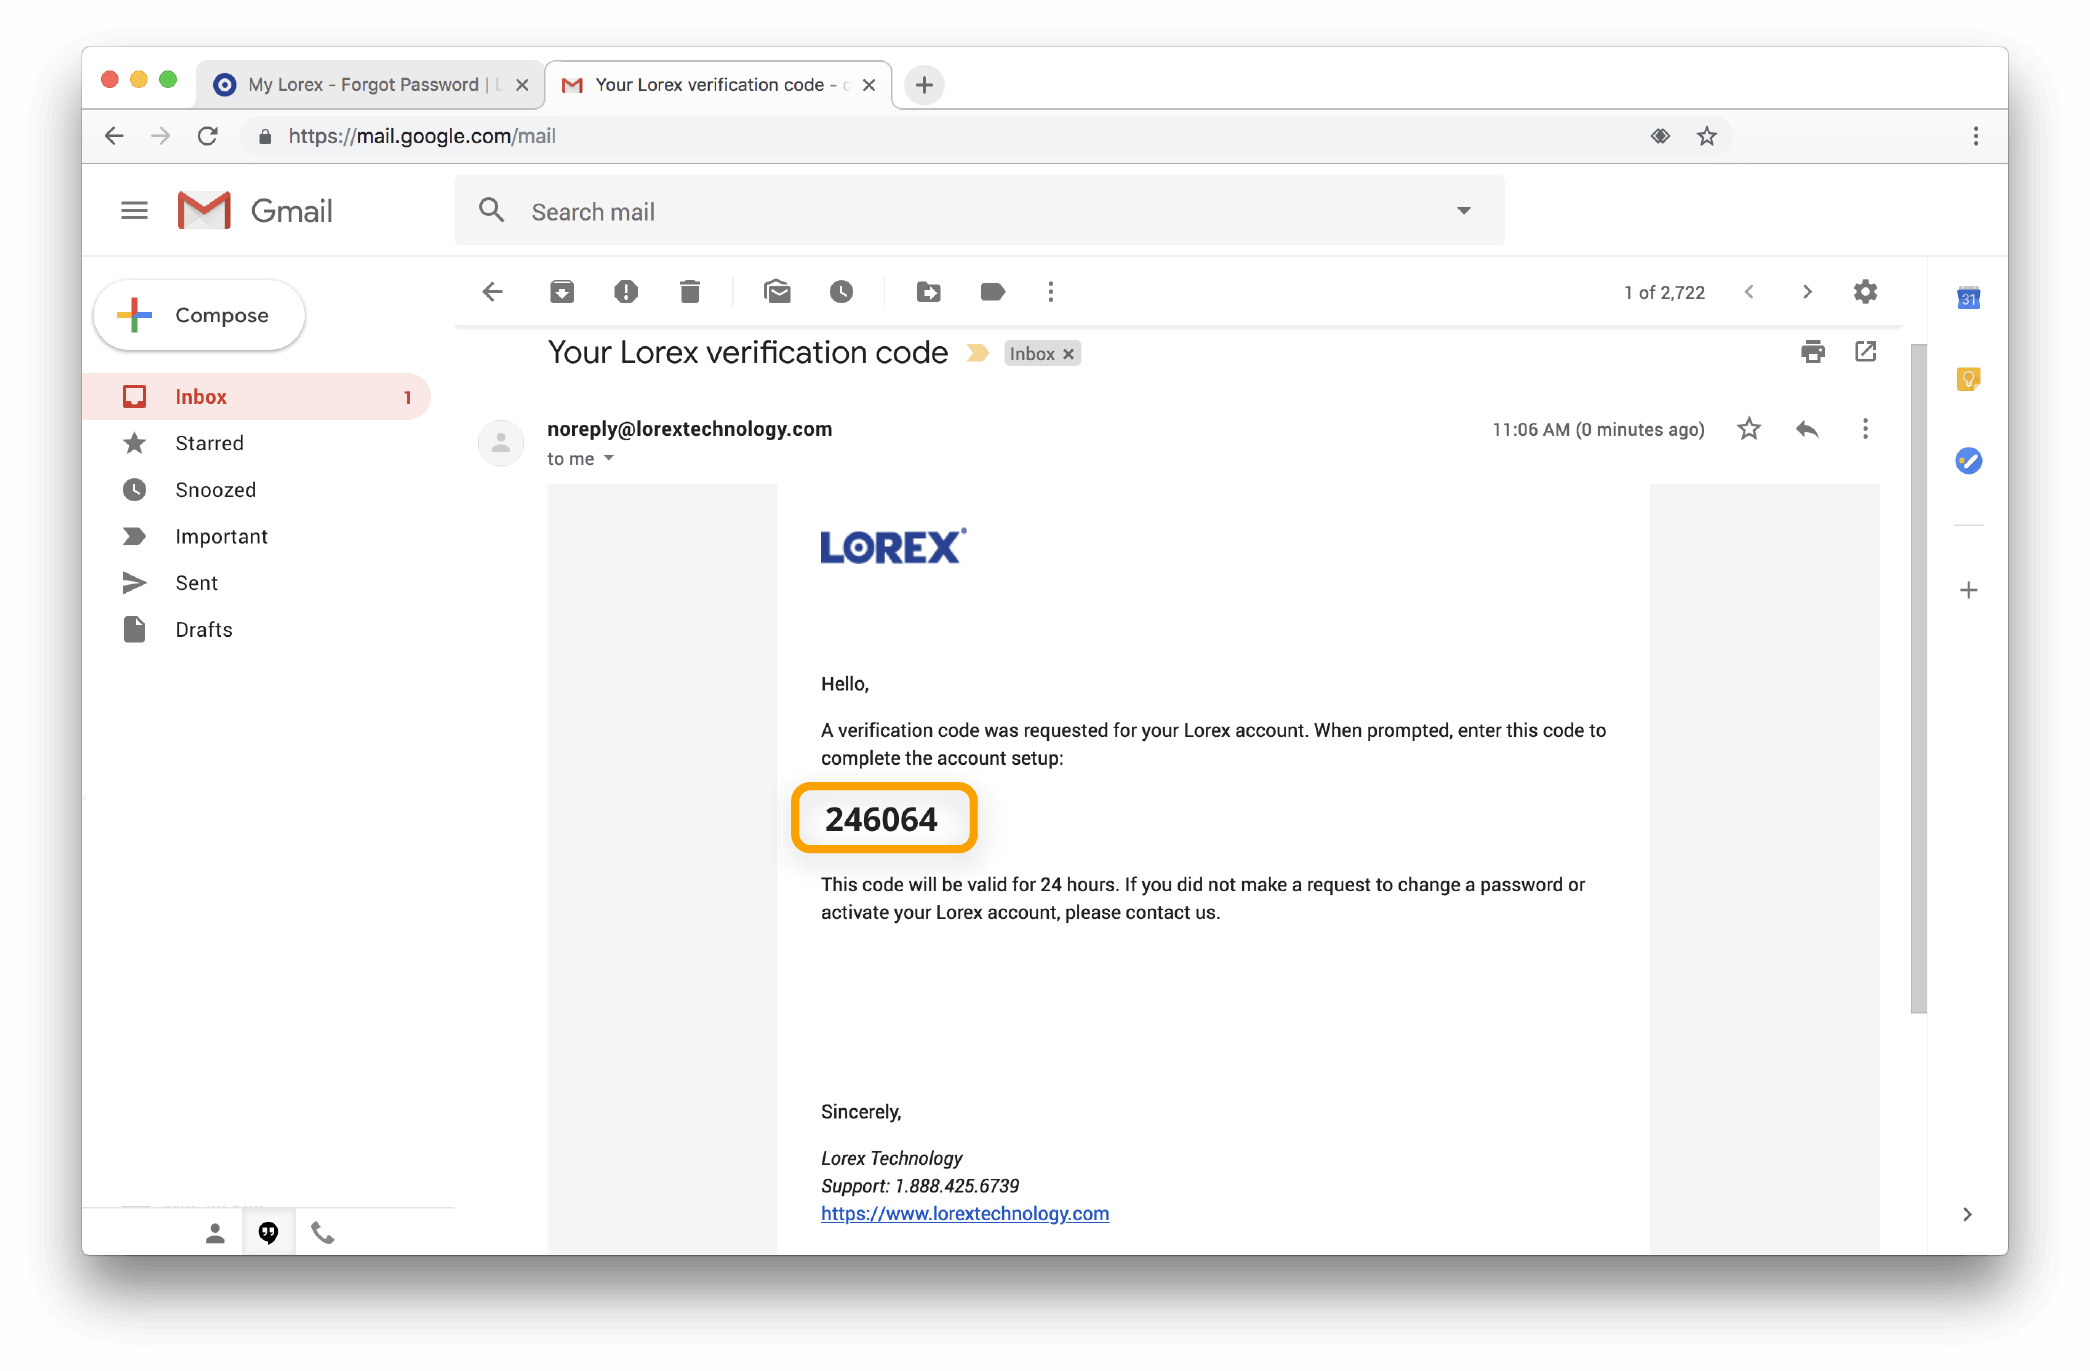
- You should receive an email with a verification code. Make sure to check your junk/spam folder if you have not received anything in your inbox.
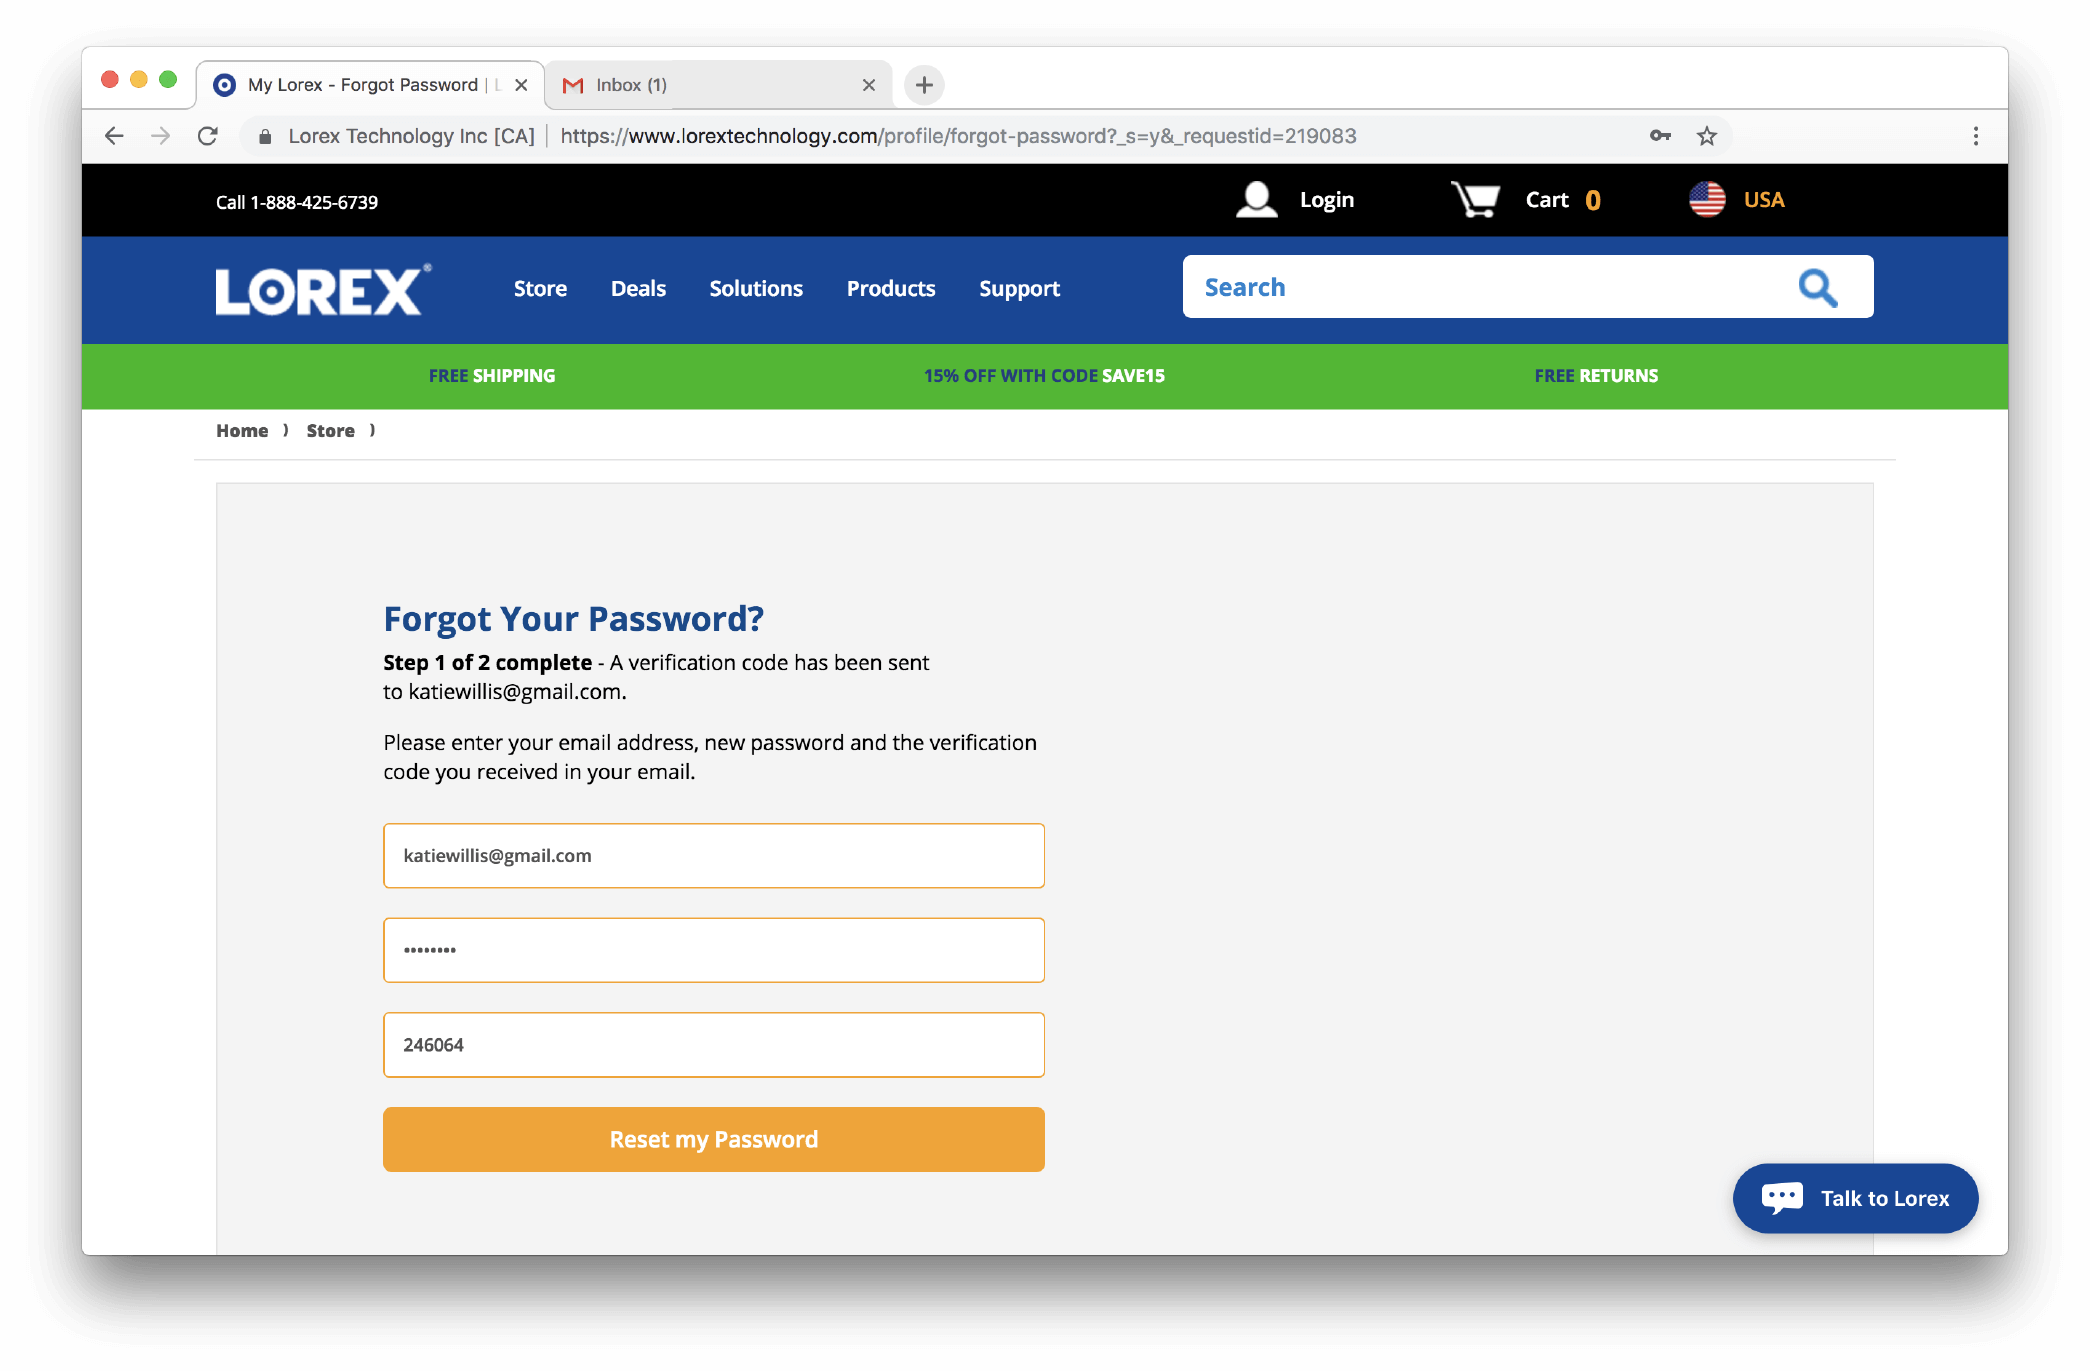
- Return back to the Lorex Forgot Your Password page and input your email address, new password, and verification code that you received.
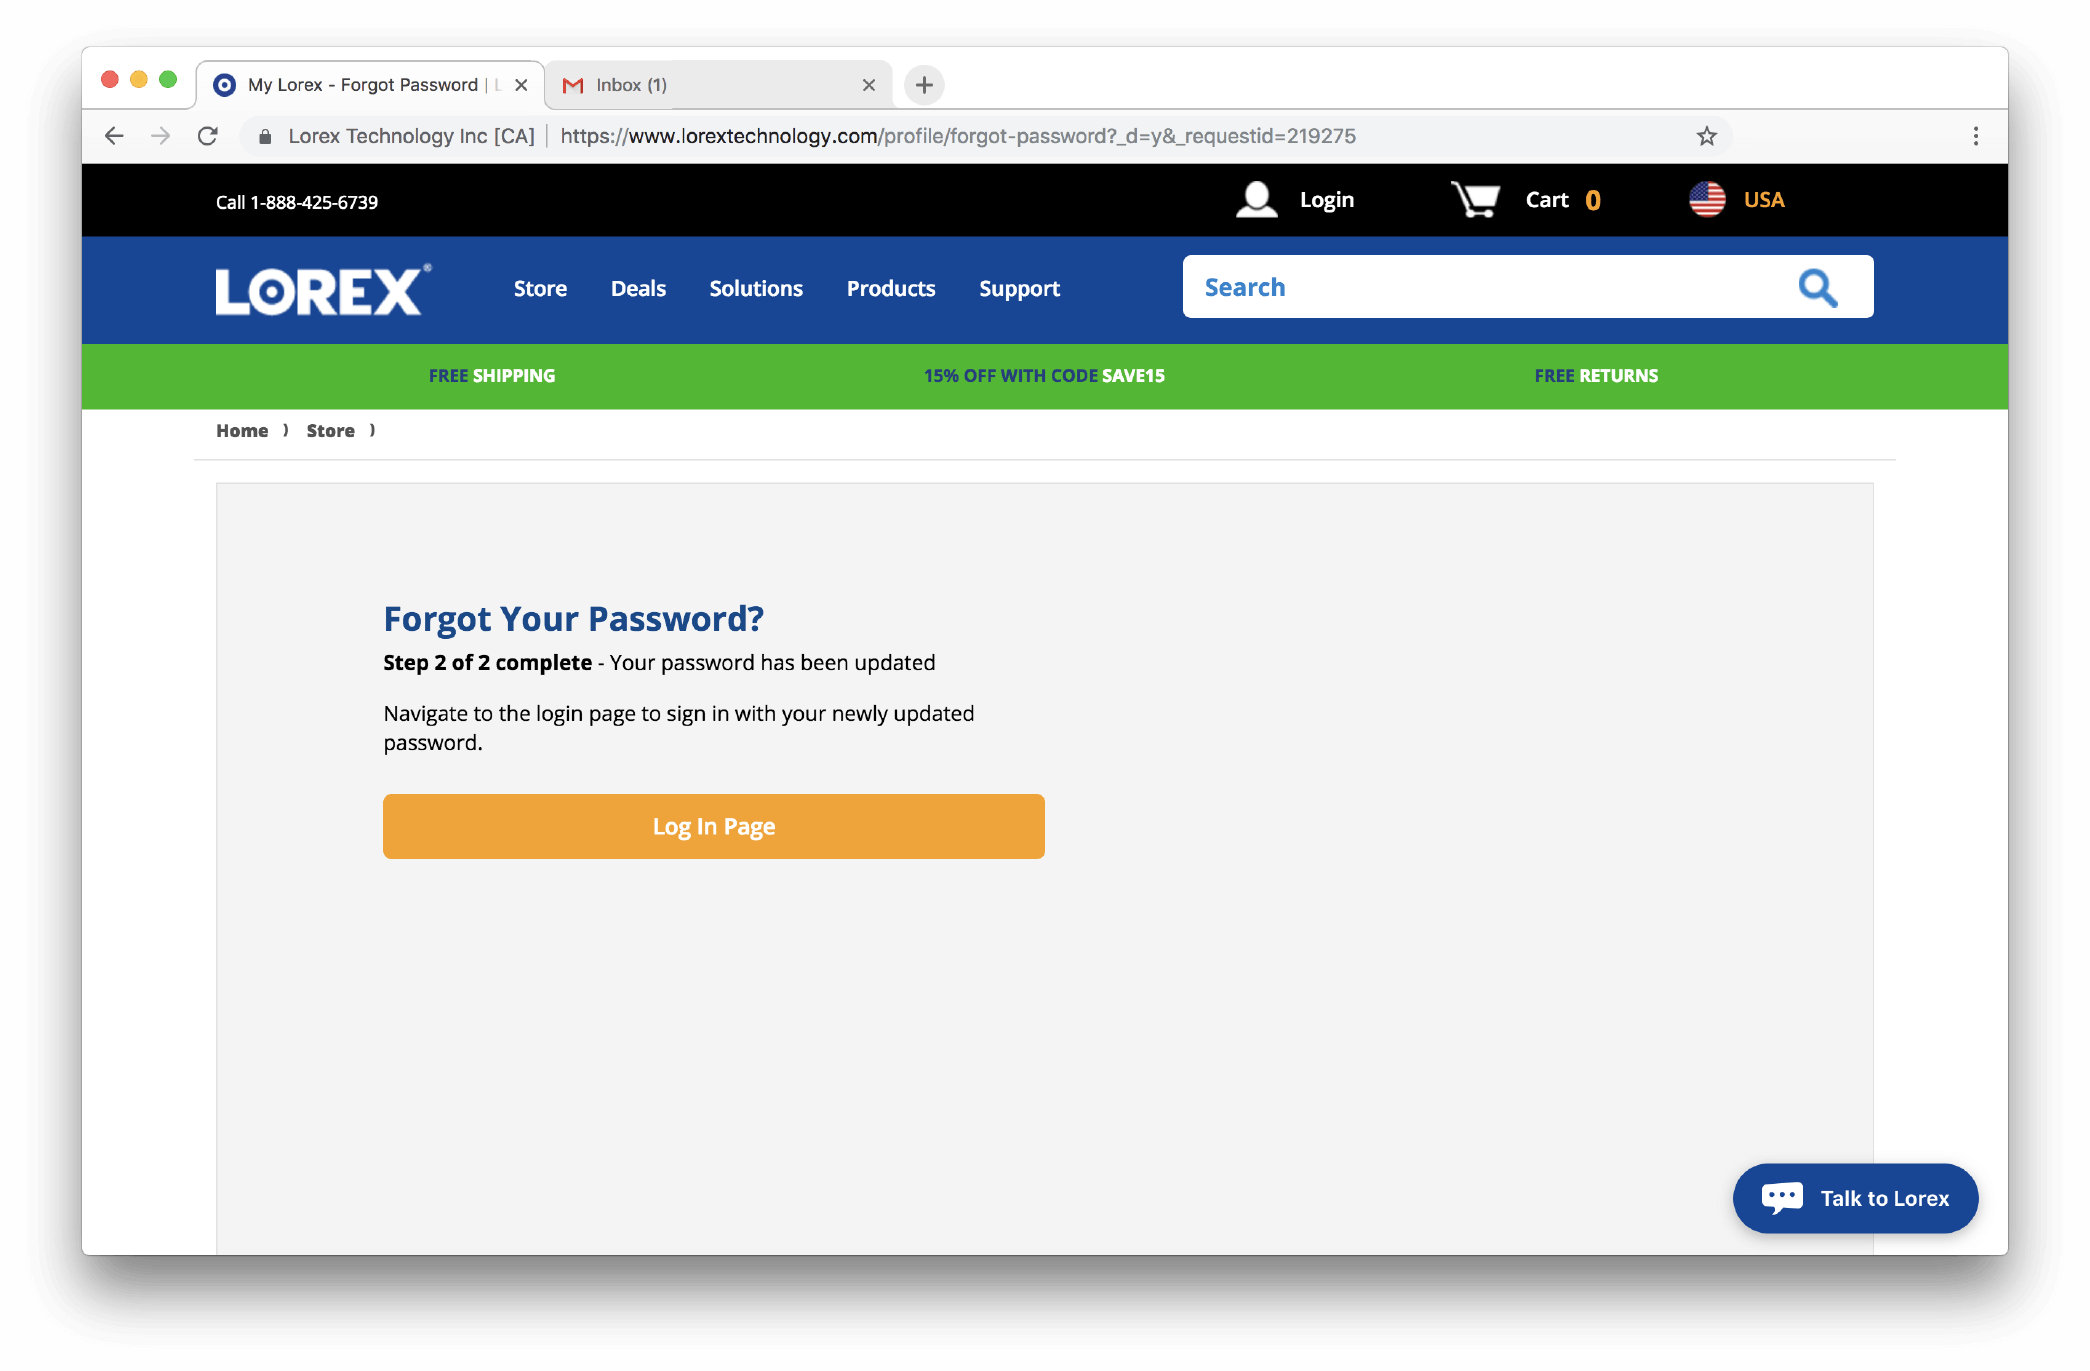
- Click Reset my Password to finish. Your password should now be reset!
Resetting Your Lorex Home App password
If you forgot your Lorex Home app password, use these steps to reset it and regain access to your app. After resetting the Lorex Home app password, it will automatically change the Lorex Account password as well.
NOTE: The following instructions are shown using an iOS (Apple) smartphone. There may be some differences in the user interface when using an Android smartphone or tablet.
To reset your Lorex Home password:
 Launch the Lorex Home app on your smartphone or tablet.
 Once you’re met with the login screen, tap Forgot password? on the bottom right.
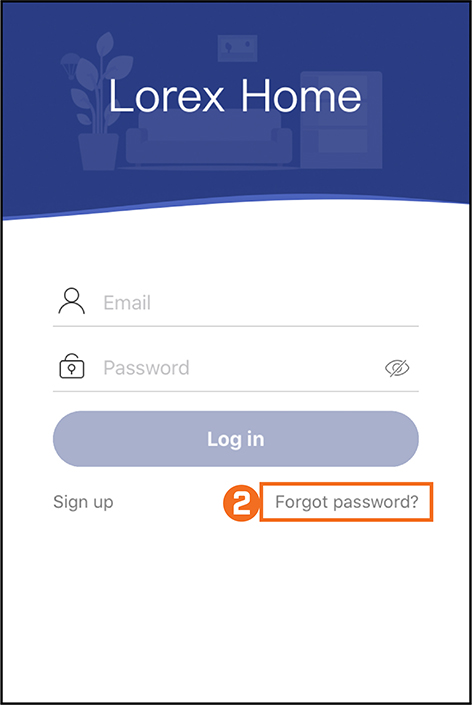
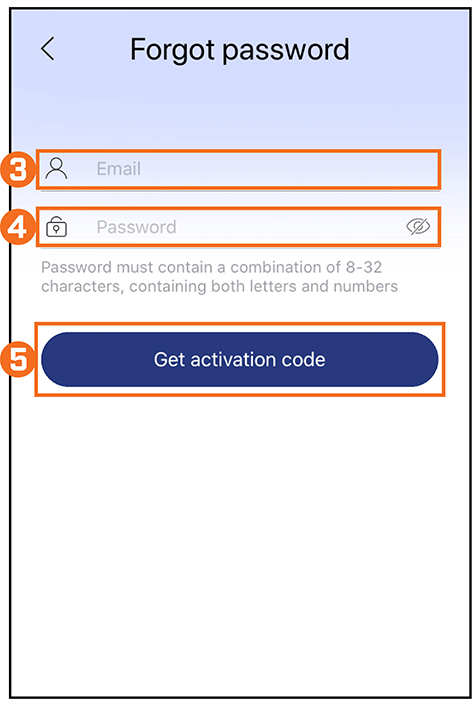
 In the Email field, enter your registered email address.
 In the Password field, enter your new account password.
NOTE: Your password must contain a combination of 8-32 characters, containing both letters and numbers.
 Tap the Get activation code button.
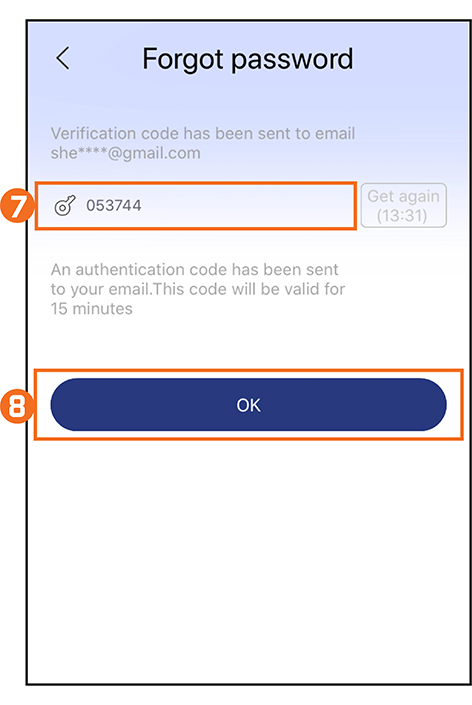
 Check your email for your Lorex activation code.
NOTE: The activation code has been sent to your email. This code will be valid for 15 minutes.
 In the app, enter the 6-digit verification code to validate your password reset.
 Tap OK.
Once validated, you will be redirected to the Devices screen.
You will now be able to login to your Lorex Home app and your Lorex Account with your new password.