How to Setup the Paramont DVR NVR, InVid Tech’s warehouse is fully stocked with products to meet the needs of our customers. InVid Tech offers many IP & HD Analog product options to cover a wide variety of installation options. Several camera and recording options are available while also providing mobile & solar surveillance, security lighting, monitors, body/covert cameras, power supplies, and more. Additionally, InVid Tech offers many specialty options, including Thermal Body Temperature Systems & Facial Recognition Systems.
How to Setup the Paramont P2P with a QR Code
With P2P QR connection there is no need to set any ports, worry whether or not your uPnP is enabled within your router, do any port forwarding within your router or setup a DDNS name.
Log into your NVR’s menu (default: admin/123456)
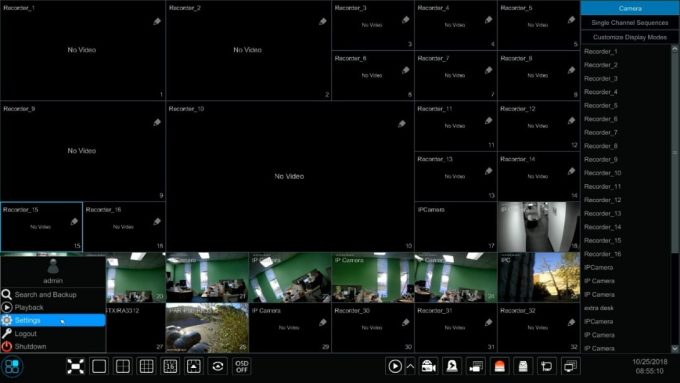
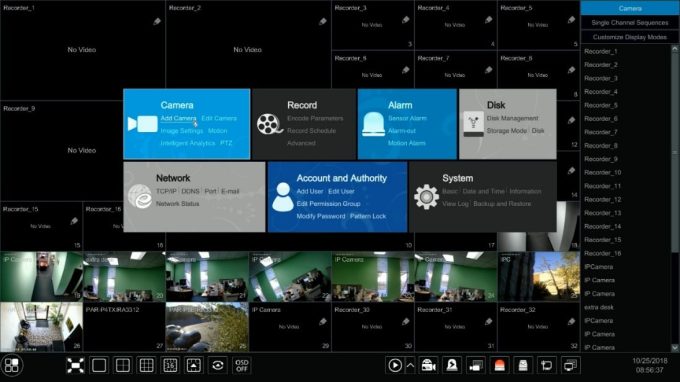
Click on the start button in bottom left hand corner (circle w/ four squares in it), choose Settings then Network
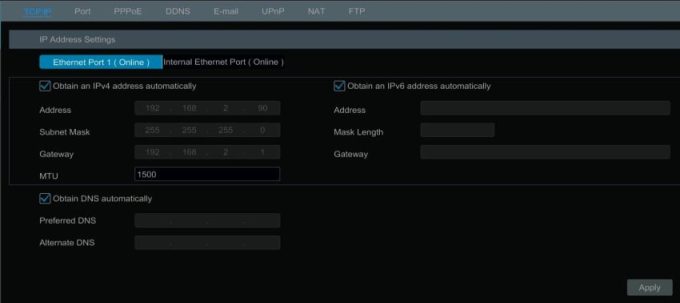
Under TCP/IP make sure “Obtain IPv4 Address Automatically” and “Obtain DNS Automatically are checked off
Under the NAT menu, check off the “Enable” box
Download the Paramont CMS mobile app to now scan
Not connected? Here are some things to check
Viewing your Paramont Device Online or from Mobile App
Viewing from your Web Browser (Internet Explorer):
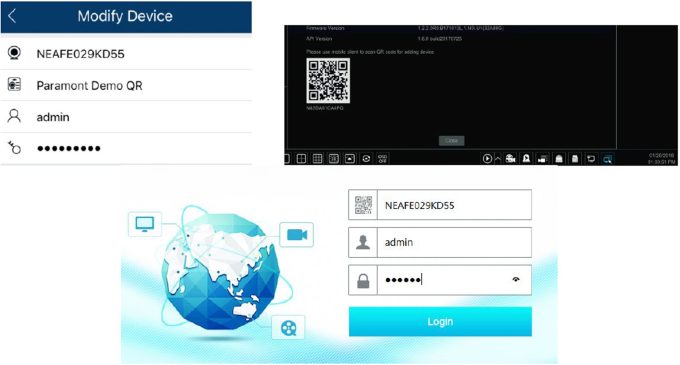
Login using QR number, which can be found in your mobile app (once scanned), the NAT menu or the Information Menu (first button to the left of your date/time). Then the DVR/NVRs user name and password (by default: admin/123456)
• You may be prompted to download or Allow the plugin, in some cases you may need to “Refresh” or re-start the browser.
Viewing from your InVid Vision mobile app:
How can I access my Paramont cameras from my computer?
Currently ActiveX is only supported by the Internet Explorer Browser so open Internet Explorer and go here or install the CMS software for your device at our website, located here.
How do I get my Paramont Device online using P2P?
What is the default login info for the Paramont DVRs/NVRs?
The default username is admin, and the password is 123456
How do I log into my Paramont DVR/NVR?
Click the circle with the four squares icon in the bottom left hand corner of the screen this is your start button, and click login.
How to Reset the Password for the Paramont NVR
Learn how to reset the password for the Paramont NVR.
IMPORTANT NOTE: DO NOT shut the Retrieve Password window above until you have entered your new Dynamic Password. Doing so will change the time, which will change the Dynamic Password, the entire process will have to start over if closed prior to receiving the password.
Is it possible to reset a password for a Paramont DVR/NVR?
Yes, please contact our Tech Support hotline (631-388-5700) when you are in front of the DVR/NVR as it MUST be done locally at the machine through our tech support. The information you will need can be found here.
How to view Paramont DVR/NVR on Mac?
The current work-around is to install the appropriate CMS software which will allow you to watch live and playback your device(s). You can download the CMS softwares off our website here.
How to Install the MAC Plugin
Step-by-step instructions for installing the MAC plugin for Paramont. Directions are intended for the Paramont series but the general concept can be followed with any series.
When installing the MAC Plugin you may encounter an error. “WebVideoPlugin_(version,etc).pkg” can’t be opened because it is from an unidentified developer. (Message will be different based on series/version plugin that is installed)
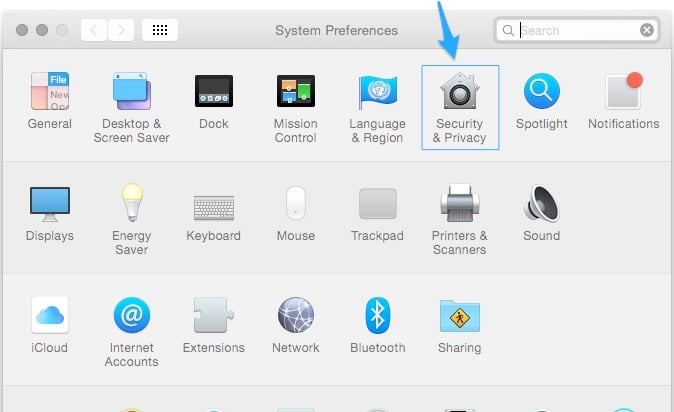
Simply open up System Preferences & Select Security & Privacy.
Select “Open Anyway” under Allow apps downloaded from: *Depending on your settings you may need to put in your password and/or select the lock in the bottom left corner.
Once you have completed these steps your installation should start immediately. If not simply try opening the file again from “downloads” or wherever you have saved the file.
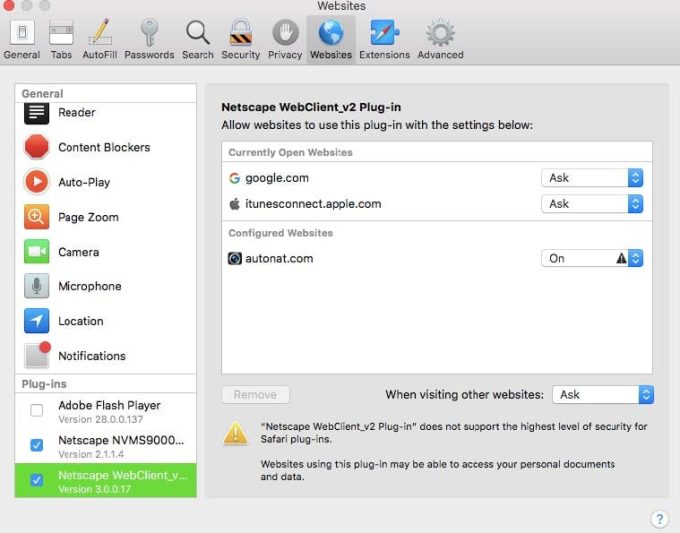
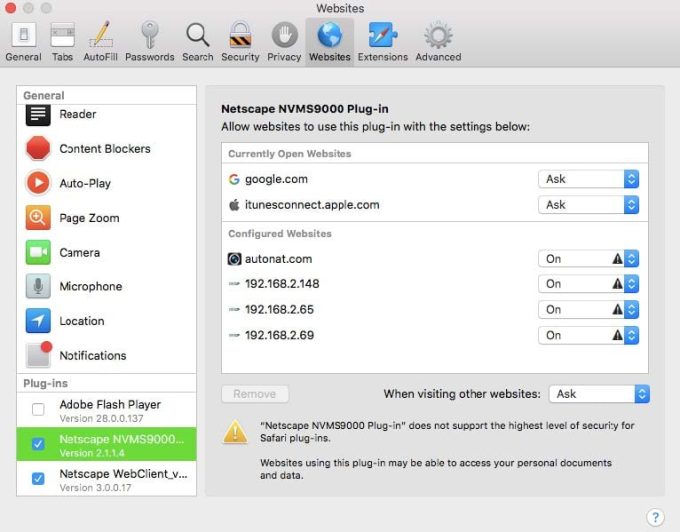
If you are having trouble viewing the cameras after you have updated to Mac OS High Sierra then go to Safari/Preferences/Websites/Plug-Ins on your left. Look for “Netscape NVMS9000 Plug-in” and “Netscape WebClient_v2 Plug-in”. Toggle the option under configure websites to “On”. Now force quit Safari then reopen and revisit the website. And it should now work. If you are still having issues please call Tech Support.
How to add NVR/DVR to phone/tablet?
Below is a video showing how with the Paramont CMS you can use the interface to add an NVR/DVR to your Phone/Tablet.
What are the system requirements for running Paramount CMS?
Paramont CMS PC Specifications
Paramont CMS (Central Management System) pulls multiple streams of video into one platform. Streaming video can cause a strain on low-performance computers. The resources your computer uses will depend on how many channels of video you stream. If you buy a computer that does not have enough power, the CMS will not run properly and freeze. The type of computer that will run best for the CMS is a computer designed for gaming. Below are some starting point components. Greater power will equal greater performance of the CMS.
Suggested Components Starting Point
How to Upgrade Your Paramont DVR or NVR
Upgrading Instructions Valid to V1.2.9, Learn how to upgrade the firmware in your Paramont DVR or NVR
The Paramont upgrade process must be performed at the DVR/NVR itself, it cannot be done from the web. Please follow the steps below to successfully upgrade your DVR/NVR.
How can I access my Paramont cameras from my computer?
Currently ActiveX is only supported by the Internet Explorer Browser so open Internet Explorer and go here or install the CMS software for your device at our website, located here.
Saving data on the PAR-P2TEMPTABLET
Saving data on the PAR-P2TEMPTABLET & the type of encryption used
The tablet will not save any information while there is no SD card within the device. As an added security benefit, the SD Card slot is behind a security screw protected plate, and the SD card must be formatted within the tablet to store information. There is an internal 16GB EMMC card, but that is for the facial database only, nothing else can be saved to that card. As long as the tablet is standalone and not connected to an NVR or CMS, nothing else could or would be saved.
If in use, any info saved to the SD cards is encrypted and cannot be viewed on a PC unless using the required software. The encryption uses a CRC8 encryption algorithm.
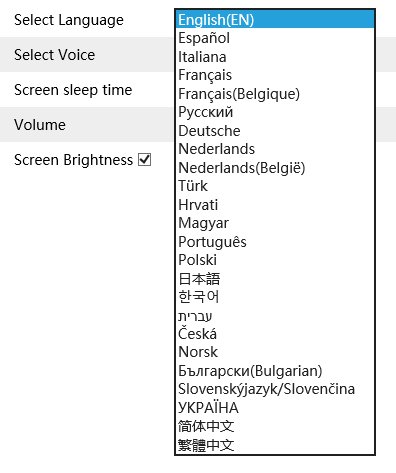
What languages are offered on PAR-P2TEMPTABLET?
What is the RTSP stream for Paramont NVR/DVR?
DVR/NVR:
Mainstream: rtsp://172.16.12.236:554/chID=5&streamType=main&linkType=tcp
Sub-stream: rtsp://172.16.12.236:554/chID=5&streamType=sub1&linkType=tcp
Is there a manual for Paramont Series Products?
Yes, you can find it on our website, here.
How to turn on push notifications for motion in Paramont CMS App?
Open your app, hit the three lines in the top left hand corner to open the menu, go to“push setting”, click on the corresponding device,turn on “device notification function”.click on the motion tab and put an orange check mark next to whichever cameras you would like motion notifications from.
How to enable push notifications for my phone & not all?
Open your app, hit the three lines in the top left hand corner to open the menu, go to “push setting”, click on the corresponding device, and turn off “Message Subscription” for the phones you DO NOT want to get notifications on.
Trying to view my Paramont DVR/NVR on Internet Explorer
Please ensure you are in fact using Internet Explorer and not Edge.
The two have similar icons, Edge is a darker blue lower case “e” whereas Internet Explorer is a lighter blue lower case “e” with a yellow ring going over the top left of the “e”.
Also note that on Windows 10, Edge is the default browser, Internet Explorer isn’t on the task bar or the desktop, but you can use Cortona and search “Internet Explorer” to launch.
Why cant i use Chrome, Firefox, Edge or Safari to view my device(s)?
Chrome, Firefox, Edge and Safari took away a plugin that was used for ActiveX plugins. This has affected anyone that uses an ActiveX plugin for their devices, not just InVid Tech.
Can I set up multiple user accounts on Paramont DVR/NVRs?
Yes, you can. Go to Settings, click on Account and Authority, click the plus sign (+)in the top right of the screen to add a new user (email address isn’t required). The difference between admin/Advanced/Common are the “Group Advanced Permissions”.
Once created click on “Edit Permission Group” across the top, choose the group on the right hand side and hit the Pencil icon to edit.
You can then enable (check mark) or disable (no check mark) your permissions, below that you can set your Local and Remote permissions for each camera as well.
How do I turn On/Off motion function on my Paramont DVR/NVR?
Go to Settings, click on Camera, click on Motion on the left. You can toggle motionOn and Off for specific cameras from within this screen, draw a motion grid over the live image for what you would like motion captured in your shot (area with green grid indicates motion activated area) and set the sensitivity you see fit for that Field of View.
How can I adjust my max bitrates on my Paramont Series DVR/NVR?
Go to Settings, click on Record, click on Encode Parameters on the left (for Main Stream), and Stream Settings on the left (for Sub Stream). Under Encoding Parameters you can cycle between “Event Recording Settings” (motion) and “Schedule Recording Settings” (constant).
How do I set a manual recording schedule?
In the Paramont DVR/NVR menu; go to settings, click record, under mode switch to manual, then on the left click on record schedule, and set your manual record schedule accordingly from there.
Sensor Record column is for hardwire Alarm Inputs, Motion Record column is for Motion only, Analytics Record column is for recording only based off Analytics (if supported) and Time Record column is for Continuous record.
Do I need to port forward this device? Paramont
If you’re using the P2P, which is explained in this help article, no port forwarding is required, if you are networking this device to be seen remotely via a WAN IP or DDNS, yes port forwarding is required.
How do I get to settings on my Paramont Series DVR/NVR?
Click on the start button, hit “settings” and it will bring you to the menu structure from there. If settings is grayed out, please login first (if you are not sure how to login view instructions here).
Why are there no icons at the bottom on live view of DVR/NVR?
It is likely you are in full screen mode, bring the mouse down to the bottom of the screen and click the first icon to the right of the start button (box with 4-arrows pointing outward) this will exit you out of full screen mode.
How to change how many cameras I see at one time?
When viewing your cameras at the bottom of the screen you will see an option to change the view of your cameras I.E. Single view, Quad View, Nine camera View, etc. If you don’t see the task bar, move your mouse to the bottom of the screen.
Why did my Paramont DVR/NVR suddenly go offline?
If you are connected to your ISP’s router (Internet Service Provider) it is possible your ISP recently performed an update to your router which can occasionally change your network environment and require a reboot of your router/recorder (Router first then recorder). It is highly recommended that with this device to install your own router to run the recorder to avoid this from happening.
How do I setup specific alarms for my Paramont DVR/NVR?
Click on settings, click on alarm, from there you can turn on and off specific alarms for your device.
How to set Paramont DVR/NVR to record (I.E. Motion, 24×7)?
Open the start menu on the DVR/NVR (Circle with the four squares in the bottom left), click settings, click record, from there select from your options with either the designated schedule options available to you, or switch to a manual option to create your own schedule.
Why are push notifications on for all the phones?
Currently it does turn on the device notification for all devices added however on a phone that you don’t want push messages sent to just simply disable the message description tab from within the push setting menu.
How to Add a Paramont DVR or NVR to Another Paramont NVR
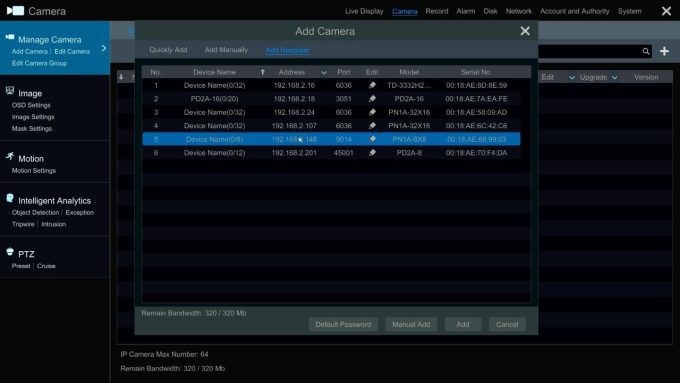
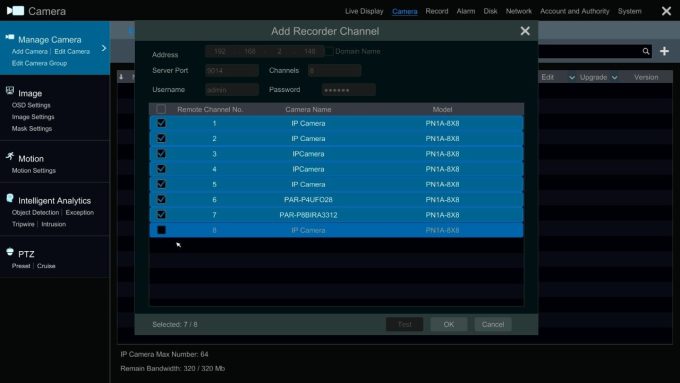
Learn how you can view additional DVRs or NVRs from a Paramont NVR
How to Setup Paramont Email Notification
Learn how to setup email notification on your Paramont machine
Step 1: Setting up a GMAIL account.
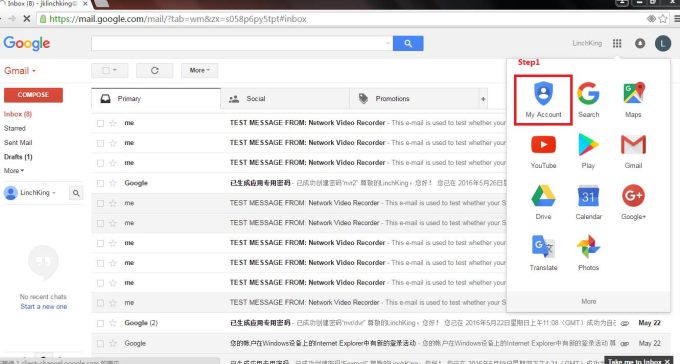
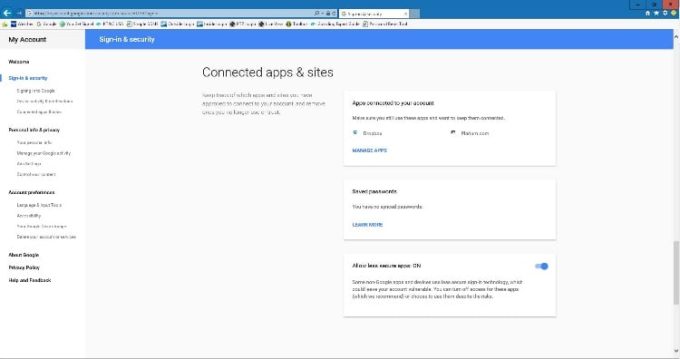
Go to My Account setting page, click on the square and click my account.
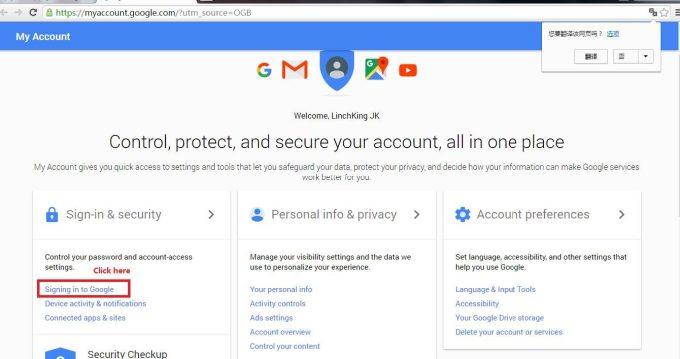
Click Signing in to Google.
Turn On, Allow all less secure apps, at the bottom of the page.
Step 2 – Setting DVR/NVR Configurations
Setting Up Email Notifications on DVR/NVR
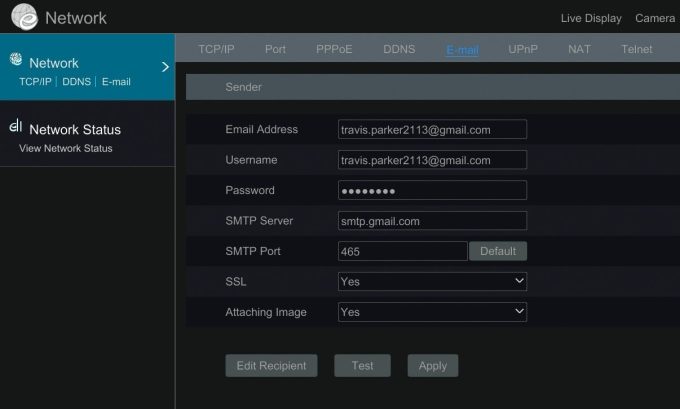
Go to Settings/Network/Email. Follow the picture below, just change the email address to your own, must be a Gmail account. “Email Address” and “Username” must be the same, i.e. “abc@gmail.com”. The Receivers email addresses can be anything you would like.
Adding Recipients
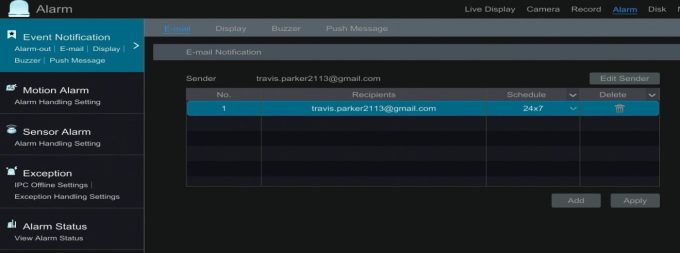
Hit Edit Recipient or go to Alarm and click Event Notification/Email, enter in Email Address, click the Add button and hit Apply when done to save.
Enabling Motion Detection
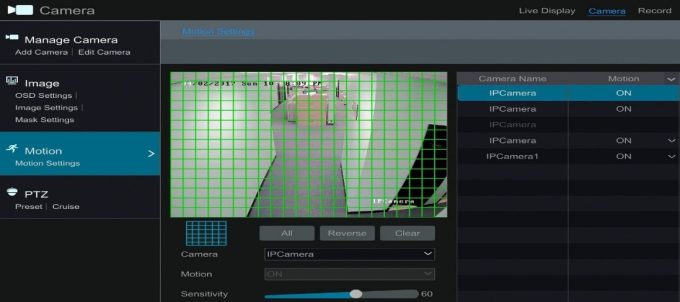
Go to Settings/Camera/Motion Settings on the left and make sure camera “X” is enabled. Make sure the grid is over the field of view where you want the motion to be detected. Set the sensitivity at least to the middle setting. The setting all the way to the left is OFF. Then click apply to save.
Linking Email Too Motion.
Go to Settings/Alarm/Motion Alarm on the left, Select Camera and turn Email notification to ON.
You are now ready to receive email notifications.
How do I format my hard drive? Paramont Series
Go to settings, click on disk, click on format on the hard drive you would like to format. **Keep in mind this will erase any existing footage**
How to use IPM-KEYBOARDNET to control PTZ using PTZ Mode
Devices:
Overview:
How to configure keyboard:
Change keyboard to PTZ mode
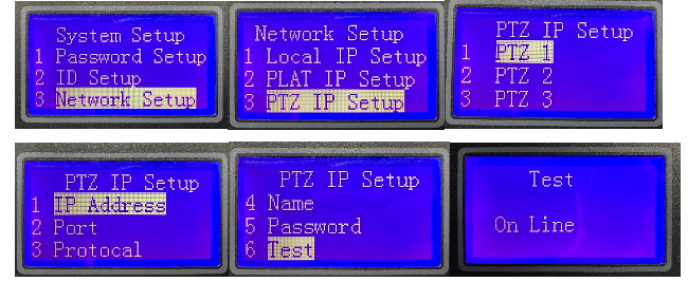
Change the local IP address according to your network configuration
(Remember to change Default Gateway accordingly)
Choose the PTZ you want to control (you can store up to 256 PTZs information to keyboard), enter the IP address, username and password of camera separately to IP Address, Name and Password in keyboard.
If the connection is success, it will show “On line”, which means the keyboard is successfully connected to camera. Then the keyboard will be able to control PTZ camera.

