Introduction
Dahua Technology Co. is one of the largest DVR / Security camera device manufacturers. Dahua DHI-XVR series DVR/NVR supports 4 cameras to 32 cameras. These DVRs support open standard protocols such as ONVIF, RTSP, FTP and SMTP. They can be configured to directly record/backup footage to the cloud via FTP/SMTP. With its support for RTSP and ONVIF, they also work with CameraFTP Virtual Security System software, which can display multiple live cameras on a computer screen while also recording the footage to the cloud.
Dahua DVRs can upload/backup .dav video clips or image snapshots to CameraFTP’s FTP server.
Basic DVR information
| Video / image resolution | 1280×720, 640×360, 1920x1080P, 2047×1536 or higher |
| Audio recording | N/A |
| Image upload frequency | 1 image/s to 1 image/5 minutes |
| Video frame rate | 1,2,3,…,30 fps |
| Night-vision | Supported. |
| Image snapshot recording | Supported |
| Video clip recording | Supported. |
| Motion detection | Supported for both image and video clip based recording |
| Continuous recording | Continuous recording is supported. |
| Supported video format | .dav |
| Connection type | Ethernet cable |
| PoE (Power on Ethernet) | N/A |
| Indoor / outdoor | Both |
| Lowest pricing (as of 7/1/2019) | $150 |
Note: This document is not designed to replace the product manual from the manufacturer. The information provided is based on our knowledge of the model Dahua DHI-XVR series of DVRs and one version of SmartPSS (Smart Professional Surveillance System) software. It may not be accurate or up-to-date. Users shall contact the manufacturer for all camera, DVR or SmartPSS-related issues and contact us only for CameraFTP-related (cloud service / FTP / SMTP) issues.
1 Connect the Dahua DVR to the network and find its IP address
Connect the DVR to your network router with an ethernet cable. The DVR’s default IP address is 192.168.1.108. If the default IP does not work, it might have acquired an IP address via DHCP. Please refer to the manufacturer’s manual for more detailed information. You can run the included software (e.g. SmartPSS) to find the DVR’s IP address. You can also use CameraFTP VSS software to find the DVR’s IP address (with or without using VSS’s cloud recording features). It is possible to configure the DVR by connecting it with a monitor and a mouse. In this document, we will configure it from a web browser or SmartPSS software on a PC.
If your DVR is connected to the router with an Ethernet cable, you can run the manufacturer’s setup program to find the DVR’s IP address. From a PC in the same network, insert the manufacturer’s software CD. Browse the content of the CD and run the setup program, it will install the necessary software for the DVR. After it is finished, launch the installed software SmartPSS as shown below:
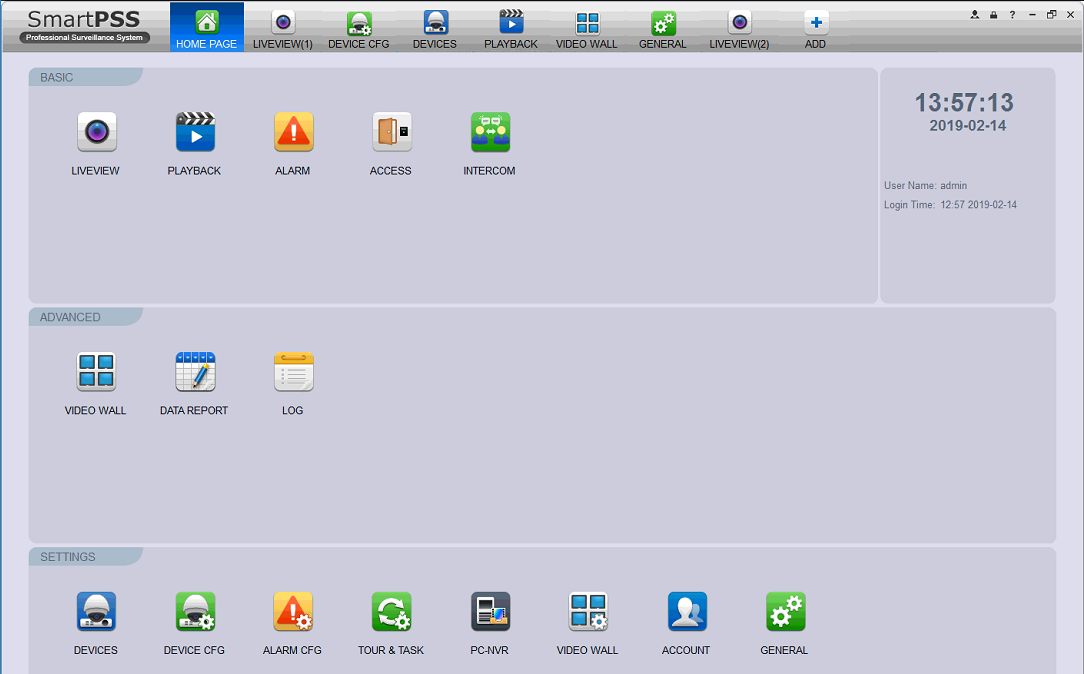
Click the Devices tab, then click Search, it will find a list of DVR devices as shown below:

2 Configure Dahua DVR Using the Web-based Configuration Tool
You can use a web browser to configure the DVR; SmartPSS can also be used to configure the DVR. Not all features can be configured via SmartPSS, and it is often slower than a web browser. In this section, we will mainly use a web browser to configure the DVR. We will talk about SmartPSS in the next section. Launch a web browser (e.g. IE or Firefox), in the browser’s address bar, type in the following URL (replace IP_Address with the camera’s real IP address) and then press Enter.
http://IP_ADDRESS
Log on to the device, click the Setup tab, you can configure the DVR settings. As the DVR has built-in storage, old footage could be cached in the local storage. The DVR may upload old video/image files, making it hard to verify whether your configuration is correct. If possible, please disable or remove DVR’s local storage first. You can also delete all old footage and set the local disk to be read-only. You can change it back after you have finished configuring cloud recording.
2.1 Configure the FTP settings
Click the Storage tab (or Network tab, dependent on the device), then click FTP tab in the left, you can then configure the FTP Settings as shown in the screenshot below. If you don’t have an account on CameraFTP, please visit www.cameraftp.com and sign up for a free trial account. CameraFTP offers 3-day free trial. When the trial is up, you can order a subscription or extend the free trial to continue using the service.
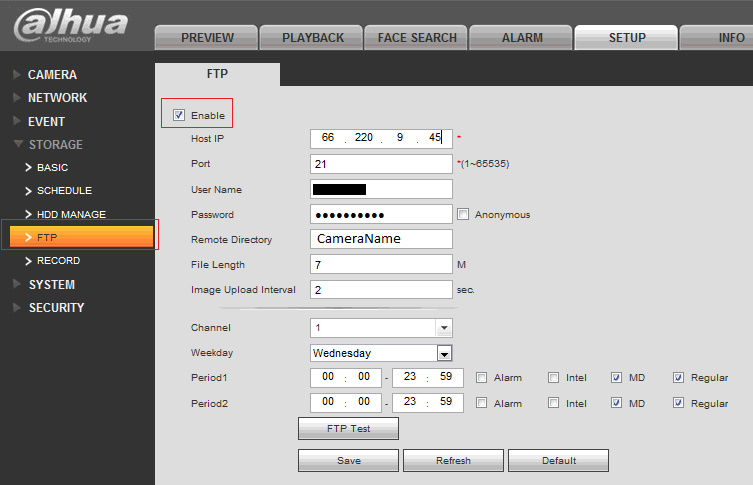
- Host IP:66.220.9.45
- Port:21
- Username / Password:
FTP username is your CameraFTP username, FTP password is your account password.
Note: In this page, you also need to configure File Length, which you can set to 5 to 10 MB. If you want to configure image recording, you can set image upload interval based on your image recording plan. Otherwise, you can leave the default value, or enter a large number.
The above settings are shared by all channels (cameras). Below you need to configure the schedules (periods) and actions for each channel (camera). Unfortunately the interface is not optimized! You will have to do so for each camera and each day of week.
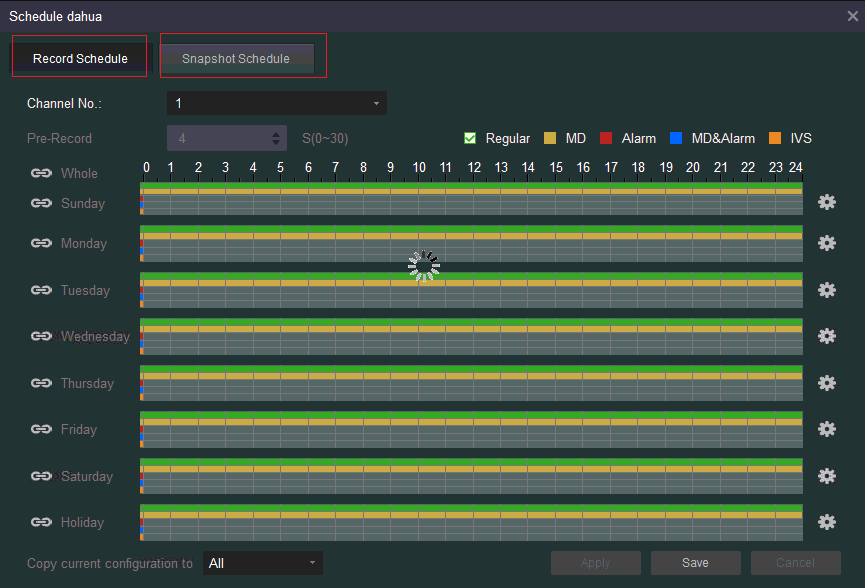
For each period, you need to configure the camera action. “Regular” means to record continuously; “MD” means record when a motion is detected. “Alarm” means when an alarm is triggered by an external alarm device (such as a motion/infrared sensor). If you don’t have an external sensor, then only select “MD” or “Regular”. You shall not select both after you have finished configured the DVR (camera). It is ok to select both for testing.
Click Save to save the settings, and then click FTP Test to test the FTP connection. If it works fine, you need to repeat it for each channel and day of the week.
2.2 Configure Video or Image Snapshot Settings (Resolution, Frame Rate, Bit Rate)
Based on your CameraFTP subscription plan, you only need to configure video settings or image snapshot settings.
If you ordered a video recording plan, then click the Encode tab as shown below. If you ordered an image recording plan, click the Snapshot tab.
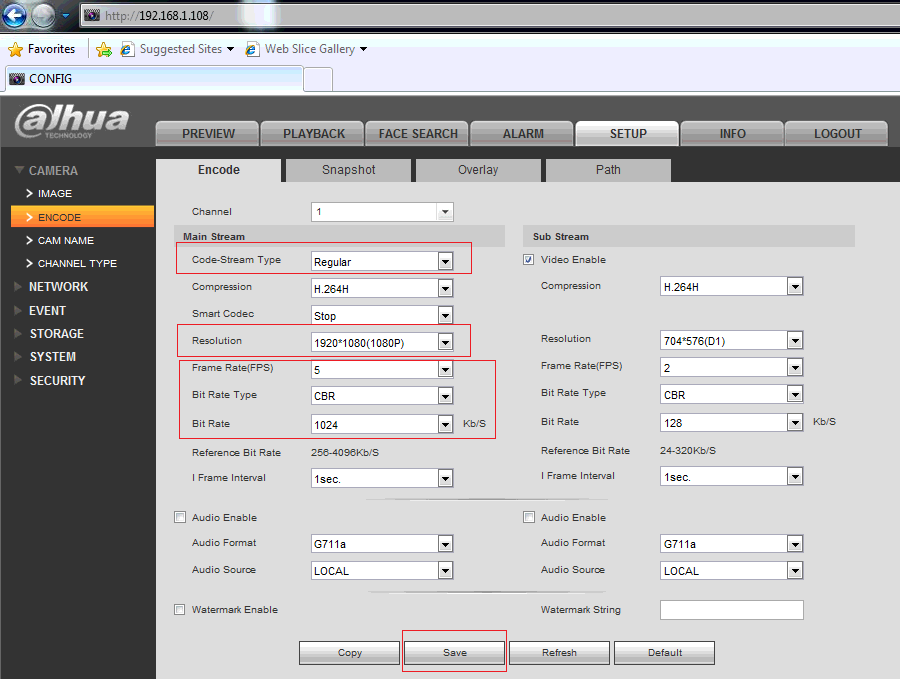
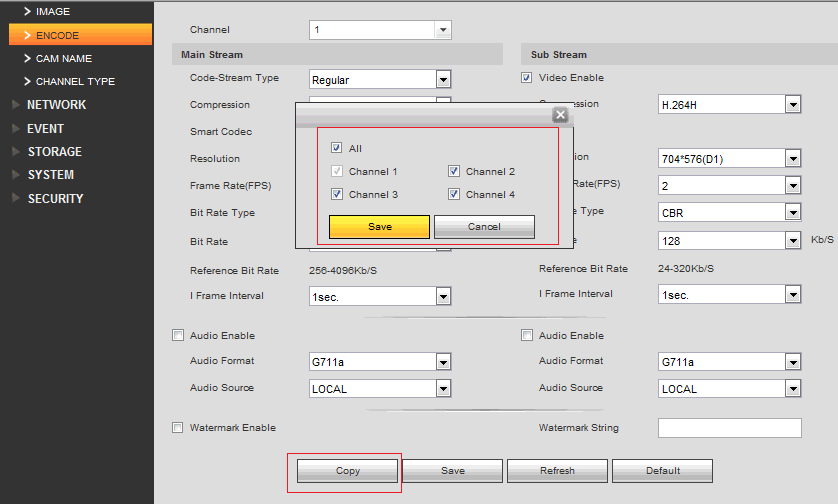
The DVR can be connected to multiple cameras, each camera can be configured with different video parameters. You must select the correct channel number for each camera. CameraFTP supports multiple orders with different parameters. Most users will use the same parameters for all cameras connected to the DVR. If so, you can copy the current camera’s settings to all cameras. Just click Copy, then select the channels to copy to, and click Save. Please see the screenshot below:
Note: For estimating the bandwidth, Number of Cameras should be set to 1.
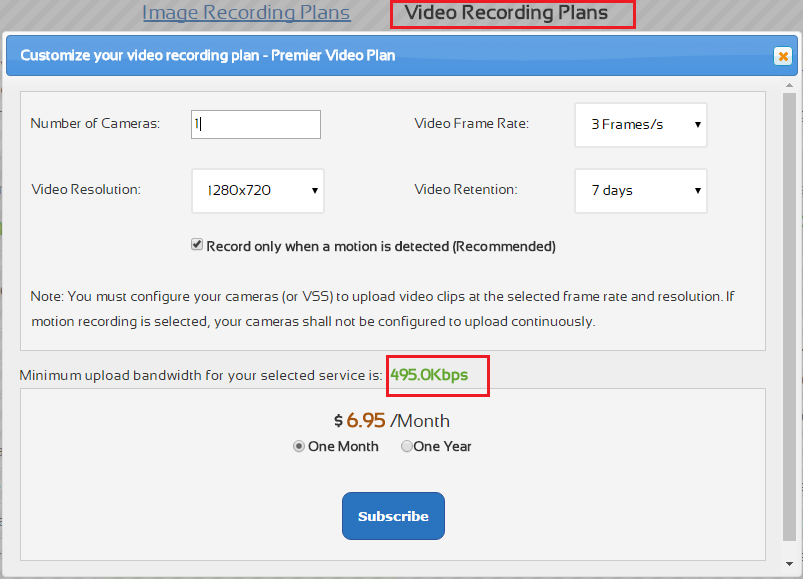
Click Save to save the video/image settings.
2.3 Configure motion detection for video / image recording
Click the Event tab, then click Video Detect as shown below.
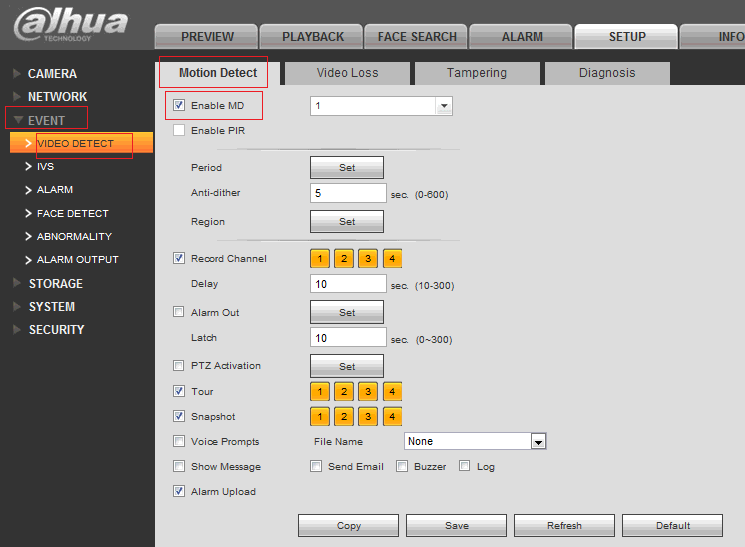
2.4 Configure continuous (or scheduled) video / image recording
If you ordered an image / video plan with motion recording, you can skip this step.
Otherwise, click the Record tab. you will see the screen as follows.
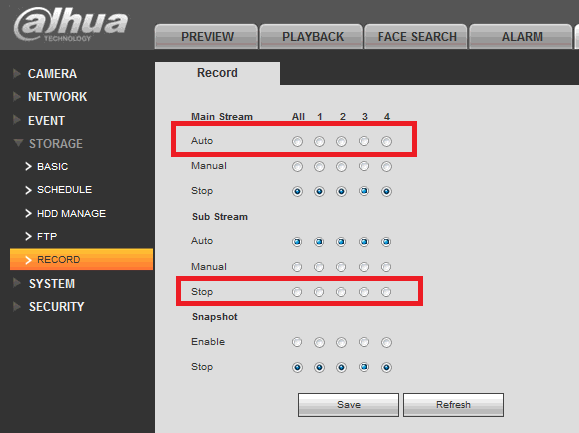
You can configure the recording schedule in the following screen. You can configure it to record continuously for all the time, or during the scheduled time intervals.
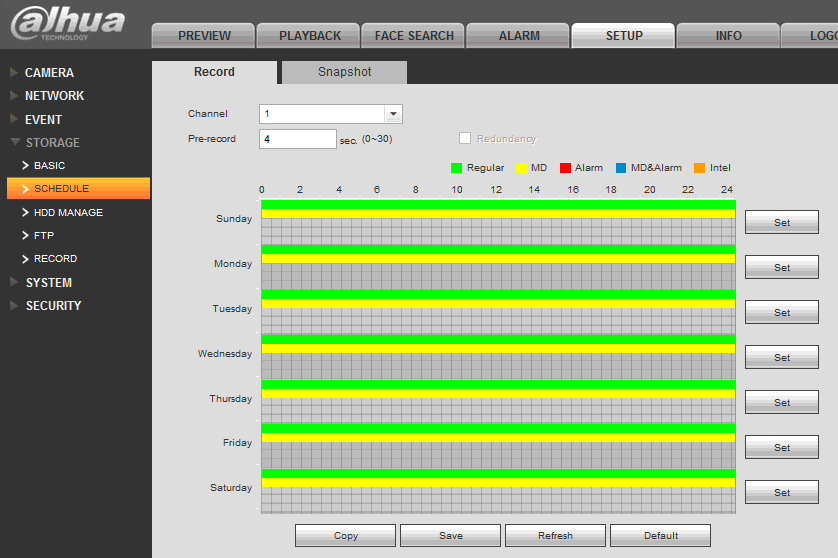
After you’ve finished setting up schedules for one channel, click Save to save it first, then click Copy to copy the same settings to other channels (cameras).
NOTE: Please do not configure both video and image recording. It will be considered as two camera licenses!
3. Configure (Dahua) DVR system with SmartPSS software
SmartPSS (Smart Professional Surveillance System) is a full-featured video surveillance application from Dahua(?). It can be used to configure Dahua DVRs and quite a few other DVRs. The software supports viewing and managing multiple DVR devices. However, if you only want to configure a DVR, based on our experience, the software has similar functionality as web browser based configuration tool. Overall, the browser-based configuration tool is faster and offers slightly more features.
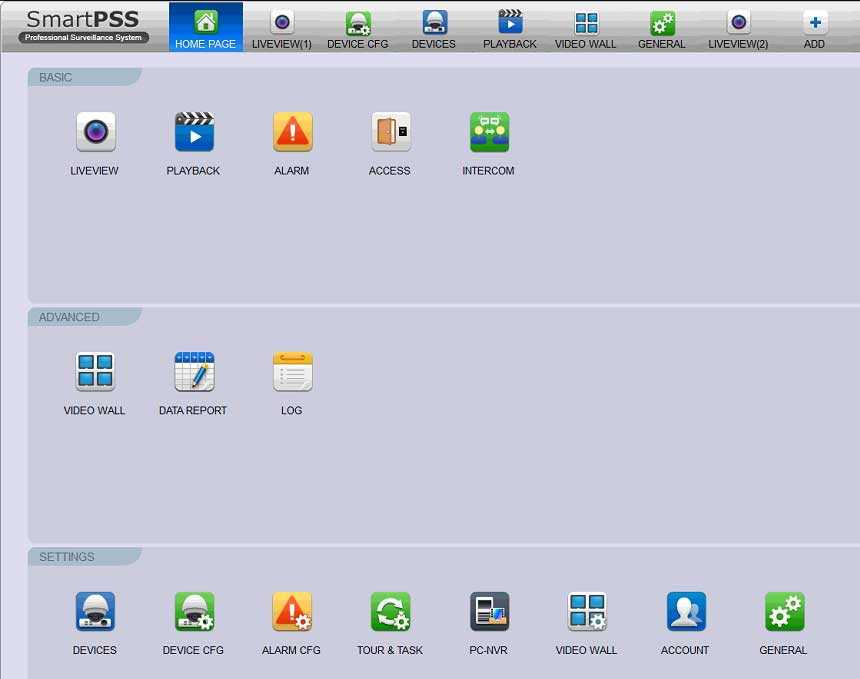
SmartPSS is bundled with your DVR device. You can also download it from Dahua’s website. First of all, please install SmartPSS on a PC. After you install it, launch the program. You will see a screen as follows:
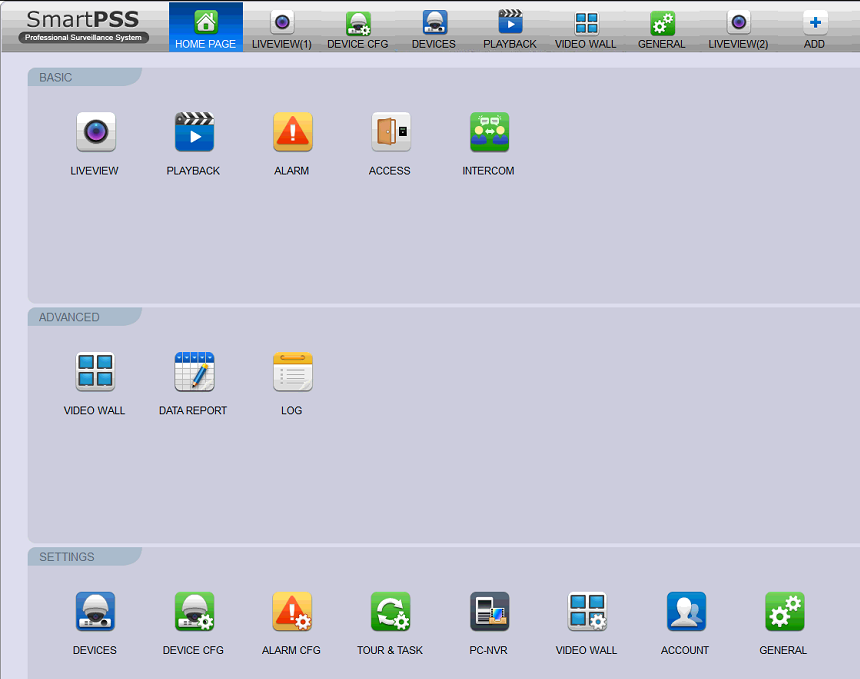

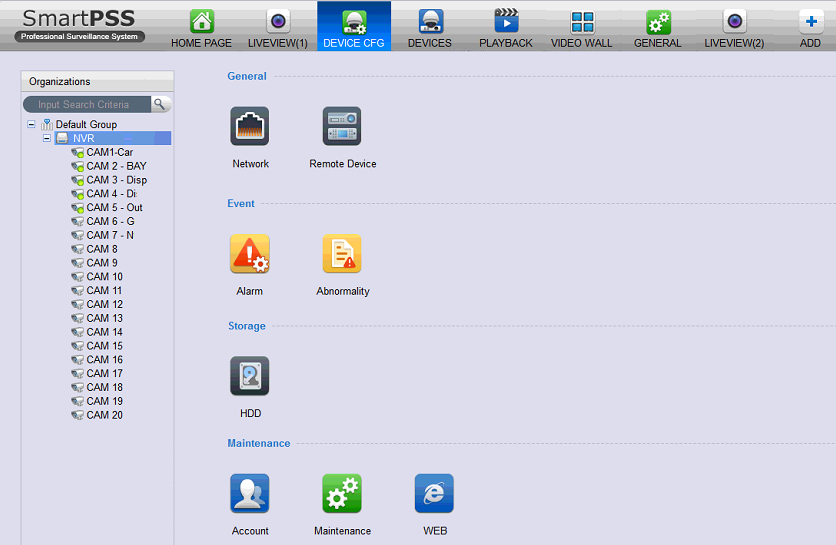
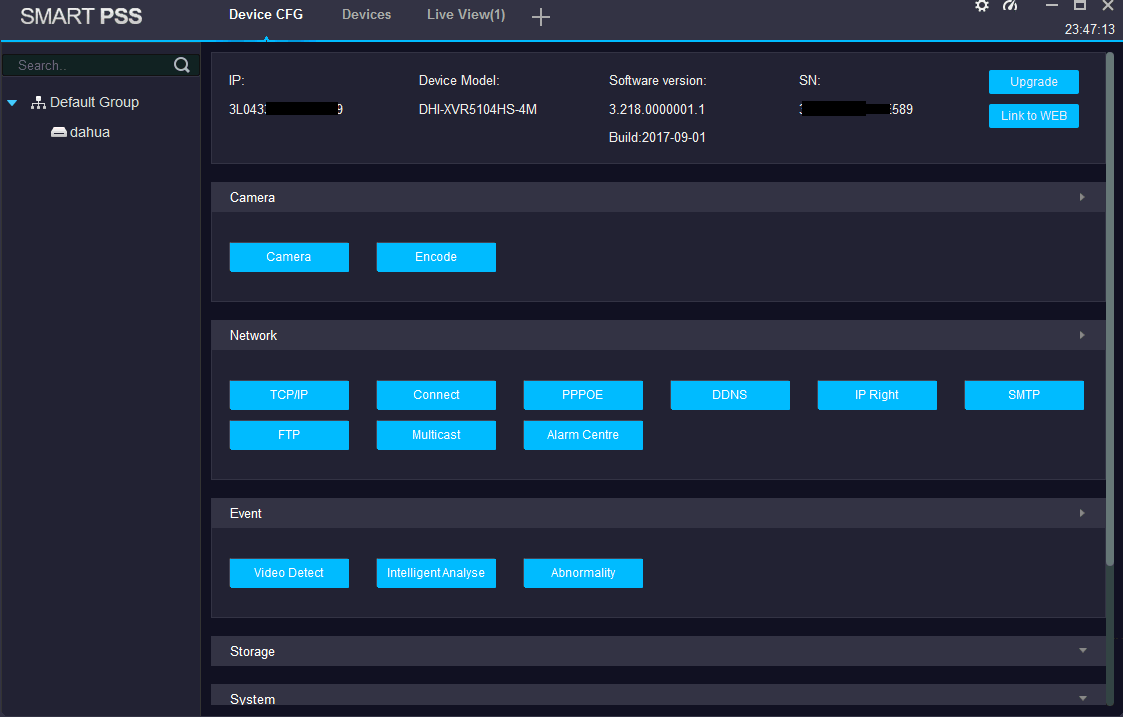
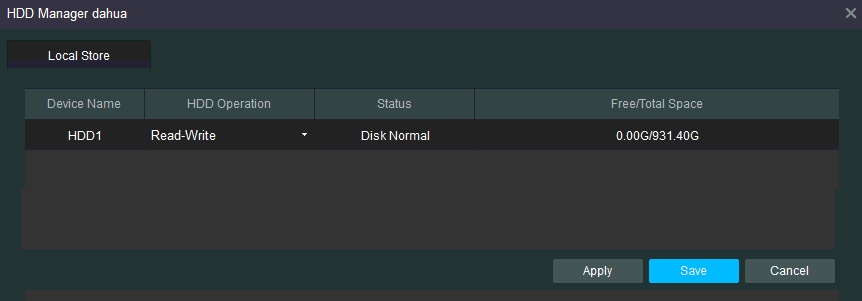
As the DVR has built-in local storage, and it can cache a lot of data. This may cause the DVR to keep uploading old footage. In order to make it easy to configure for cloud recording, we recommend disabling the local storage, or delete all local files and make the disk read-only while you are configuring the DVR. After you have finished configuring the DVR, you can re-enable the local storage. You can try to disable the local storage from the following screen:
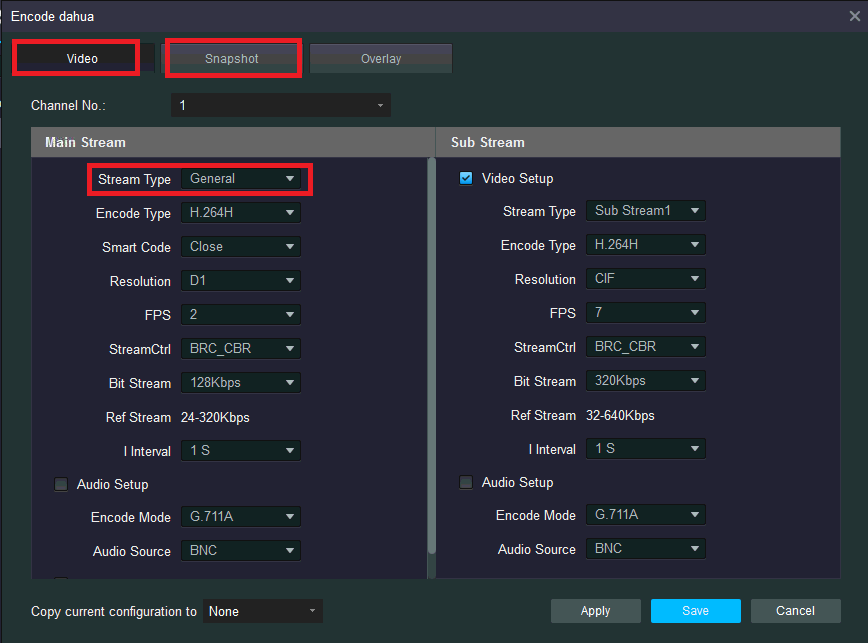
For video recording, you need to configure the video parameters. For the Stream Type dropdown, please select “General” if you want continuous recording; otherwise, select Video Detect (or Motion Detection). The video parameters should be based on your CameraFTP subscription. The bit rate is a little tricky, please refer to the bandwidth calculator in Section 2 of this document. For image recording, please click “Snapshot”.
After you have configured for one channel (camera), you can copy the configuration to other cameras (channels), just click “Copy current configuration to” button and select the channels that you want to copy to.
Click Network (or Storage?) button in the Device Config screen, then click FTP, you can config FTP settings in the following screen:
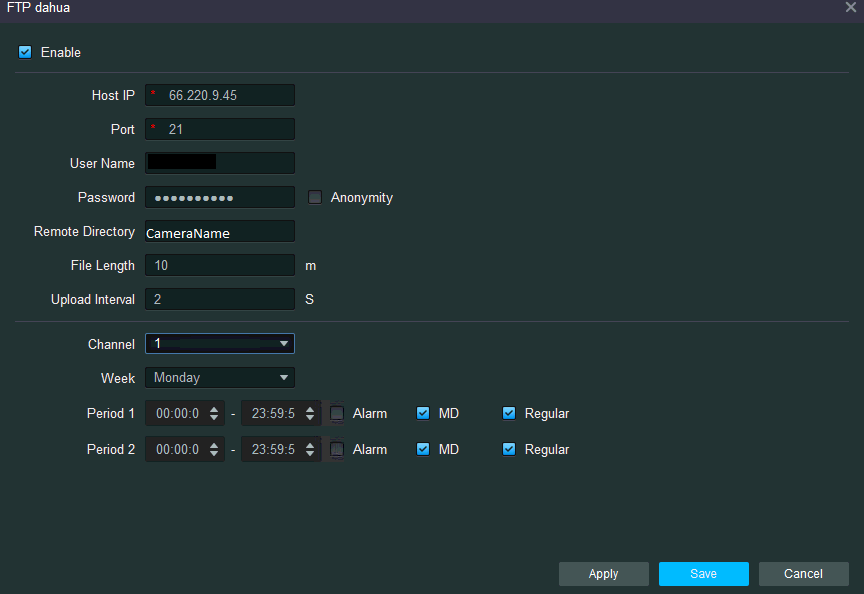
The FTP settings page is not well designed. The FTP account info applies to all channels/cameras; but the schedule part does not. You need to set for each channel and every day of week. Note “MD” stands for Motion Detection, “Regular” means continuous (recording).
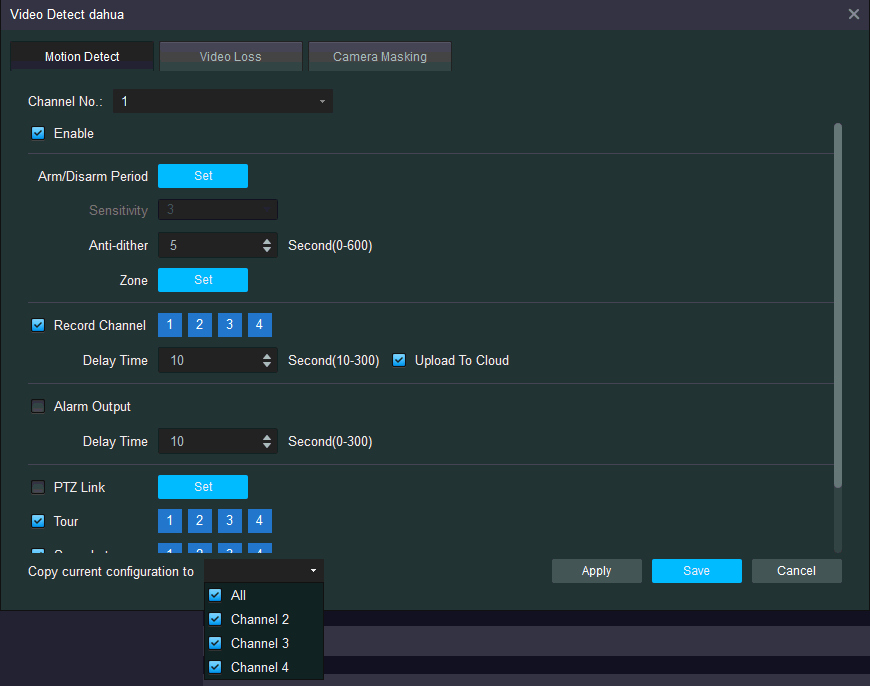
From the Device Config screen, click Video Detect (or Alarm) in the Event Section, you can configure video motion detection settings:
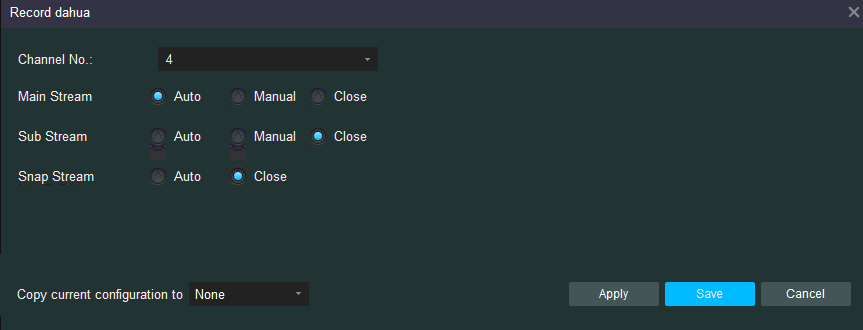
You can also define which video stream to record. Click Record, then click Record Controll, it will display the following screen:
As mentioned, Dahua DVR / SmartPSS does not always work correctly. After you’ve configured it, you need to test it.
4. Use CameraFTP VSS with Dahua DVR system
CameraFTP VSS software can use a PC as a CCTV DVR system. It can display live camera videos on your computer screen, while also recording the video/image to the cloud (and the local disk). Dahua DVR is compatible with CameraFTP VSS software. Using CameraFTP VSS with Dahua DVR is easier to setup than uploading directly from the DVR. However, it requires a PC and CameraFTP VSS Software must be always running.
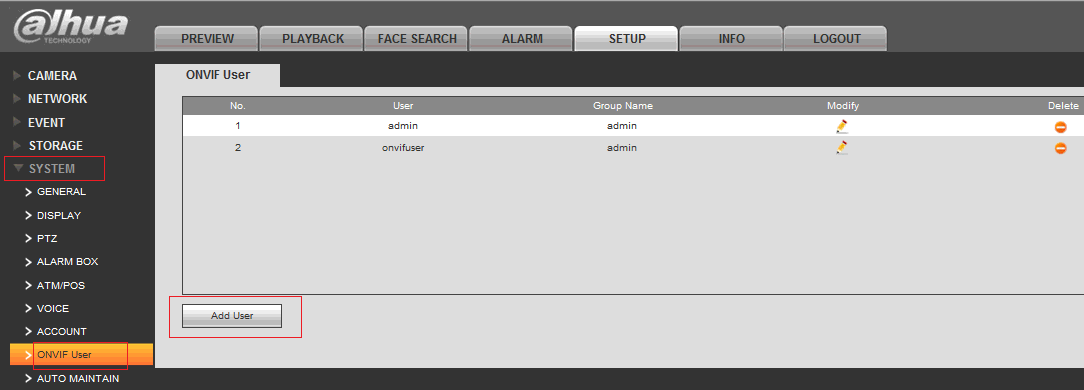
Dahua DVR supports the standard ONVIF protocol. However, you need to add an ONVIF user account for it to work. To add an ONVIF user account, click the System tab, then click ONVIF User. Click Add User to add a user as shown below. You can name the user as “onvifuser”.
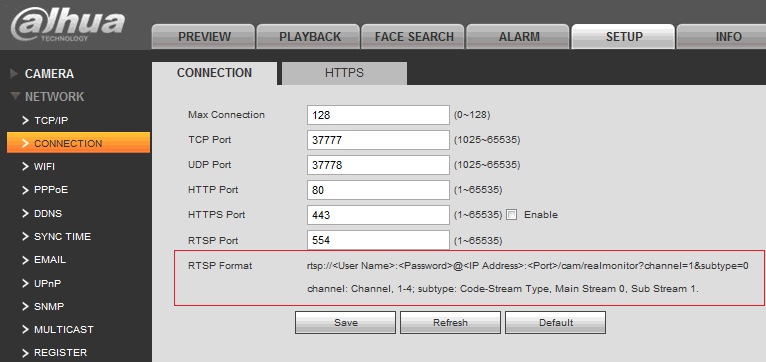
CameraFTP VSS can automatically find the video stream URLs. If your DVR has many channels, you can manually enter the video stream URL. CameraFTP VSS allows you to add multiple cameras with the same IP address. Please see the screenshot below.
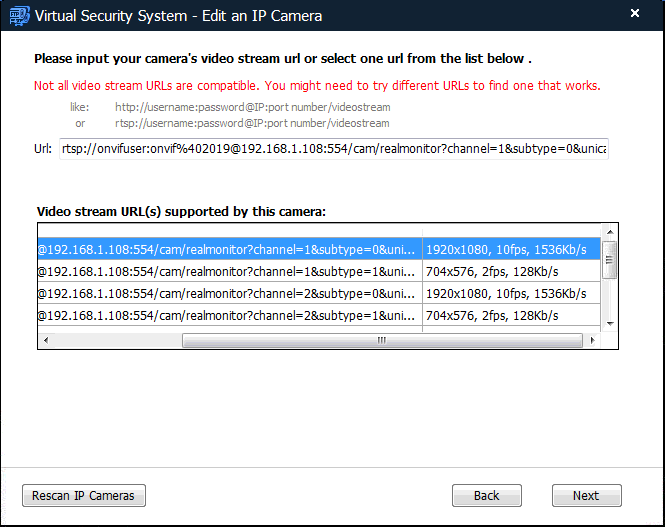
For more detailed info about using CameraFTP VSS, please visit CameraFTP VSS manual.
5. Separate multi-channel footage into different camera folders
If you configured the DVR to record to the cloud directly, the DVR will upload all files to the same one camera folder. This makes it hard to view the cameras, and it violates our service agreement. The last step is to separate them into different camera folders. This step is usually done by CameraFTP Support staff.
If you’ve setup a multi-channel DVR, please make sure to contact CameraFTP so that we can help separate files into different camera folders.
6. CameraFTP Viewer
After your DVR (cameras) is setup, you can visit www.cameraftp.com to live monitor or play back the recorded footage from anywhere. You can also download CameraFTP Viewer App for iOS, Android and Windows Phone.
every post is very informative for your health ..
every post is very informative for your health ..
every post is very informative for your health ..
please help me, my problem is not solved.