NOTE!
•Enter a valid SMTP server address and port number, and then select Enable TLS/SSL if required.
•Only certain DVR models support image attachment. You may click
Test to check whether the email can be sent successfully.
3.Click Apply to save the settings.
Multicast
Multicast can be used to realize live view when the number of connecting Web clients exceeds the limit the DVR can accommodate.
1.Click System > Network > Multicast.
2.Select the check box to enable multicast, and then enter the multicast IP and port number.
0
Enable Multicast
Multicast IP
Port
206 . 7 . 102 . 212
880
Apply Exit
3.Click Apply to save the settings.
4.Log in to the Web client and set Live View Protocol to Multicast under Setup > Client.
NOTE!
Set the multicast IP correctly. Multicast address is class D address with the range 224.0.0.0 through 239.255.255.255; some are for special use:
•224.0.1.0–238.255.255.255 can be used on the Internet.
•224.0.0.0-244.0.0.255: only for use on LAN.
•224.0.0.1: all-hosts group address, which refers to all the multicast-
capable hosts and routers on a physical network.
•224.0.0.2: for all routers on this subnet.
•224.0.0.5: for all OSPF routers.
•224.0.0.13: for all PIMv2 routers.
•239.0.0.0–239.255.255.255 are for private use like 192.168.x.x.
11 disk configuration
Disk Management
View disk information, including total and free disk space, disk status, disk type, disk usage, and disk property. Admin users can format disks and edit disk property.
1.Click Storage > Hard Disk.
.
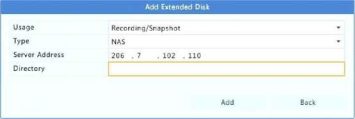
2.To add a disk, click Add. In the dialog box displayed, select disk usage (recording or backup) and disk type (currently NAS only),
enter the server address and directory, and then click Add. Up to eight NAS disks are allowed.

.
3.To edit disk property, click , and then modify disk usage (recording or backup) and disk property (Read/Write, Read Only or Redundant) as needed.
NOTE!
|
n No.
|
Total(GB)
|
Free(GB)
|
Status
|
Type
|
Usage
|
Prope… Edit
|
Delete
|
|
1
|
0.00
|
0.00
|
Abnormal
|
Local
|
Recording/Snaps…
|
Read/…
|
.
|
|
□ 2
|
2794.52
|
2300.75
|
Normal
|
Local
|
Recording/Snaps…
|
Read/… y
|
.
|
|
□ 3
|
2794.52
|
2281.25
|
Normal
|
Local
|
Recording/Snaps…
|
Read/… y
|
.
|
|
□ 4
|
2794 52
|
2288.75
|
Normal
|
Local
|
Record ing/Snaps…
|
Read/… y
|
.
|
|
□ &
|
2794.52
|
2319.75
|
Normal
|
Local
|
Recording/Snaps…
|
Read/… y
|
.
|
|
□ 6
|
2794 52
|
2331.75
|
Normal
|
Local
|
Recording/Snaps…
|
Read/… y
|
.
|
|
□ ?
|
2794.52
|
2278.00
|
Normal
|
Local
|
Recording/Snaps…
|
Read/.,, y
|
.
|
|
□ 8
|
2794.52
|
2281.25
|
Normal
|
Local
|
Recording/Snaps…
|
Read/… y
|
.
|
|
.
|
.
|
.
|
Refresh
|
Add
|
Format
|
.
|
Exit
|
•Disk property can be edited if the disk is used for recording.
•The Redundant property is available to certain DVR models.
•You may use external eSATA disks for recording or backup purpose and unmount them if necessary.
4.To format a disk, select the disk and then click Format. A confirmation message appears. Click Yes.
NOTE!
•Local disks will be formatted automatically when installed.
Extended disks will not.
•Format a disk with caution. All data will be removed.
Space Allocation
Allocate space to store videos of a specified camera.
1.Click Storage > Allocate Space.

