Synology Camera Full Guide, Using Synology cameras can bring greater convenience to businesses in terms of procurement, management, and maintenance, enhancing the overall user experience for their current surveillance system.
How do I add a Synology Camera?
Purpose
This article introduces different methods to add a Synology Camera: via the Surveillance Station web interface, the desktop client Surveillance Station Client, or the mobile app DS cam. Users of wireless Synology Camera need to use DS cam to configure the network settings. For users who haven’t set up a Synology NAS, the desktop utility Synology Camera Tool can be used to find wired Synology Camera and configure their network settings before adding them.
Environment
• Wired Synology Camera models
◦ Surveillance Station 9.1 or above
· Android 3.7.0 / iOS 5.6.0 or above
• Wireless Synology Camera models
◦ Surveillance Station 9.2 or above
· Android 3.10.0 / iOS 5.9.0 or above
Resolution
Add to Surveillance Station
Before you start, complete the camera hardware setup and make sure your Synology Camera and Synology NAS are on the same network.1
By default, Synology Camera applies the DHCP protocol.
Use Surveillance Station or Surveillance Station Client
• Auto-detected cameras
When a new Synology Camera
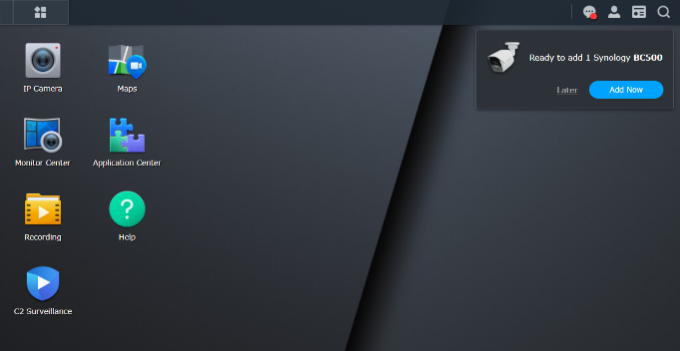
2 has been connected to your network, a pop-up message will appear in the upper-right corner of the Surveillance Station desktop. Click Add Now and
follow the wizard to initialize
3 and set up the camera.
• Add later or together with third-party cameras
Launch the IP Camera application, click Add, and
follow the wizard to configure the camera.
Use DS cam
• Auto-detected cameras
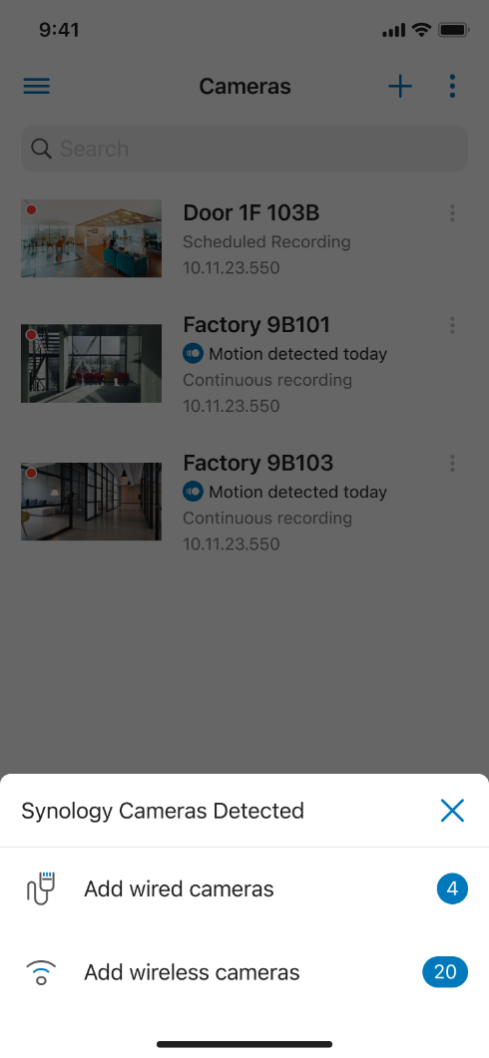
When a new Synology Camera
2 has been connected to your network, or detected by your Bluetooth, a pop-up message will appear from the bottom of the page. Click Add Now and
follow the wizard to initialize and set up the camera.
4
• Add later
Go to the Cameras page, tap

from the upper-right corner, and follow the wizard (
Android/
iOS) to add the camera.
Pre-configure with Synology Camera Tool
To configure and connect to Synology Camera devices before setting up a Synology NAS, download and launch Synology Camera Tool.
1.Check the auto-discovery list. If you do not see your cameras:
◦ Add specific cameras:
Click Find Devices and select Find specific device. Enter the required information and click Find.
◦ Add multiple cameras in an IP range:
Click Find Devices and select Scan IP Range. Enter the required information and click Scan.
2.Select cameras with the same status and click More to initialize or authenticate them.
◦ Initialize: Set the camera name, account, and password if it is the first time you connect to the Synology Camera.
◦ Authenticate: Enter the correct credentials to authenticate the cameras.
Once complete, you will be able to click on the IP address of the devices to open their web interface.
3.To configure network settings or update the cameras, click More.
◦ Configure Network: Assign fixed IP addresses.
◦ Update Firmware: Update cameras to the latest version.
Notes:
1.If the camera and NAS are on a different network, refer to
this article for more information.
2.In this context, “new” refers to a camera that has not been initialized, i.e., its credentials have not been set up.
3.If the camera’s IP address is 192.168.0.50, modify the IP address on the camera information page before you initialize it.
4.If the camera’s IP address is 192.168.0.50, the status will show Disconnected after the adding. Tap More > Edit Connection to modify the camera address before you initialize it.
What can I do if I can’t find my wired Synology Camera?
Symptoms
You cannot find your wired Synology Camera in the auto-search list of Surveillance Station, DS cam, or Synology Camera Tool.
Environment
• Wired Synology Camera models
• Surveillance Station 9.1 or above
• DS cam (Android 3.7.0 / iOS 5.6.0 or above)
Resolution
The following are some common reasons why you may not be able to find your wired Synology Camera. Make sure to update Surveillance Station and DS cam to the required versions, and check the items listed below.
Camera Power
If the LED indicator is off, the camera is powered off. If you are sure the cable is plugged properly, refer to the possible causes below and try the steps:
◦ PoE (Power over Ethernet): Check the LED indicator of the PoE switch to verify the power status.
◦ Power cord: Replace the power cord if it is malfunctioning.
• Electricity blackout or voltage transients: Consider using an Uninterruptible Power Supply (UPS) for extra protection.
• Demanding environment: Check if the current environment meets the requirements listed in the camera’s hardware installation guide.
DHCP Server
You might not be able to find your camera if your network lacks a DHCP server or if the server is unable to assign an IP address. In such cases, the camera will use the default static IP address 192.168.0.50. Follow the steps below:
1.Set your computer to the same subnet as the camera.
◦
Windows: Go to Windows > Settings > Network & Internet, click the Properties button under Network status, and click the Edit button under IP settings.
◦
macOS: Go to Apple menu > System Settings > Network.
2.Open a web browser and enter “192.168.0.50” in the address bar. You should be able to see the web interface of your Synology Camera.
3.Enter and confirm the account name and password.
4.Go to the Network page, select Use static IP, and assign an address.
If you have multiple Synology Camera devices, note that all of them will use 192.168.0.50 and cause conflicts. Power on one camera at a time and repeat Steps 2 to 4 to assign static addresses.
Camera Block List
You may not be able to find your Synology Camera because your Synology NAS or computer is on the camera’s block list. Depending on the search results:
If you can find your camera in Synology Camera Tool but not in Surveillance Station or DS cam:
Your Synology NAS might be blocked by your camera. Unblock it to continue.
2.Go to Network > Security.
3.Click Block List and remove your Synology NAS.
If you cannot find your camera in Synology Camera Tool:
Your computer might be blocked by your camera. Change the computer’s IP address.
1.Switch your computer to Wi-Fi or use your mobile phone’s hotspot. Your computer will be given a different IP address automatically.
2.Return to Synology Camera Tool and click Retry and find your camera.
3.Click on the camera’s IP address to access its web interface.
4.Go to Network > Security.
5.Click Block List and remove your computer.
How do I receive external event data from third-party systems via webhooks?
Purpose
Surveillance Station can integrate with third-party systems, such as alarm and access control systems, through webhooks to obtain event data. Event information from external sources can be sent into Surveillance Station and used in the following actions1:
• Display event information in real-time on the Monitor Center
• Save event information and play back the corresponding recordings
• Send alerts to the Monitor Center
This article is a guide on configuring action rules with webhooks to receive data from third-party systems.
Environment
• Surveillance Station 9.1.4 or above
Contents
Resolution
A webhook URL must be properly configured to add a bookmark or display an alert in Monitor Center when a webhook event is triggered.
A. Configure a webhook URL
1.Go to Action Rule and click Add.
2.In the Information page, select Triggered as the Rule type.
3.In the Event page, select Webhook as the Event source to create a webhook URL.
2
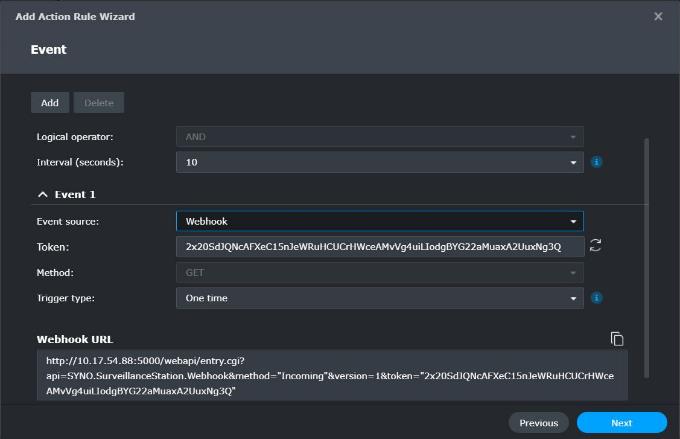
4.Specify a unique token for this webhook event. You can use the auto-generated token or customize your own. To establish a proper connection between third-party systems and Surveillance Station, the tokens must match.
5.Choose a trigger type between One time and Interval. Click Advanced Webhook Ingredients button to add optional ingredients such as the text1, text2, text3 and time.
◦ One time:
Send the webhook URL when the event occurs.
For example:
https://{NAS_IP:PORT}/webapi/entry.cgi?api=SYNO.SurveillanceStation.Webhook&method=”Incoming”&version=1&token=”UserDefinedToken”&text1=”Access control event”&text2=”Device 01″&text3=”John Doe unlocked the door”&time=1970-01-01T00:00:00
◦ Interval:
Send the webhook URL with the ingredient status (status=”active” when the event starts and status=”inactive” when the event ends).
3,
4
For example:
· When the status is active:
https://{NAS_IP:PORT}/webapi/entry.cgi?api=SYNO.SurveillanceStation.Webhook&method=”Incoming”&version=1&token=”UserDefinedToken”&status=”active”&text1=”Access control event”&text2=”Device 01″&text3=”John Doe unlocked the door”&time=1970-01-01T00:00:00
· When the status is inactive:
https://{NAS_IP:PORT}/webapi/entry.cgi?api=SYNO.SurveillanceStation.Webhook&method=”Incoming”&version=1&token=”UserDefinedToken”&status=”inactive”
6.Click Next and quickly pair the Add a bookmark or Trigger an alert actions with the webhook event.
8.Click on the Add button to add more actions if desired.
9.In the Schedule page, you can customize when the action rule should be active.
B. Configure action to add a bookmark and display the event information on Monitor Center
After creating a webhook URL, you have the option of pairing an add bookmark action with the webhook event. This action can be customized in the following ways:
• Device: Select a camera to pair with the event.
• Duration: Specify bookmark duration in seconds. If the webhook trigger type is set as “interval”, the bookmark duration will be determined by the event time.
• Name: The action rule name is used by default. You can customize the name by clicking on the Add Ingredient button to add specific information sent via webhook ingredients, such as the webhook text1, text2, and text3.
• Description: Customize a text description for the bookmark. You can click the Add Ingredient button to add specific information sent via webhook ingredients such as the action rule name, webhook text1, text2, and text3.
◦ Enable Display bookmark information on Monitor Center channels to show the information in real time in Monitor Center.
◦ Auto-lock the bookmark.
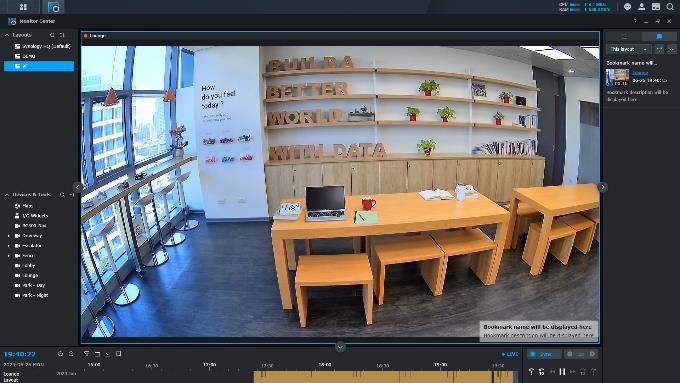
C. Configure action to send alerts to Monitor Center
After creating a webhook URL, you have the option of pairing an action with the webhook event to send alerts to Monitor Center.5 This action can be customized in the following ways:
• Device: Select a camera to pair with the event.
• Duration: Specify how long the alert will display in Monitor Center in seconds.
◦ Enable Only trigger when the specified value exists in data of webhook to add an alert trigger condition when the text1, text2, or text3 contains specified values.
Notes:
1.Refer to
this article for a full list of applicable actions.
2.The webhook URL generated by the system uses the current login URL. If you want to integrate with external services, ensure that the webhook URL you are using is accessible by those external services.
3.An error may occur if an inactive status is never received.
4.If “Add bookmark” is selected as an action, the bookmark duration will lengthen until the event ends.
5.After setup, this alert can also be managed in the alert settings in Monitor Center.
How do I send Surveillance Station data to third-party systems via webhooks?
Purpose
There are many third-party systems that offer additional services such as alarm systems and access control systems. Surveillance Station allows you to send event data such as Face Recognition and License Plate recognition results to third-party systems via webhooks for easy integration.
This article is a guide on configuring action rules with webhooks to send data to third-party systems.
Environment
• Surveillance Station 9.1.1 or above
Resolution
When an action rule is configured, the system will automatically execute an action when an event is triggered. To configure an action rule:
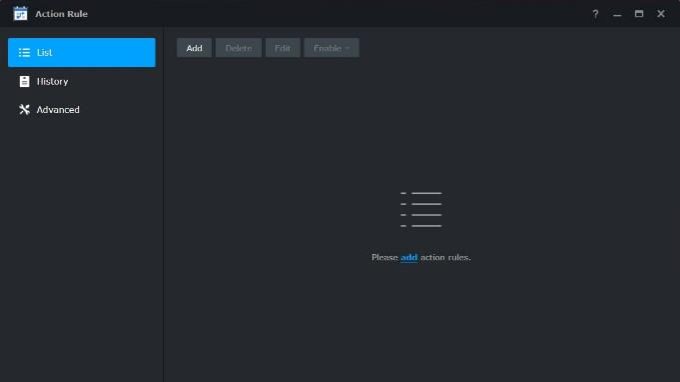
1.Go to Action Rule and click Add.
2.In the Information page, select Triggered as the Rule type.

3.In the Event page, select the event that will trigger the outgoing webhook.

4.In the Action page, select Webhook as the Action device.
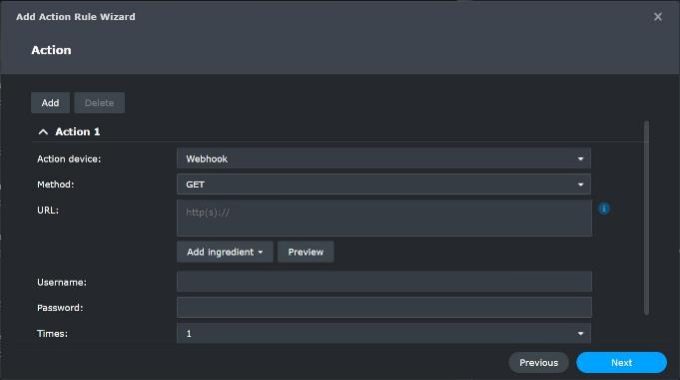
5.Choose a method between GET/POST/PUT, and fill in the third-party system’s URL and sign in information. Make sure that the third-party system supports the method chosen here.
6.If the selected event supports sending out additional information, the Add ingredient and Preview buttons will appear.

Click Add ingredient and insert parameters from the available ingredients list. Check
Supported Ingredients for available information that can be sent.

◦ GET: Add and send the ingredients in the URL.
◦ POST/PUT: Add and send the ingredients in the body.
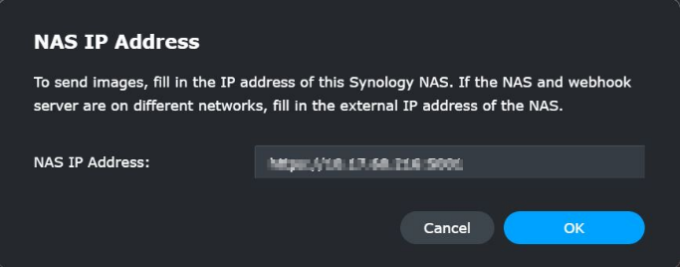
If an one of the ingredients selected involves images (e.g., Face capture, Profile photo), fill in the IP Address of this NAS. If the third-party system is in a different network, an external IP address will be required to retrieve the images. By default, the local IP address of the NAS will be used.
7.Click Test Send and confirm that the information is successfully received by the third-party system.
◦ A green checkmark will appear if the connection to the third-party system is successful.

◦ If Surveillance Station receives a response from the third-party system, a Response specifics hyperlink will appear. Click on the hyperlink to check the response details.
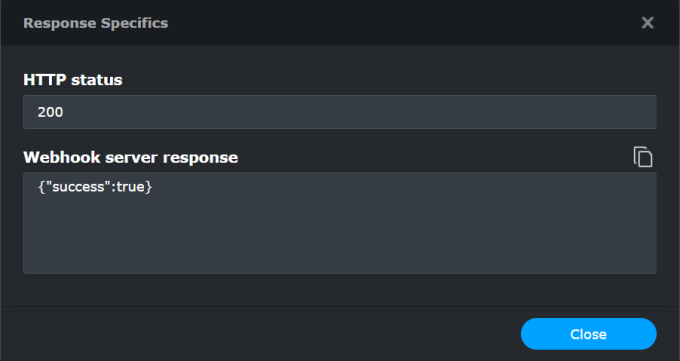
◦ If the connection fails, check that the URL is correct.
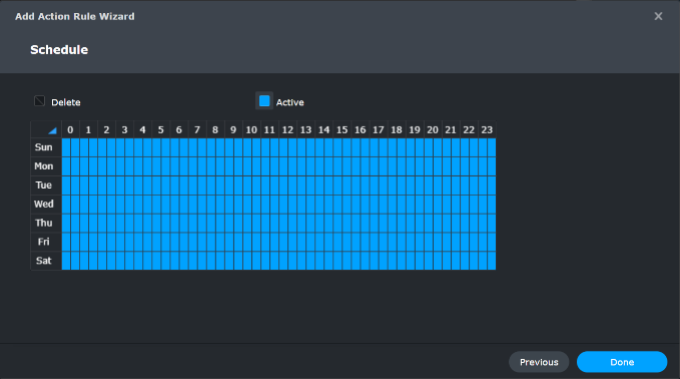
8.In the Schedule page, you can customize the schedule when the action rule should be active.
How do I build a Smart Home through IFTTT?
Details
By combining Surveillance Station Action Rule with IFTTT (if this, then that), you can build a Smart Home with just a few clicks. Smart bulbs can be turned on when motion is detected, and front-door security cameras can start recording when the lock is opened.
Contents
Resolution
Use IFTTT services as the Action Rule trigger
This section takes sending emails when Surveillance Station enters Home Mode as an example:
1.In Surveillance Station, launch Action Rule and click Add.
2.Follow the instructions provided by the Add Action Rule Wizard and fill in the required information.
3.In the Action window, select either IFTTT or Webhook as the Action Device.
4.From your browser, go to the
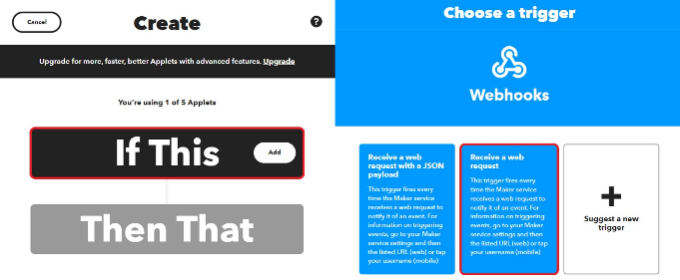
IFTTT website, sign in, and click Create.
5.Click If This. In this example we will use Webhooks to create an event as the trigger.
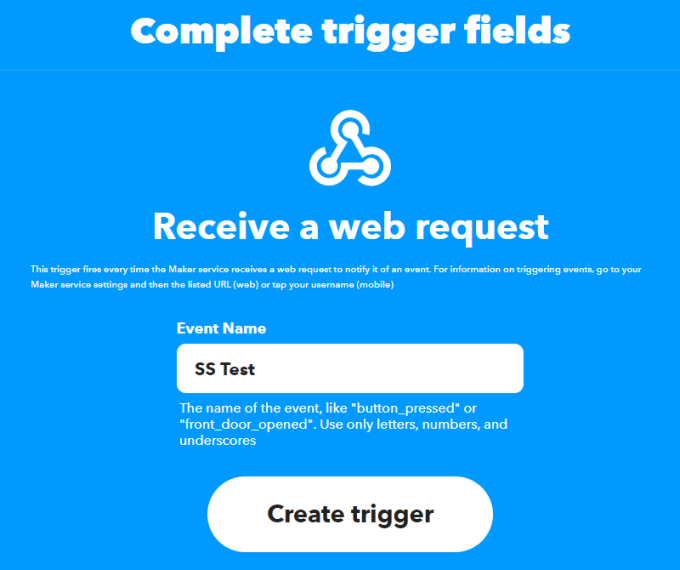
6.Enter an event name to create a trigger.
7.Click Then That to choose an action (e.g., send an email). Complete the action fields to create an action service.
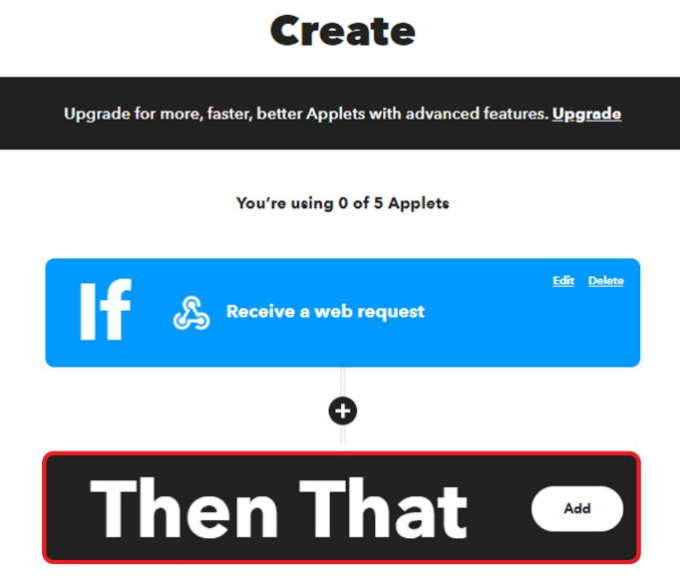
8.Click Continue to review your newly created Applet and finish.
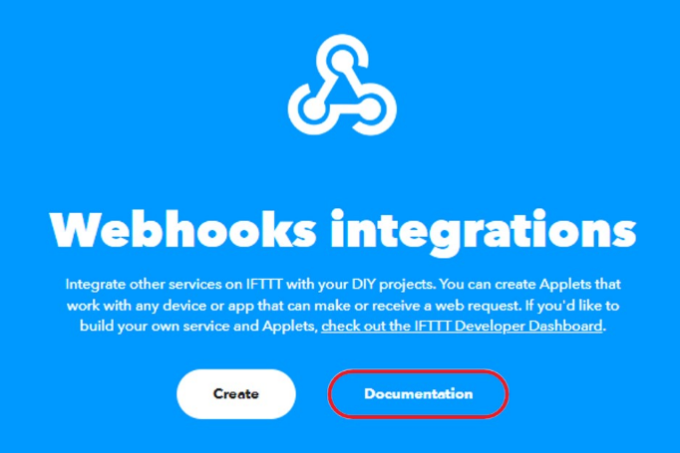
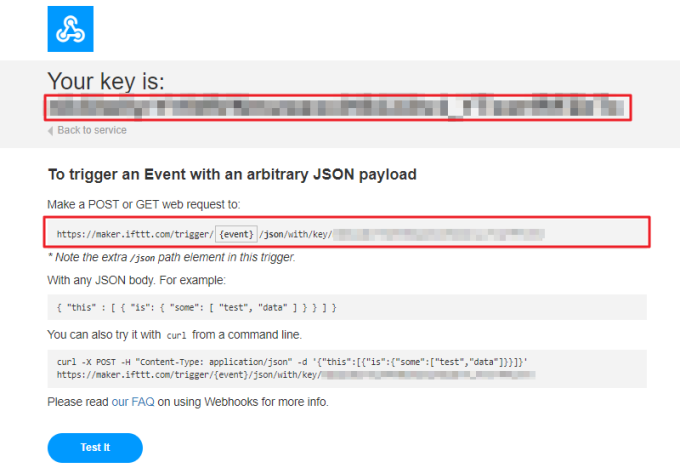
9.Once your new Applet is created, go to
IFTTT webhooks, click Documentation and find the key and URL. You can enter value parameters if needed, and click Test It to try the connection.
10.Go back to Action Rule on Surveillance Station.
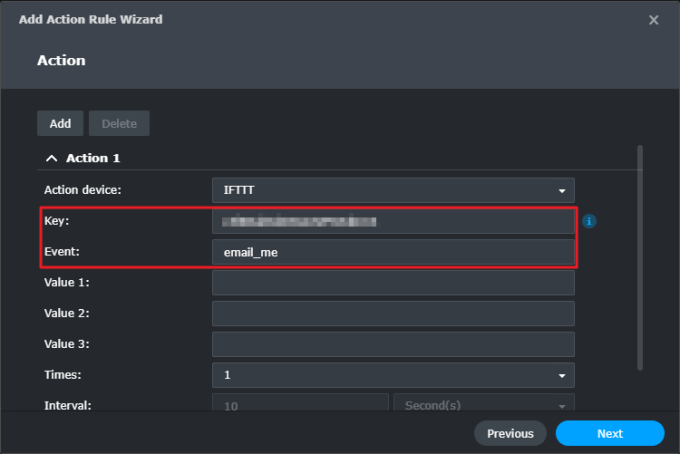
◦ If you selected IFTTT in Step 4, enter the following:
· Key: Enter the key found in the Webhooks documentation page.
· Event: Enter the event name you used to create the IFTTT applet (see Step 6).
· Value 1 to Value 3: (optional) Fill in if needed.
◦ If you selected Webhooks in Step 4, enter the following:
· URL: Enter the URL found in the Webhooks documentation page. Replace {event} with the event name.
· Username: Enter the username of your IFTTT account.
· Password: Enter the password of your IFTTT account.
· Method: HTTPS (Hypertext Transfer Protocol Secure) is used for requests and responses between clients and servers. You can choose from the following methods:
· Auto: A GET request will be sent first; if it fails a POST request will be sent next.
· GET: Requests data from a specified resource. As it can be cached and will remain in the browser history, it is not suitable for processing sensitive data.
· POST: Sends user-generated data to a server. Data will be enclosed in the body of the request message.
· PUT: Sends data to a server to create or update a resource. It completely overwrites what currently exists at the target URL.
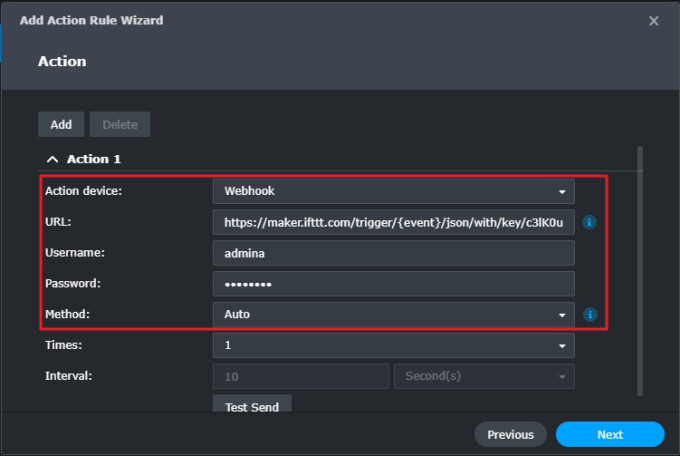
11.Click Test Send to check the connection and click Next.
12.Set up the Schedule and finish the setup.
Use IFTTT services as the Action Rule event
This section takes triggering recording when a door lock is opened as an example:
1.In Surveillance Station, launch Action Rule and click Add.
2.Follow the instructions provided by the Add Action Rule Wizard and fill in the required information.
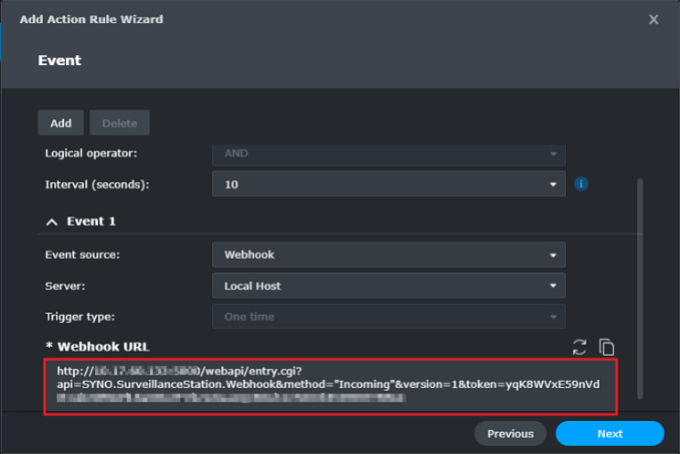
3.In the Event window, select Webhook as the Event source, copy the Webhook URL and click Next.
1
4.From your browser, go to the
IFTTT website, sign in, and click Create.
5.Click If This and select the appropriate service.
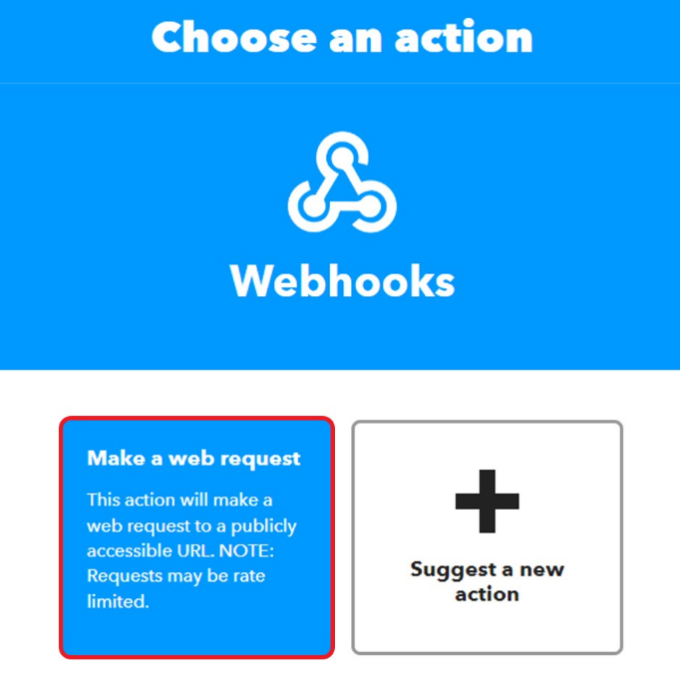
6.Click Then That and select Webhooks as the action service. Use the Webhook URL copied from Action Rule to set the Webhooks as the action service.

7.Go back to Action Rule on Surveillance Station. Modify the required settings and click Next.
8.Set up the Schedule and finish the setup.
Notes:
1.The webhook URL generated by the system uses the current login URL. If you want to integrate with external services, ensure that the webhook URL you are using is accessible by those external services.
Why can’t I use AXIS Barcode Reader in Surveillance Station?
Symptoms
• You cannot install AXIS Barcode Reader or AXIS Barcode to Synology Surveillance Station on the AXIS camera platforms armv7, armv7hf, and artpec.
• You are unable to add AXIS Barcode Reader as a transaction source in the Transactions application.
Diagnosis
This is because AXIS updated the Barcode Reader into a new QR code reader that requires a paid license. As a result, Surveillance Station 9.0.2 and above no longer supports AXIS Barcode Reader related functions.
Users who have added AXIS Barcode Reader before updating to Surveillance Station 9.0.2 should not be affected. For more information, refer to the AXIS official website.
How do I reset my Synology Camera?
Purpose
This article explains the difference between methods to reset your Synology Camera.
Resolutions
The following table shows the 2 reset types and their respective behaviors:
| Reset Types |
Reset Process |
LED Indicator During Reset |
| Soft Reset |
Press and hold the RESET button1 for 4 seconds. |
Rapid blinking |
| Hard Reset |
Press and hold the RESET button1 for 10 seconds. |
Soft reset your Synology Camera
• The following items will be reset:
2
◦ User accounts are restored to default. You will need initialize your camera again.
◦ HTTP/HTTPS/RTSP ports will be reset to 80/443/554.
◦ IP address, DNS, gateway, and other network interfaces will switch to DHCP. If your environment does not support a DHCP server, the camera’s IP will revert to the default IP address 192.168.0.50 after 30 seconds following a soft reset.
◦ Previously saved SSIDs will be removed (wireless camera only).
◦ Auto Block and IP address filter will restore to the default settings.
• After completion, follow the instructions in
this article to add your camera.
Hard reset your Synology Camera
• A hard reset will factory reset your camera.
2
• After completion, follow the instructions in
this article to add your camera.
Notes:
1.Refer to the
product manual of your device to find the RESET button.
2.The firmware version remains unchanged.
How do I add an unsupported IP camera to Surveillance Station?
Details
To add cameras that are not in the IP Camera Support List, you can use Integration Tool to integrate third-party cameras, follow the instructions in the Generic/ONVIF setup, or configure the User Define setup to stream videos to designated storage locations.
Resolution
Generic/ONVIF setup
The Generic1/ONVIF setup is compatible with a wide range of camera models. This setup allows Surveillance Station to automatically loads device configurations, beneficial for cameras with frequent firmware updates including new functions. (Supported functions)
Surveillance Station 9.0 or above
1.Launch IP Camera and click Add.
2.Check if your camera is shown on the list:
◦ Generic: If your camera under Model is shown as Unknown, it can be added using the Generic API. Select the camera and continue.
◦ ONVIF: If your camera under Brand is shown as ONVIF, select the camera and continue.
◦ Add Manually: If you do not see your camera, click Add Manually.
· Generic: Select [General] from Brand, and choose a model based on your Surveillance Station version:
· For 9.1, choose [Generic_General].
· For 9.0, choose [Generic_brand] (e.g., [Generic_AXIS]).
· ONVIF: Select [ONVIF] from Brand. Select All functions or Streaming only from Model.
Surveillance Station 8.2
1.Go to IP Camera > Add > Add Camera.
2.Select Quick Setup or Complete Setup and click Next.
3.Do either of the following:
◦ Generic: Select your camera from Brand. From Camera model, select [Generic_brand] (e.g., [Generic_AXIS]).
◦ ONVIF: From Brand, select [ONVIF]. From Camera model, select All functions or Streaming only.
4.Fill in the required information and follow the wizard. (
Detailed steps)
Integration Tool
Integration Tool allow users to submit requests for the inclusion of unsupported cameras in the IP Camera Support List by exporting their camera configurations. Go to IP Camera > More > Integration Tool and follow the wizard to complete the setup.
User Define setup
The User Define setup provides the highest compatibility and supports various network video streaming devices. It is suitable if you wish to stream RTSP/HTTP/RTMP2 videos or play mp4 files in Surveillance Station.
Please note that:
• User-defined cameras can only receive video streaming. Functions such as resolution settings and PTZ controls are not supported.
• Supported video formats include MJPEG (HTTP, RTSP), H.264 (RTSP, RTMP), H.265 (RTSP, RTMP), and MPEG4 (RTSP).
Surveillance Station 9.0 or above
1.Go to IP Camera > Add > Add Manually.
2.From Brand, select [User Define].
3.From Type, select Streaming-RTSP, Streaming-HTTP, Streaming-RTMP, or File.
4.Do either of the following:
◦ For Streaming-RTSP or Streaming-HTTP, enter the streaming path in the following format:
Username:Password@IP_address:port/video_path
3
◦ For Streaming-RTMP, copy and paste the RTMP path and key to your client.
◦ For File, click Select and add a file.
Surveillance Station 8.2
1.Go to IP Camera > Add > Add Camera.
2.Select Quick Setup or Complete Setup and click Next.
3.From Brand, select [User Define].
4.From Type, select Streaming-RTSP, Streaming-HTTP, or File.
5.Do either of the following:
◦ For Streaming-RTSP or Streaming-HTTP, enter the streaming path in the following format:
Username:Password@IP_address:port/video_path
3
◦ For File, click Select and add a file.
How do I troubleshoot Synology Camera’s hardware issues?
Purpose
This article lists common hardware issues of Synology Camera.
Resolutions
Camera not powered on
Check the LED indicator1 to verify if the camera powers on. If not, troubleshoot based on the following power sources:
PoE (Power over Ethernet)
• Make sure your PoE switch meets the IEEE802.3af standard or higher.
• Make sure the network cable is securely connected to both the camera and the PoE switch. If the cable is damaged or bent, or the RJ45 connector is damaged, replace the cable and try again.
• Try connecting the camera to a different network port on the PoE switch, and check the indicators on the PoE switch to rule out any port malfunctions.
• Try connecting only one camera at a time if multiple Synology Camera devices were connected to your PoE switch. If the camera powers on, your switch may not be supplying enough power for all devices. Check the output power specifications of your PoE switch.
Power adapter
• Make sure to use a 12V/1A DC adapter with a Ø2.1mm connector for wired Synology Cameras, or a 5V/1A adapter for wireless models. Using a non-compliant DC adapter may damage the camera and prevent it from powering on.
• Check the DC adapter and its cable for damage. If damaged, replace it before retrying.
• Your power circuit may be providing unstable power. Try connecting the DC adapter to a socket different from your current circuit to see if the camera starts properly.
Indicator not displaying a static blue light
Rapid blinks of the LED indicator implies that the camera is not yet ready. If a powered Synology Camera continues to display rapid blinks for more than five minutes2, and you cannot locate the camera through the Synology Camera Tool, Surveillance Station, or DS cam within the same local network, the problem may exist in the camera’s system. Contact Synology Technical Support for further assistance.
microSD card malfunctioning or unrecognized
If the microSD card is malfunctioning or not recognized by the camera, try formatting the card or make sure it meets the following requirements:
• Supported file system: exFAT.
• Supported microSD cards: Up to 256 GB. Larger cards may be unrecognized.
• We recommend using a Class 10 (C10) / UHS Speed Class 1 (U1) / Video Speed Class 10 (V10) high-speed microSD card with a minimum write speed of 10 MB/s.
Notes:
1.For details on the behavior of the Synology Camera LED indicator, refer to the
product manual of your model.
2.Under normal circumstances, Synology Camera completes the startup process and is ready for use within approximately 1 minute.
How do I troubleshoot wireless Synology Camera connection issues?
Purpose
This article lists common connection issues regarding wireless Synology Camera.
Environment
• Wireless Synology Camera devices
• Surveillance Station 9.2 or above
• DS cam (Android 3.10.0 / iOS 5.9.0 or above)
Resolution
Camera not found in DS cam
The LED indicator is on, but you cannot find your camera.
• Camera already added to another NAS.
Its Bluetooth function has been disabled to prevent unauthorized configuration. Hard reset the camera by pressing and holding the reset button for 10 seconds to reset all settings to factory default.
• Bluetooth issues
Connect to the camera using a QR code (
iOS/
Android).
Camera not connected to selected Wi-Fi
When you heard Connect Failed from the camera, consider the following issues:
• Incorrect Wi-Fi credentials
Make sure you have entered the correct username and password.
• Unsupported security type
Your wireless Synology Camera supports only WPA-PSK, WPA2-PSK, and WPA3-PSK security types. Select an SSID with the one of these supported security types.
Camera not connected to NAS
If the LED indicator is blinking slowly, your camera is connected to Wi-Fi but cannot connect to your NAS or NVR. Check if your devices are on the same subnet, if the DHCP is working, or if your devices are in the camera’s block list.
• Different subnets
Your Synology NAS and Synology Camera are on different subnets within the same LAN. Try these steps:
1.Select your wireless camera, tap

, and choose Edit Connection.
2.Tap Try Smart Connection to automatically set up port forwarding on your router.
If the camera still cannot connect to you NAS, refer to this article.
If your network do not have a DHCP server, or the server is unable to assign an IP address, you camera will use the default static IP address 192.168.0.50. Follow these steps:
1.Set the subnet of your computer to match that of the camera.
2.Open a web browser and enter 192.168.0.50.
3.Sign in and go to Network > TCP/IP.
4.Select Use static IP and assign an address.
5.Go to DS cam > Camera, tap

, and choose Edit Connection.
6.Update the the camera IP assigned in the previous step.
If you have multiple wireless Synology Camera devices, repeat steps 2-4 one at a time to assign each camera a static IP address.
Your camera may have blocked the addresses of your Synology NAS. Follow the steps below to unblock your device:
1.Use a browser and enter the camera’s IP address to access the web interface.
2.If you cannot access the web interface, the IP address of your camera may be also blocked by your computer. Change the computer’s IP address by switching to Wi-Fi or connect to a smartphone’s hotspot and try again.
3.Go to Network > Security > Block List.
4.Remove your NAS from the block list.
Unable to use QR code
If you are unable to add your camera using the QR code, consider the following issues:
• Insufficient brightness/proximity of the QR code
1.Increase the brightness of your smartphone screen.
2.Place the QR code 15-20 cm (around 7 inches) in front of the camera lens.
• Camera added to another NAS
Its QR code function has been disabled to prevent unauthorized configuration. Hard reset the camera by pressing and holding the reset button for 10 seconds to reset all settings to factory default.
• QR code scanned, but Connect Failed voice prompt heard
◦ Incorrect Wi-Fi credentials
Make sure you have entered the correct username and password.
◦ Camera already initialized
The Wi-Fi cannot be configured if the camera has been initialized (the account and password have been configured) to prevent unauthorized configuration. Soft reset the camera by pressing and holding the reset button for 4 seconds to reset the administrator’s login credentials to default.
◦ Unsupported security type
Your wireless Synology Camera supports only WPA-PSK, WPA2-PSK, and WPA3-PSK security types. Select an SSID with the one of these supported security types.
If your network’s SSID is hidden, tap Specify security type to select your security settings.
Synology Surveillance Station setup,
How to connect cameras to Synology NAS,
Synology Surveillance Station camera compatibility,
Synology IP camera setup guide,
Best cameras for Synology NAS,
Synology Surveillance Station guide,
Configure IP camera with Synology NAS,
Synology camera recording settings,
Synology camera security setup,
Synology NAS camera monitoring,
Synology NAS camera recording,
Synology camera motion detection settings,
Synology Surveillance Station remote Access,
How to set up security cameras on Synology,
Synology Surveillance Station notifications,
Synology Surveillance Station motion detection guide,
Synology camera live view setup,
Synology camera storage requirements,
Synology IP camera recording settings,
Synology NAS security system setup,
Step-by-step guide for Synology camera setup,
Connect Reolink camera to Synology NAS,
Best IP cameras for Synology Surveillance Station,
Set up Synology NAS for camera surveillance,
Synology NAS Surveillance Station configuration tips,
How to add Hikvision camera to Synology,
Integrating Synology Surveillance Station with IP cameras,
Synology camera motion detection troubleshooting,
Synology NAS as a security camera server,
How to set up Synology Surveillance Station alerts,
Best Synology NAS for camera surveillance,
Synology Surveillance Station license pack,
Synology NAS for security cameras,
Recommended cameras for Synology Surveillance Station,
Synology compatible IP cameras,
Buy Synology camera licenses,
Surveillance Station camera setup services,
Synology NAS for home surveillance,
Synology camera setup support,
Synology Surveillance Station home security setup,
How to configure motion detection on Synology,
Troubleshoot Synology camera connection issues,
Synology Surveillance Station recording settings,
Synology camera remote access setup,
Set up mobile app for Synology Surveillance Station,
How to add custom IP camera to Synology,
Synology Surveillance Station setup tutorial,
Fix motion detection on Synology Surveillance Station,
How to monitor Synology camera remotely,
Configure Synology NAS for video storage


