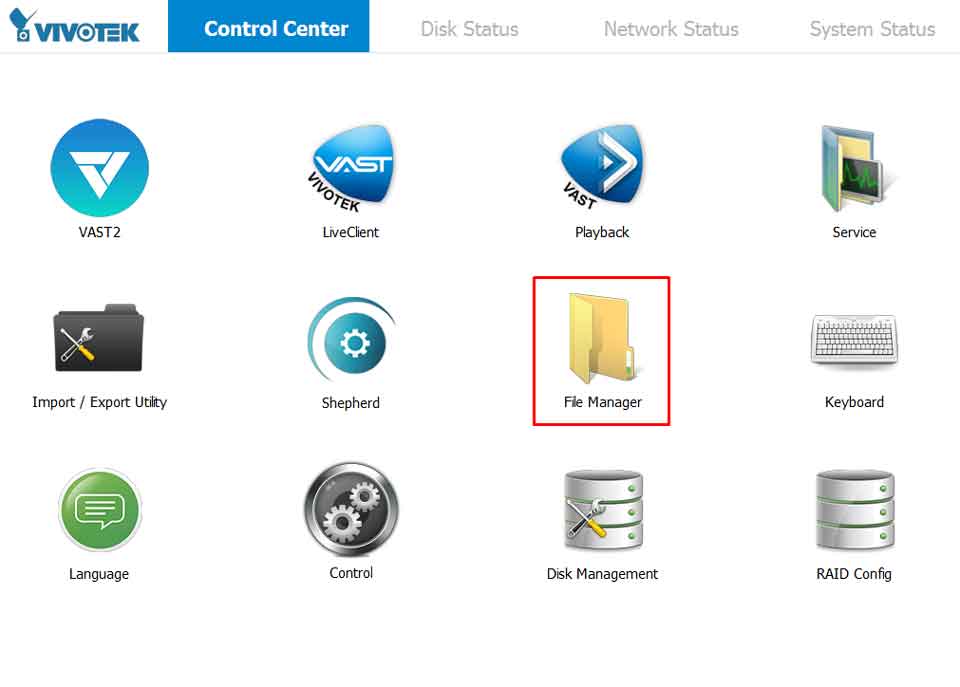
Vivotek NVR Windows based user guide, VIVOTEK’s NR9782 is a full-featured high-performance H.265 NVR. Equipped with a 3U 128-CH 16 Bay Rackmount network appliance, standard RAID capability and H.265 video codec, the total storage capacity of the NVR also endows the NR9782 with scalability and flexibility, making it perfect for large-scale transport or industrial applications as well as public spaces such as campuses.
Installation (Windows-based)
[NR9X82-v2] What type of RAM memory uses the NVR?
Both NR9782-v2 and NR9682-v2 supports dual-channel DDR4 2133MHz SDRAM. The following models are suggested for use:
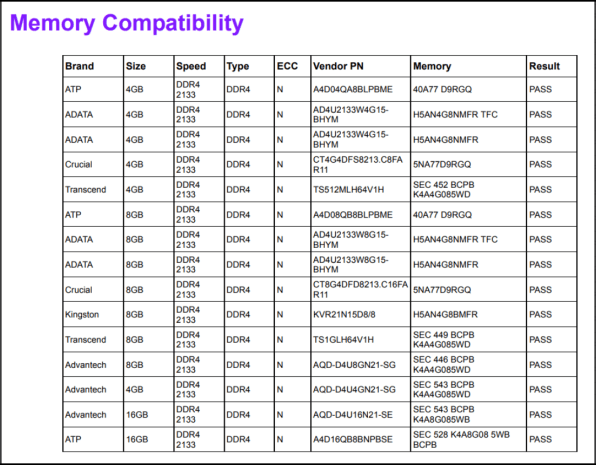
Please note that this is a list of the RAM memory tested in factory, other brands can also be used as long as they are from the same configuration.
[NR9X82-v2] What is the maximum RAM capacity that can be used in the NVR?
By default the NR9782-v2 and NR9682-v2 uses 2 RAM 4G DDT-2400 512×8 (8GB in total).
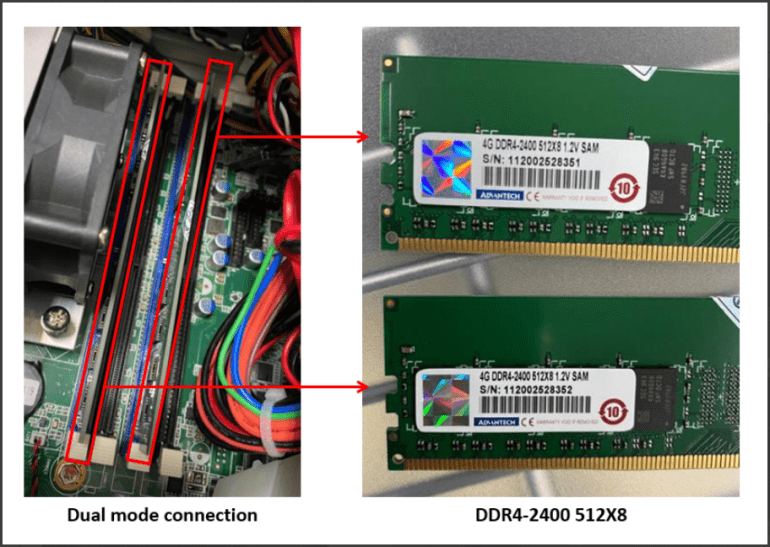
It can support a total of 64GB of RAM memory. If you are planning to expand the RAM memory be sure to connect them in a dual configuration (pairs indicated by the colors blue/pair 1 and black/pair 2) to distribute the loading evenly and improve performance. For more information about how dual channel works please check the following link: https://www.compuram.de/blog/en/single-dual-and-multi-channel-memory-modes/.
Vivotek NVR Windows based user guide
Read Also : Vivotek DVR NVR IPC Software firmware download
[NR9X8X/NR9X8X-v2] What is the default Windows username and password set for the NR devices?
In order to perform several configurations in the NR device (such as RAID configuration and System OS management) you may need to use the NR default username and password. Please refer to the following table to know what is the default password of your NR device:
|
NR Device name |
NR9581/NR9681 |
NR9681(A)/NR9681(A) |
NR9682/NR9782 |
NR9682-v2/NR9782-v2 |
|
Username |
vivotek |
vivotek |
vivotek |
vivotek |
|
Password |
-empty- |
-empty- |
-empty- |
vivotek |
Note: -empty- means that you need to leave the password in blank.
[NR9X8X/NR9X8X-v2] How to check if the HDMI port in the NR is working properly
You can check your HDMI port using Microsoft windows device manager easily, to do that please follow these steps:
Step 1. In the NR Control Center, click on the “Control” icon to open the Control Panel.
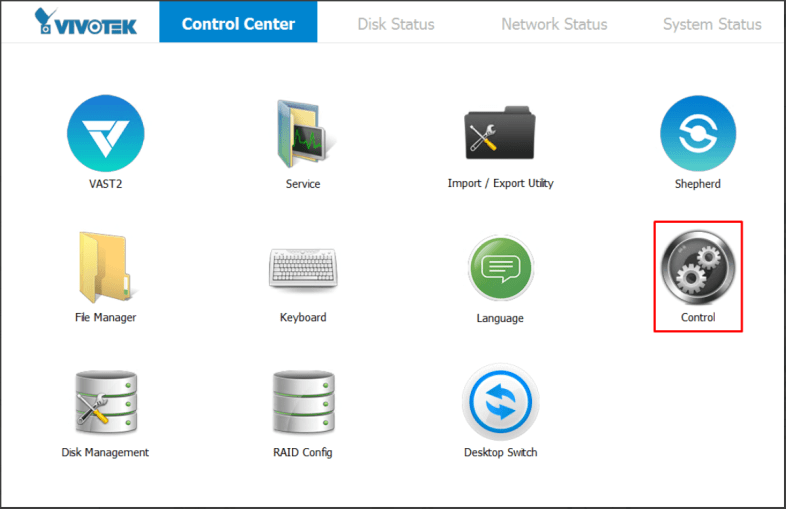
Step 2. In the Control Panel interface, click on “System and Security”.
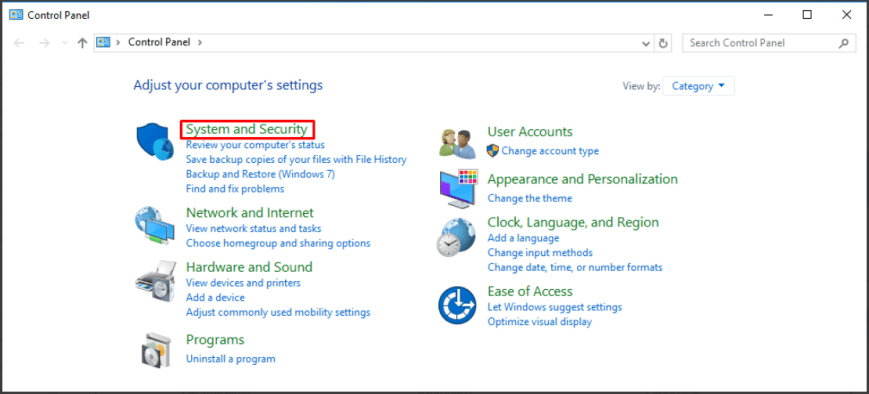
Then, click on “System”.
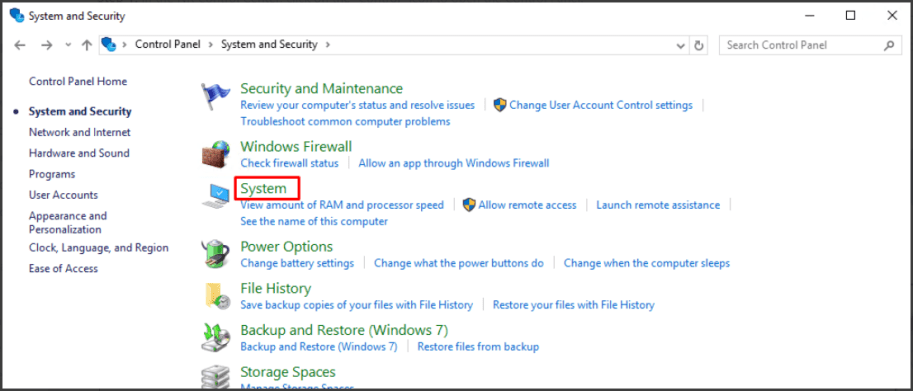
Step 3. Once you are in the “System” interface, in the left panel select “Device Manager”.
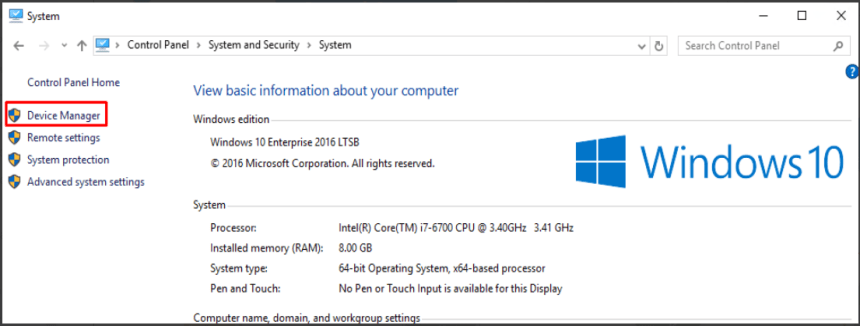
Step 4. Look for your Monitor (connected to the HDMI port) in the list of under “Monitors”.
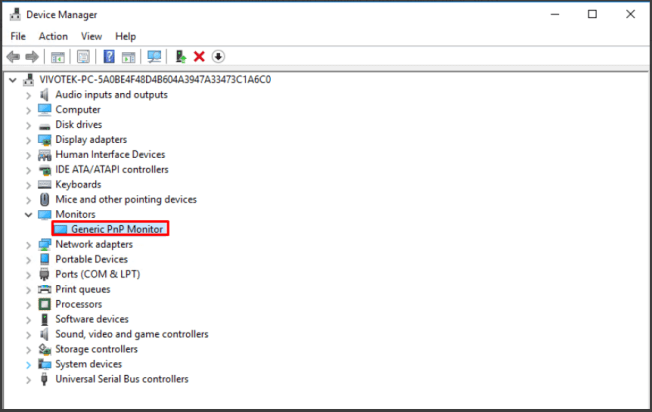
Step 5. If the monitor is present in the list of “Monitors”, right click on it and check its properties.
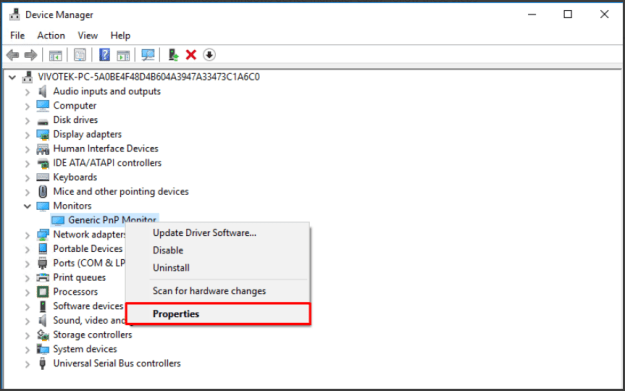
You can see a dialogue box now, look for the status of HDMI in that dialogue box.
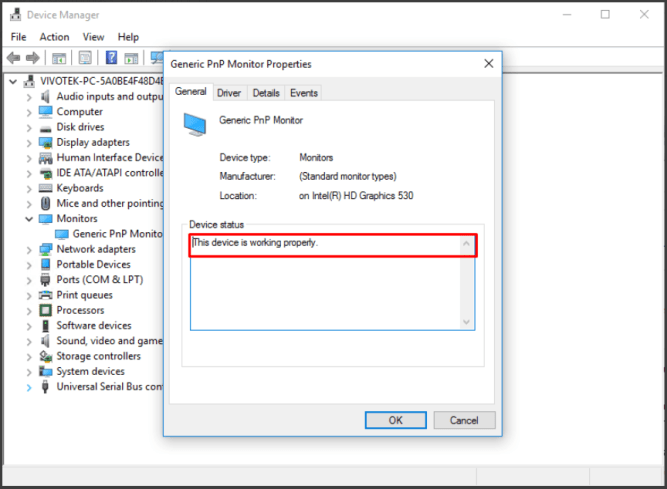
If the dialogue box says “The device is working properly” then your port is good and is also in working condition, but if you get a message of troubleshooting that means the port is in working condition but there is some problem, and if you see a message “failed” then it will mean that the port or the monitor is not working properly.
[NS9521] How many displays can be connected to the NS9521 server?
Question
How many displays can be connected to the NS9521 server?
Answer
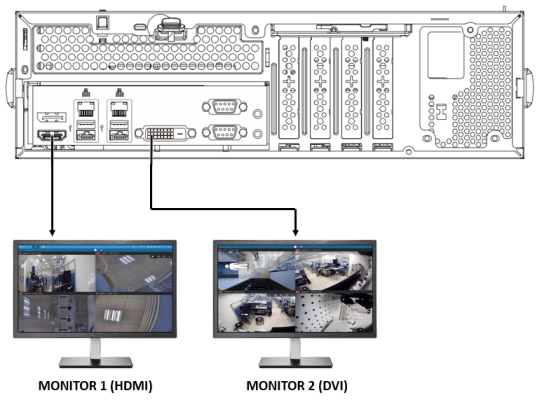
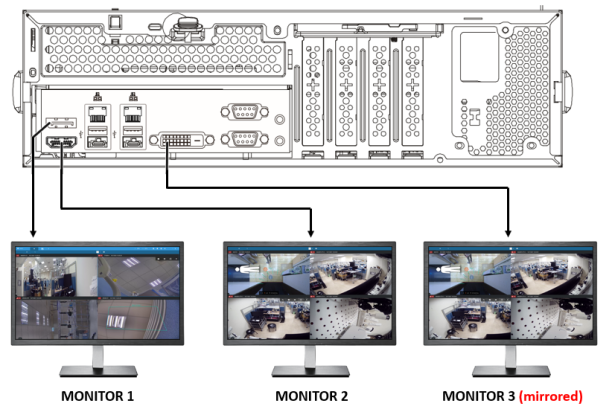
The NS9521 have 3 display ports (HDMI, DVI and Display port connector) but it only supports a maximum of two displays using the following configurations:
1. Display configuration (HDMI + DVI)
2. Display configuration (HDMI + Display port)
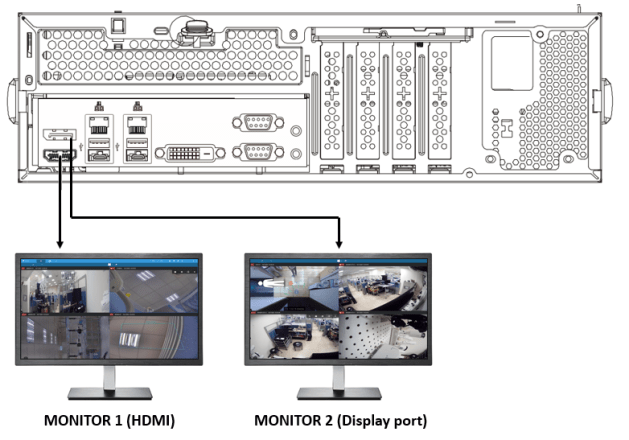
If a third monitor is connected to the remaining display port (empty port) it will automatically mirror the second display.
[NR9581/NR9681] Why does it always beep?
QUESTION
Why does it always beep since power on?
ANSWER
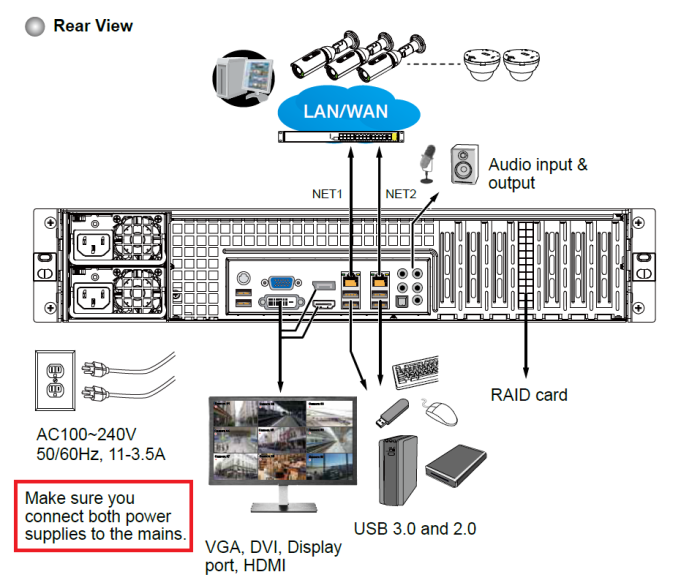
Both of main power and redundant power should be connected.
Otherwise, beep sound will always exist.
[NR9581/NR9681][1.13.1.10] How to connect and configure UPS to NR9581/NR9681?
QUESTION
This document guides you how to connect NR9581 with CyberPower CP1500PFCLCD.
Test environment
NVR Model: NR9581
Firmware: 1.13.1.10
UPS model: CyberPower CP1500PFCLCD
Firmware: CRCA102_261
Software: PowerPanel Business Edition for Windows
ANSWER
1. BIOS
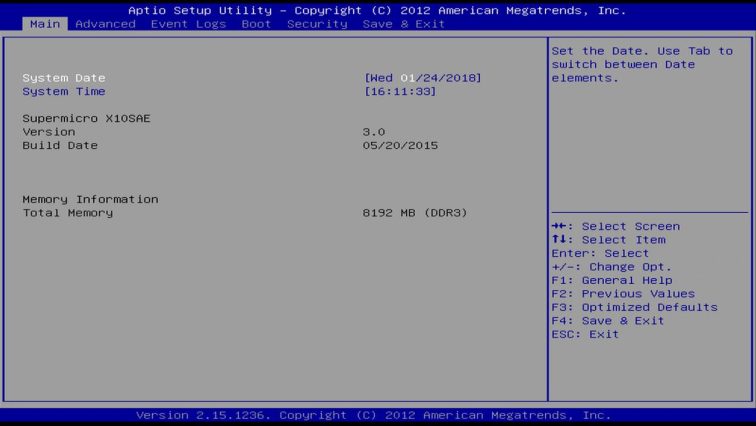
Follow the steps to configure “Restore on AC Power Loss” option in BIOS.
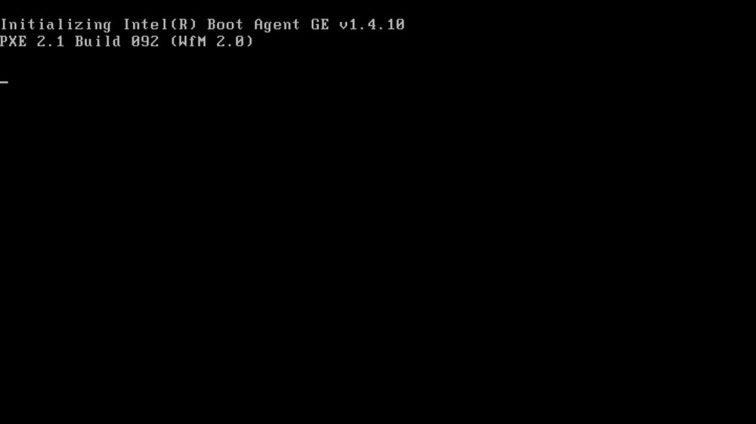
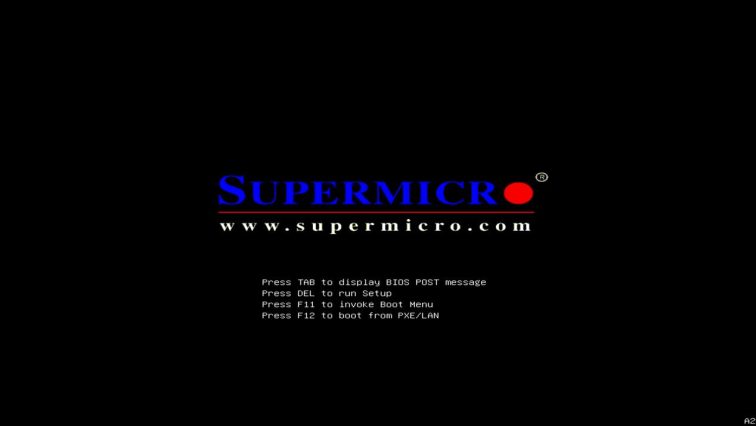
(a) Restart NR, press “Delete” key to enter BIOS after this is displayed during NR is booting.
(b) Use “Arrow” key to move to Advanced category, and Boot Feature is also selected because it is the first option. Press “Enter key” to enter Boot Feature options.
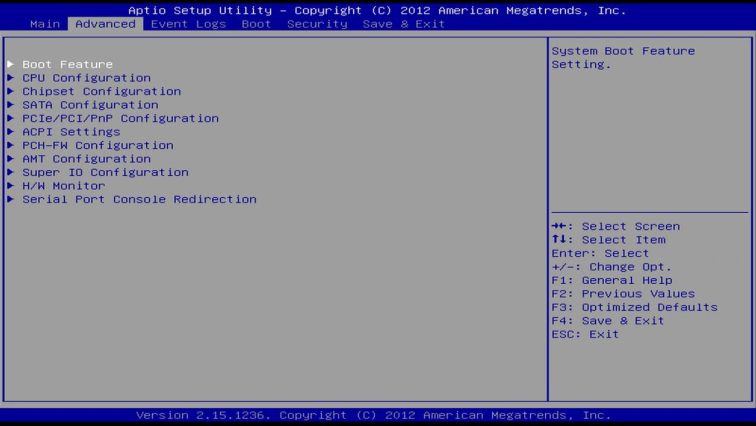
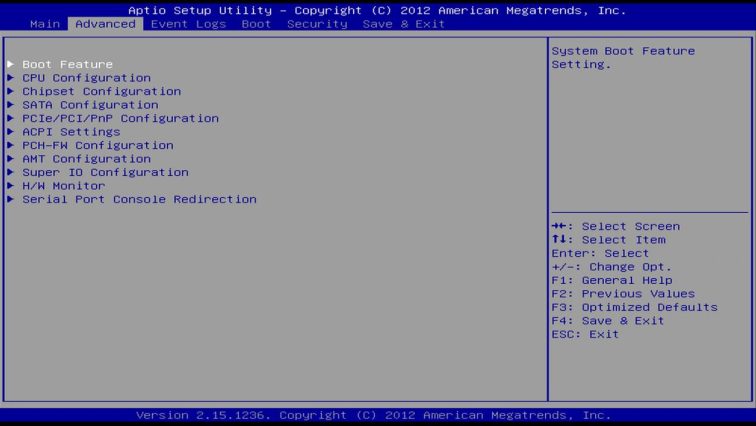
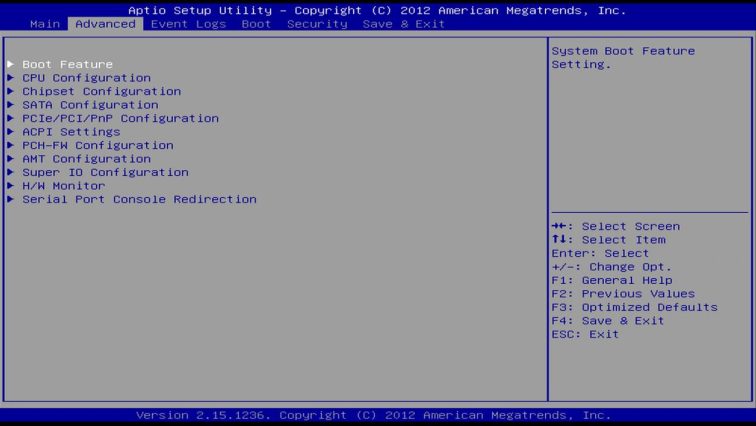
(c) In Boot Feature options, go to Restore on AC Power Loss.
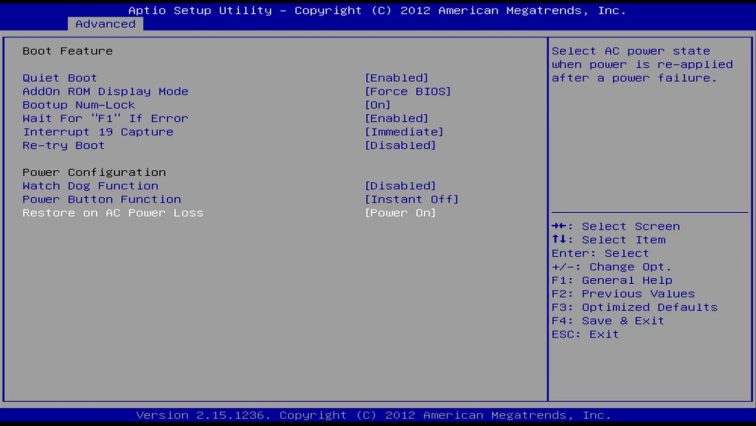
(d) Press “Enter” key to list its options, select Power On option and press “Enter” key again.
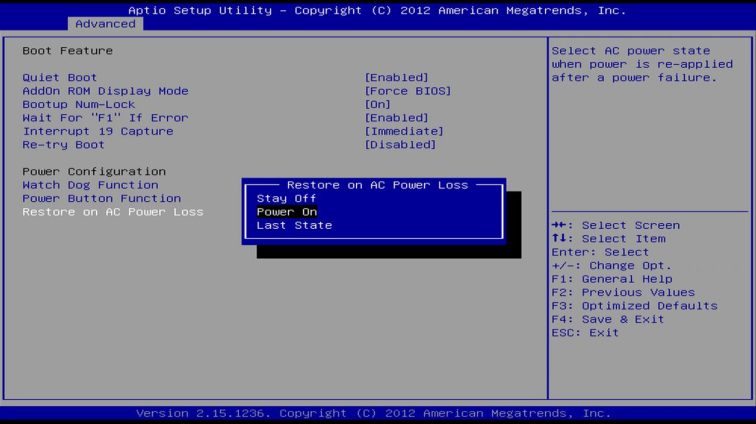
(e) Press F4 to Save & Exit.
2. Windows OS
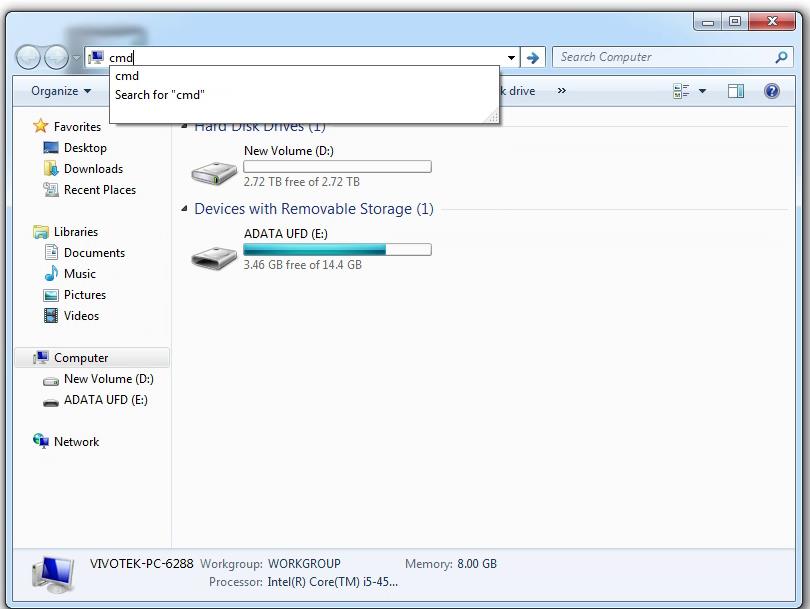
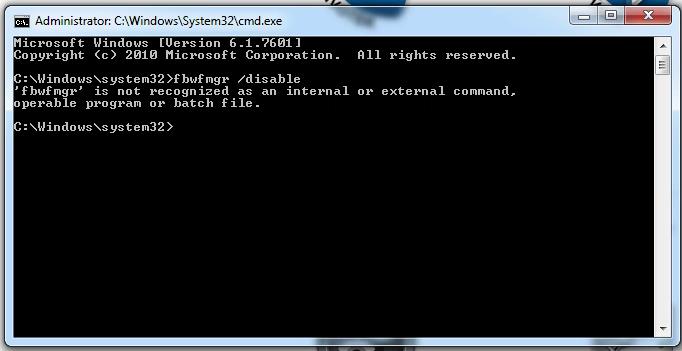
After NR is booted, double click File Manager. After it is displayed, type “cmd” in the address bar and press “Enter” key to bring out command line window. In the command line window, type this command “fbwfmgr /disable”. You must reboot NR after this command is typed.
If Windows responses that “‘fbwfmgr’ is not recognized as an internal command, operable program or batch file.”, just ignore it. That only means you are using older firmware and ‘fbwfmgr’ command doesn’t exist.
Above step prevents UPS software from being removed after reboot.
3. Cable connections
(a) The power cable of NR must connect to sockets which are protected by battery. Note that not all sockets of an UPS are protected by the battery.
(b) The UPS must be connected to NR via USB cable.
(c) This picture shows the rear panel of CyberPower CP1500PFCLCD.

4. Install UPS software
The UPS should have a management tool in its CD. Or it is available on its support web site. Install the management software. Generally, you should configure these.
(1) The amount of seconds to shut down NR after utility power is failure.
(2) The amount of seconds to shut down UPS after NR is down.
4-A. CyberPower CP1500PFCLCD
(1) Download “PowerPanel Business Editions for Windows” from CyberPower supporting site.
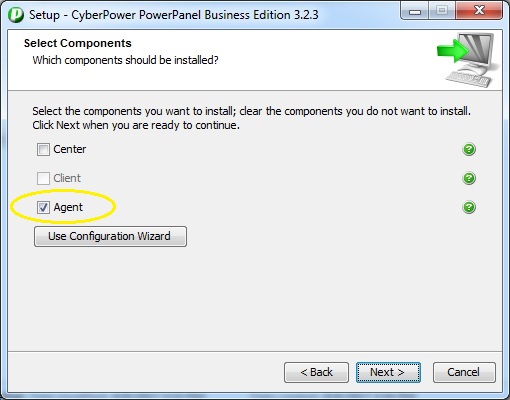
(2) During the installation, select “Agent” type. Accept all default to complete installation.
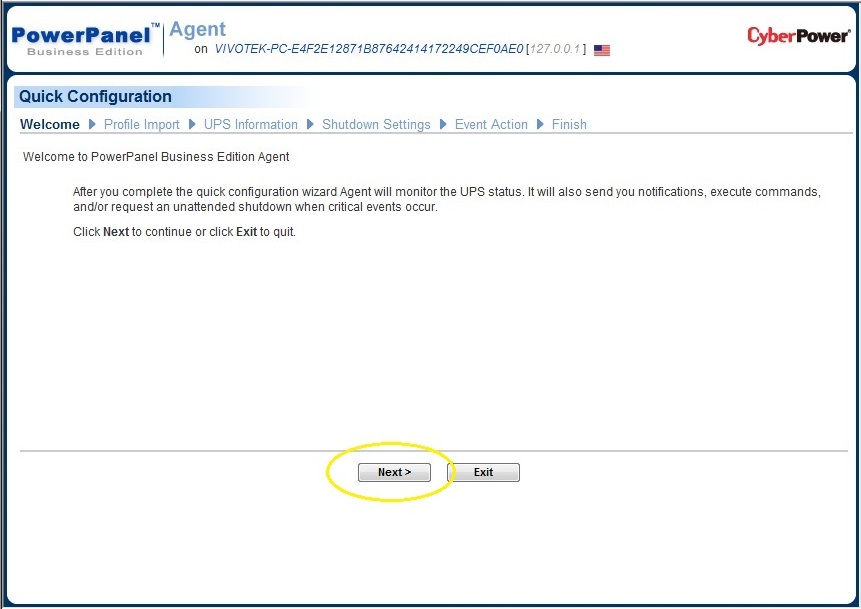
(3) When you first run the application, just click “Next” to accept all default configurations.
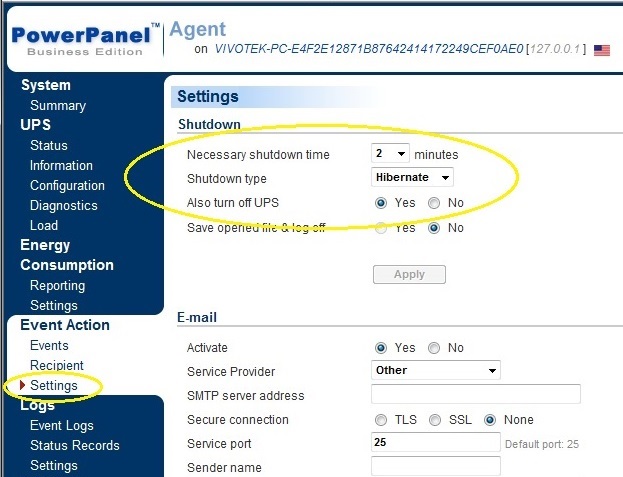
(4) Go to “Event Action/Settings”. Configure these four items like the picture.
|
Event Action > Settings |
|
|
Necessary shutdown time |
2 minutes |
|
Shutdown type |
Hibernate |
|
Also turn off UPS |
Yes |
|
Save opened file & log off |
No |
Hibernate: It will save your open documents and running applications straight to your hard drive so that there’s no chance of losing anything if power is abruptly cut.
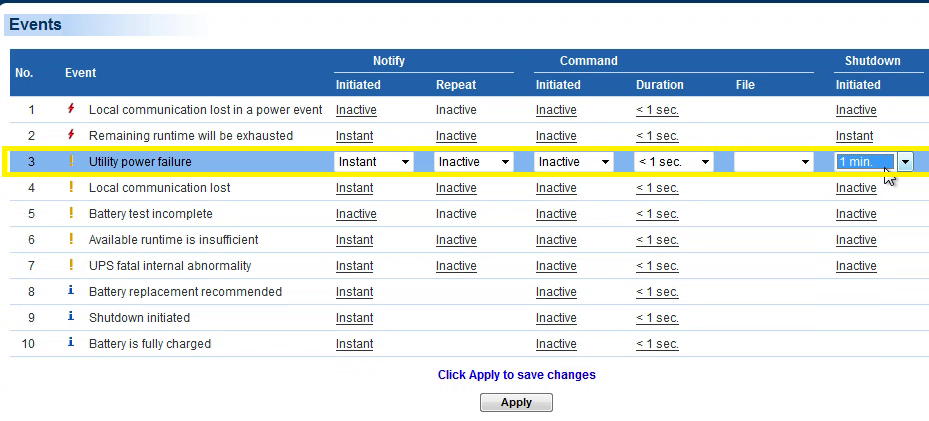
(5). Go to “Event Action/Events”. Configure this item like the picture.
|
Event Action > Events |
|
|
Utility power failure |
Shutdown set to 1min |
5. Test before you deploy
The above steps are tested OK in VIVOTEK’s lab environment.
Since your environment could be different from our lab, we suggest you test your UPS connection and configuration before you deploy.
How to upgrade VAST in NR9581/NR9681?
Question
How to upgrade VAST in NR9581/NR9681?
Answer
[Windows-based NVR] Is the license channel in NR series fixed?
Question
Is the license channel in NR series fixed?
Answer
Yes, the license channel in NR series is fixed. You cannot add more license into NR series.
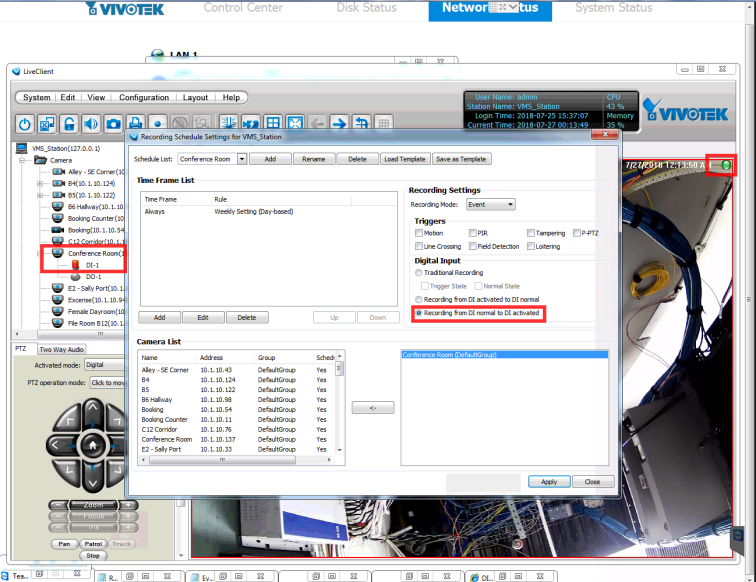
[NR9581/NR9681][1.13.1.10] DI recording only records for few seconds even DI is still triggering, what could be the problem?
QUESTION
[NR9581/NR9681][1.13.1.10] DI recording only records for few seconds even DI is still triggering, what could be the problem?
ANSWER
This is a known issue, please upgrade VAST version to v1.13.1.101 or later version to fix this issue
[NR9X82-v2] What to do if the server cannot identify the AVAGO RAID card and shows an error message in device manager?
Question
What to do if the server cannot identify the AVAGO RAID card and shows an error message in device manager?
Answer
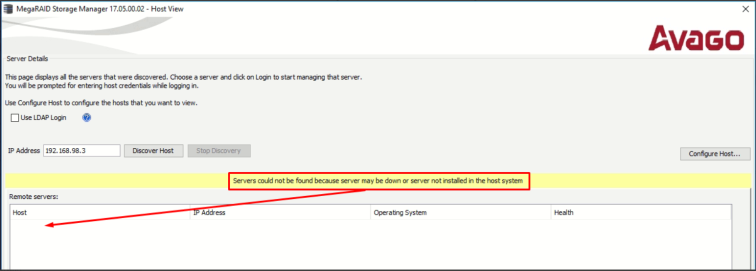
If you access the MegaRaid Storage manager and find out that you cannot login into the system because the software cannot find the RAID in the system (Please see picture below), it could be due to a number of factors such as improper installation, system configuration issues, or hardware issues. :
Here are some steps you can take to troubleshoot the problem:
Verify RAID card status: Access the windows “Device manager” and check the status of the RAID card.
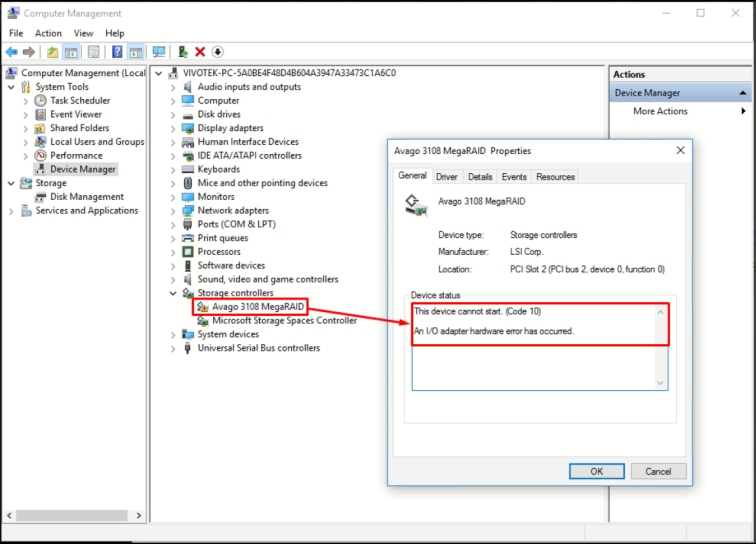
Verify RAID card LED status: Check that the RAID card LED are ON and are working correctly. For more information please refer to the following link: [NR9X8X/NR9X8X-v2] MegaRaid RAID card SAS Activity LED.
Check physical connections:. Make sure that the RAID card is properly seated in the PCI slot. If you’ve recently moved your server or installed new hardware, it’s possible that the card has been dislodged.
If everything is working at it should, the problem may be related to the BIOS configuration, to verify please follow the next steps:
Step 1. Reboot the NR9X8X-v2 and click “delete” when on the booting process to log in to the BIOS.
Step 2. Go to “Advanced” > “CSM Configuration” and change the Storage to “UEFI” and click “F4” to save & exit.
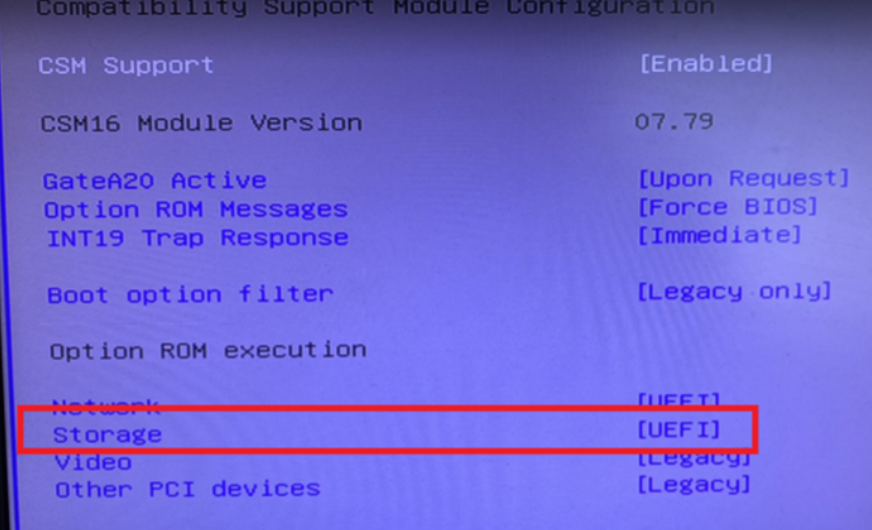
Note: the BIOS configuration for the storage should be UEFI as default.
If after checking everything you are still encountering the same issue, please contact Technical Support for assistance.
[NR9X8X/NR9X8X-v2] MegaRaid RAID card SAS Activity LED
The SAS Activity LED is located at LED1 on the add-on card. When LED1 is blinking, the SAS connections supported by the Avago 3108 controller are active. See the table below for more information:

SAS Fault LED
LED6 is used to indicate if a SAS failure has occurred. When LED6 is on, an error has occurred to on-card SAS connections. See the table below for more information.

System Heartbeat
LED The System Heartbeat LED is located at D13 on the add-on card. When D13 is blinking, the system is functioning normally. See the table below for more information.

You can find more information about the RAID card in the following link:
http://www.supermicro.com/manuals/other/AOC-S3108L-H8iR.pdf
If none of the LED are working, please try to reinsert the RAID card and restart this device. Please be sure the NR9X81 have been turned OFF before trying to reinsert the card. If after reinserting the RAID card many times, the device still cannot detect the RAID card. Please ship this device for RMA service.
On ND8301/ND8401, if one of raided HDD went defective, how can I rebuild RAID with new HDD?
QUESTION
On ND8301/ND8401, if one of raided HDD went defective, how can I rebuild RAID with new HDD?
ANSWER
Once you replace the faulty drive with a new one, an automatic rebuild will begin, and its progress will be indicated by a status bar as shown below.
The process will take hours depending on the sizes of your disk drives, e.g., 8 hours if using 2TB drives in a RAID5 volume.
If using a RAID5 volume, the recording task will be halted during the rebuild process. Recording will continue if using storage volumes in other RAID levels.
(For more detail you may refer to
http://download.vivotek.com/downloadfile/downloads/usersmanuals/nd8401manual_en.pdf P.198)
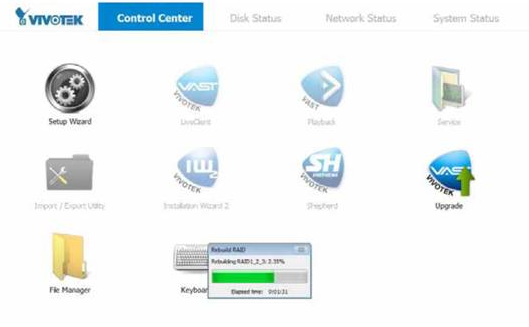
Since ND8401 is on Windows Embedded OS, the functionality of RAID is provided by Intel driver, in other words, it would also determine when to rebuild RAID.
If automatic rebuild did not start just in place, you could go to Setup Wizard and try to rebuild RAID manually,
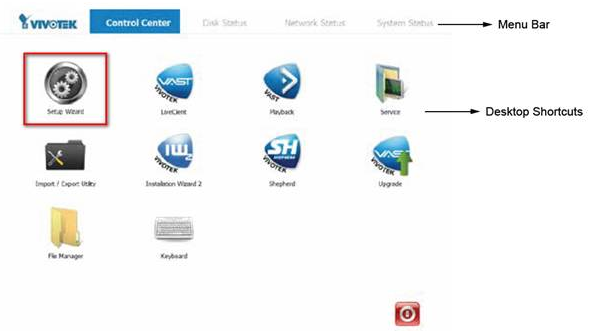
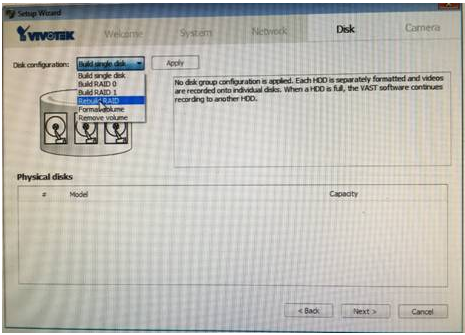
What is the rebuild machanism of ND8401/ND8301?
QUESTION
1. When will the ND8401/ND8301 do rebuild?
2. Can we cancel the rebuild function?
3. Is there any work around to avoid rebuild?
ANSWER
1. When will the ND8401/ND8301 do rebuild?
If ND8401/ND8301 is powered off abnormally, it will do rebuild when next power on.
2. Can we cancel the rebuild function?
No, we can’t. The rebuild mechanism is defined in hardware level.
What our software can do is to stop the VAST service during rebuild.
3. Is there any work around to avoid rebuild?
If you use RAID 5, we suggest to use UPS to stablize the power.
If the period of abnormal powered-off is longer than what UPS can support, please buy the UPS which can support to powered off the server automatically.
Hence, ND8401/ND8301 won’t do rebuild when next power on.
[NR9X81] How to skip error to enter OS after unexpected power off occurs
QUESTION
After unexpected power-off and power-on, my NR9X81 can’t enter OS and stuck with the error message during system boot, as shown below. (Cache data was lost due to an unexpected power-off or reboot during a write operation, but the adapter has recovered. This could be due to memory problems, bad battery, or you may not have a battery installed)
How can I skip this error and enter OS if the issue happen again?

ANSWER
Please refer to attached document
[Windows-based NVRs] What disks does NR9x81/NR9x82 support?
Question
What disks does NR9x81/NR9x82 support?
Answer
The NR9581/NR9681/NR9682/NR9782 supports to connect SATA and SAS HDD because its hard disk interface is SAS 2.0.
Note: You cannot mix SAS and SATA in the same RAID.
Below picture shows the hard disk interface of NR9581/NR9681.
Below picture shows the hard disk interface of NR9682/NR9782.
Below picture shows the hard disk connectors of SATA and SAS HDD.
[NR9581/NR9681][1.13.1.10]I did not do any operation,the NVR just freezed and can not operate after installed with new SATADOM, what should I do?
QUESTION
[NR9581/NR9681][1.13.1.10]I did not do any operation,the NVR just freezed and can not operate after installed with new SATADOM, what should I do?
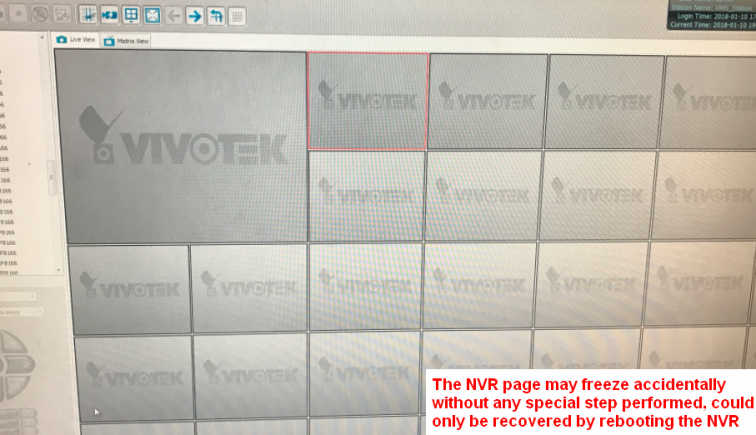
ANSWER
The problem could be caused by not up to date display driver, please follow attached steps to upgrade display driver(10.18.14.4332)
[Windows based NVR] How to check network disconnection events in the Windows system event logs
Question
How to check network disconnection events in the Windows system event logs
Answer
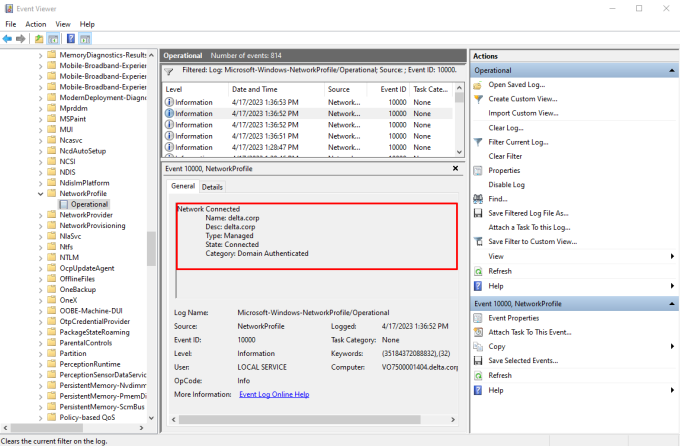
If you found that your NR/NS device suddenly lost network connection and want to find out exactly what happened, you can check the Windows even logs. Every time there is a disconnection incidence it will be registered so if you are trying to figure out why the system was not accessible or stopped communication with other device you can follow the next steps:
Step 1. Open the Event Viewer by typing “Event Viewer” in the Windows search bar.
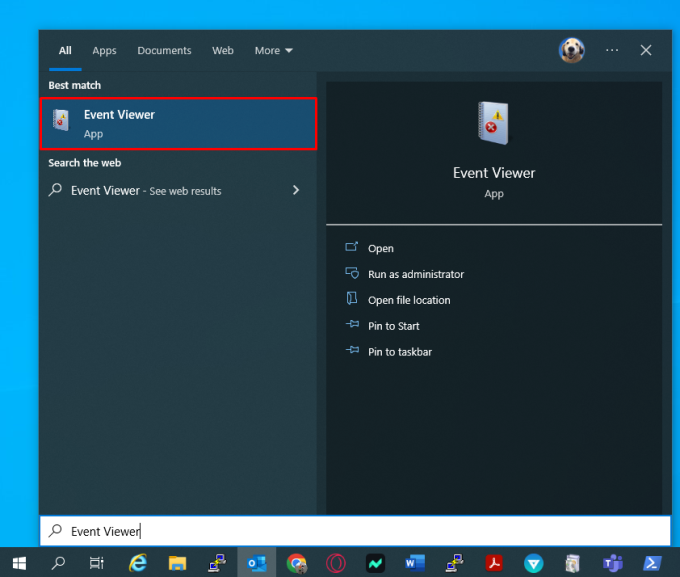
Note: You can also use the Run dialog (Windows + R) and type “eventvwr.msc” to run the application.
Step 2. In the left pane, click on “Applications and Services Logs” and select Microsoft > Windows > NetworkProfile.
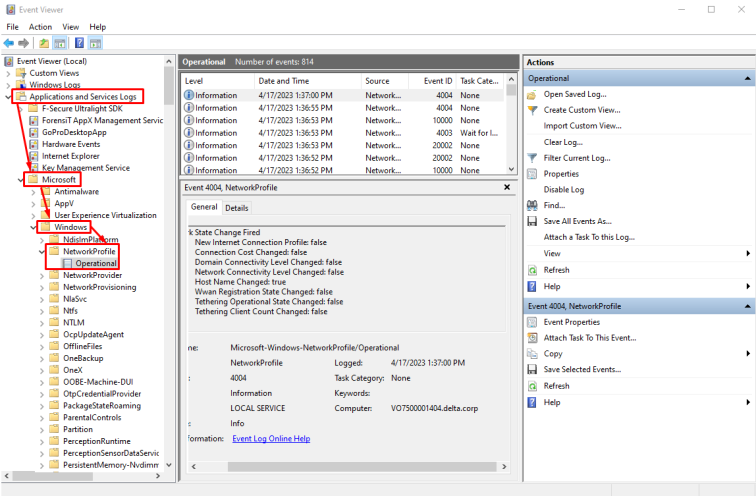
This section will display all the Network connection state logs.
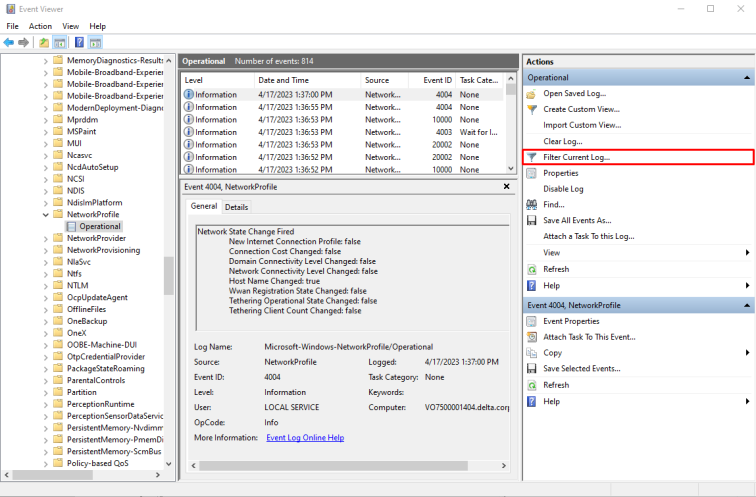
Step 3. To filter for disconnection events, click on the “Filter Current Log” option in the right pane.
Step 4. In the “Filter Current Log” dialog box, in the “Event IDs” box, type “10000” (which is the ID for disconnection events).
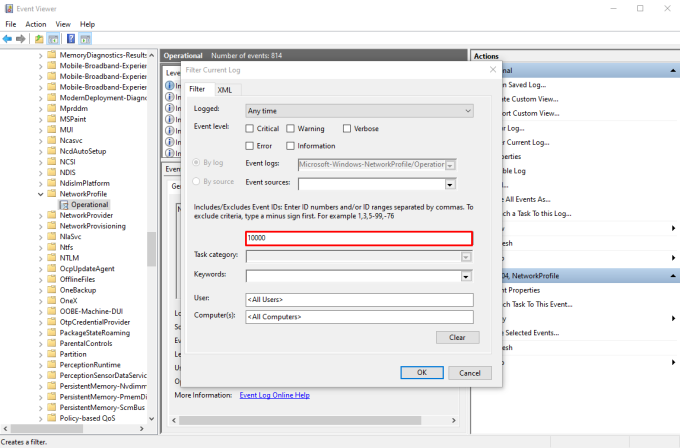
Click “OK” to apply the filter.
Step 5. You should now see a list of events that match the filter criteria. You can click on individual events to view more information about them, such as the date and time of the event, the source of the event, and any relevant details or error messages.
[Shepherd] How to manually update the Shepherd on NRs and NS devices
Question
How to manually update the Shepherd on NRs and NS devices
Answer
In order to manually upgrade the Shepherd software on your NR or NS device, please follow the next instructions:
Step 1. Download the latest version of Shepherd using the following link: https://www.vivotek.com/Shepherd#downloads
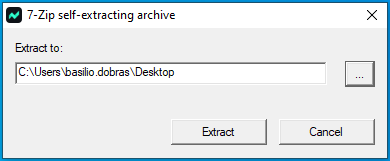
Step 2. Run the installer file on the server and choose an extraction location.
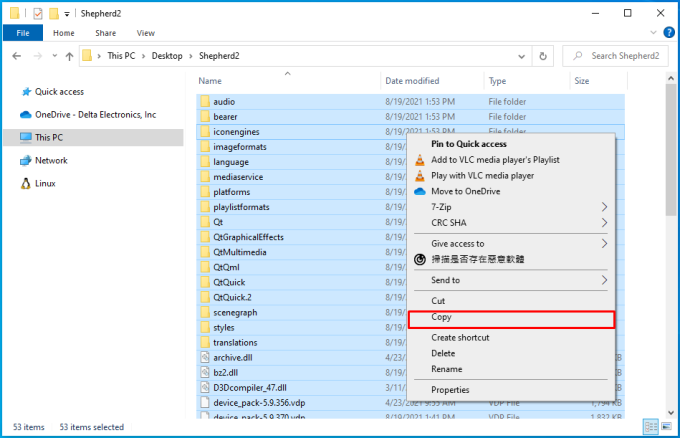
Step 3. Locate the folder named ‘shepherd2’ in the extraction location. Then, open the folder and select all files (Ctrl + A) and copy them (Ctrl + C).
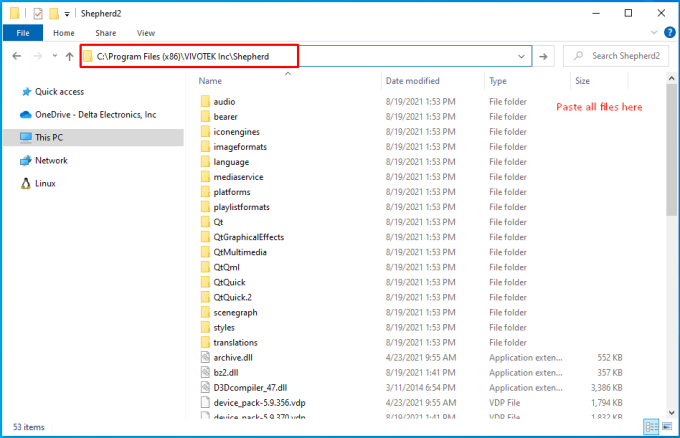
Step 4. Navigate to the system Shepherd installation folder: C:\Program Files (x86)\VIVOTEK Inc\Shepherd. You will need to manually type the path or use “C:/” in the file explorer’s top bar.
Step 5. Paste the copied files into the Shepherd folder (Ctrl + V).
Note: Make sure to close any Shepherd windows before proceeding.
Step 6. Select “Replace files” when prompted.
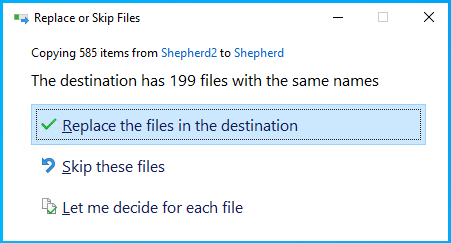
Once finished, open your Shepherd application in the control center and check that the latest version of the application was successfully installed.
[NR9581/NR9681/NR9682/NR9782] Why the NR9581/NR9681/NR9682/NR9782 can not upgrade to Windows 10?
Question
Why the NR9581/NR9681/NR9682/NR9782 can not upgrade to Windows 10?
Answer
The NR9581/NR9681/NR9682/NR9782 Network Video Recorder by VIVOTEK is embedded with Microsoft “Embedded Windows Standard 7”. According to Microsoft announcement, the device cannot be upgraded directly to Windows 10:
https://docs.microsoft.com/zh-tw/windows-hardware/service/mobile/upgrade-windows-embedded-devices-to-windows-10
NR9581/NR9681/NR9682/NR9782 are based on “Embedded Windows Standard 7” to design. If the customer reloads the Windows 10 on NR9581/NR9681/NR9682/NR9782, it will cause the NR9581/NR9681/NR9682/NR9782 series Network Video Recorder can not work. This is out of VIVOTEK reach so we would not support this.
[NR9581/NR9681][1.12.5.201] Fails to boot up and shows BCD error
DESCRIPTION
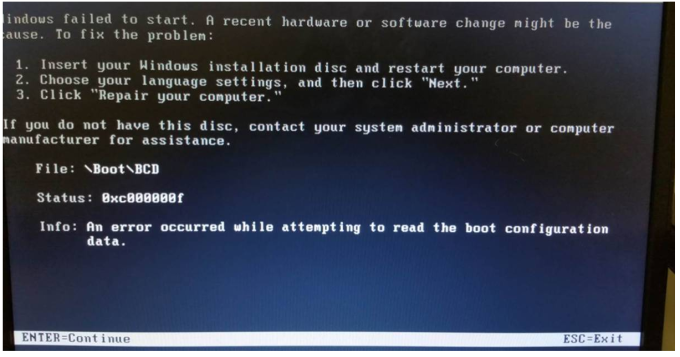
[NR9581/NR9681] Fails to boot up and shows BCD error
-NVR could not successfully boot up and Windows failed to start
-From the error message we can see the file \Boot\BCD cannot be found
ROOT CAUSE
Once the NVR has performed recent Windows update, bootmgr would be renewed, after PC/Windows reboots again, booting would be initiated at wrong partition and could not find BCD file
SOLUTION
Renew NR9581/NR9681 patch file by following attached document to avoid these issues.
[NR9X81] How to set windows password when login OS?
QUESTION
I don’t want other people to enter my NR9X81’s OS.
How to set windows password when login OS?
ANSWER
Please refer to attached document to set windows password.
[NR9X81] How to change the system display language in the NR9X81
QUESTION
How to change the system display language in the NR9X81
ANSWER
The NR9X81 Windows OS system language display can be changed but it requires special steps. Please follow the next steps to change the display language of the device:
Step 1. In the NVR Control Center, open the file manager
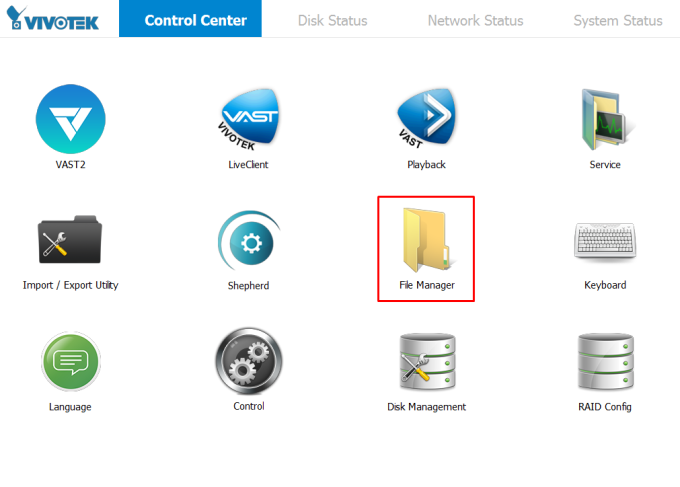
Step 2. In the displayed window click on “System properties”
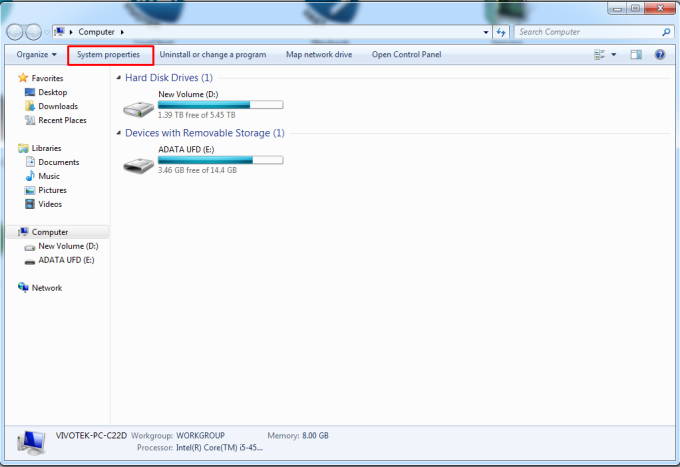
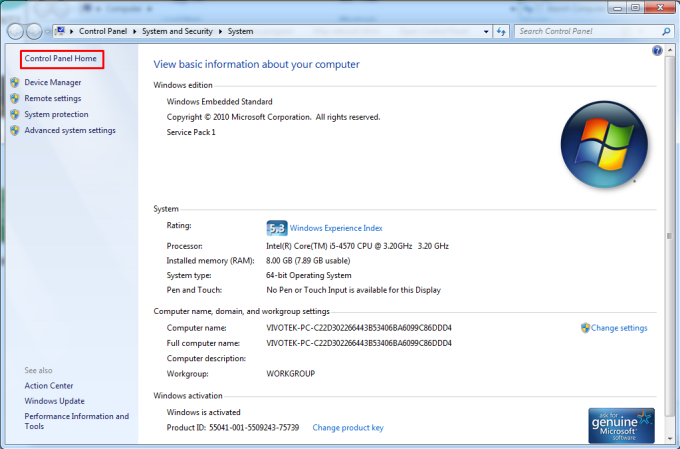
Step 3. In the left panel select “Control Panel Home”, this will allow you access to the “Control Panel” menu
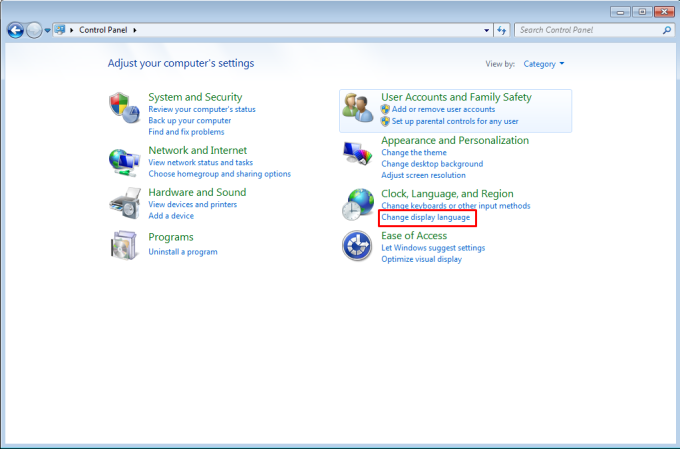
Step 4. Select “Change display language”
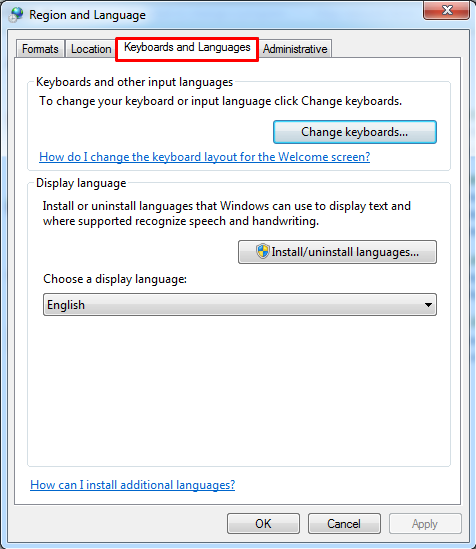
Step 5. In the “Region and Language” window, be sure to select the “Keyboard and Language” tab
Step 6. In the “Display Language” section, select the language you want to display as the Windows OS display language.
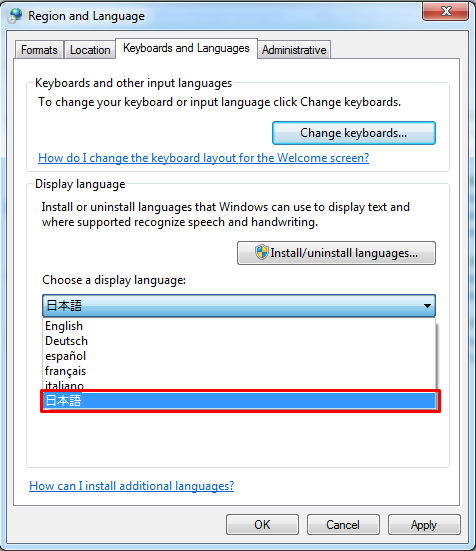
Note: The default languages available are the following:
If you wish to install a new language, please click on the “Install/Uninstall new language” button and follow the installation wizard steps.
For more information please refer to the following link:
https://support.microsoft.com/en-us/help/972813/windows-7-language-packs-are-available-for-computers-that-are-running
Step 7. After selecting the language click on the “Apply” button.
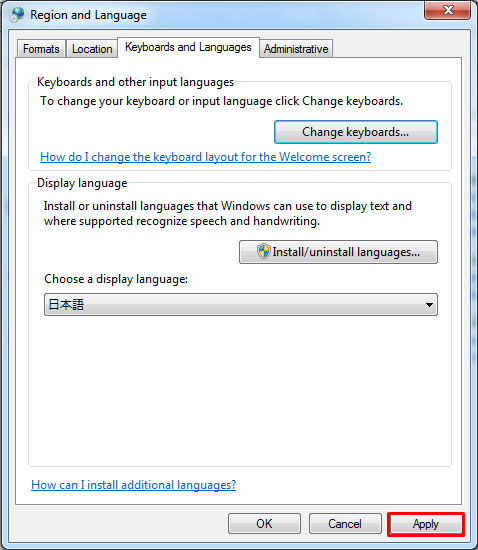
Step 8. After applying the settings, a pop-up window will appear informing that in order to make the changes is required to log off, press “CANCEL”
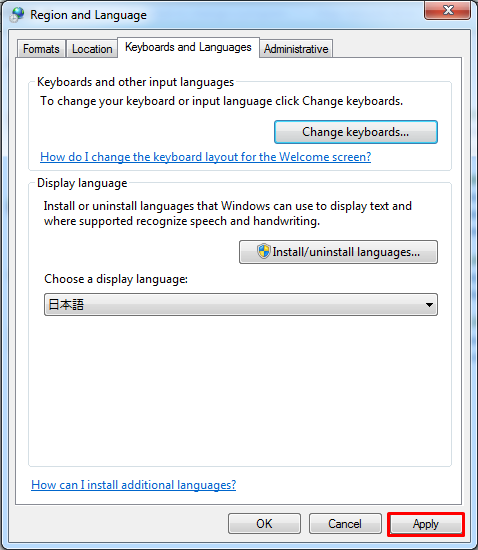
IMPORTANT NOTE: There are other configurations that need to be made before logging off so do not click on the “Log off now” button
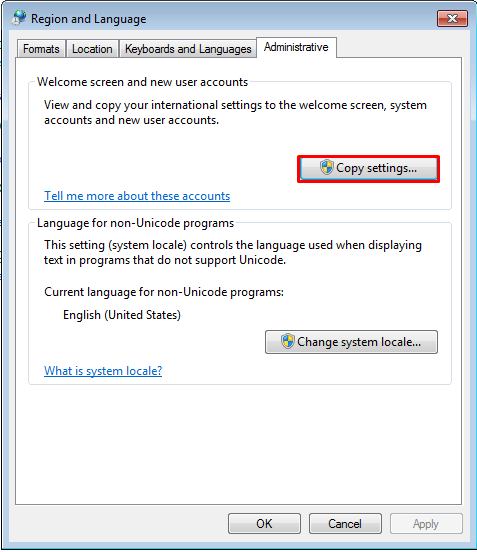
Step 9. In the same window, go to the “Administrative” tab and in the “Welcome screen and new user accounts” section, click on the “Copy settings…” button.
Step 10. Be sure to uncheck the following (if checked):
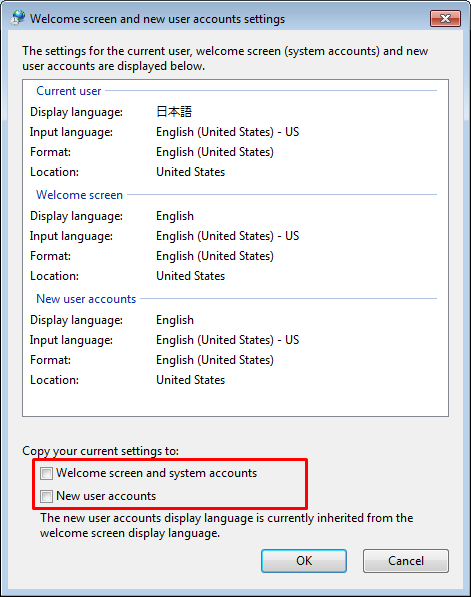
IMPORTANT: If they are checked and you restart the device, the NVR won’t be able to use the licenses because the system won’t recognize the new account names (with the new language format). Also, you wont be able to access the Windows system so you will need to restore the system, loosing all the configurations.
Step 11. After checking the settings previously mentioned, press OK. Then in the “Region and Language” window press “OK” and restart the device.
[NR9581/NR9681][1.13.1.10] Can not sync time with NTP Server
QUESTION
[NR9581/NR9681][1.13.1.10] Can not sync time with NTP Server
It shows error message “Result: An error occurred getting the status of the last synchronization. Element not found.”
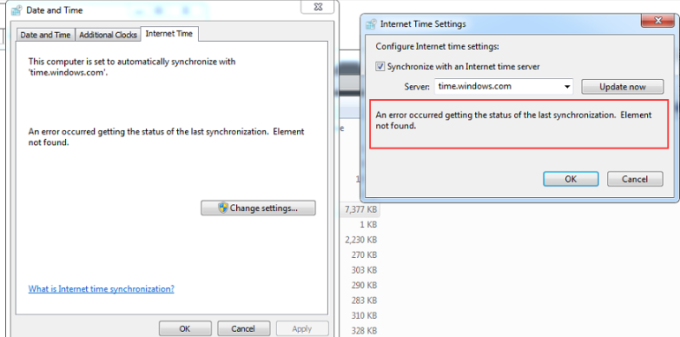
ANSWER
Please follow the step below
1. Run below command on cmd:
net stop w32time
w32tm /unregister
w32tm /register
net start w32time
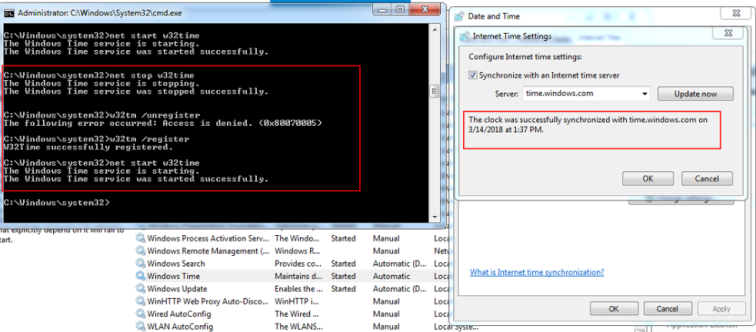
2. Update system time with NTP server again
For more detail, you may refer to below link on Microsoft forum
https://social.technet.microsoft.com/Forums/ie/en-US/44d67903-21ad-412c-8c00-b268d3c755c0/sync-time-and-date-error-in-windows-server-2008-r2-express?forum=winservergen
