Hiseeu AHD DVR XMEye User Guide, XMEye is video monitoring software for IPC and DVR. With cloud technology, easy log in by the device’s serial number to show the live view monitoring video to phone and do operation accordingly.
Support log in with cloud technology
Support real time live view
Support remote playback
Local recording and play
Support snapshot and pictures searching
Support bidirectional talk
Support PTZ control
Support scanning serial number by QR code
Support cloud user register and modify
Support remote device add, edit and delete
Support local device add, edit and delete
Support adding device by address
Support manually searching device in LAN
Support version updating automatically
Support searching device function by shake
How to find out the “Cloud ID” (Serial Number) when adding device to PC Client “VMS”?
The “Cloud ID” is “serial Number”on the NVR UI Monitor Interface

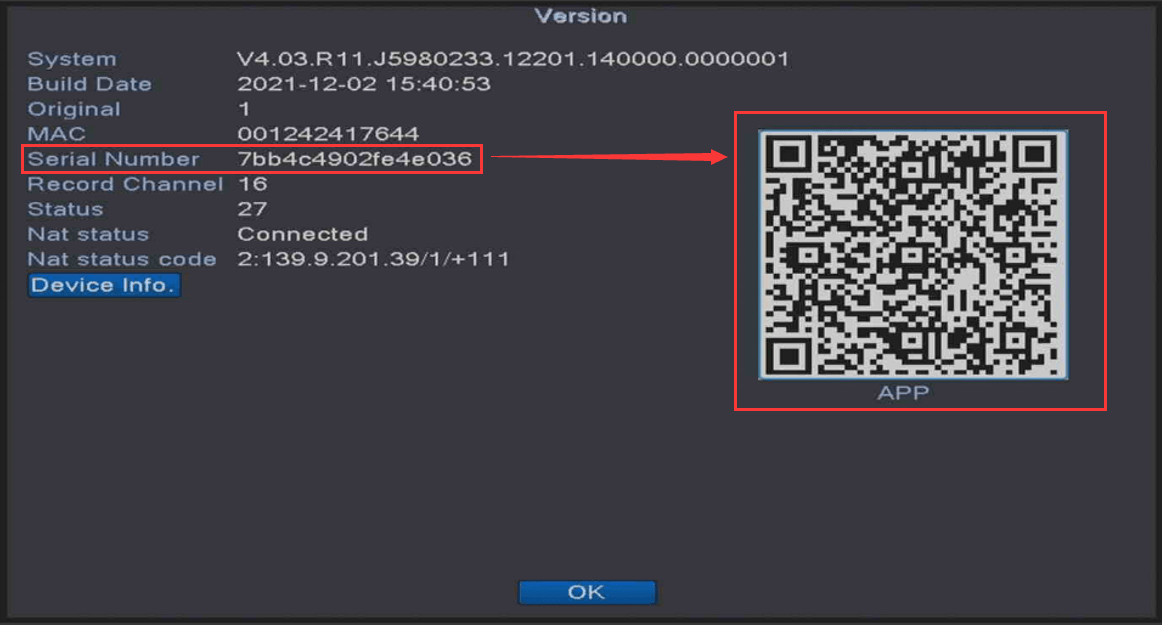
Go to your TV Monitor that is connected to NVR, Navigate to “Main Menu–>Advanced–>Version“–> You will see the Serial Number


How to Flip the Camera
1. select the channel of the flip camera
2. Navigate to “Main Meun“–> “XVI control“
3. check the”Overturn

How to reset XMEye Pro Password?
1. Click on “Forget Password”
2. Input your number or Select “Email”(Depends on the method you signed up before)
3. Input your email address and click on “Get Code”
4. A code will be sent to your email, input the verification code here and click on “Next” to continue.

How to Share the APP to other
1.Open the “Xmeye Pro ” app ,Click the pencil to edit,
Then Click the Share

2.Select the function which you want to share

3.Finally enter the user name who you want to share ,then you can shre to others successful.

Hiseeu AHD DVR XMEye User Guide
Read Next : XMEYE DVR SYSTEM INSTRUCTIONS FOR USE
My UI Interface shows “No signal” or “Black Screen”

We need to divert this issue into two situations:
1. DVR Indicator light is on:

(1) Cause: The camera system’s video output resolution is 1080P. If your TV monitor resolution is below 1080P, this issue will occur. Steps:
Please right-click and hold your mouse for over 10 seconds to see if the system can reboot or not. Or, please try to connect the system to another TV monitor with a higher resolution (above 1080P)
(2) Cause: The hard disk drive inside of the DVR box is broken, and use the screwdriver to open the DVR box to unplug the wires of the hard disk drive, and reboot the DVR to have a try. If the DVR box can be rebooted after unplugging the wires of the hard disk drive(HDD), which means the HDD is having the issue, and needs a replacement, plz contact email love@hiseeu.com for a replacement HDD if their warranty is still 1 year, and if the warranty is over 1 year, plz leave a five-star review for us to apply for a free HDD
After the steps, if the thing still can’t be resolved, which means the DVR box is broken, plz contact email love@hiseeu.com for a replacement DVR box if their warranty is still 1 year, and if the warranty is over 1 year, plz leave us a five-star review for us to apply for a free DVR box
2.DVR Indicator light is off:

(1) Cause: The power adapter 12V 2A connected to DVR box is broken
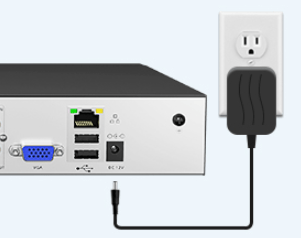
Step: Use another power supply 12v 2A to power on the DVR unit to have a try
( If you do not have a spare one, use the one that is connected to 4 cameras to have a try)
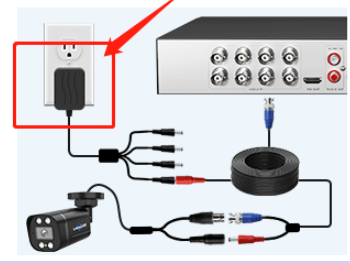
(2) Cause: The hard disk drive inside of the DVR box is broken Step: Use the screwdriver to open the DVR box to unplug the wires of the hard disk drive, and reboot the DVR to have a try. If the DVR box can be rebooted after unplugging the wires of the hard disk drive(HDD), which means the HDD is broken, and needs a HDD replacement, plz contact email love@hiseeu.com for a replacement HDD if their warranty is still 1 year, and if the warranty is over 1 year, plz leave a five-star review for us to apply for a free HDD
My UI Interface stuck in Hiseeu Logo
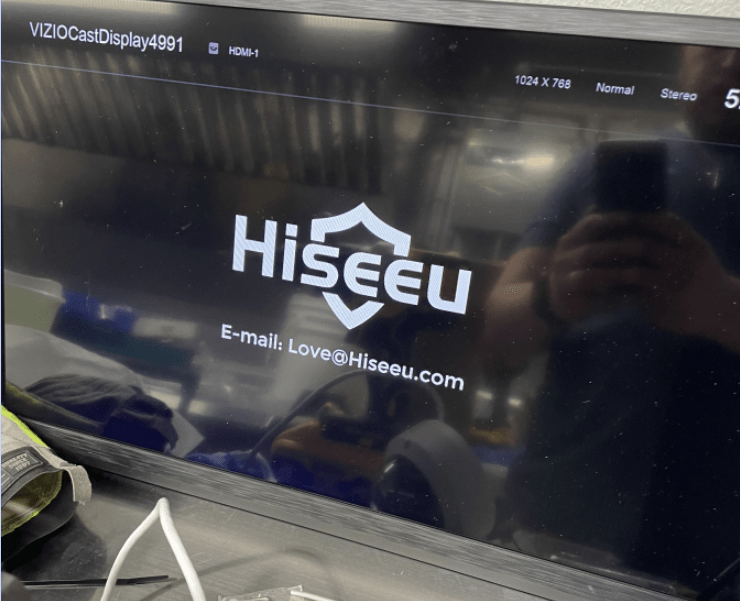
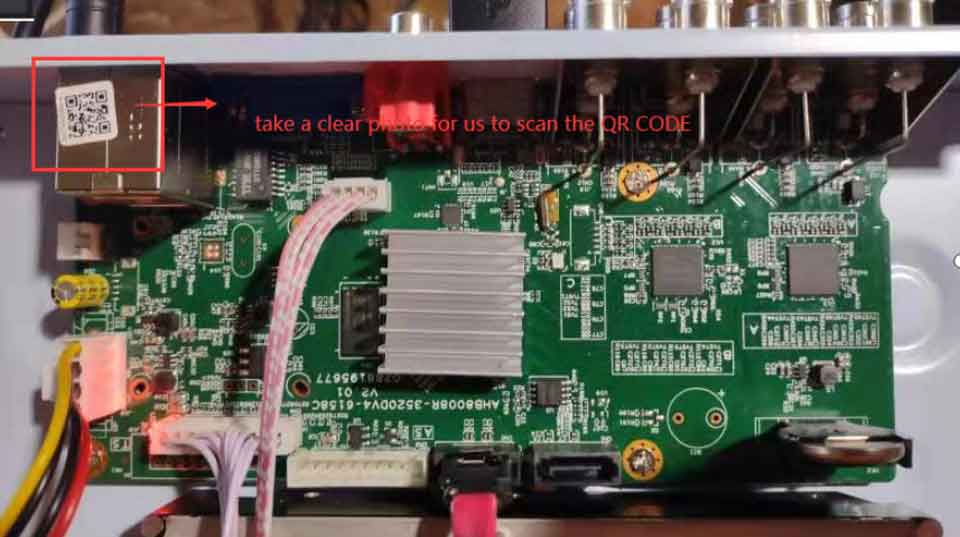
We need to upgrade the system to solve this problem, and check customer’s NVR mainboard info first, and take a photo for us to make sure about firmware verison, then we will ask manufacturer to send us a firmware to upgrade the system to solve this problem
1. If you are in the phone call , just let the customer take a photo of the mainboard, and send it to email love@hiseeu.com. We will ask for a firmware to solve this problem during our working time
(Different versions have various firmware, there is no standard firmware to upgrade the system, so we need to ask the original manufacturer to do that)
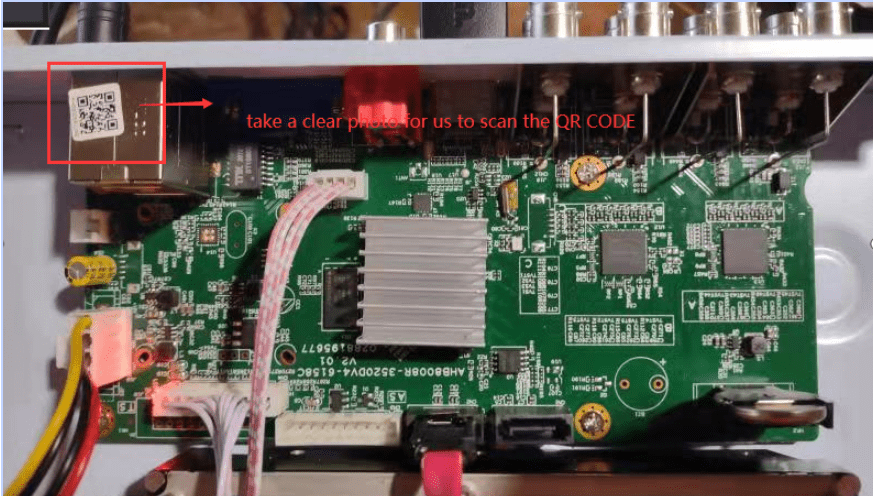
2. If you are dealing with the email:
Try with the steps:
1. Ask the customer to open the DVR box by using the screwdriver, and take a photo of this mainboard, and make sure the QR Code is clear enough for us to scan
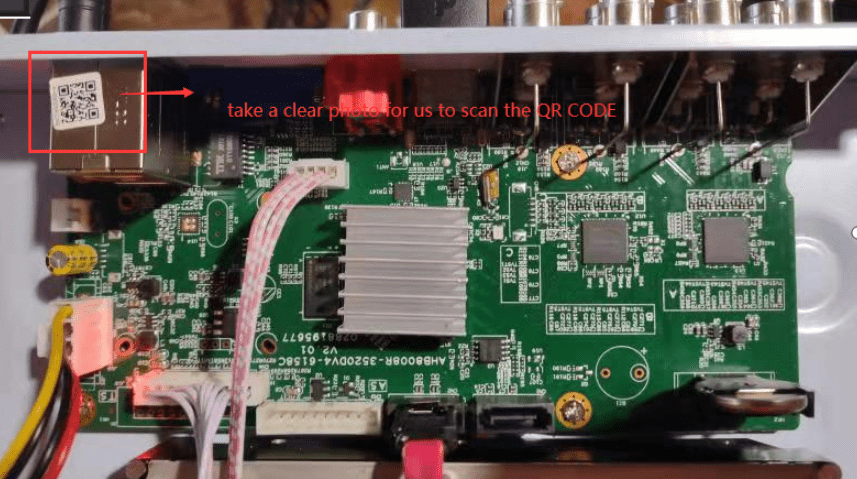
2.After receiving the photo of the mainboard, we will ask the XM Manufacturer for a firmware, and upgrade the NVR with the new firmware.
Upgrade steps
Attached upgrade firmware is for your reference, please download and unzip it first.
1. Copy these 2 files to your USB flash drive, the root directory(Do not under any folder, see the picture attached)

2. Power off the DVR and insert the USB device
3. Power on the DVR, it will upgrade automatically. Please give it a try and let us know the outcome.
How to Sign Up APP Account
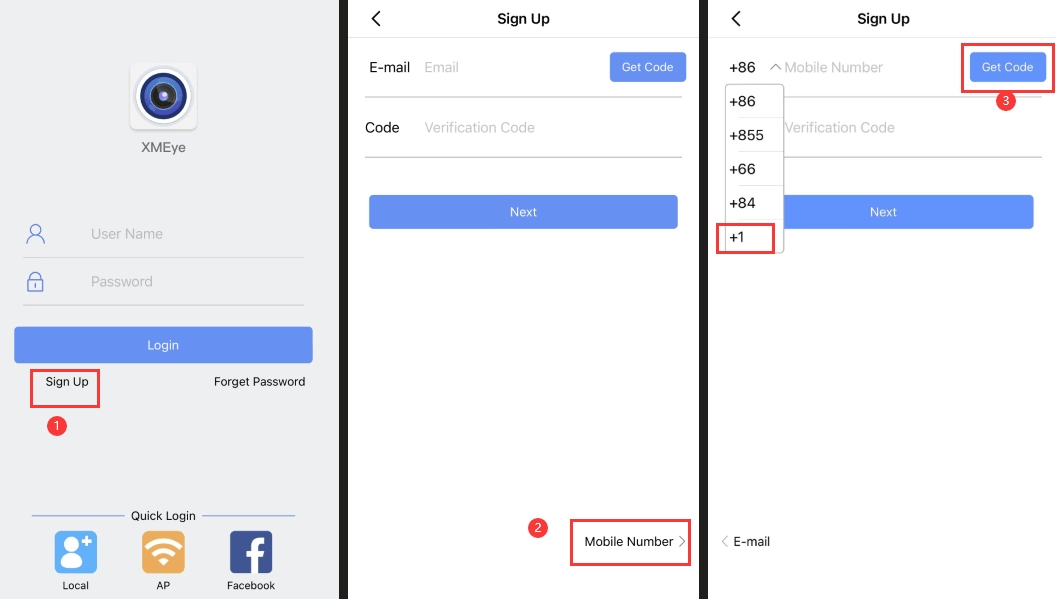
Please follow these instructions to sign up for an account via your mobile number.
1. Click on Sign Up
2. Sign Up by email or Select Mobile Number
3. Select the correct country code +1, input your mobile number and click on “Get code”
4. A code will be sent to the mobile phone number, input the verification code and continue.
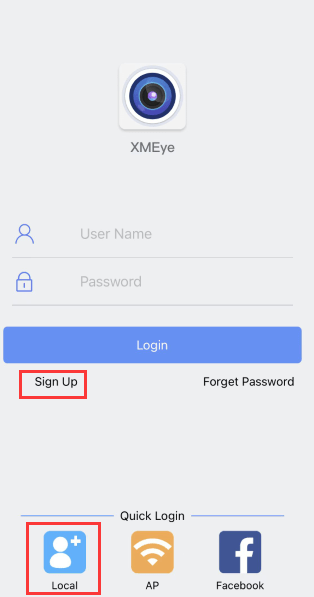
[Note: You can tap on “Local” for quick login without registration. (In this situation, you still can have live view and playback but are not able to receive motion detect alarm message), so mostly we suggest customers to sign up an account first]
Network “Probing DNS”?
1. Go to Monitor UI Interface, and Navigate to “Main Menu > Network > Net Service”, if the “Cloud Status” shows connected, means NVR/DVR is online
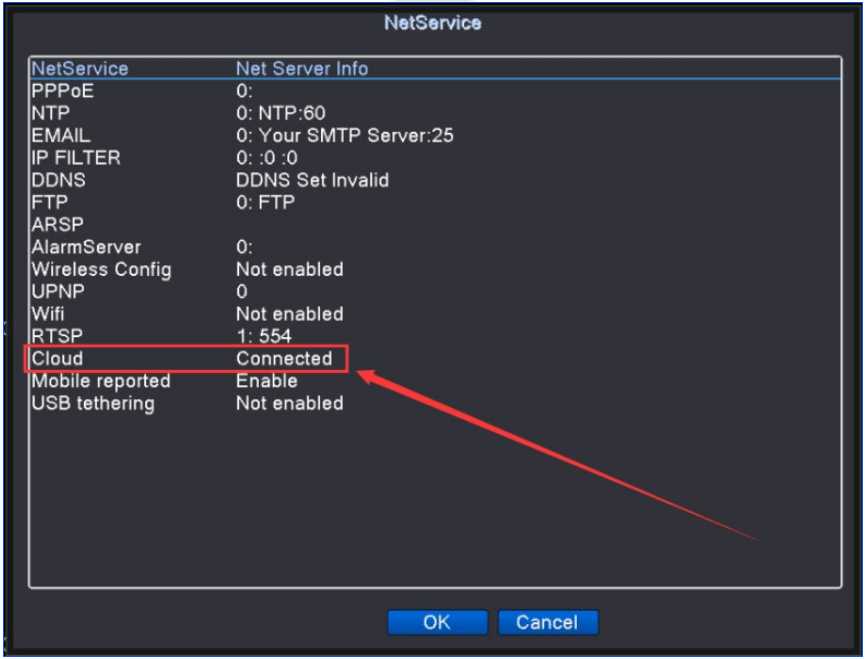
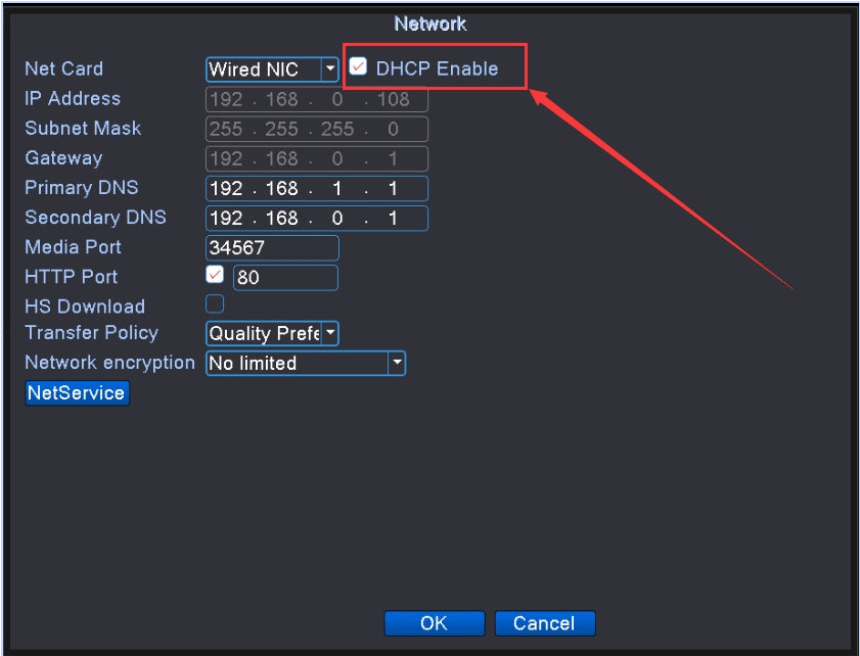
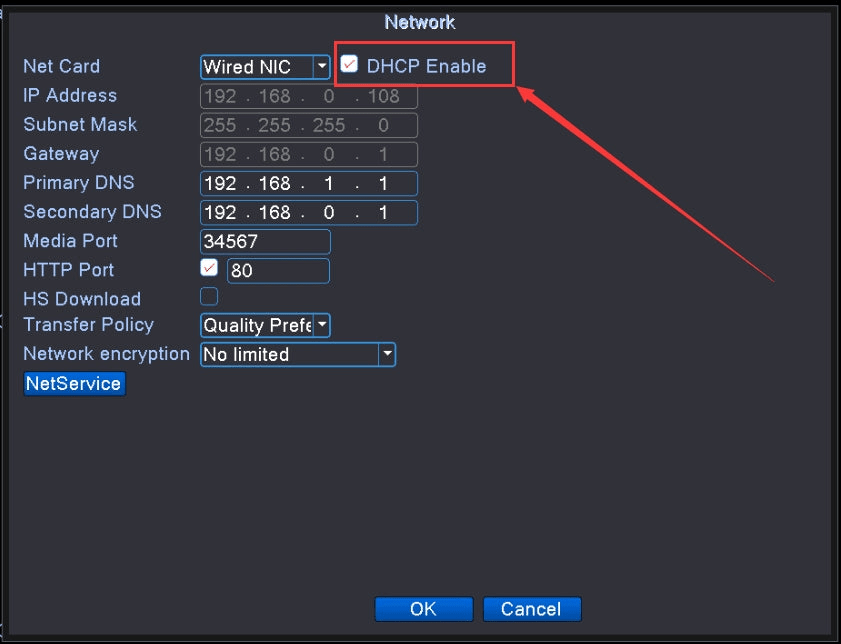
–>2. If the cloud status shows “Probing DNS”, Please Navigate to “Main Menu > Network > Check the icon of “Enable DHCP”–>Apply; –>Reboot the DVR by unplugging the power adapter and re-plug it, then double-check the cloud status ( only cloud status shows )
One or two cameras are not wokring
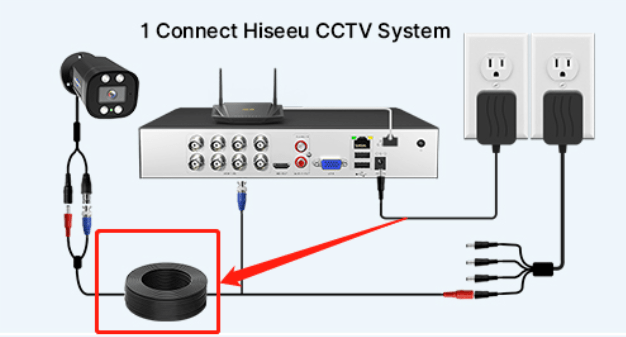
(1) BNC Cable connected to Camera is broken
Step: Use another BNC cable to connect the camera to have a try
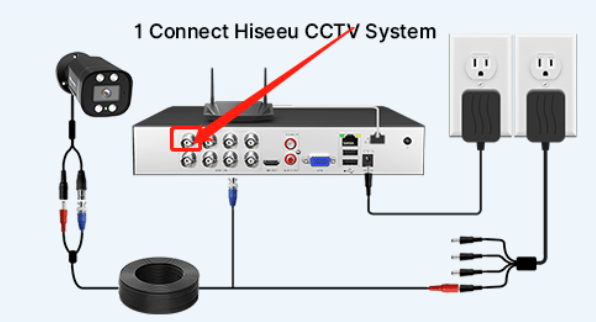
(2) The port of the DVR box is broken
Step: After changing the BNC cable, and still there is no camera image, plz insert the camera into another port of the DVR to have a try
(3) Camera is broken after troubleshooting with the steps (1)–(2)
Unable to open VMS archive file
Please drag the exe file to your Desktop interface (do not under any folder) and run it again.
Like it the photo shows , plz do have a try again ,the VMS will run normally

Upgrade NVR/DVR firmware
If customers need a firmware upgrade for NVR/DVR, and we need the “System version” to send to XMmanufacturer to ask for a firmaware to upgrade
Go to Monitor UI Interface, and navigate to “Main Menu– Advanced–Version“
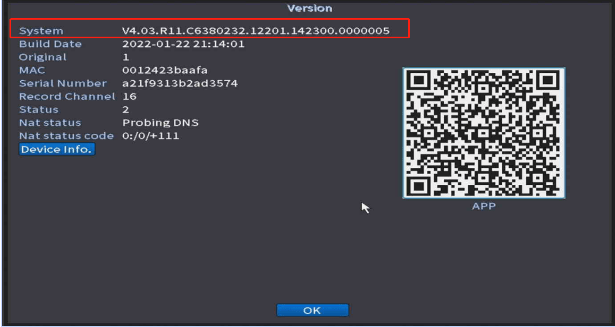
After get the Version:
Please follow the instructions below to upgrade the NVR/DVR firmware. Steps:
Attached new firmware for you, please download it and unzip it.
1. Copy to your USB flash drive, and put it in the root directory(Do not under any folder)

2. Plug the USB device into NVR/DVR
3. Navigate to “Main Menu–> Advanced–> Upgrade”
> Upgrade position(Select your usb device)
–> Upgrade file (Select the firmware)
–> Upgrade

What if the APP keeps asking the user and password?
Step: Plz input the Monitor UI user name and password to resolve this issue
The cause: Sometimes the APP would be in the process of auto-maintain, so it would ask for the user name and password to protect the account’s safety. This page will pop up when you want to live to view the camera.
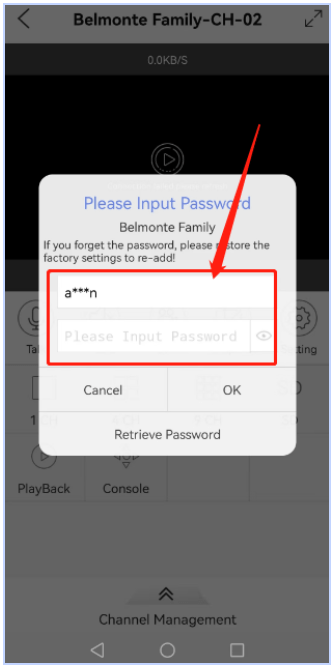
Note: Some customers enter the App account user name and password. Actually, it’s the Monitor UI user name and password
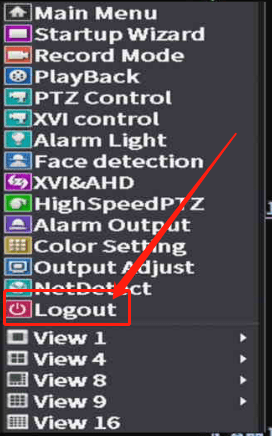
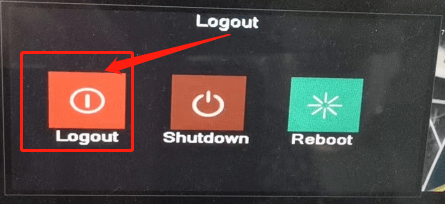
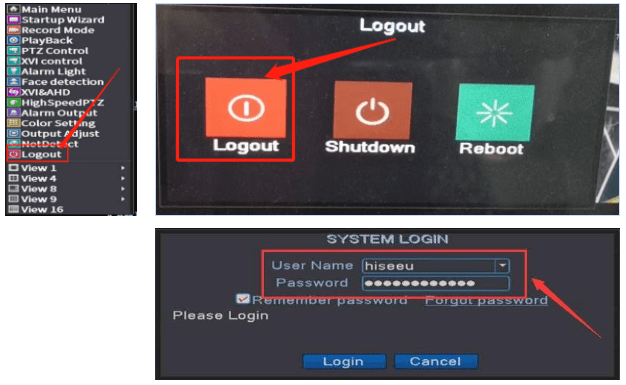
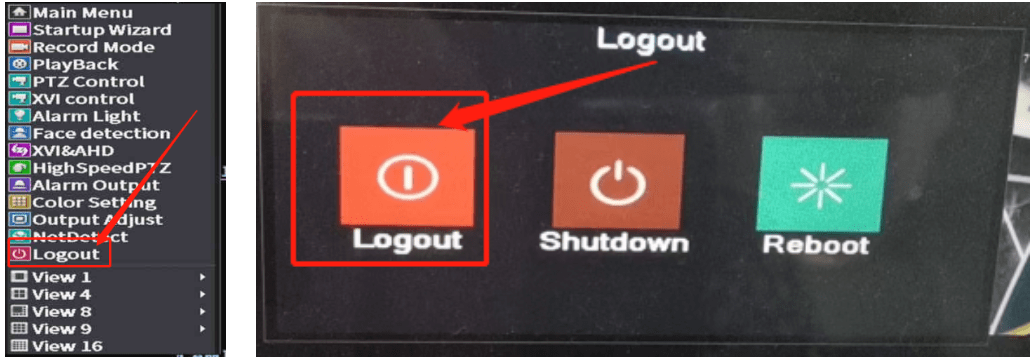
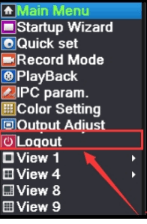
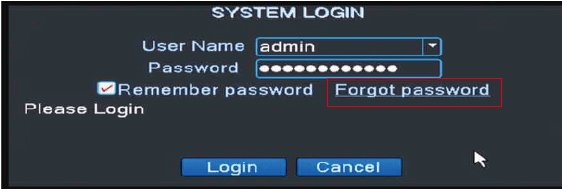
As for how to find out the user name and password, plz go next to the TV monitor UI Interface, and right click the mouse from “Log out–Log out“, then right click the mouse and navigate to “Main Menu“, this interface [system login] will pop up, and here are the user name and password we need to enter into the app

Add device on PC Client(VMS)
VMS download link:
For Windows (2023 newest version)
https://download.xm030.cn/d/MDAwMDE0OTM=
For Mac ( 2022 version)
https://download.xm030.cn/d/MDAwMDA2NDA=
1. Download PC Client “VMS” and installed
[ Need to drag the file to the desktop after installing firmware, or it would ocurred the issue of “unable to open archive file”]
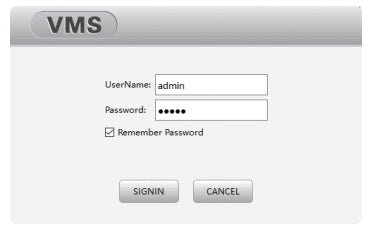
2. Login with the default User Name and Password. Click “SIGN IN”.
Default User name is: admin
Default Password is: admin
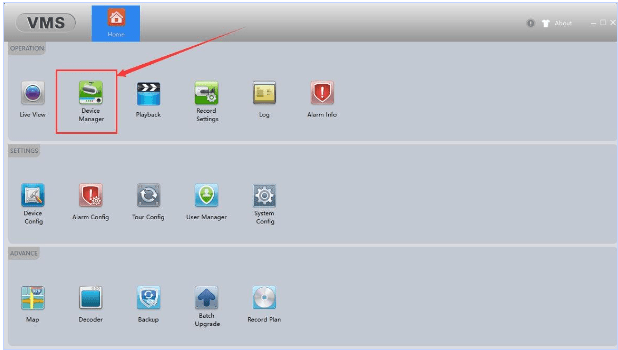
3. Navigate to “Device Manager”–>”Manual Add”
4. Login Type: Cloud ID
Device Name: Name Your Device as you like
Cloud ID : Device Serial Number. We need to go to the TV Monitor connected to the NVR , and find out the information on TV Monitor UI, then right click the mouse to navigate to the path of “Main Menu–>Advanced–>Version” to find out the information “serial number”
[Note: most customers do not know how to find the serial number, so they can’t add the device to PC Client
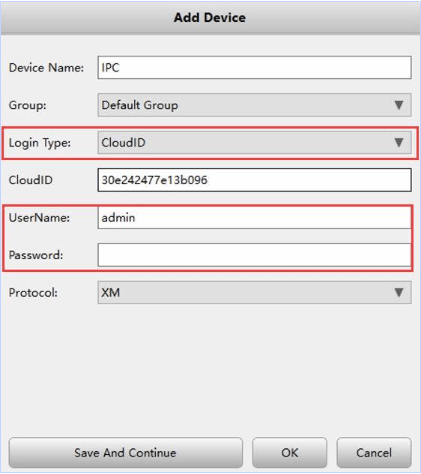
User Name and password: Input the user name and password that you created for the NVR , and we also need to find this from the Monitor UI.
[Note: Most customers do not know their user name and password, so we need to guide them to go next to the TV monitor, and right click the mouse from “Log out–Log out”, then right click the mouse and navigate to “Main Menu”, this interface [system login] would pop up]
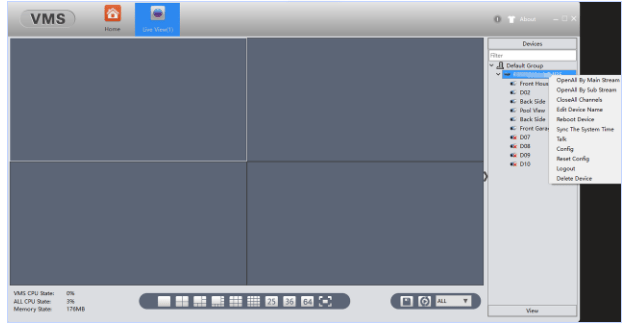
5. Navigate to “Live View”, Click on the device name(serial number), then select “Open All By Sub Stream”
Enable the APP push notification on mobile app “XMEye Pro”
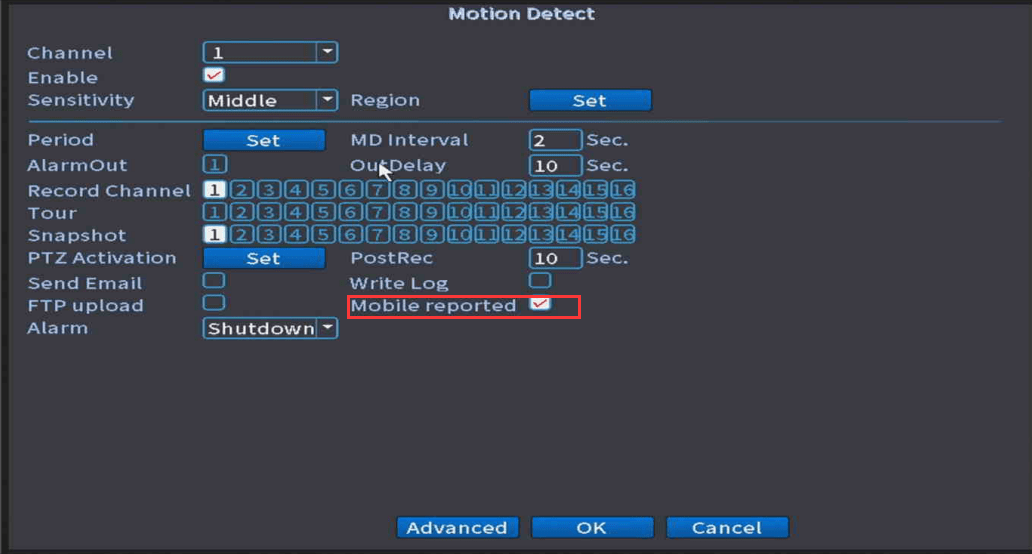
1.Please right-click mouse and navigate to Main Menu–> Alarm–>Motion Detect/Human Detect/Face Detect–> Enable “Mobile Reported”–>click “OK” (Default Setting is for Channel 1, Please select “All” channels.)
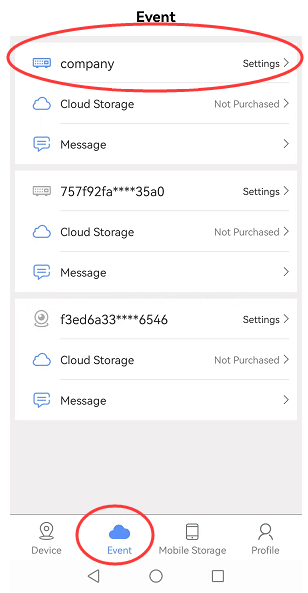
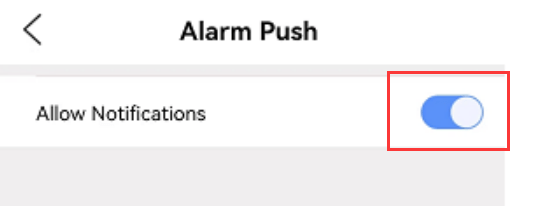
2.Open “XMeye Pro” mobile App, and navigate to Event–>Device (the one you named)–>Enable “Allow Notifications”
Add device to mobile APP (XMeye Pro)
As for how to add the device to mobile APP(XMeye Pro), please follow the below instructions
–>1. Please connect the NVR box to your Router via Network Cable;
–>2. Navigate to “Main Menu > Network > Net Service”, if the “Cloud Status” shows connected, means NVR is online (Please skip step3),
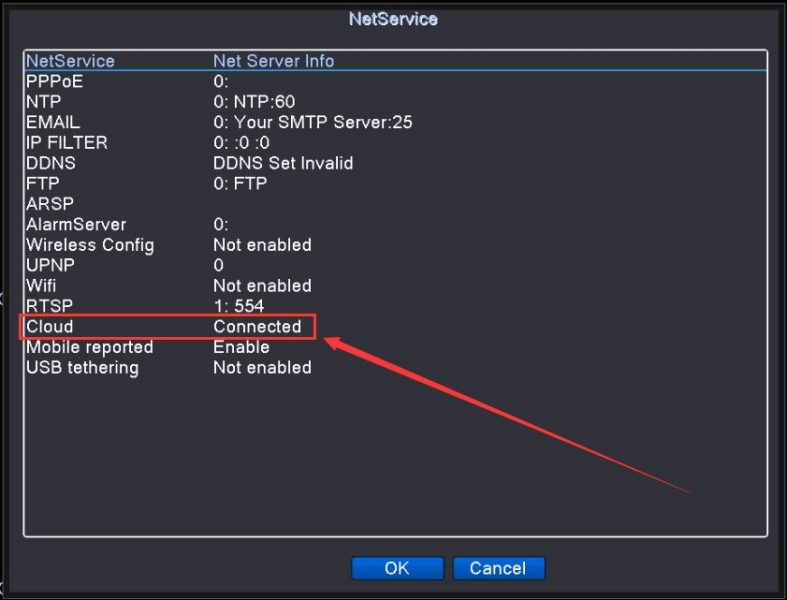
–>3. If the cloud status shows “Probing DNS”, Please Navigate to Main Menu > Network > Check Enable DHCP–>Apply;
–>Reboot DVR by unplug power adapter and re plug it, then double-check the cloud status.
–>4. Go to your TV Monitor, navigate to Main Menu–>Advanced–>Version–> You will see the serial number.
The QR code contains serial number info.
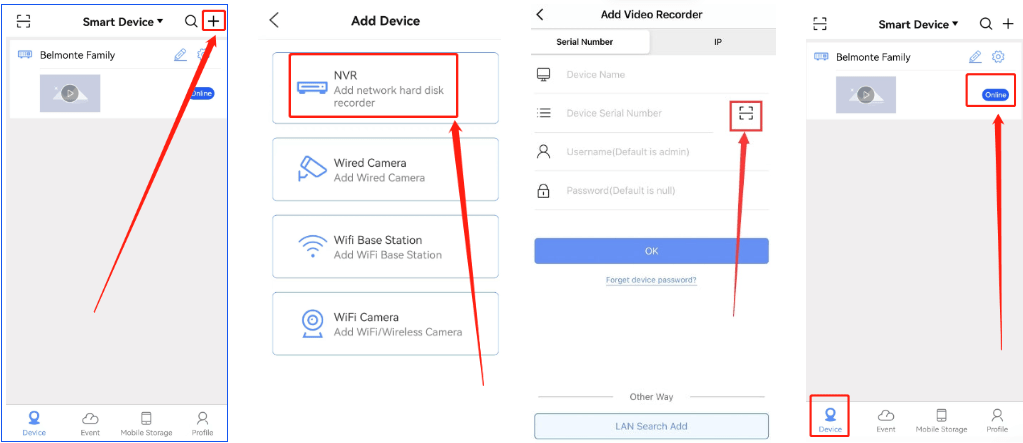
–>5. Open the mobile APP “XMeye Pro” and register an account by your email
–>6. Click”+” to add device–>Choose “NVR”
Click the “Scan” icon to Scan NVR’s QR Code. (QR code contains username and password)
No need to input the user name and password manually.
And click “Ok”, and go back to the Device page on App,and you will see the device shows status: online ,
Note1:
We do not suggest customers to manually input the serial number, If they input it, the user name and password need to be input, If they scan the code, they don’t have to input the user name and password, So we need to guide them to scan the QR code first, in some situations if we really need the information of the user name and password, and for how to find out the user name and password, plz go next to the TV monitor UI Interface, and right click the mouse from “Log out–Log out“, then right click the mouse and navigate to “Main Menu”, this interface [system login] would pop up]

Note 2:
If device shows “offline”, there could be two causes:
(1) DVR is not connected to network successfully, plz go back to Monitor UI Interface to check if the cloud status shows connected or not in the path of “Main Menu > Network > Net Service”
(2) The way he adds the device to the app is wrong, especially some customers don’t know how to find out the QR Code and input the wrong user name and password
What should I do If I forgot my DVR password
1.Right click mouse from home screen, Click “Log Out–>Log Out”
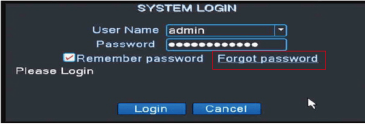
2.Then click “Forget password” > “Forget answer ” > Then you will see two “QR code” on the monitor
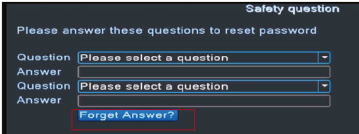
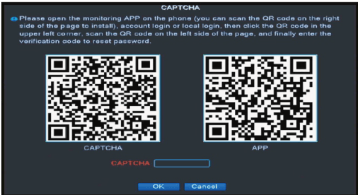
3.Open your Mobile APP “XMEye Pro” ,
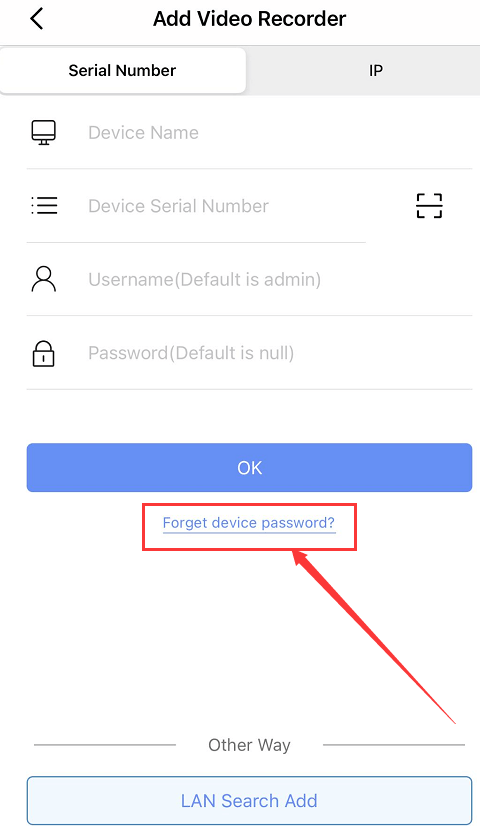
(1). Click the “+” icon on the top right corner—>Hit “NVR”
(2). Click “Forgot your device password”–> Scan the QR code (CAPTCHA on the TV monitor)
(3). Scan the QR code shown on your TV monitor. You will get the verification code.
(4). Input the code in “CAPTCHA”
Why can’t live view the videos on mobile APP or PC Client VMS
1.Please make sure that your DVR system is already connected to the router through ethernet cable successfully
2.Please go to Main Menu > System > Net Service to check the network is connected or not, Cloud should shows: connected
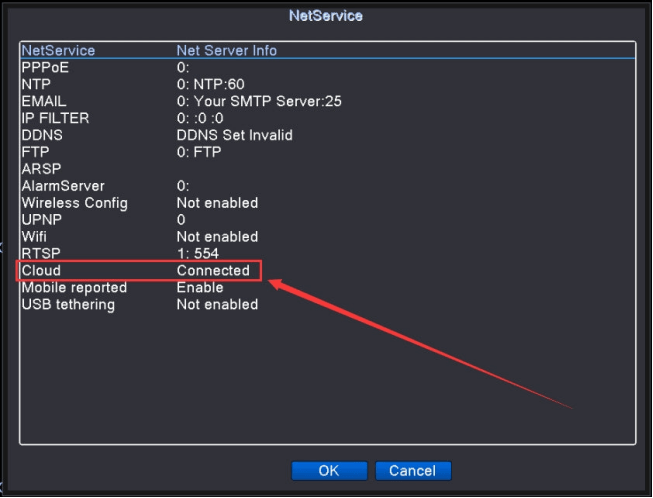
3.Make sure the way you add device to your mobile app or PC client with correct serial number and password
Serial number: “Main Menu–Advanced–Version”
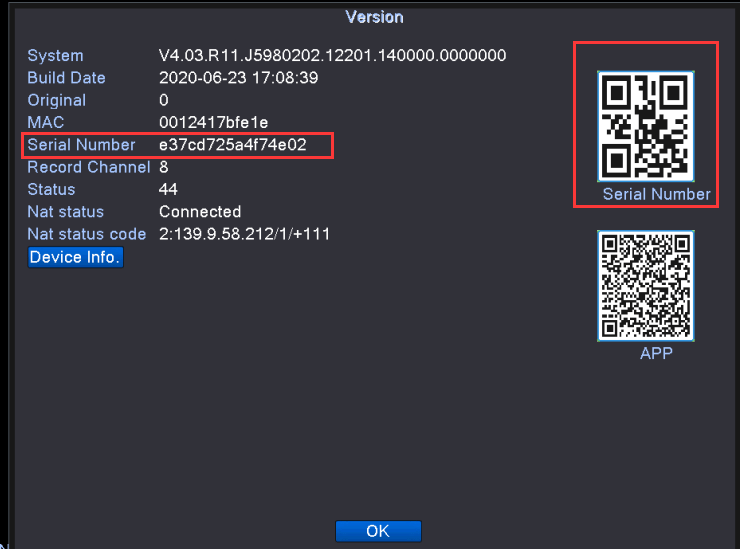
Password: DVR login password
Why the DVR can’t record or playback video
If HDD(Hard disk drive) is having issue or something wrong with record setting, the DVR can’t record/playback the video
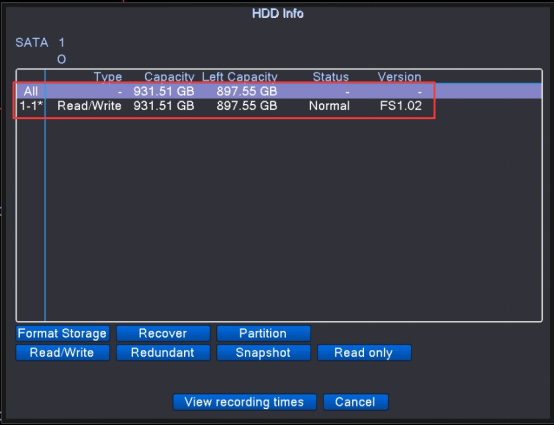
1. Check if the hard drive status is normal or error
Navigate to: Main Menu–>Advanced–>HDD info.
If it’s hows “error” or no hard drive info, means hard drive failure. (need to replace hard dirve)
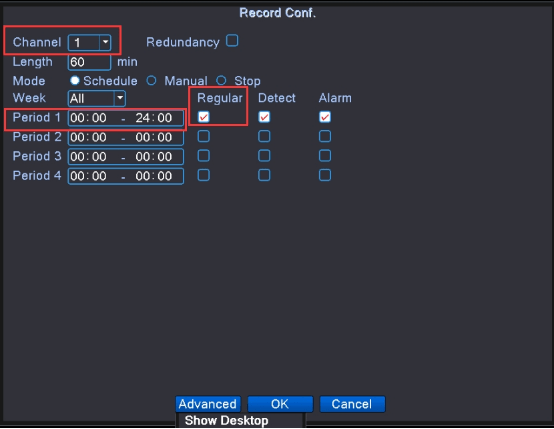
2. Check the record plan is set up for 24/7 continues recording
Navigate to Main Menu–>Record Conf
Channel : select “All”
Period: “00:00-24:00”
Select “Regular”
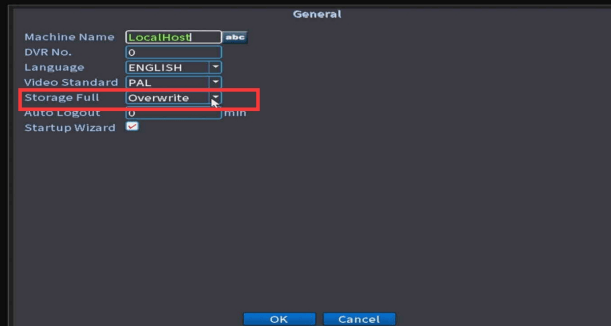
3. Please make sure the HDD was set up to “Overwrite”
Navigate to Main Menu–>General–>Storage Full
Any ideas, let us know. Thank you for your cooperation.
