Guarding Vision Troubleshooting Guides, The Guarding Vision app is designed to work with DVRs, NVRs and IP cameras which support Cloud P2P function. It allows you to live view your cameras remotely. All you need to do is creating an account and adding device into the account, then you can enjoy the real-time video from cameras on a global scale. It also allows you to play back recorded video to search every milestone of your life. When motion detection alarm of your device triggered, you can get an instant message notification from Guarding Vision app.
No Video Output
H-series Recorders are set to auto detect the output its connected to. So either HDMI or VGA. It also tries to auto detect the resolution of display your Monitor supports.
Sometimes this doesn’t always work and your monitor is stuck showing No Signal.
Guarding Vision Troubleshooting Guides
Read Next :
Step 1. Log Into NVR’s Web Interface
You will need the NVR and a PC connected to the same local network to access this.
Once logged in, go into the Configuration Tab at the top, then System -> System Settings -> Menu Output.
In our example, this NVR is connected to a 1080p monitor using the HDMI output.
As you can see, the NVR is output a really low resolution since it cannot auto detect.

In our case, we will change the Menu Output to HDMI/VGA and the Resolution to 1920/1080/60HZ.
Then Click Save.
The NVR will then Reboot.

After the NVR has rebooted, it should start displaying properly on your monitor once the corrected adjustments have been made!
Resetting an H-series NVR / DVR Password
Prelim
Its very rare, but some recorders have an actual reset button physically on their motherboard. If you press and hold this for 30 seconds, this will default the recorder entirely. And you will start from scratch.
If there is no reset button, follow the next instructions:
Step 1. Download and Run the SADP Tool
You can Download the SADP Tool Here
Step 2. Determine the Firmware Version and Build Date
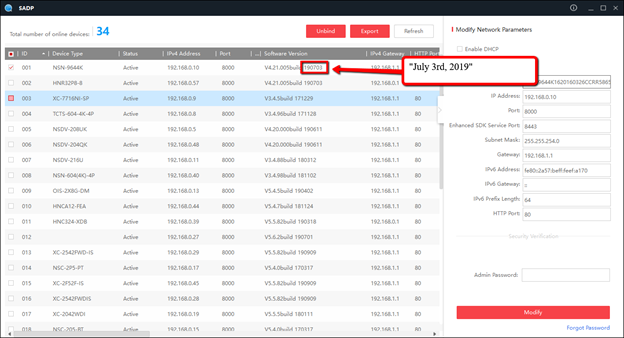
Example: 190703 = July 3rd, 2019
If the build date is 2016 or older, please email the full serial number of the recorder and email it to our support team. customerservice@nellyssecurity.com.
If the build date is 2017 and newer, please go to the “2017 and Newer” Section below.
2016 and Older Instructions
Serial Number Location:
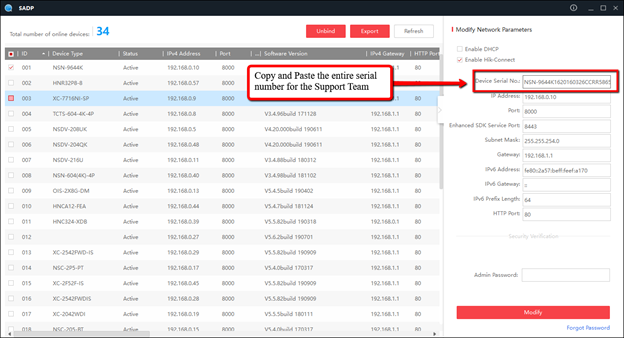
The Support Team will then send over a generated Key for you to use. (the code is good for that day only)
Click on “forgot password” in the bottom right corner 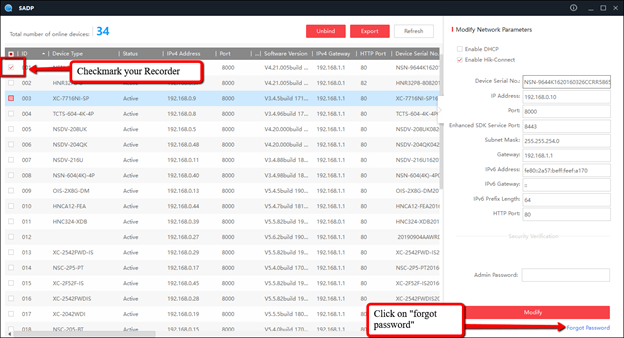
Paste in the generated code, input your new password then click Confirm 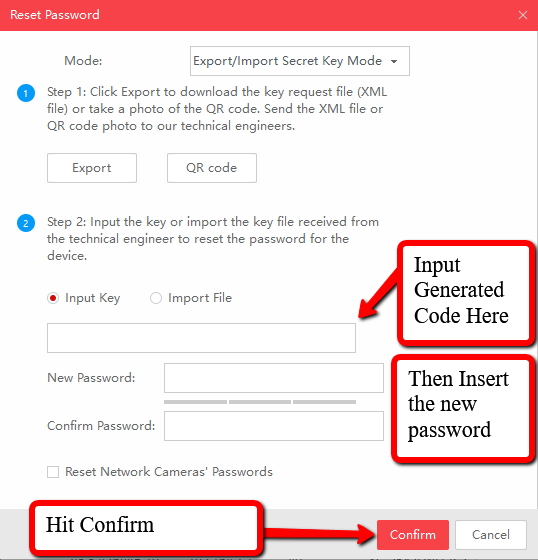
After Confirming, you should get a Success message and you’ll be all set!
2017 and Newer Firmware
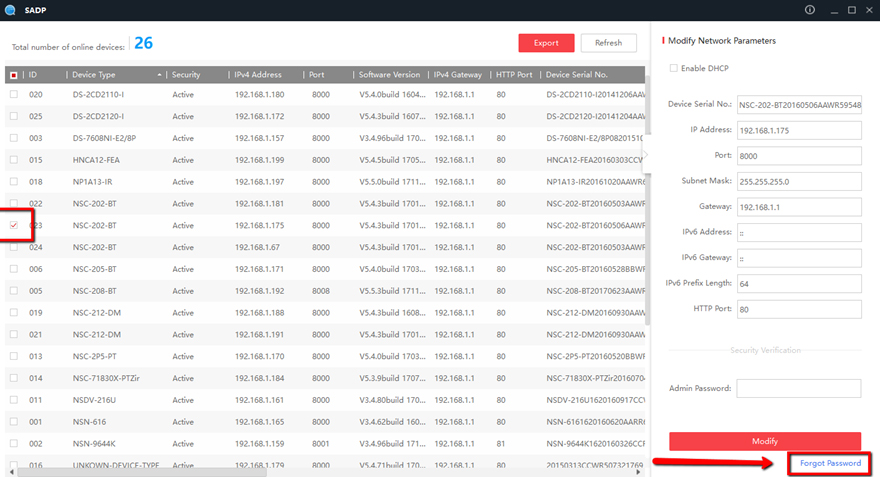
Select the device, by checking the checkbox to its left, and press the Forgot Password option on the bottom-right corner of the user interface.
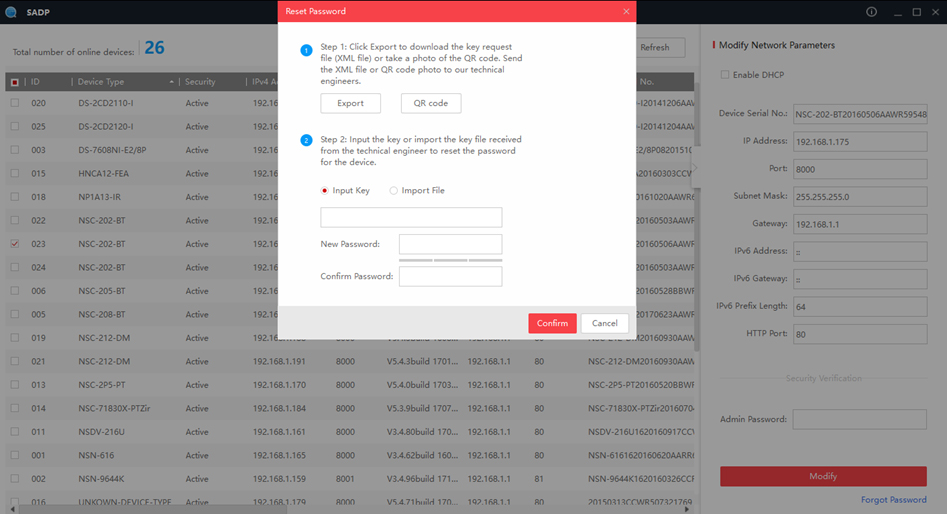
A pop-up window containing instructions will appear.
Press the EXPORT button to export the password reset key.
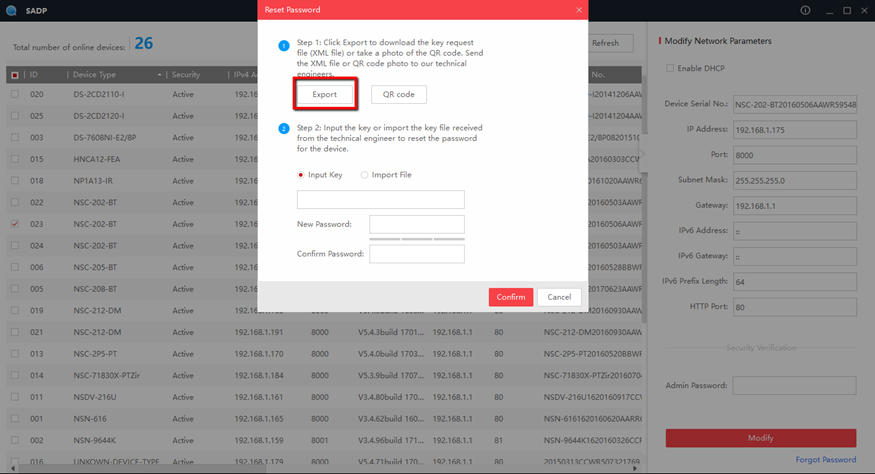
After pressing the EXPORT button, a new SELECT FOLDER window will appear. For ease of use, select DESKTOP as the export directory and click on the Select Folder button on the bottom.
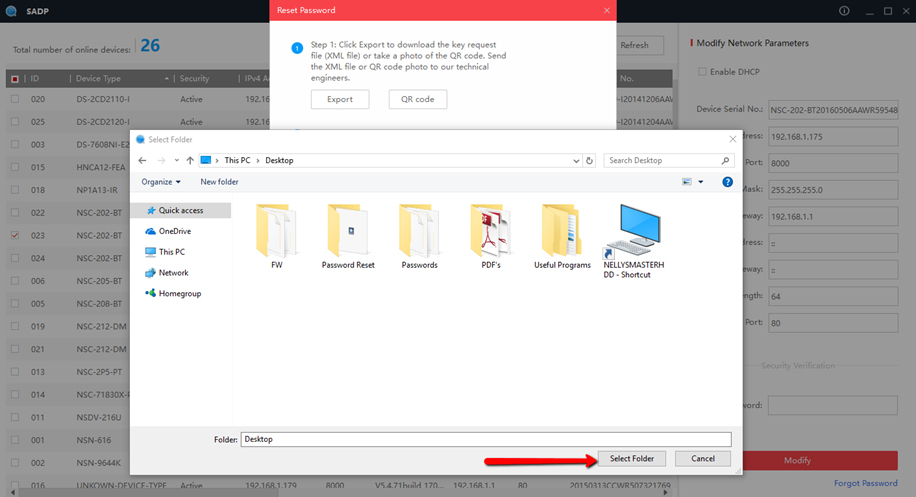
After locating the reset file on the desktop, email it to customerservice@nellyssecurity.com
Please allow an hour to receive a reply during normal business hours (Mon-Fri 9AM-5PM CST). If the email was sent outside of normal business hours, the reply will be sent on the next business day.
The reply from the technical support team will contain a reset file or key, generally called ENCRYPT (the file may have an altered name, if files for multiple devices are being sent). Upon receiving the reset file download it to the DESKTOP (for ease of access).
Please note, the reset file is good for 4 calendar days, and during those days the device for which the reset file has been generated cannot be rebooted or powered down.
To finalize the reset procedure, the Reset file or Key will need to be “imported” into the device, along with a new password (remember, there is no default password to reset to).
To “import” the reset file, click on the button with a FOLDER ICON.
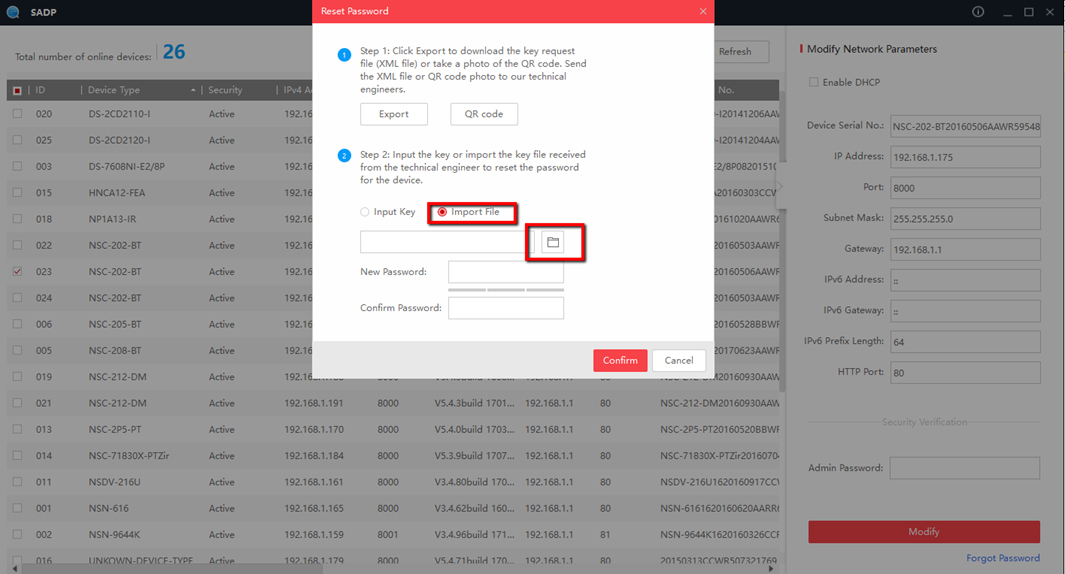
A new OPEN window will appear. Select DESKTOP as an import directory and select the reset file and click on the OPEN button.
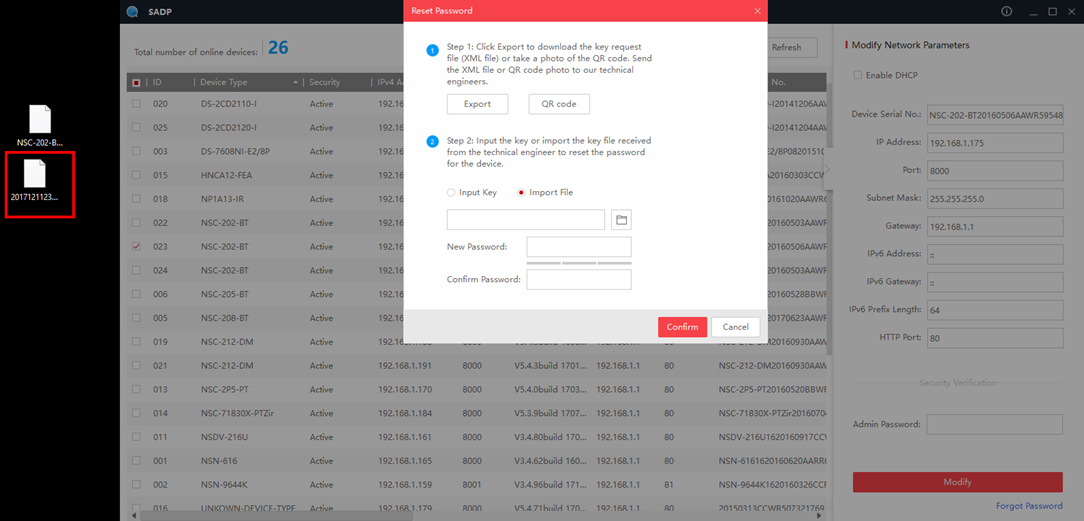
Type the new password into the NEW PASSWORD field, then confirms the password by re-typing the password into the CONFIRM PASSWORD field. Press CONFIRM.
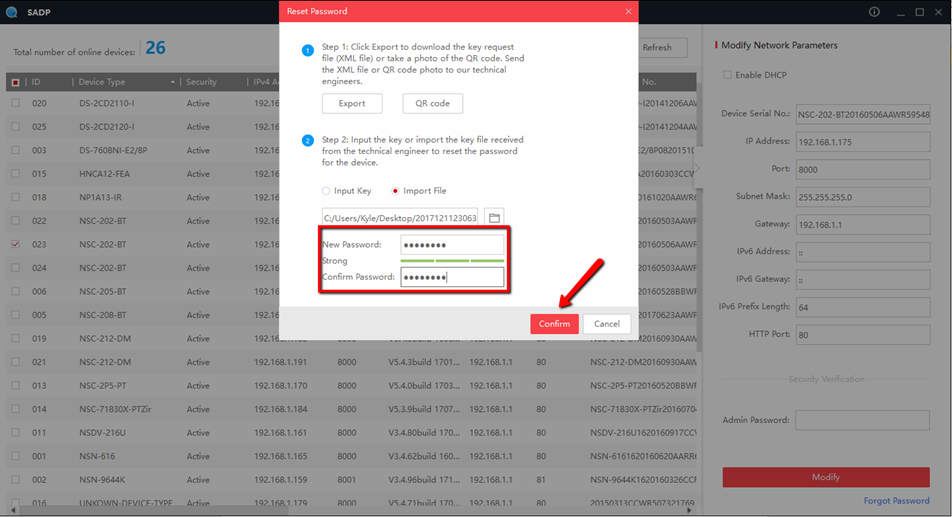
After Confirming, you’ll get a Success Message and you’ll be all set!
How To Find and Input Encryption Key (Verification Code)
If you have Stream Encryption enabled on your device, trying to view the Live View may require an extra step by inputting the encryption key for the Web Interface, IVMS-4200 software, and the Guarding Vision app.
Attached Monitor
The first place you can find the Encryption Key is from the attached monitor.
There are two different interfaces for their respective firmwares. 3.0(older) & 4.0(newer).
3.0 Interface:
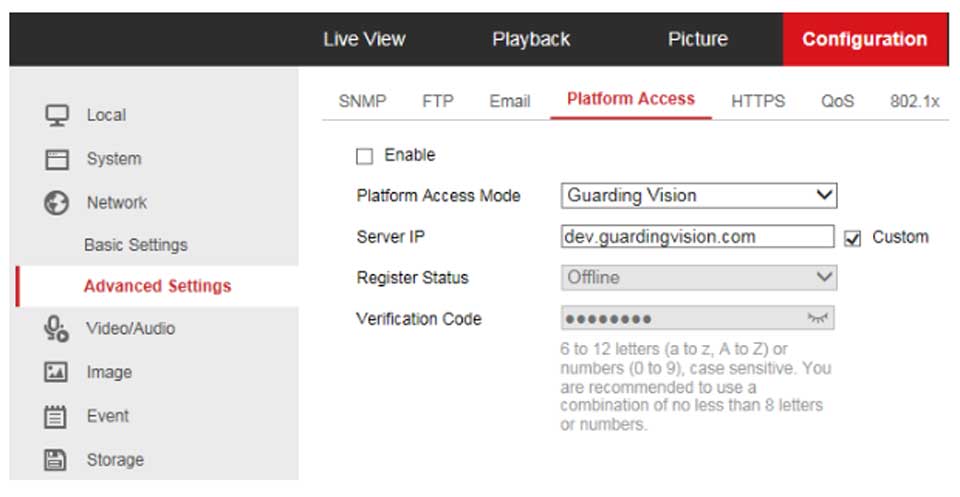
Main Menu -> Configuration -> Network -> Platform Access -> Verification Code 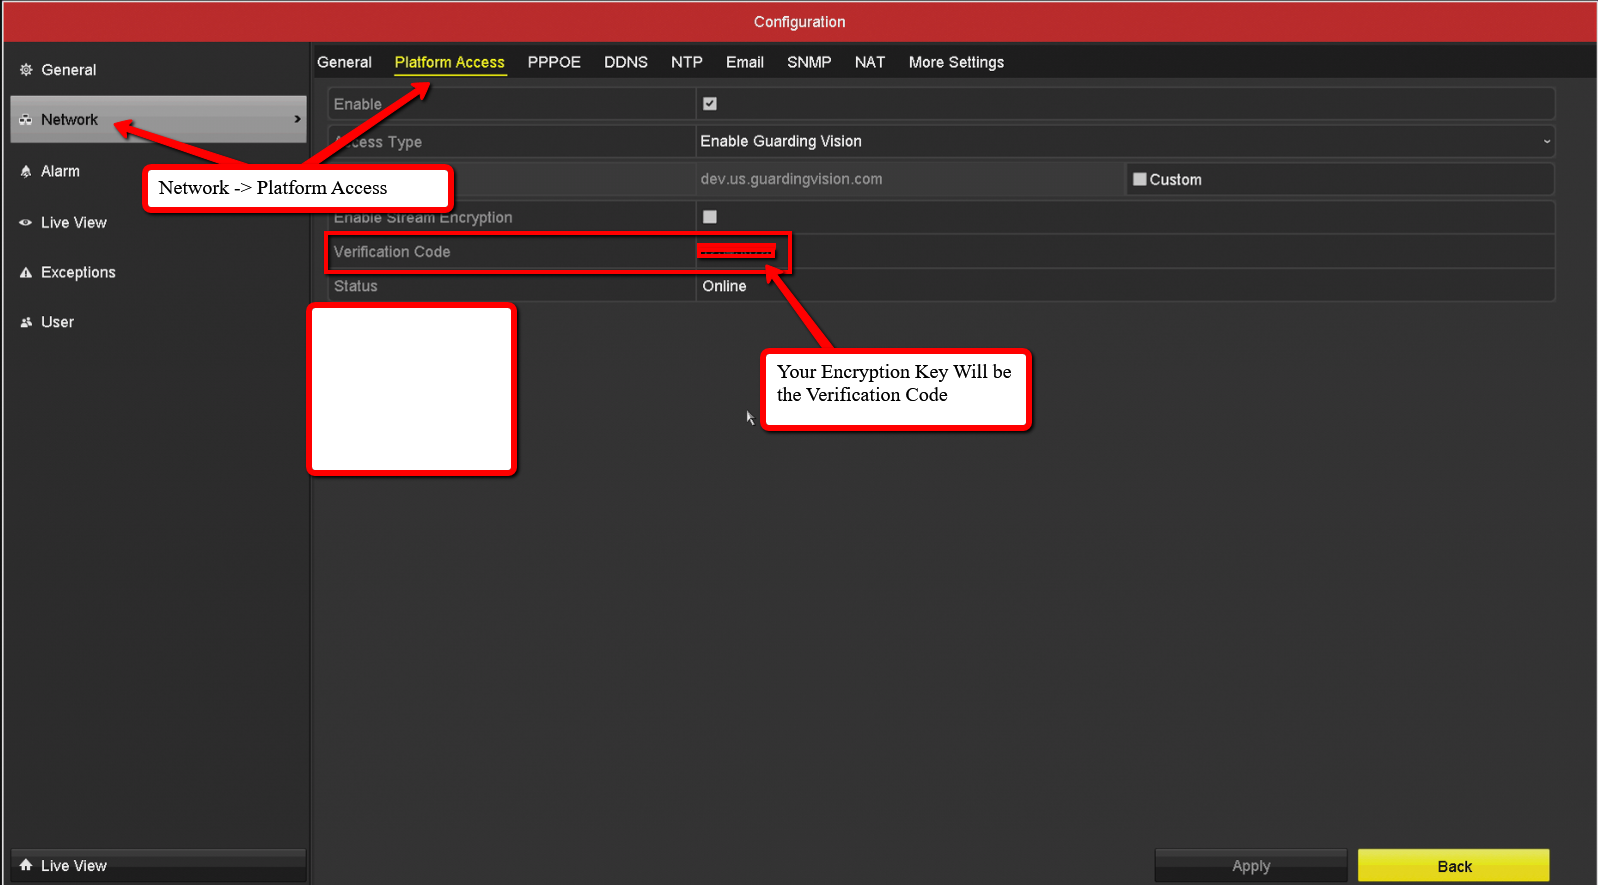
4.0 Interface:
Home -> System -> Network -> Advanced -> Platform Access -> Verification Code 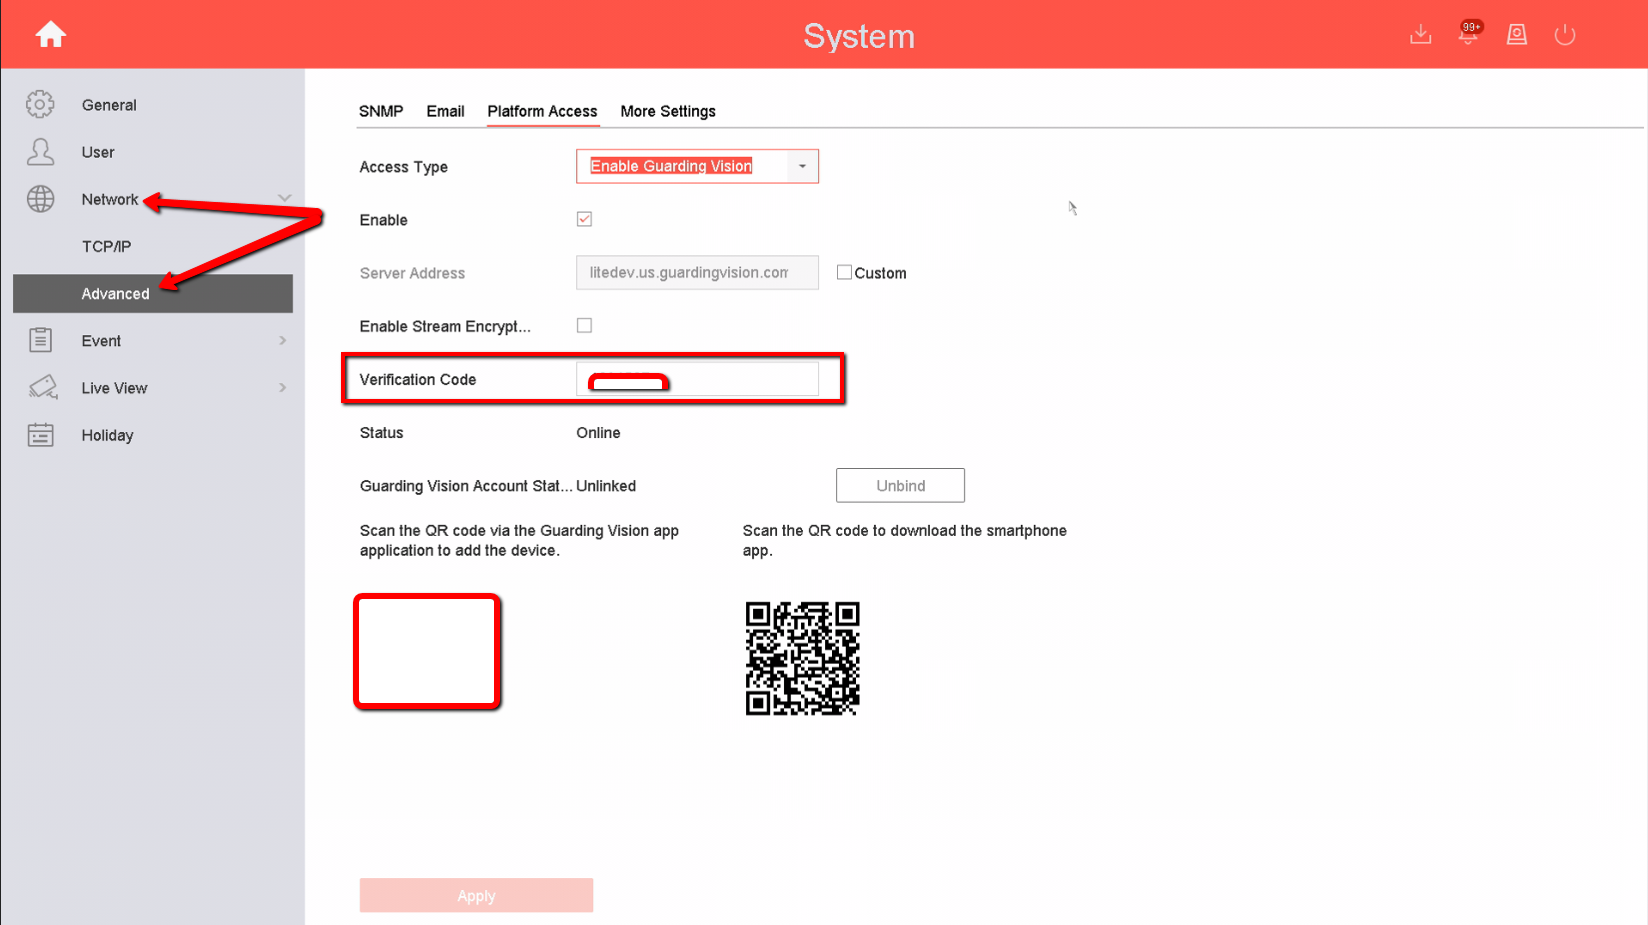
Web Interface
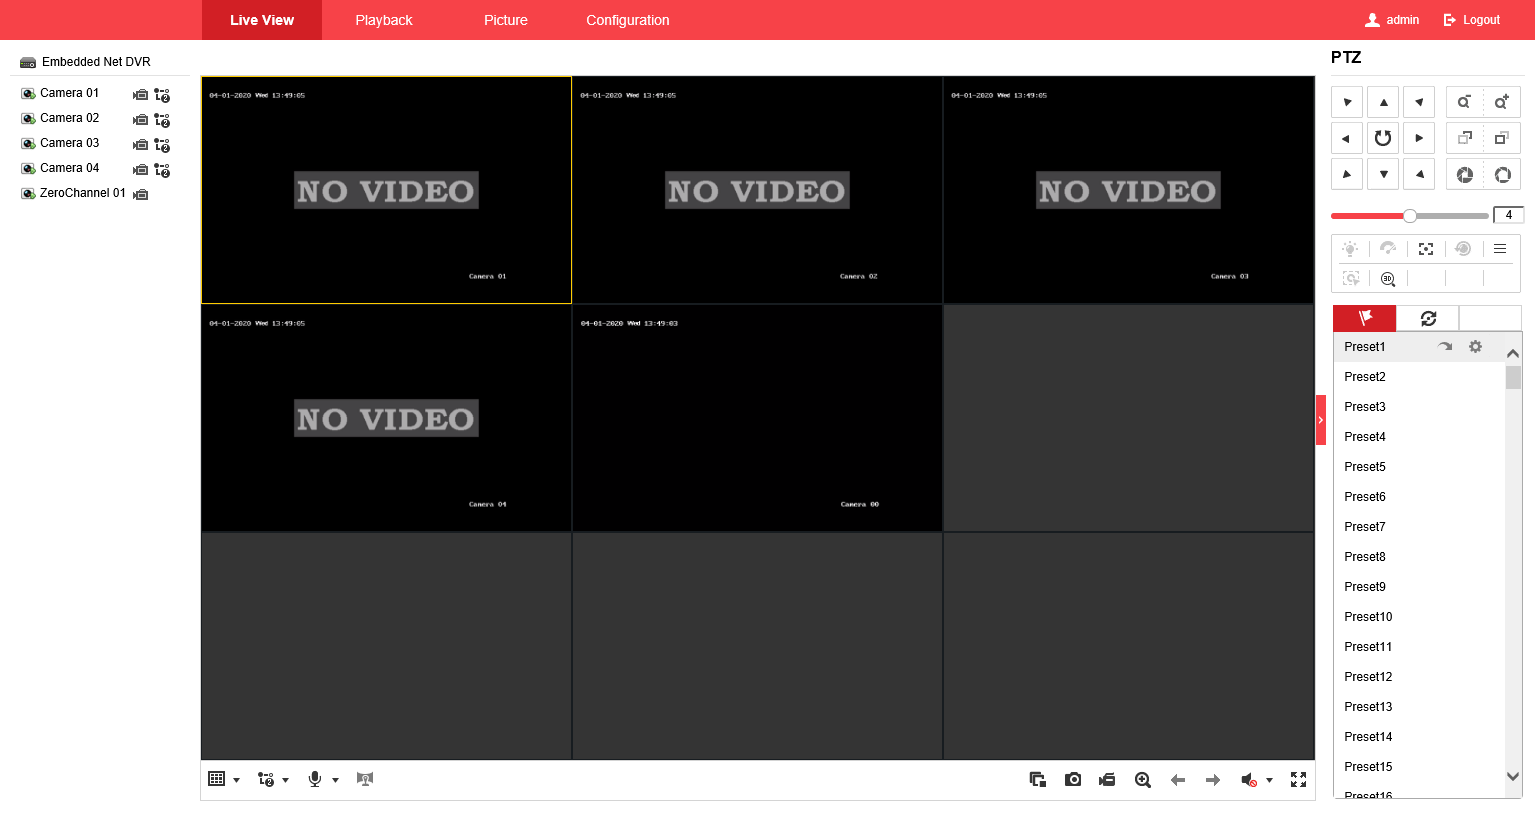
When Selecting Play from the web interface, you may get an Invalid Encryption Key message at the bottom right corner
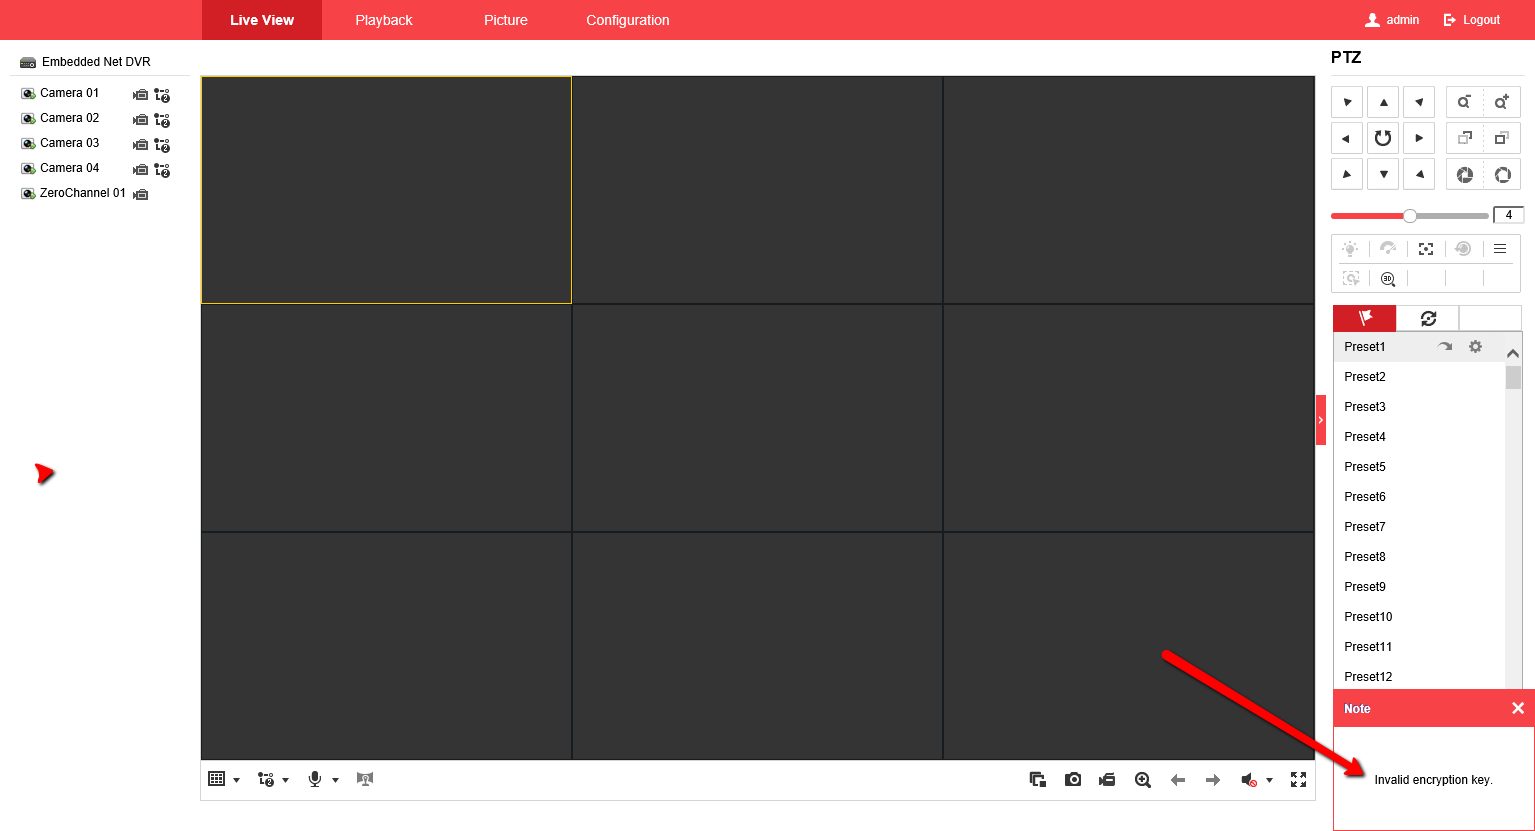
To fix this, Go into the Configuration Tab at the top, then Network -> Advanced Settings -> Platform Access.
Click on the Eyelash icon to reveal your Encryption Key.

Now take this Key and go into the Local Tab on the left side.
Paste the Key in the Encryption Key section and click Save.
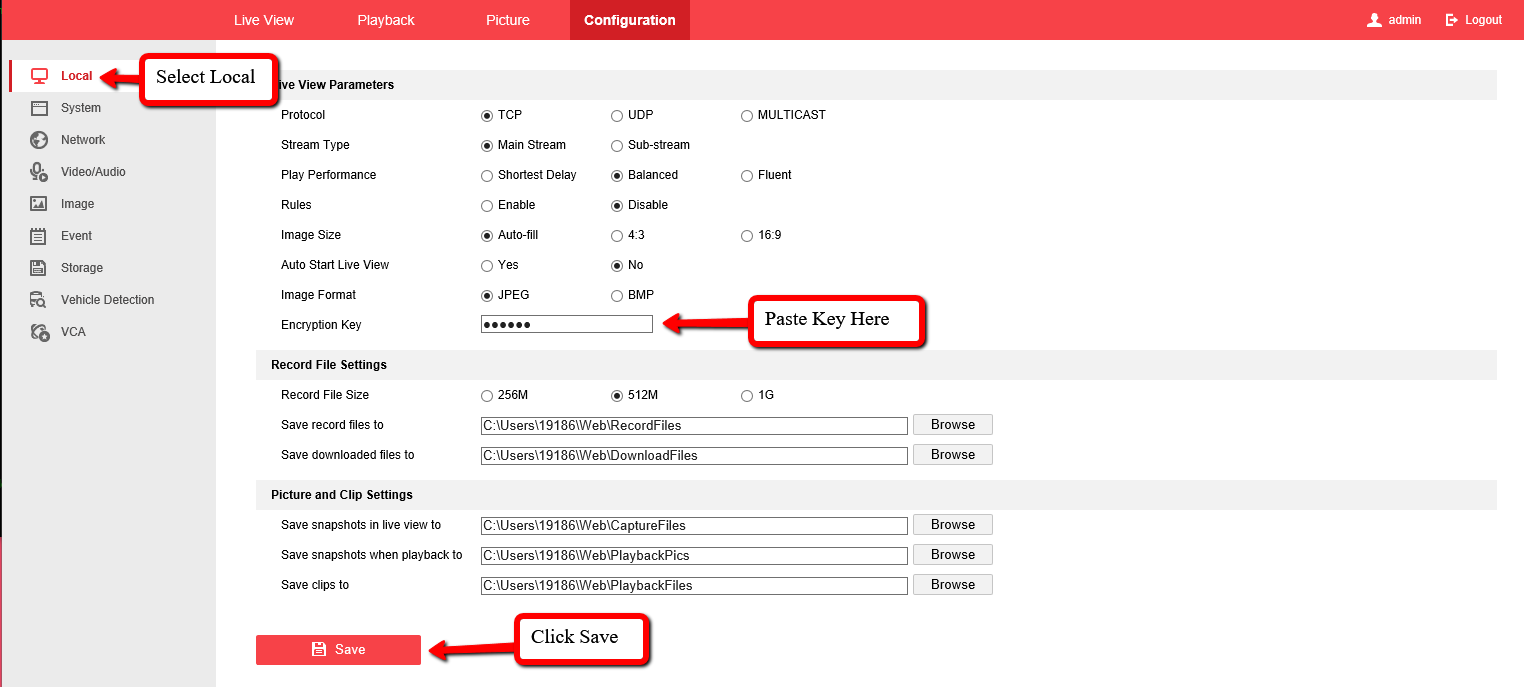
Now go back into Live View and the cams will play!
IVMS-4200
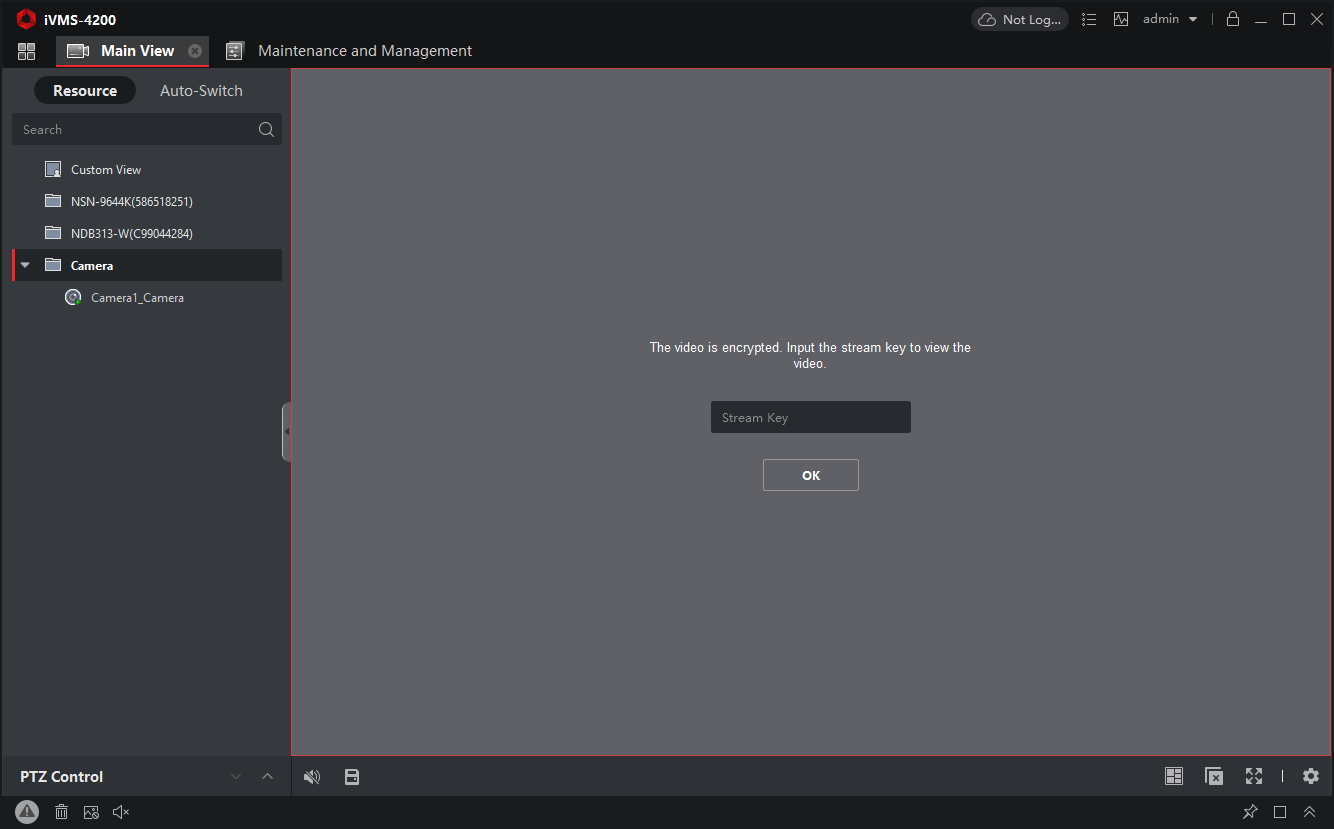
When pulling up your recorder on IVMS-4200, you may get prompted to input your Encryption Key.
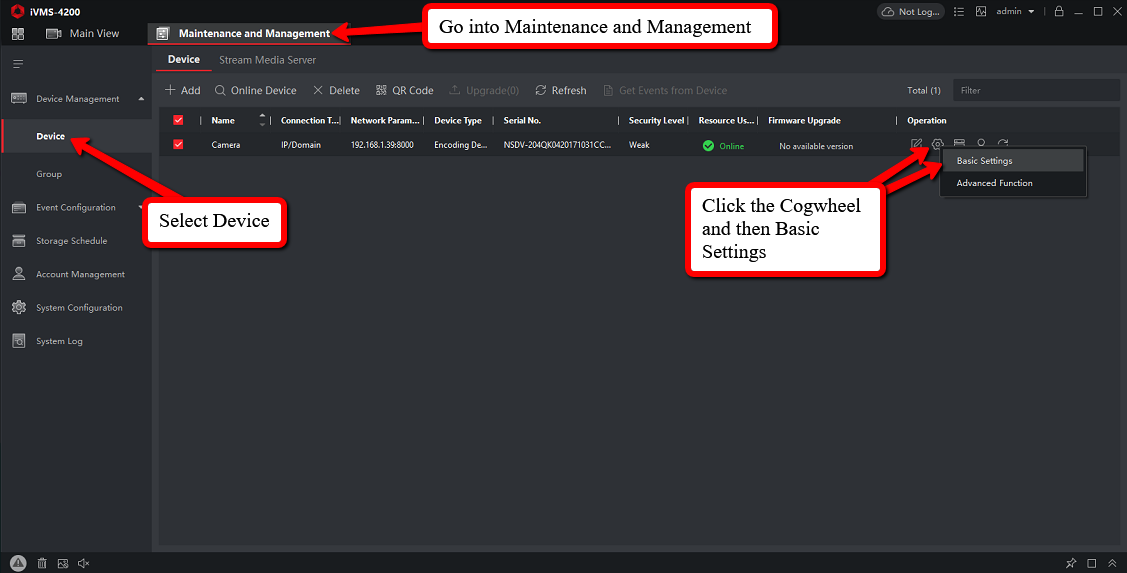
If you do not know this key you can find it by going into the Maintenance and Management section
Then Device tab on the left and click on the Cogwheel icon next to your device and select Basic Settings
Now a popup will appear and it will look similar to the web interface.
Network -> Advanced Settings -> Platform Access.
Click on the Eyelash icon to reveal your Encryption Key

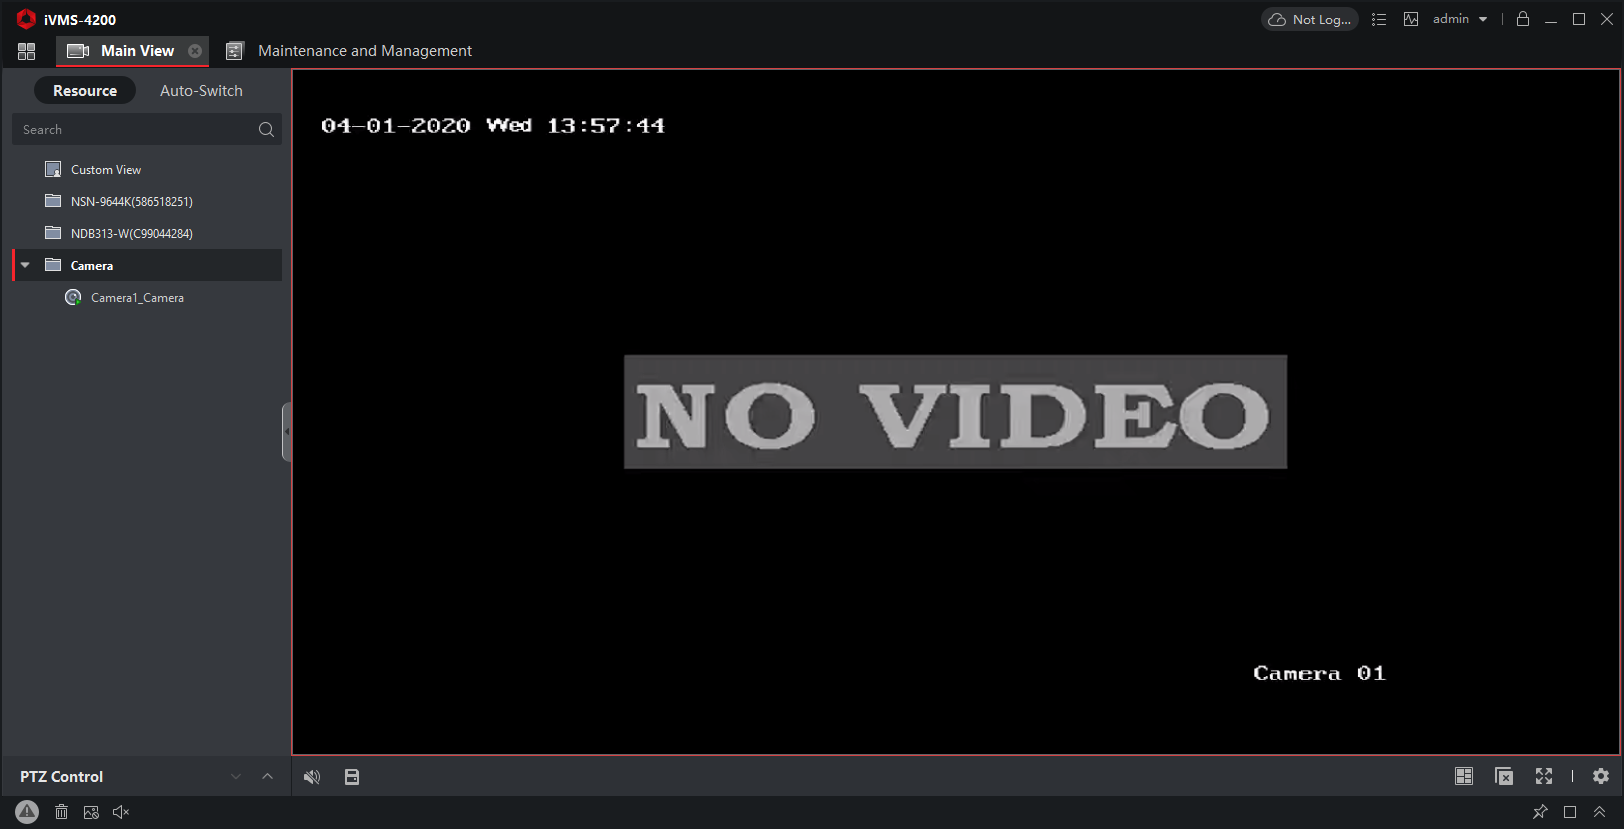
Now you can go back into the Live View on IVMS-4200 and put in that code in and the Live View will appear.
Guarding Vision
When pulling up the Live View from the Guarding Vision app, you may come across Lock Icons over the Panels. Click on one and you will be prompted to input the Verification Code.
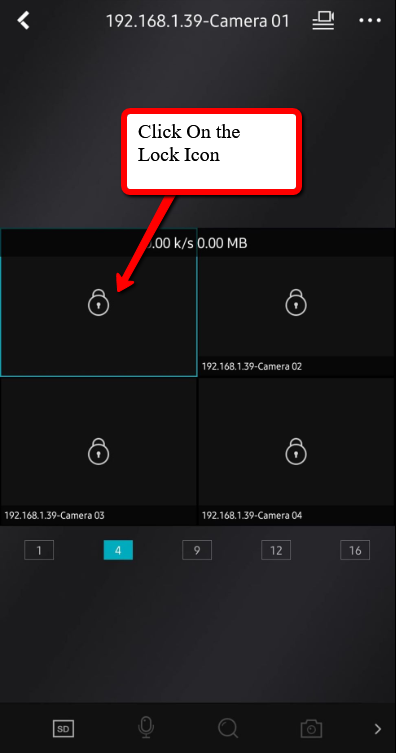
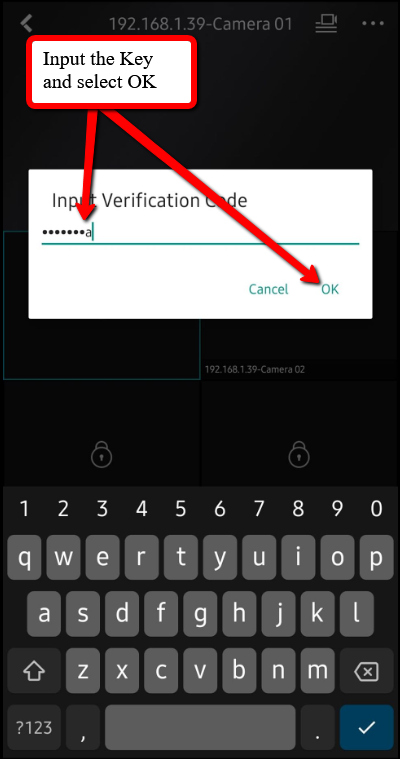
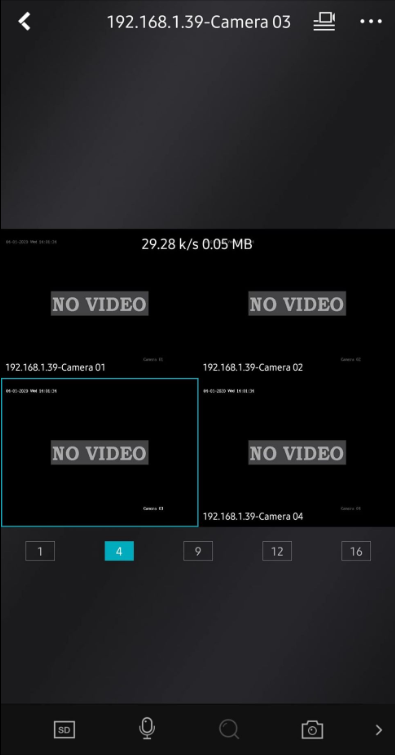
After putting the code in, hit OK, then the live view on the cams will appear, you may have to click on the other Lock Icons to bring them up.
How to set up Gmail email alerts on a H-Series NVR
This Guide will give you step by step instructions on how to setup email alerts using Gmail account and an H-series NVR
NOTE
If you would like to receive E-mail alerts whenever an event has occurred, we recommend using a Gmail account. It’s free, secure, and easy to configure.
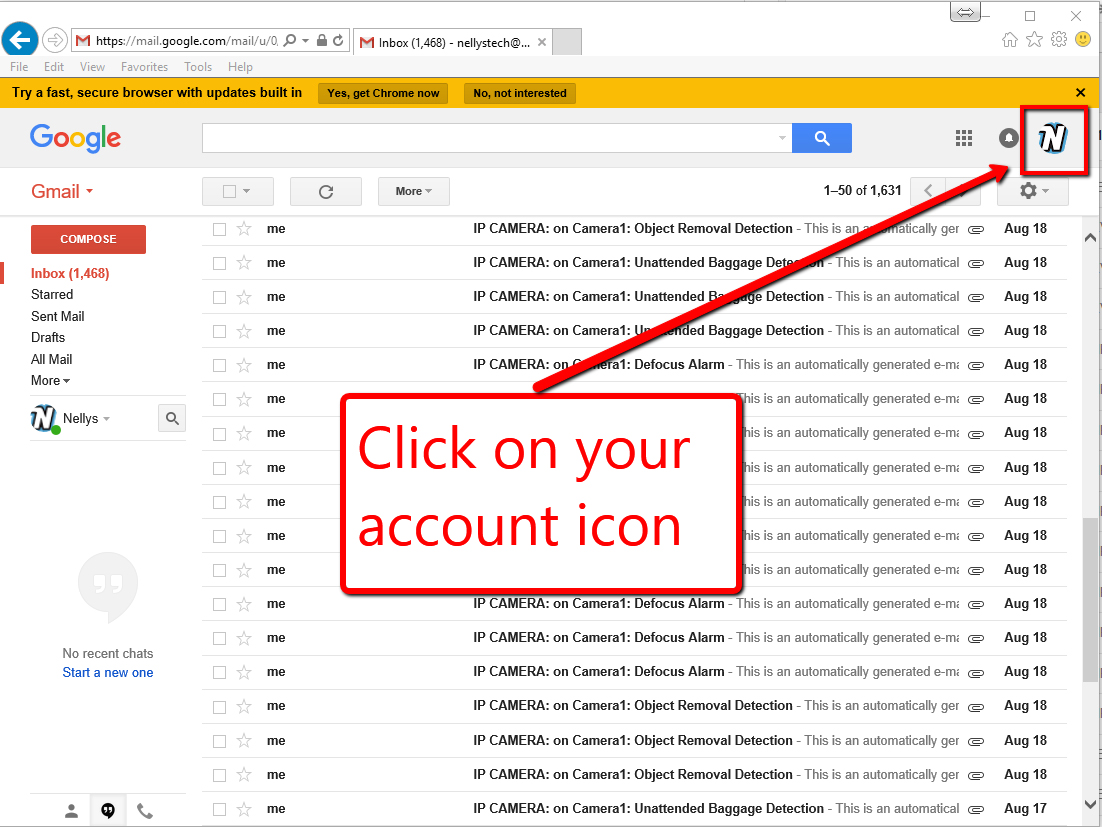
Step 1: Log into Gmail with your user name and password, then click on your account icon in the top right. Our account has been customized with the Nelly’s “N”. Yours might have a default user icon.
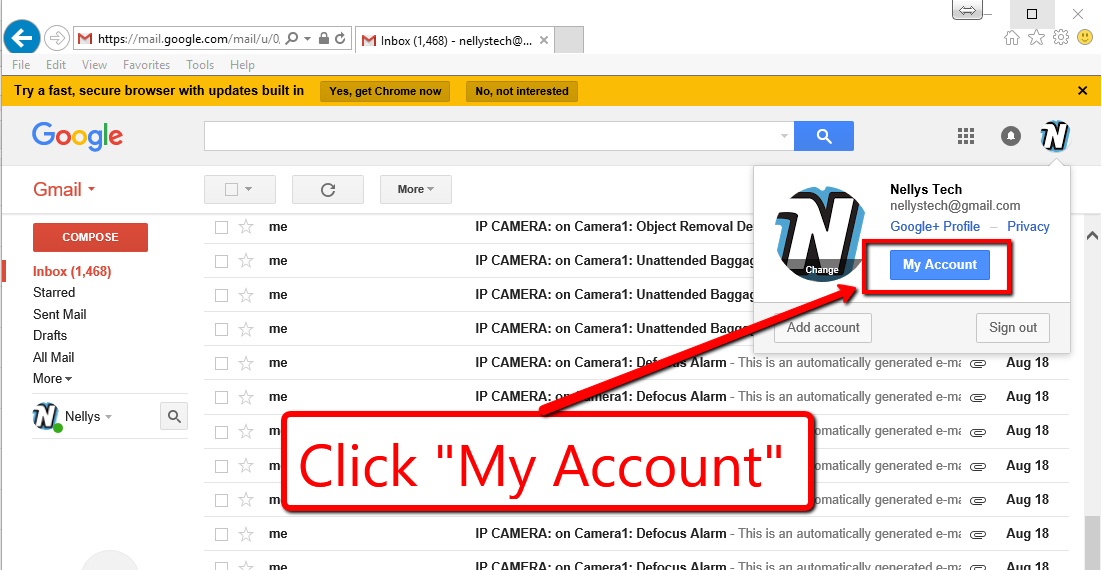
Step 2: Click on the “My Account” button
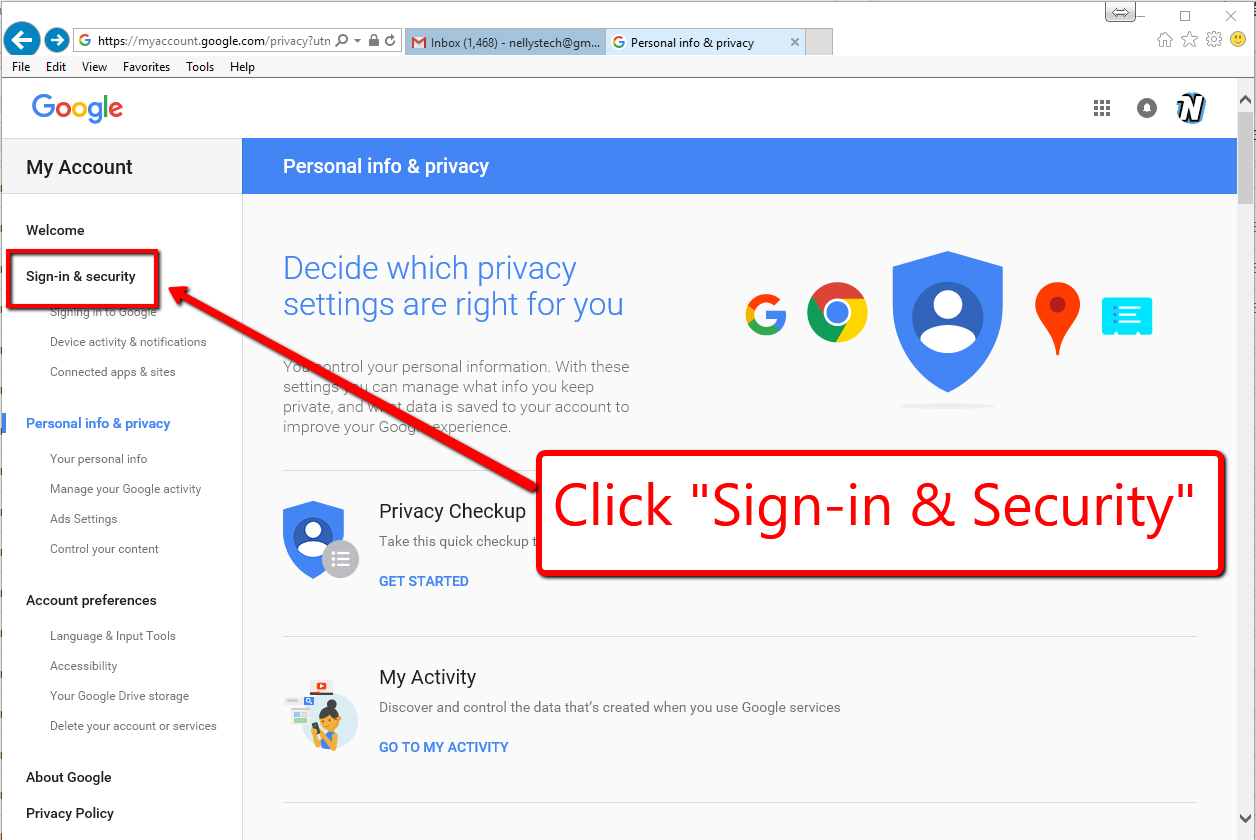
Step 3: Then click on “Sign-in & Security” on the left
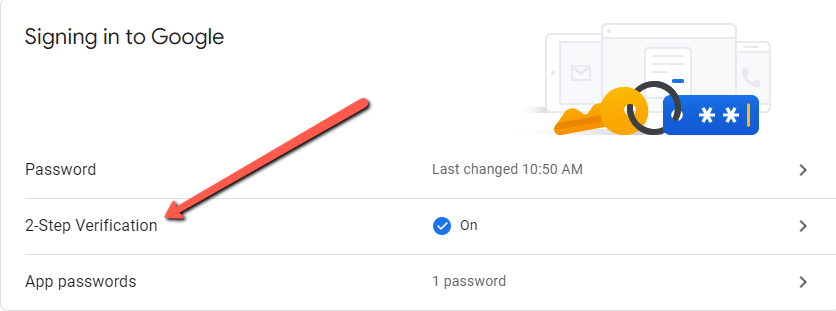
Step 4: 2-Step Verification: Turn on 2 Step Verification if it’s not enabled, otherwise the setting you need to enable will not be displayed.
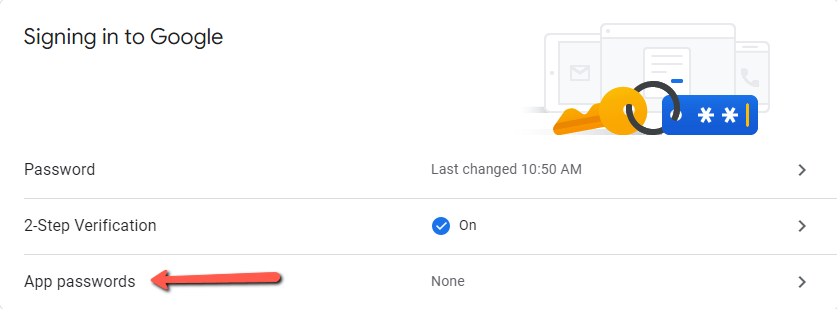
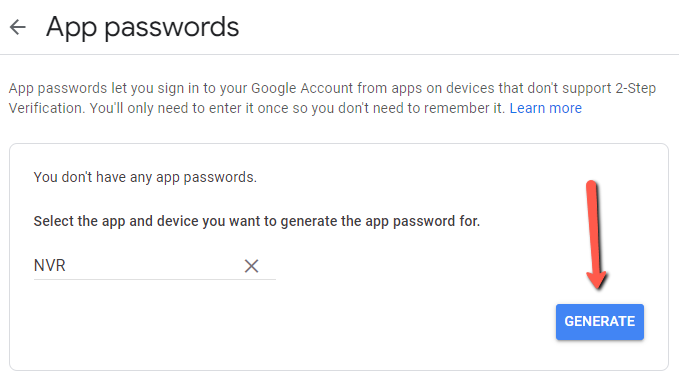
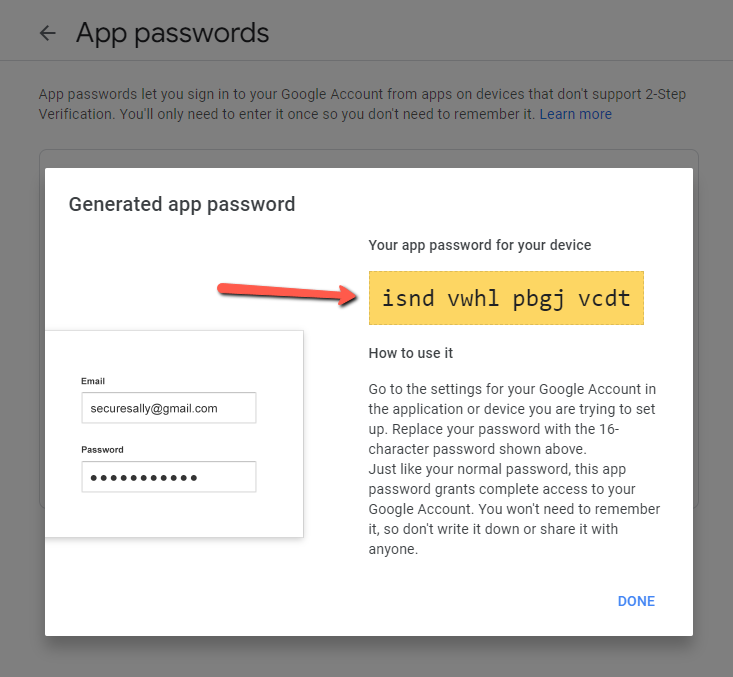
Step 5: Now there should be an option for “App passwords” underneath 2-Step Verification. Select this option, Select App and choose “custom” and name it NVR/DVR and it will generate an app password that you will need to save for later.

Step 6: Use the Local Ip address of your NVR and type it into a web browser. On the log in screen use your user credentials and log in.
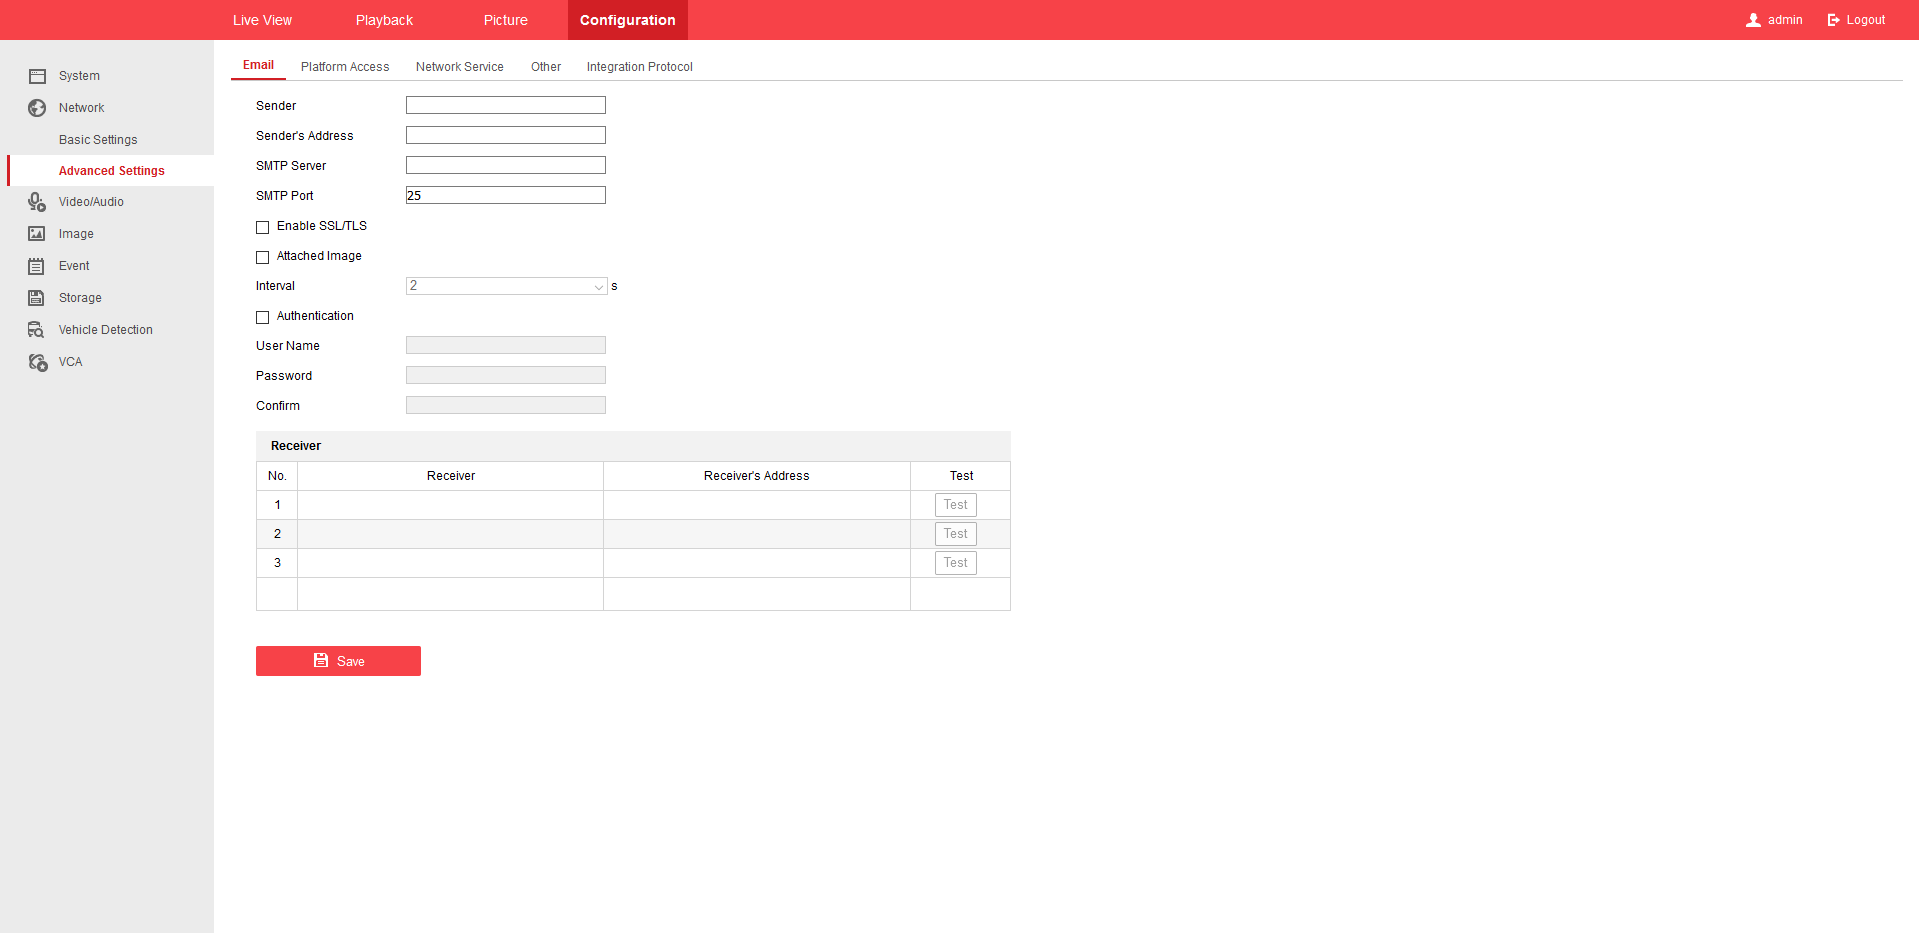
Step 7: Click Configuration –>Network –>Advanced Settings. Once you are on the Email tab enter the information as show Below.
Username: Full Gmail email address (ex. nellyssecurity@gmail.com)
Password: Generated App Password
SMTP Server: smtp.gmail.com
SMTP Port: 587 – Check the TLS/SSL box
Snapshot Interval: Check the box to attach a snapshot to the email when an event has occurred
Sender: NVR
Sender’s Address: Full Gmail email address
Select Recipient: Here you can choose to send to multiple people
Recipient: The name of the person receiving the email alerts
Recipient Address: Full Gmail email address of the person that will receive the email alerts
Schedule: Whenever you want the emails to send. By default they are set to send all day every day if they are triggered.
Be sure to click SAVE
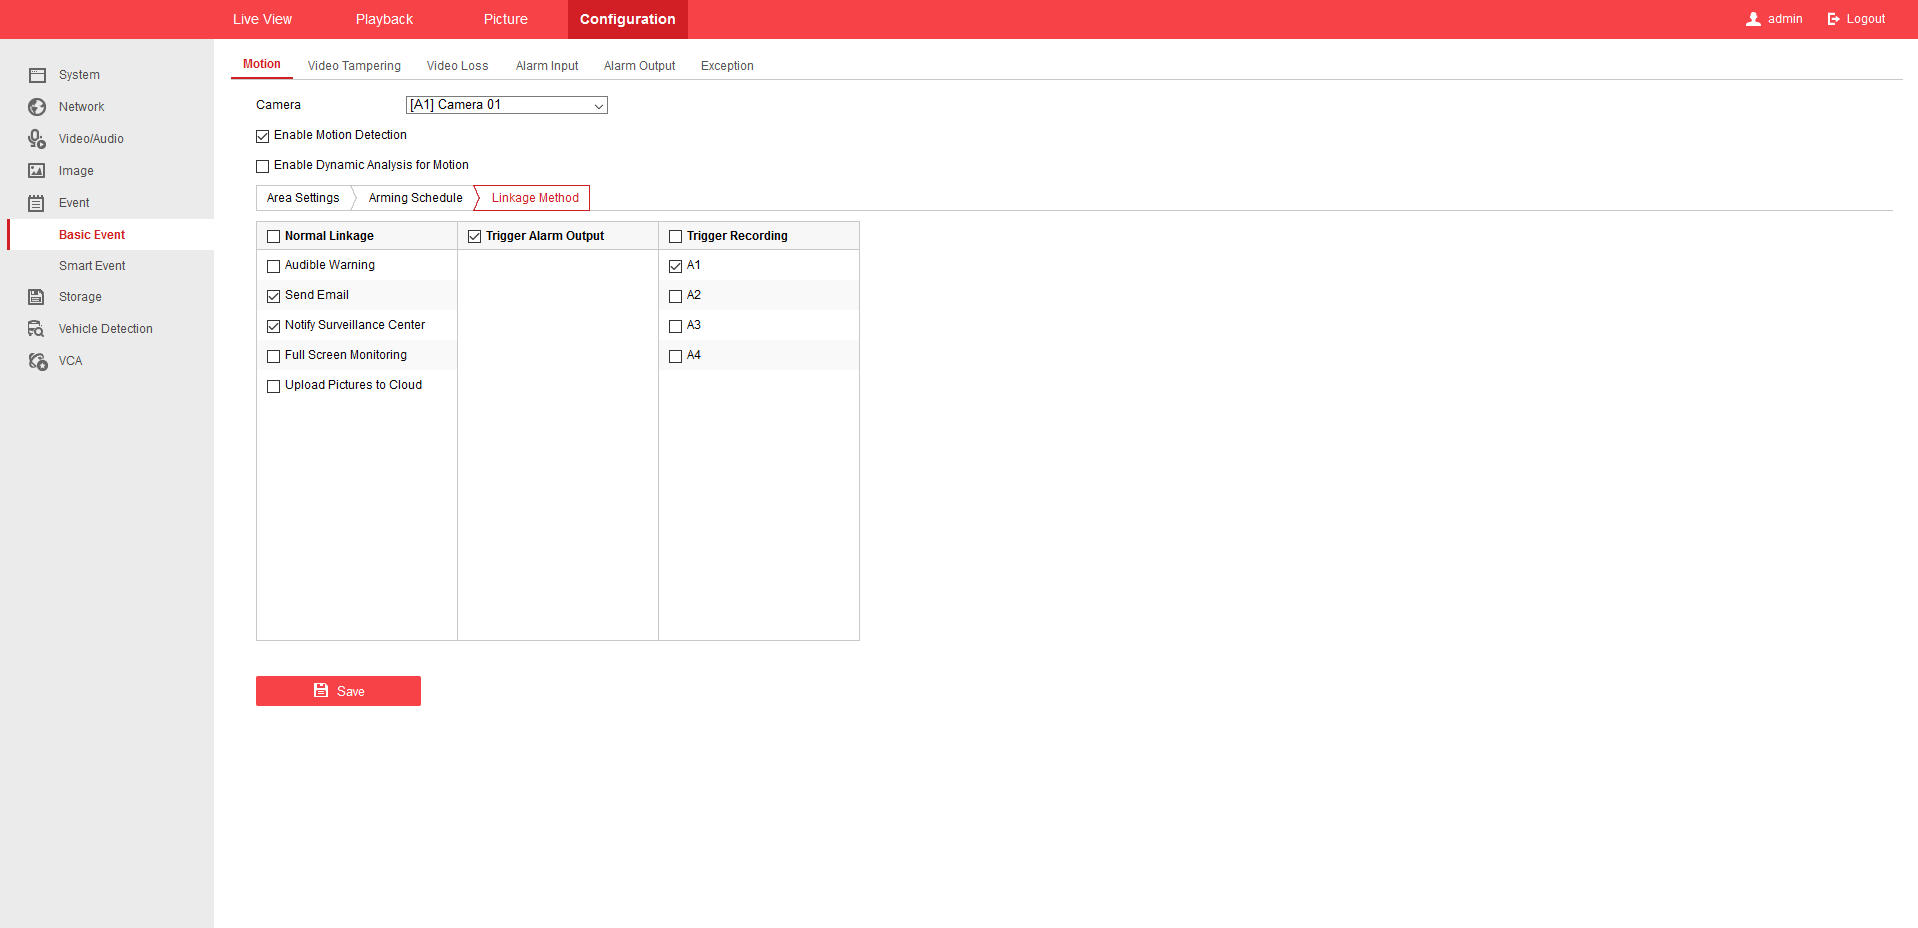
Step 8: To receive Email Alerts via Motion Detection be sure you have “Send Email” Checked under ‘Linkage Method’
Adding & adjusting H-series NVR with iVMS-4200
List of needed materials:
- Computer
- Recorder
- iVMS-4200
- SADP
You can download iVMS-4200 and SADP from the links below.
SADP – https://www.nellyssecurity.com/media/software/hikvision/utilities/sadp.exe
iVMS-4200 – https://www.nellyssecurity.com/media/software/hikvision/ivms-4200-3.2.0.10.exe
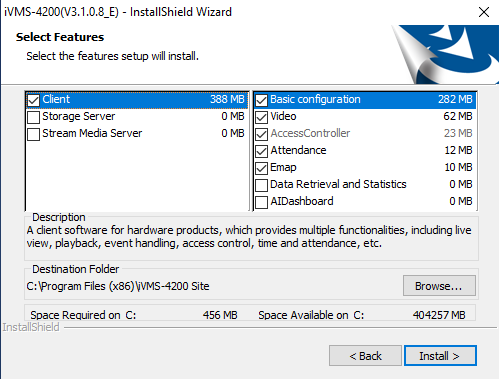
Once you have downloaded the iVMS-4200 software you can go ahead and start installing it. Once you get to the screen below if you have our H-series LPR camera. You will want to check the Data Retrieval and Statistics. Otherwise just click install.
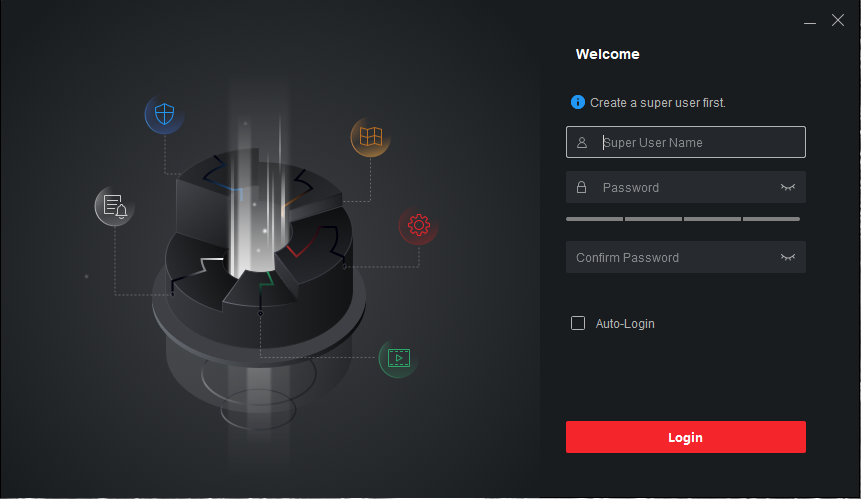
Once you get to this page you are creating a username and password for the iVMS-4200 software. I would suggest making it the same as the username and password to the NVR. If you do not want to log into the software every time that you start it just check the Auto-Login box then click login.
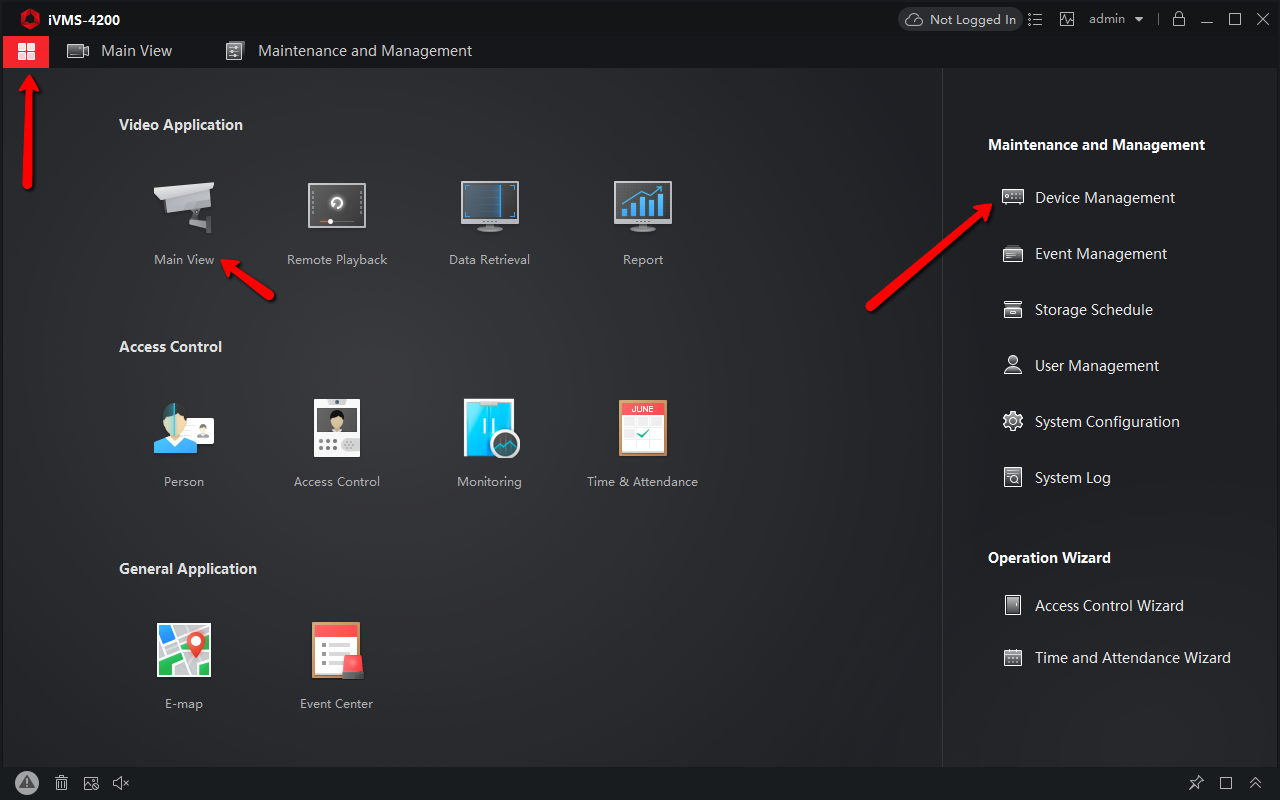
Once you have logged into the iVMS-4200 software there are two tabs that you will be using the most. That is the Device Management tab and the Main View tab. Once you click on one name it will take you to that tab. Then just click on the 4 boxes in the upper left hand corner to go back to the control panel and select the other tab.
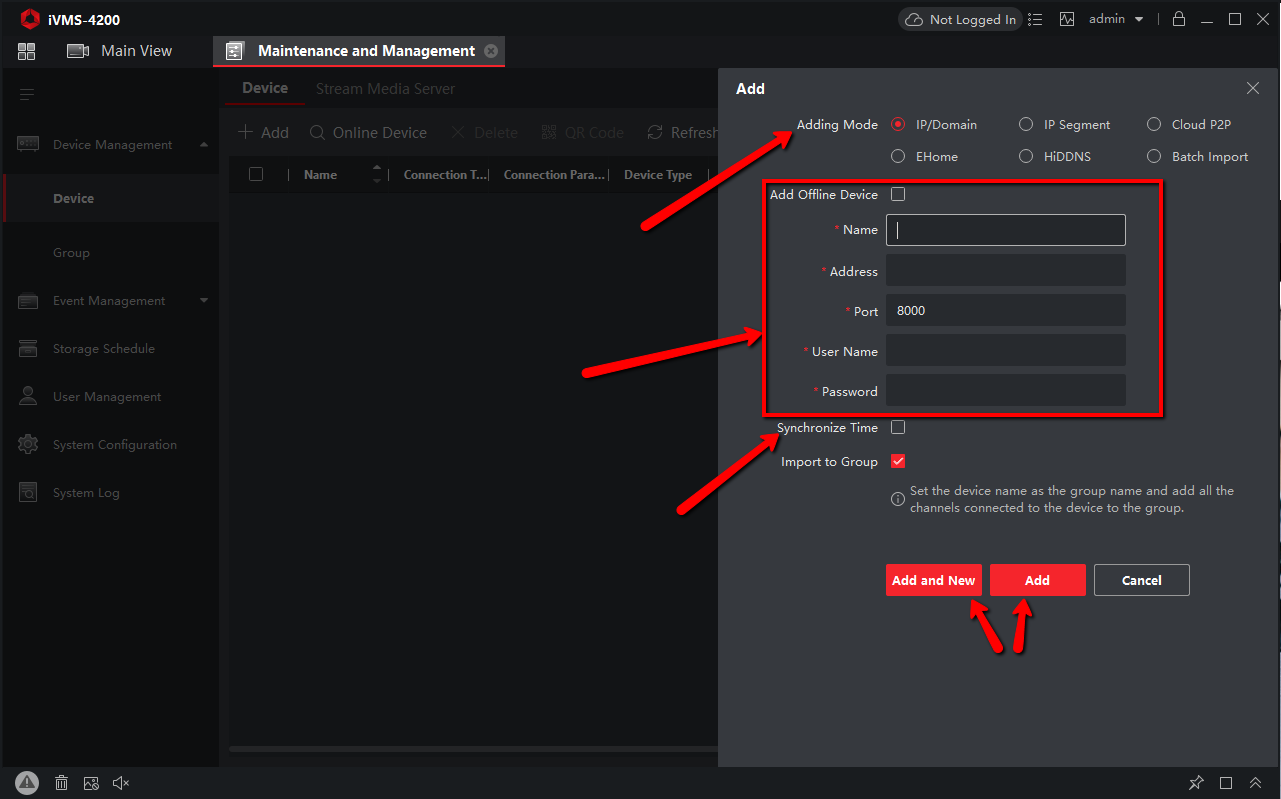
Then we will want to go the the Maintenance and Management tab and click the add button. Which will bring up the add section shown below. We will input all of the information for our NVR or camera here. We will select our adding method which will be IP/Domain if you will always be on loaction with the cameras and connected to the same network that they are on. Or you can select Cloud P2P if you are trying to view them remotely. We have a more in-depth guide on the Cloud P2P method linked below.
https://support.nellyssecurity.com/hc/en-us/articles/360044654314
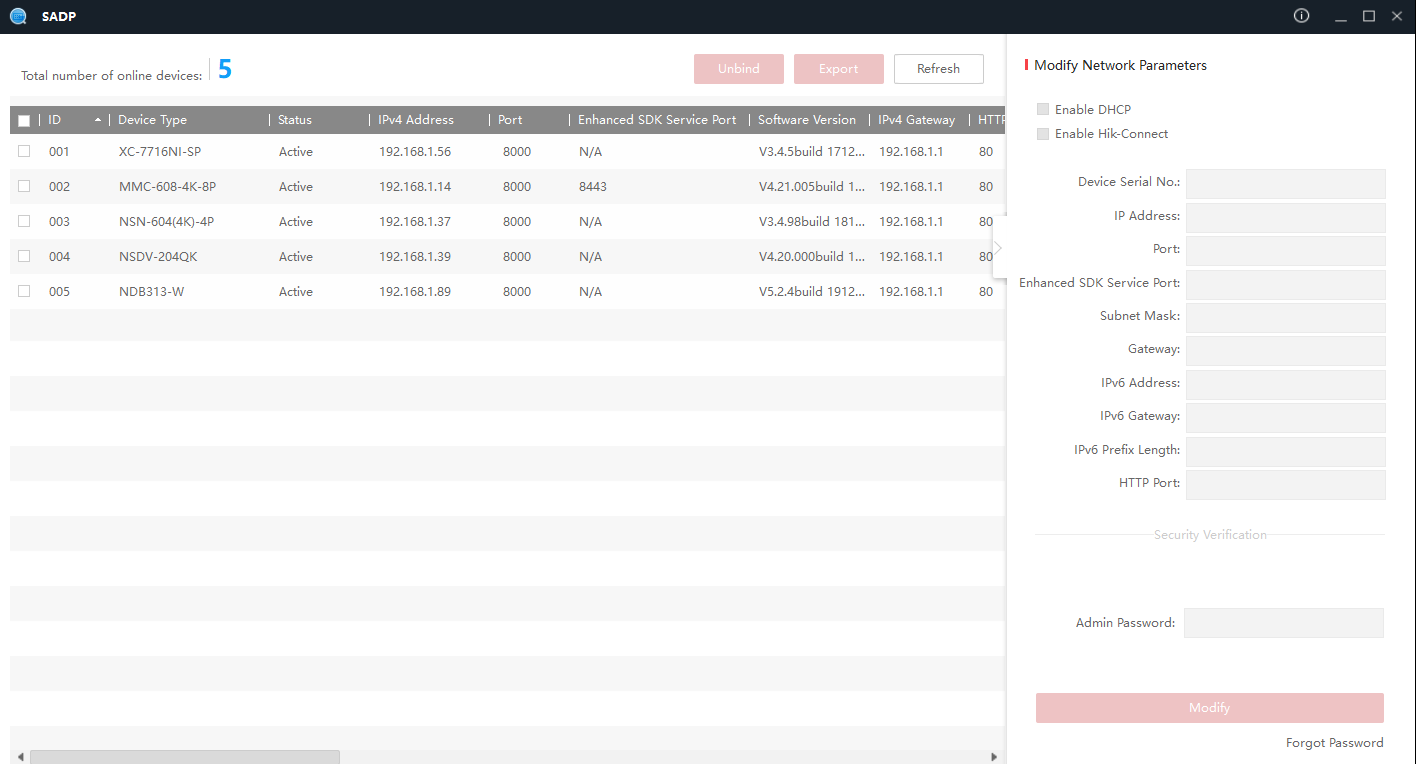
If you have trouble finding any of your H-series devices on our network. You will want to run the SADP tool to be able to find them. This will give you all of the information to be able to add the H-series device into the iVMS-4200 software.
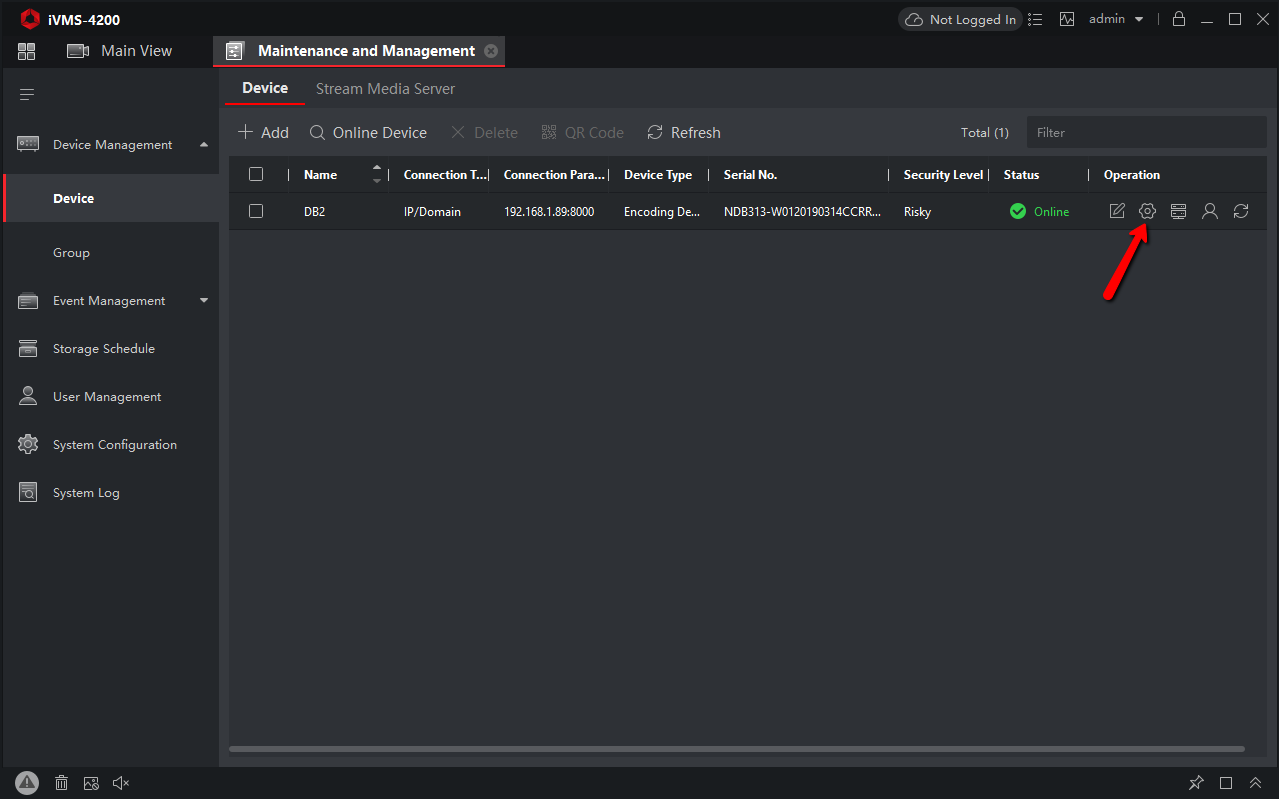
You can manage the settings for your NVR or camera once you have it added to the software. To do this you simply click on the cog symbol under the operations section. If you do not see the cog symbol either minimize one of the other fields. Like serial number or use the scroll bar at the bottom of the Maintenance and Management tab to scroll to the right.
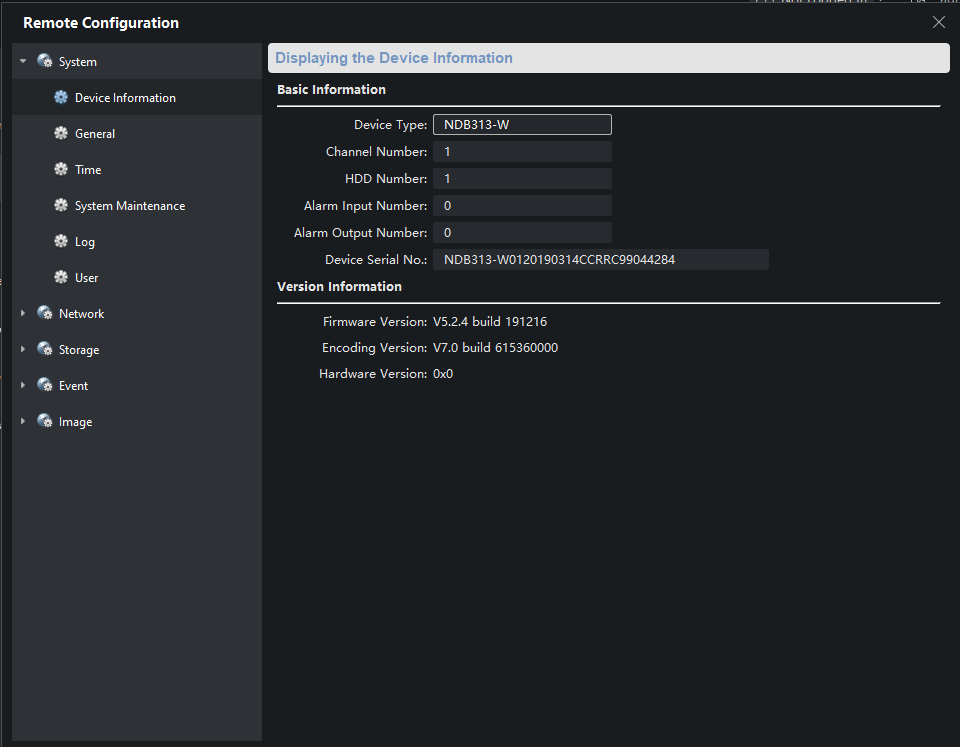
Once you click on the cog symbol you will see the window shown below. This window will give you about the same level of control as being logged directly into your device.
How To Set Up DDNS Account On NO-IP
If you are trying to view your NVR somewhere other than your home network , such as your place of business or a friend’s house, you will need to forward the ports on your router or you will get ‘page not found’ errors and messages. Please refer to the “Port Forwarding” section of our Quickstart guides for information on where to find what ports your device is using.
You will then need access to your router. The procedure will vary depending on the make and mode, please refer to the owner’s manual of your router for information on how to forward the correct ports. You need to complete that step before starting the process below or DDNS will not work.
- Go to www.noip.com and click Sign Up on the right-hand corner.
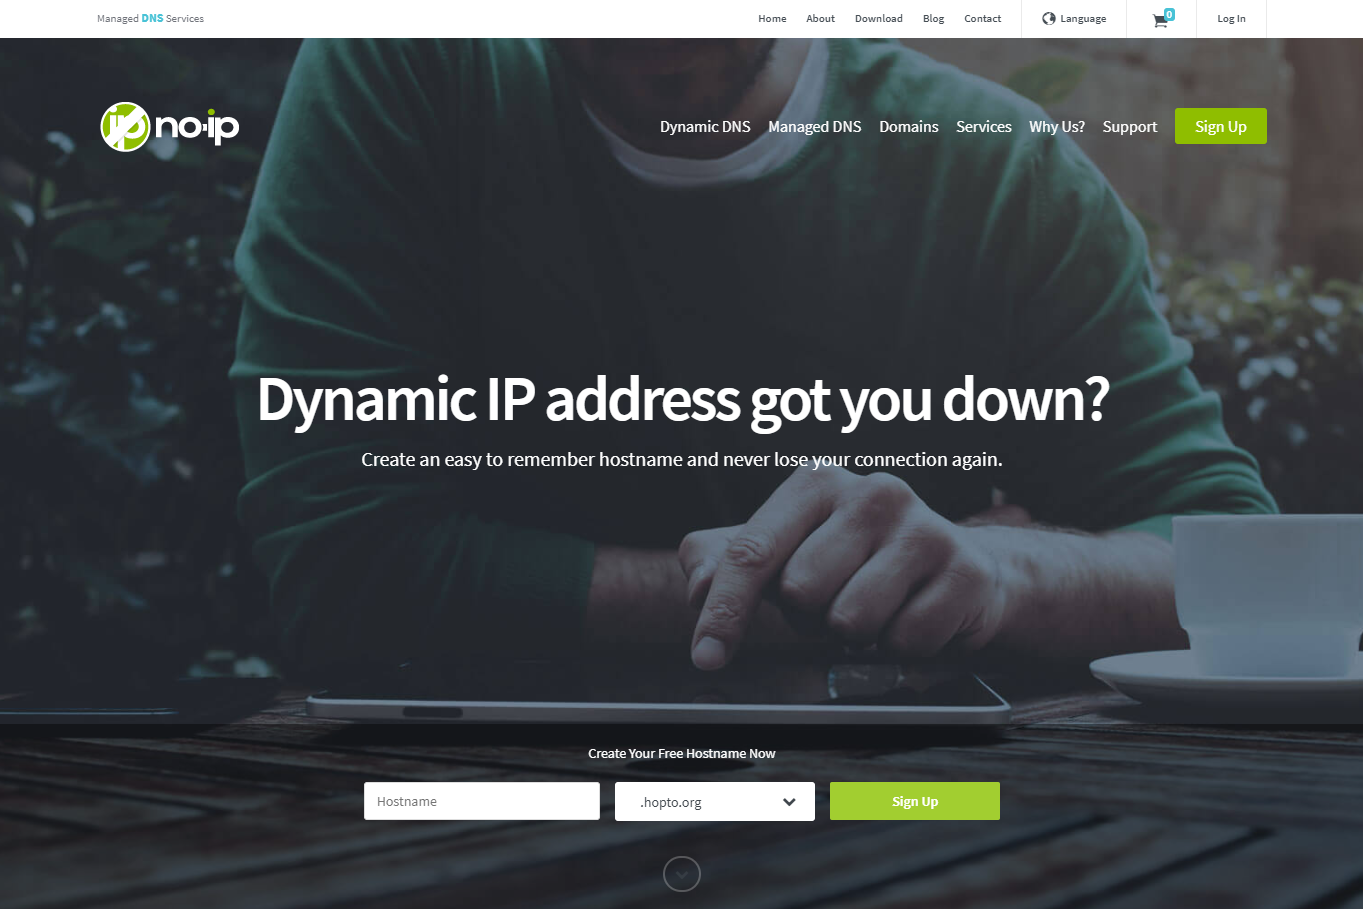
- Next you will be taken to signup page, fill out all the required information. You will enter your email, desired username and password and click “Create My Free Account“. Also below the password field you will see your username that will be used to create your DDNS domain (free). You can select a few domains from the drop down list i.e ddns.net, hopto.org etc.
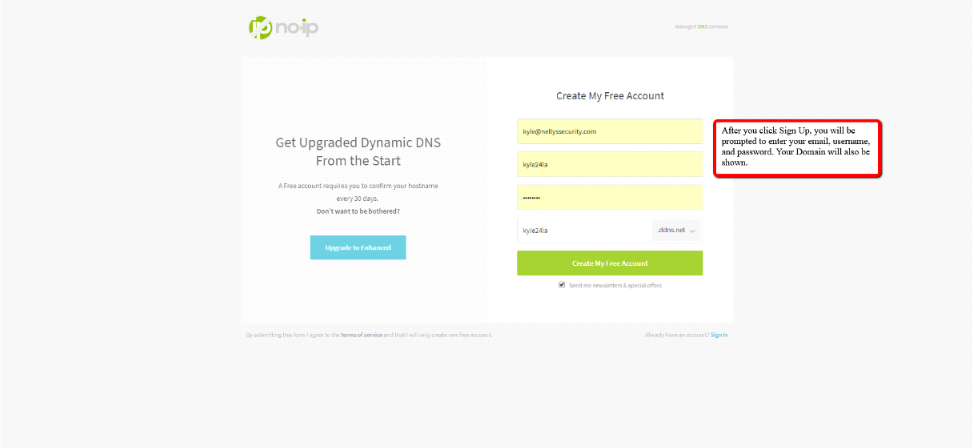
- Once you have all the required information filled out click “Create My Free Account“. After clicking that you will receive an email where you will be asked to confirm your account. As shown below click “Confirm Account” button.
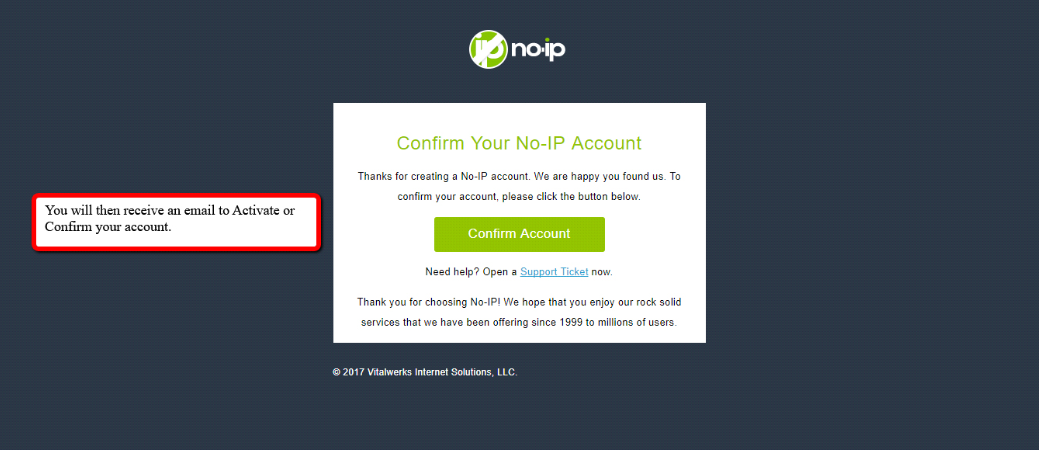
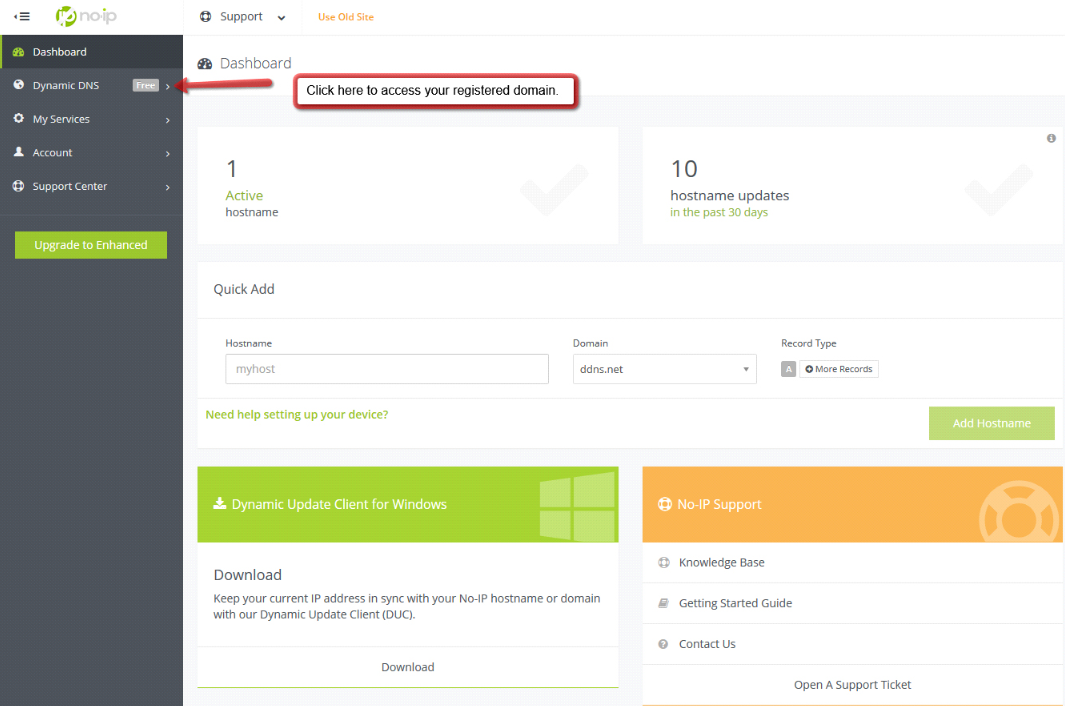
- You should now have a verified account created and should be logged into the NO-IP website. On top of the web page you will see “My Account“. Click on that to access your Account Dashboard. Here is where you can create a custom host name by typing it in the “Host Name” box under the QuickAdd section or use the default one created whenever you signed up for the account. For guide purposes, we’ll use the default which will be your username and the extension you chose. In our example, we chose ddns.net.
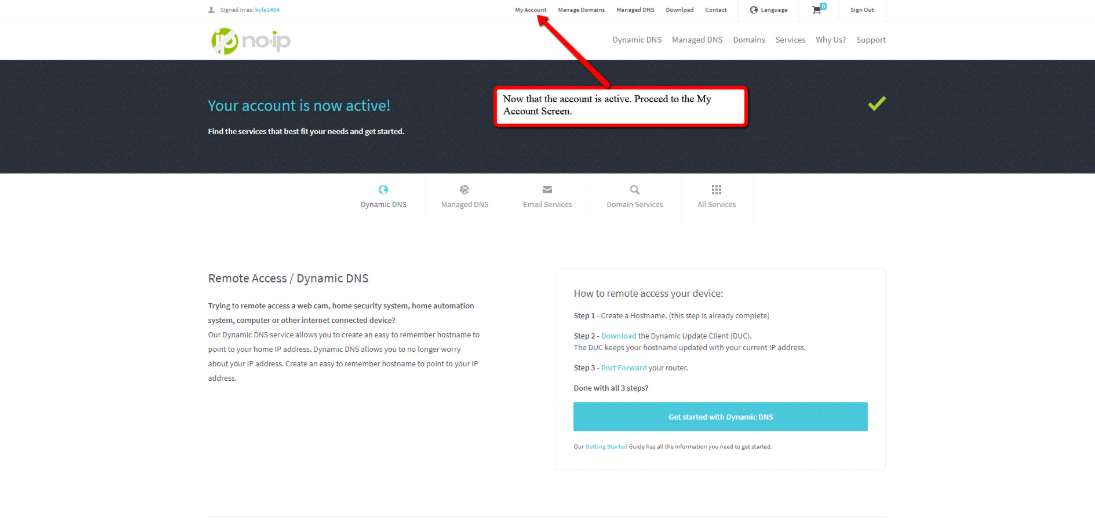
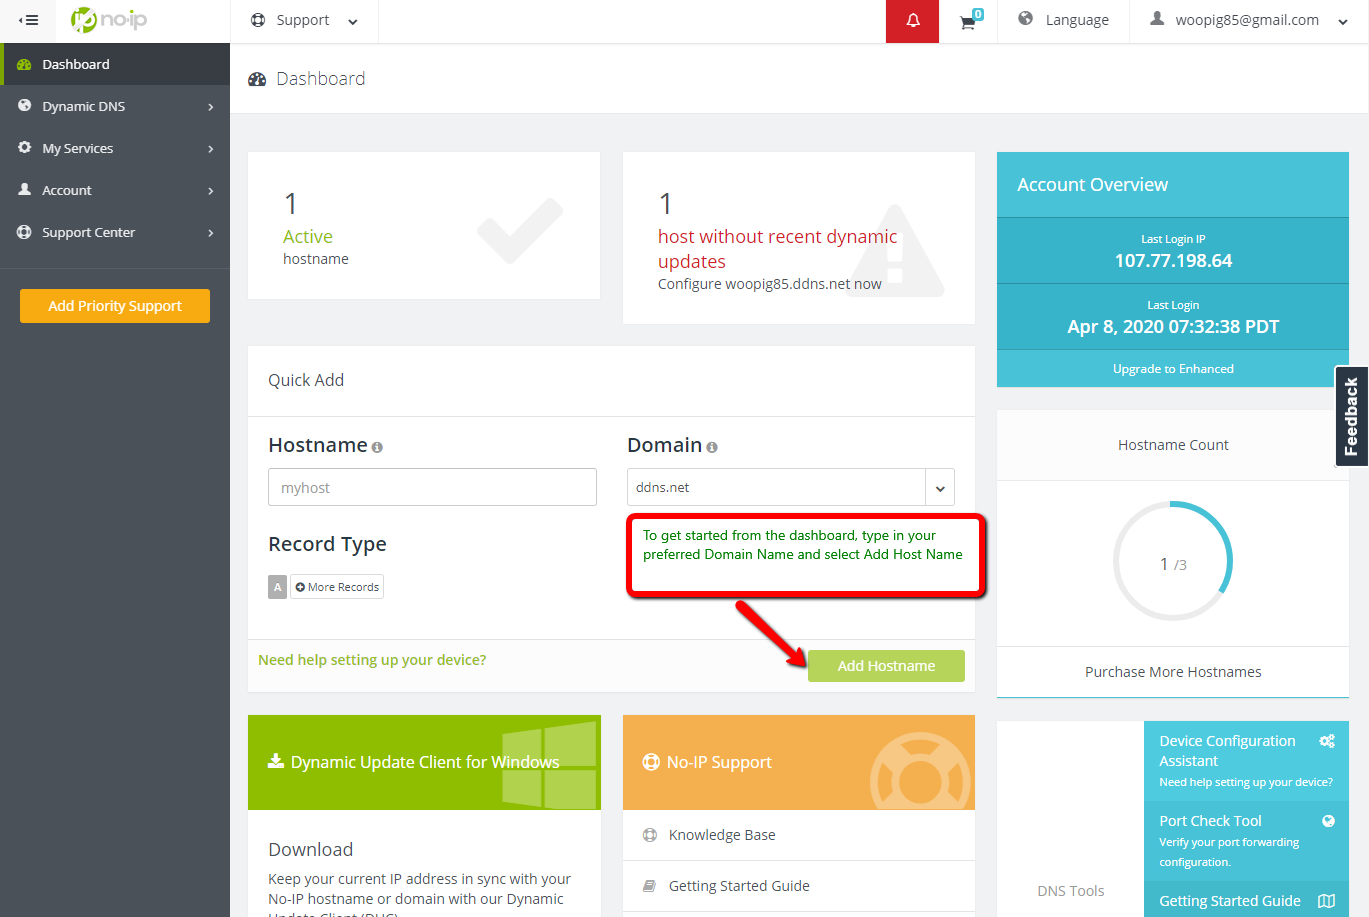
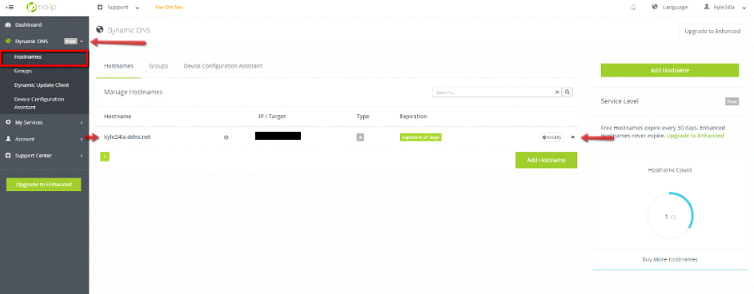
- As shown in the image below the domain was created by default. In most cases it will be your username.ddns.net. Click Dynamic DNS on the left side panel to see your registered domain.
NOTE: You will receive an email once a month from NO-IP to click on a link to keep your account active.
How to Set up DDNS on the NVR
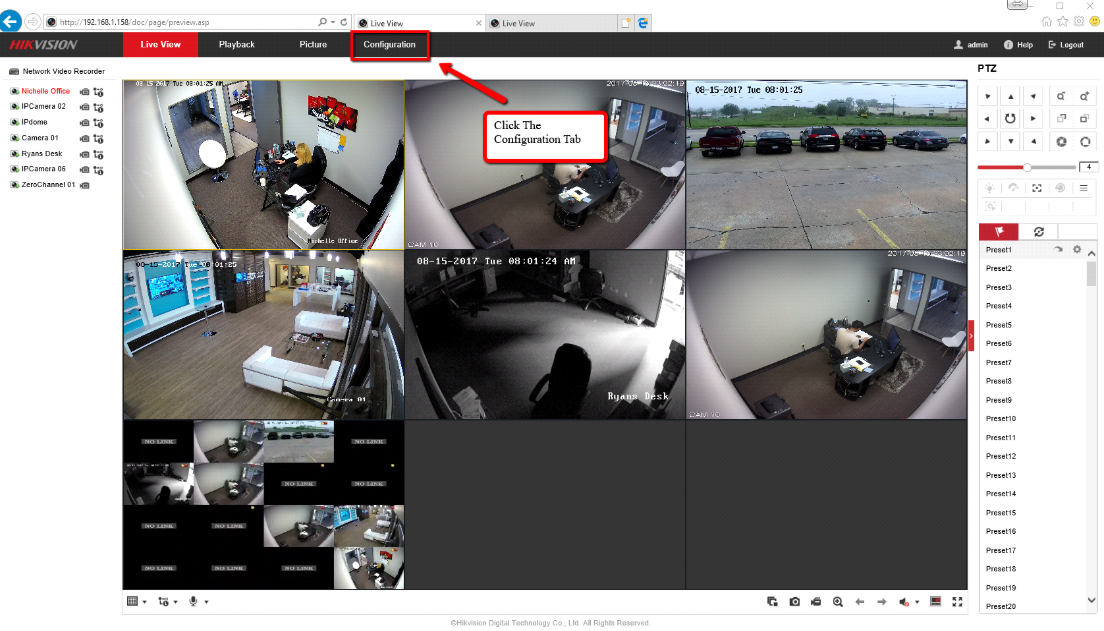
- By now you should have the DDNS domain setup. Log into your NVR using a web browser (Internet Explorer preferred) and click the Configuration tab (as shown below).
- On the left side of the page click Network>Basic Settings.
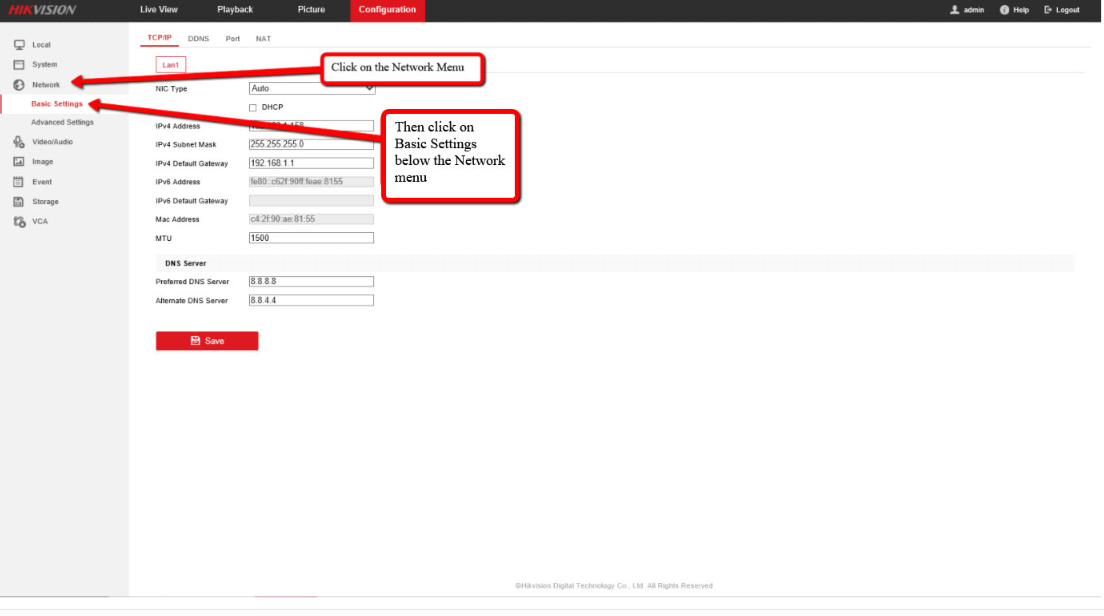
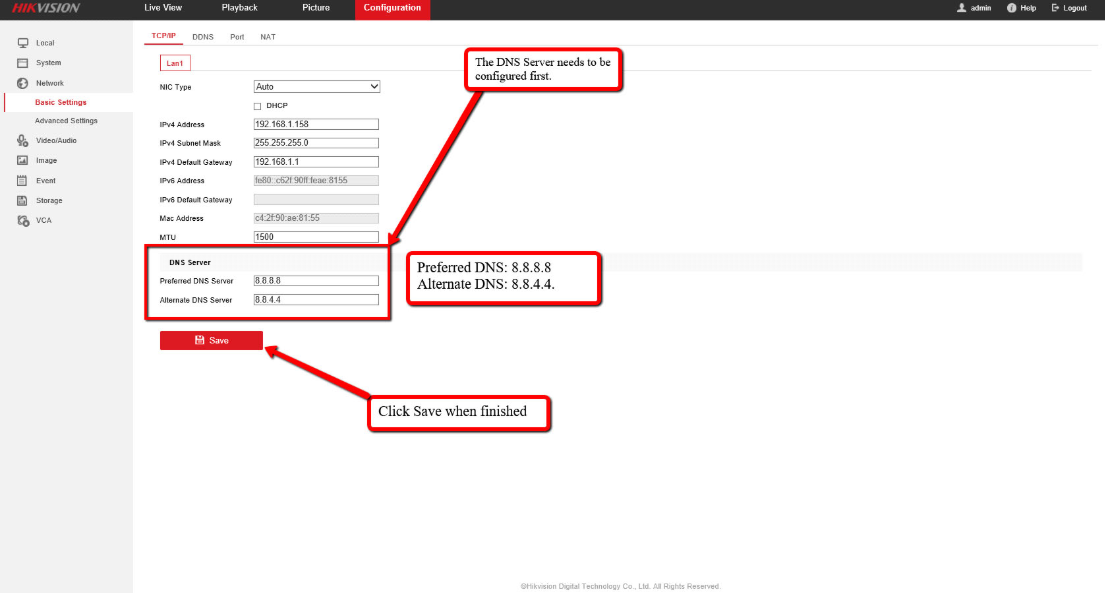
- As shown below we need to ensure that the DNS server addresses are correct. If they are different from what is shown below, change them to the following (do not forget to click SAVE).
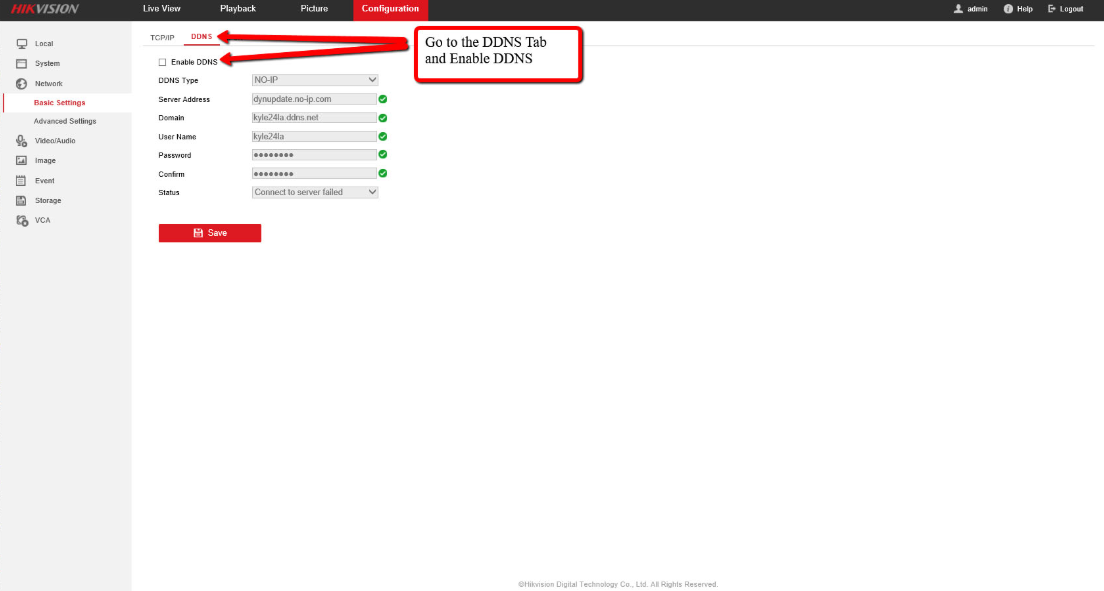
- Click on DDNS tab on the page. Here you will input your DDNS account information as well as the Domain. Click the “Enable DDNS” so you can edit the fields.
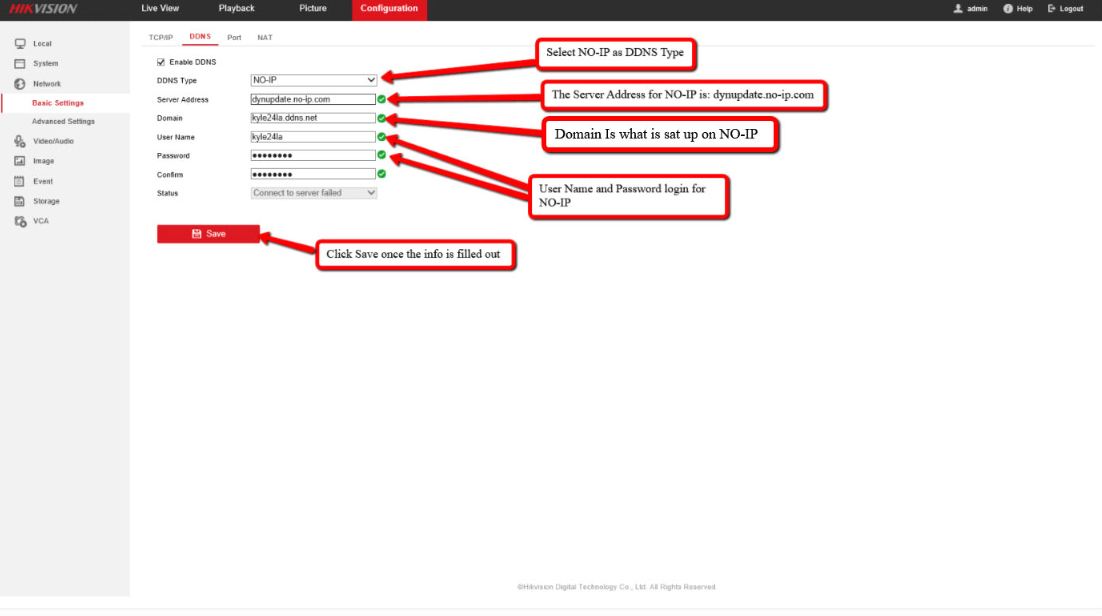
- Select NO-IP for DDNS type from the drop down list.
- Server address for NO-IP will always be dynupdate.no-ip.com.
- The Domain section will always be the same as the Domain that was made in step 4.
- Username and Password will be the same as your no-ip website login.
- Do not forget to click SAVE.
NOTE: If the status shows anything other than what is shown below, check your log in information and all the other fields to verify everything is correct.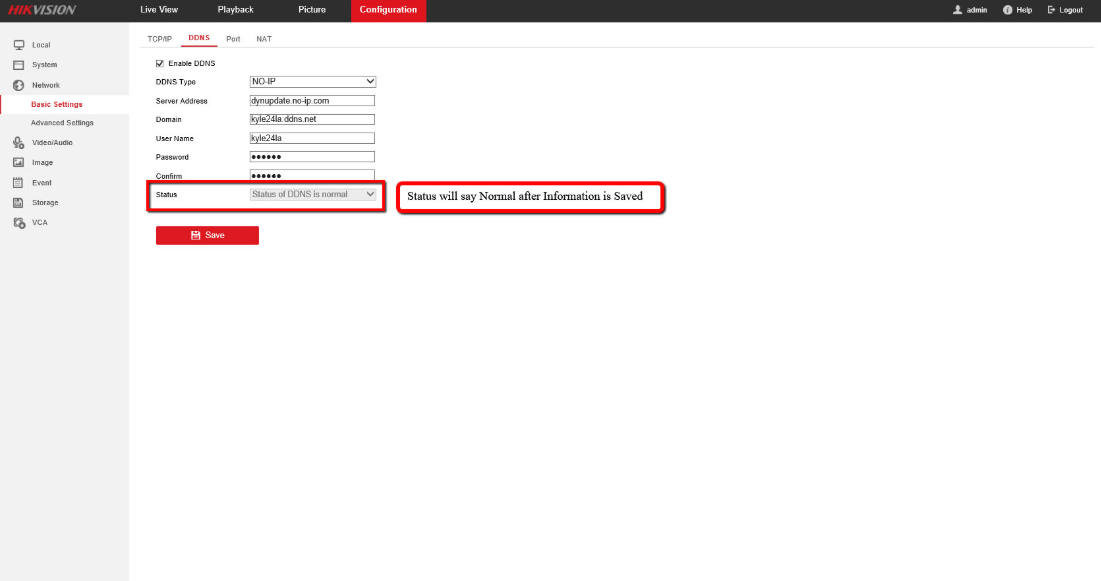
Open a web browser (IE or Firefox) and type in your DDNS web address, you should be able to see the log in screen of the web interface. If you are using any other port besides 80 on the NVR enter that port number with a colon at the end of web address.
Example: 
If you are still not able to pull up your DDNS name, it might be due to your ISP (Internet Service Provider). Some ISPs don’t allow a ‘loop through’ meaning you can’t pull up your public IP address while connected to your home network no matter what you try. If this is the case try connecting from an outside connection such as a friend’s house, your place of business, or a mobile device with the WiFi turned off.
Adding a camera on a TVI DVR to an H-Series NVR using the web interface
This guide will show you how to easily add a camera channel from an H-Series TVI DVR to an available channel on an H-Series NVR.
Requirements:
- H-Series DVR with a camera connected
- H-Series NVR with an unoccupied channel
- Computer
Note:
Before you begin you will need to get the IP address of the NVR, DVR and the camera number you want to add to the NVR (Ex. Camera 1, 2, 3, 4, etc). You can find the IP address of both recorders by installing and running the SADP Tool. In the example below we’ll be adding channel 1 from the DVR to the NVR.
1. Access the web interface of the NVR by typing it’s IP address into a browser. After logging in click Configuration at the top, then go to System->Camera Management->IP Camera Tab.
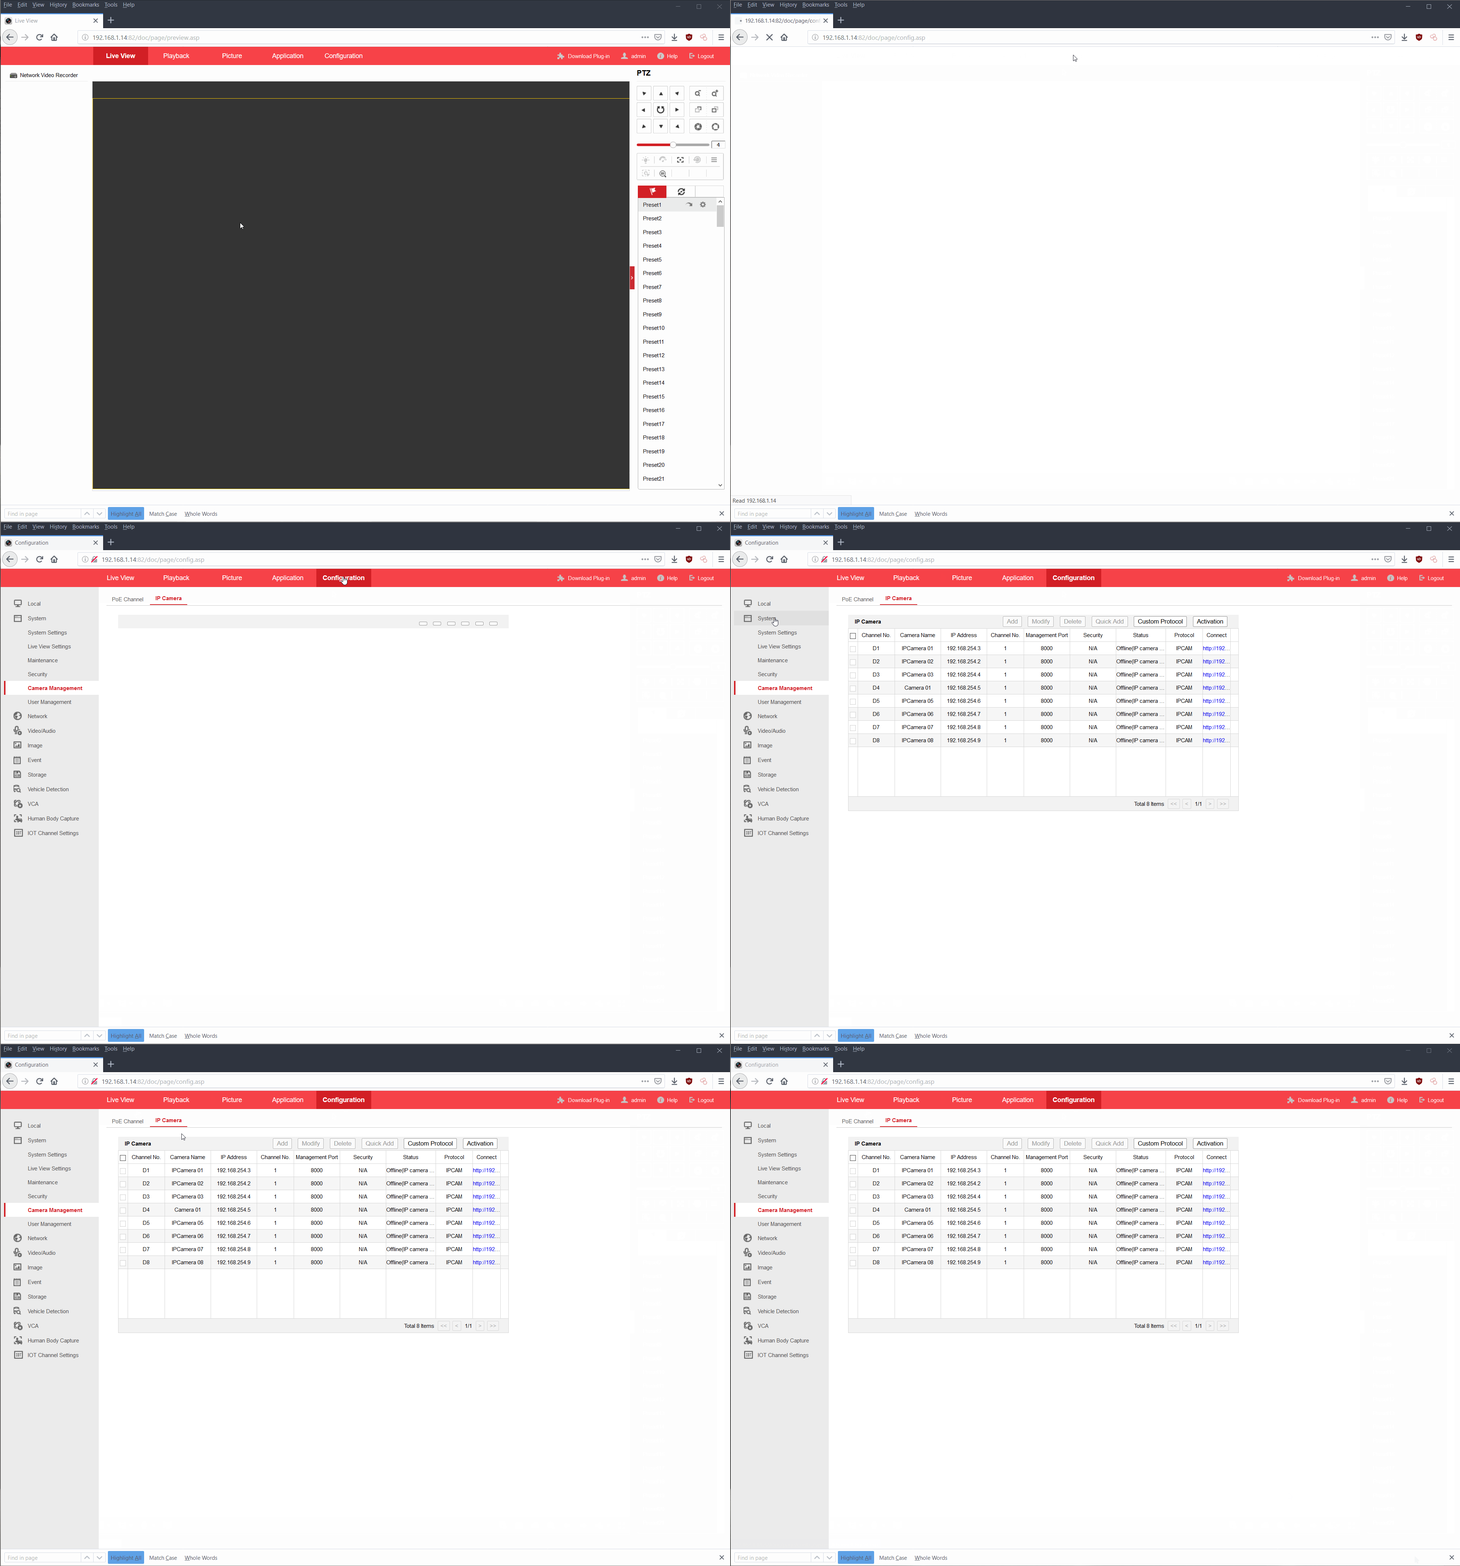
2. Once on the camera management page you will see a list of channel numbers (D1, D2, D3, etc) and their corresponding IP addresses. Select the unused channel you want to use by clicking on it. Next click the Modify button at the top. On the window that comes up change it from “Plug and Play” to “Manual”.
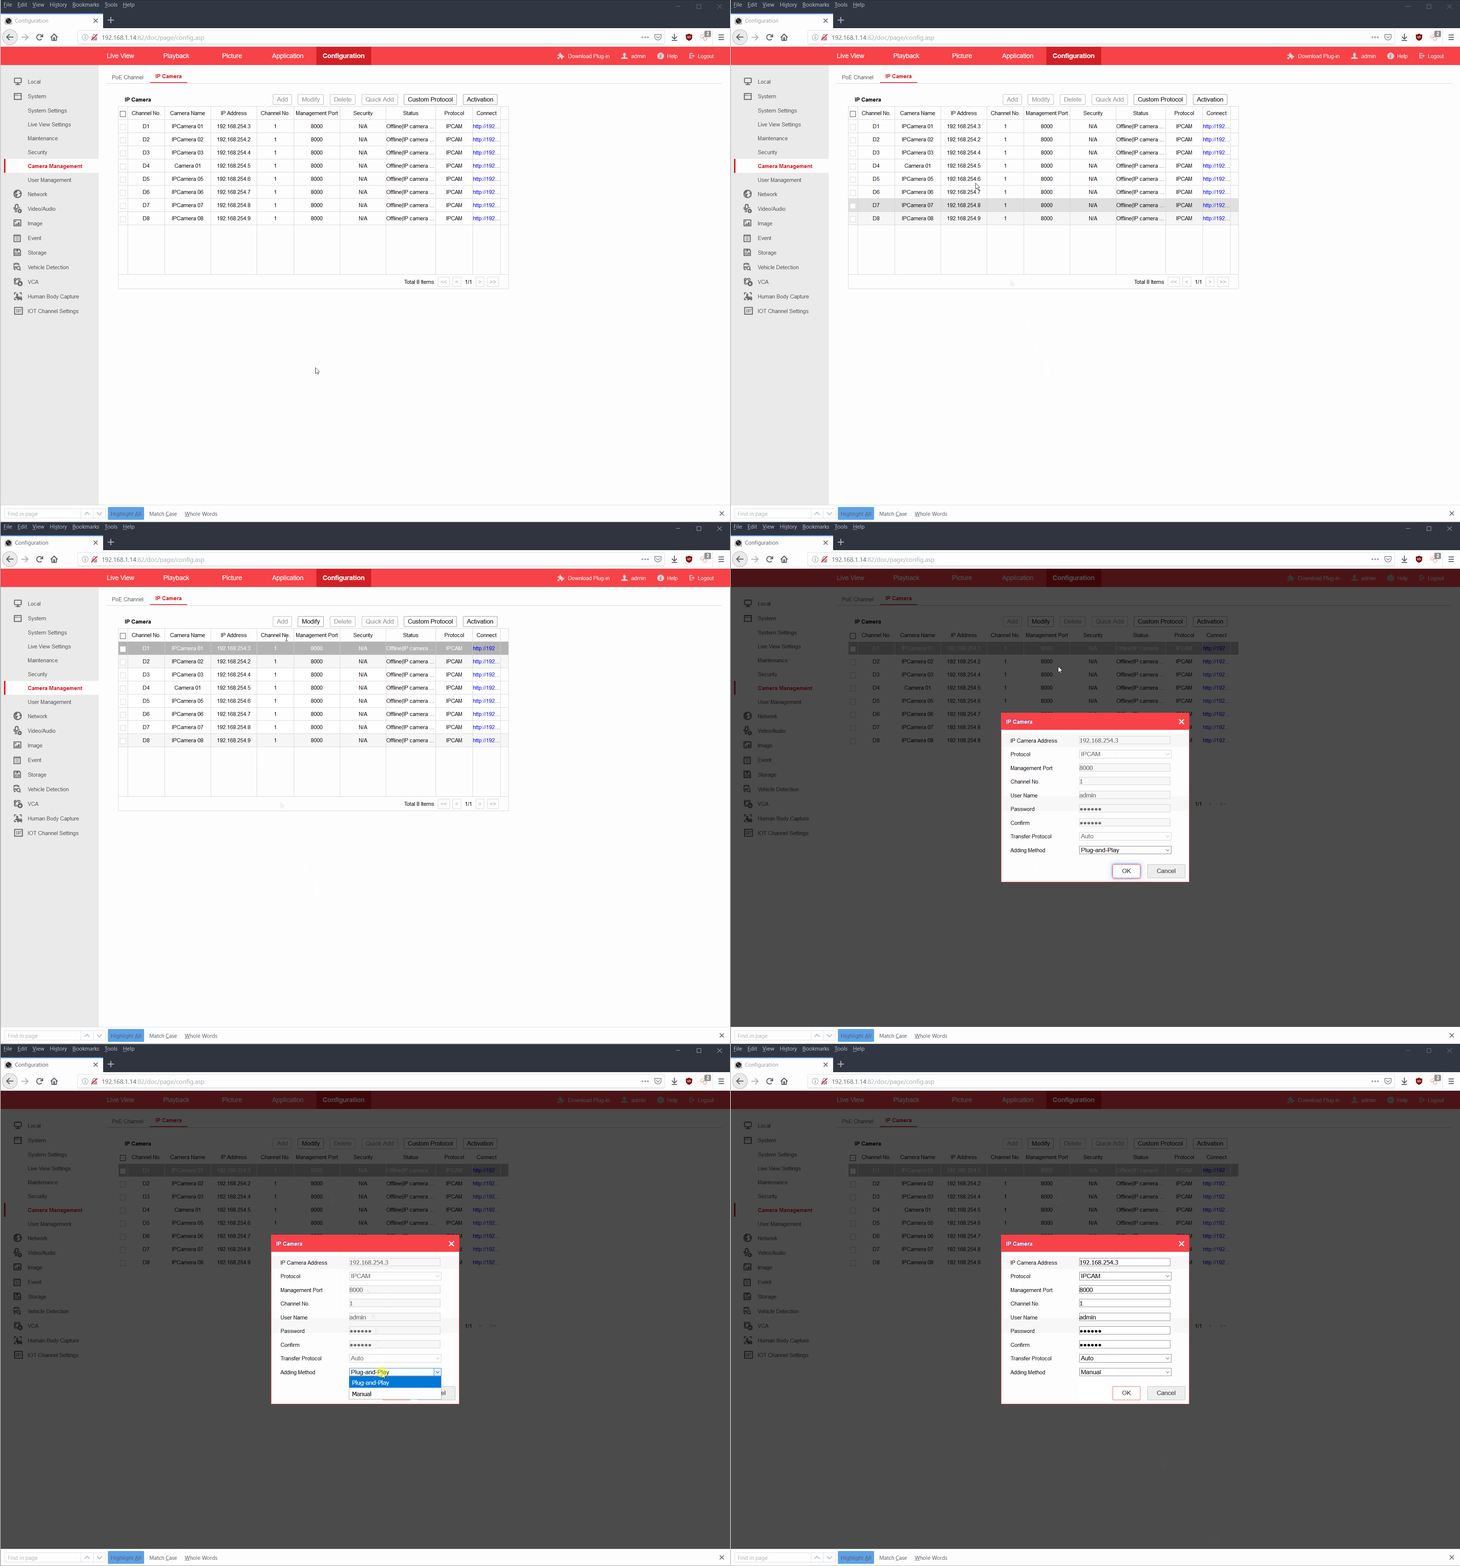
3. Fill in each field on the window as listed below:
IP Camera Address: Your DVR IP address
Protocol: IPCAM or Hikvision
Management Port: 8000 (Unless the server port was changed on the DVR, if so use that instead)
Channel No.: The channel number you want to pull from the DVR. For example, if you want to add camera 2 from the DVR then input the number 2.
User name: admin
Password: Password to log into your DVR
Confirm: Password to log into your DVR
Transfer Protocol: Auto
Adding Method: Manual
4. Lastly, click OK. You should see the status change to “Offline(Connecting)“. After a few seconds Refresh the page (F5 on the keyboard). The status should now say “Online“.
To confirm it added successfully go back to Live View and click the camera icon on the left. You should now have a live view of the camera added to the DVR on your NVR.
Note:
This guide explained adding the camera assuming both the DVR and NVR are on the same Local Area Network (LAN). If the DVR and NVR are at different locations this method will still work but requires the DVR server port (usually 8000) to be port forwarded. After that’s done replace the IP address with the Public IP address of the location with the DVR. Pulling in a camera from a remote location can consume a lot of bandwidth so it’s highly recommended to not do this unless there’s an above average upload speed at the DVR location (10mbps+).
