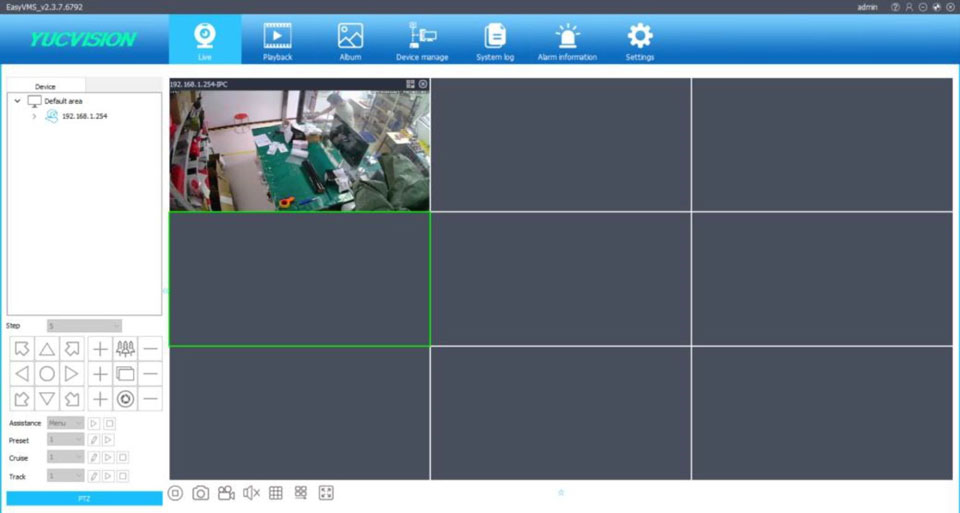
EasyVMS P6SLite PC Software Manual,P6SLite For Pc software name is EasyVMS, you can download the software here, support Windows PC. P6SLite For Pc Function System operating environment Operating system. This article contains all the contents of P6SLite, multiple ways to add, settings of P6SLite camera functions, how to use the computer, and will be
-
EasyVMS SDK
-
EasyVMS
-
Android P6Slite
-
EasyConverter
-
EasyTool
-
AIOT TestTool
-
TestTool IPCam
-
USBCameraTool
-
USBTV TestTool
-
WXActiveTool
EasyVMS P6SLite PC Software Manual
Read More :
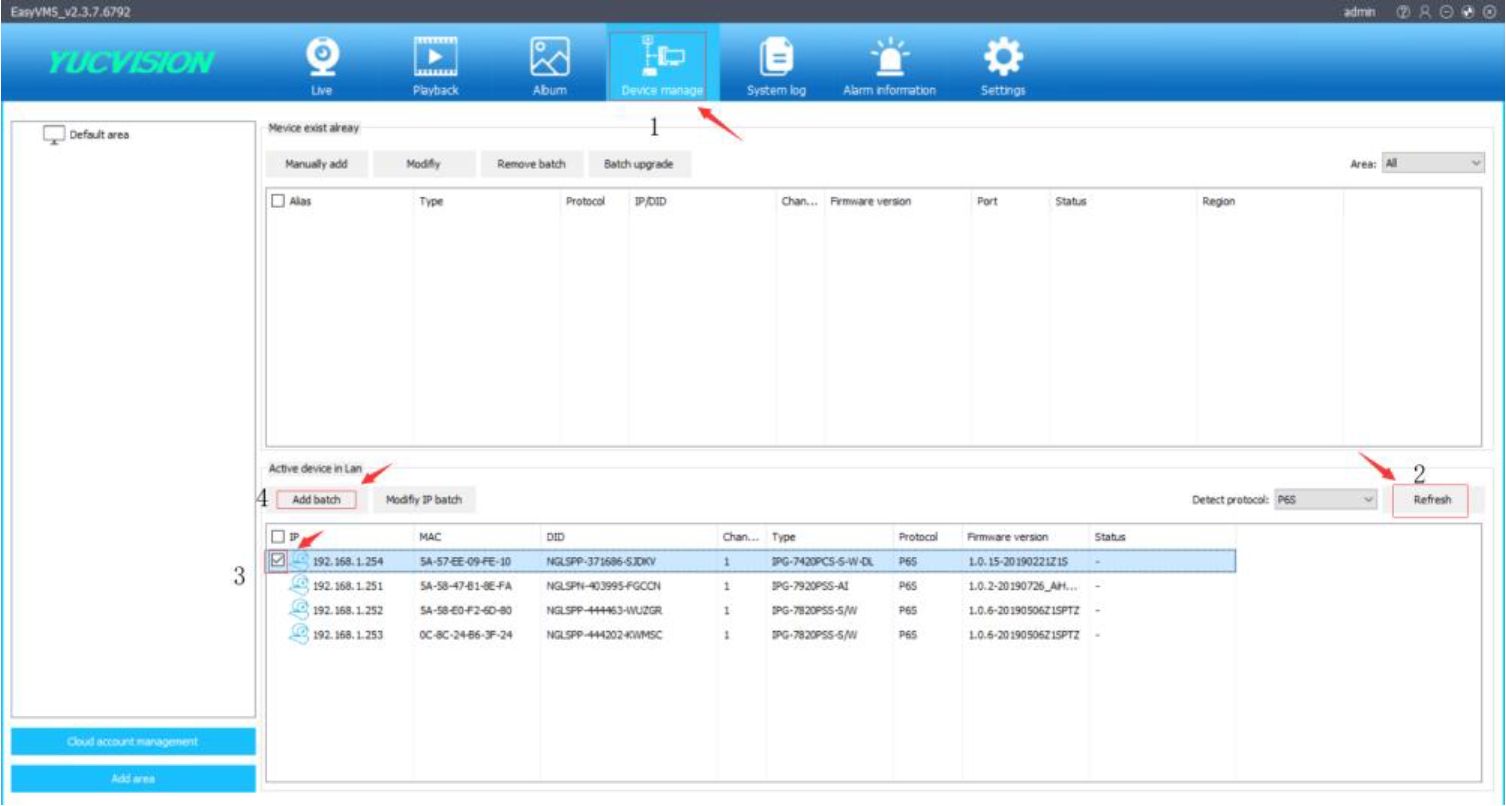
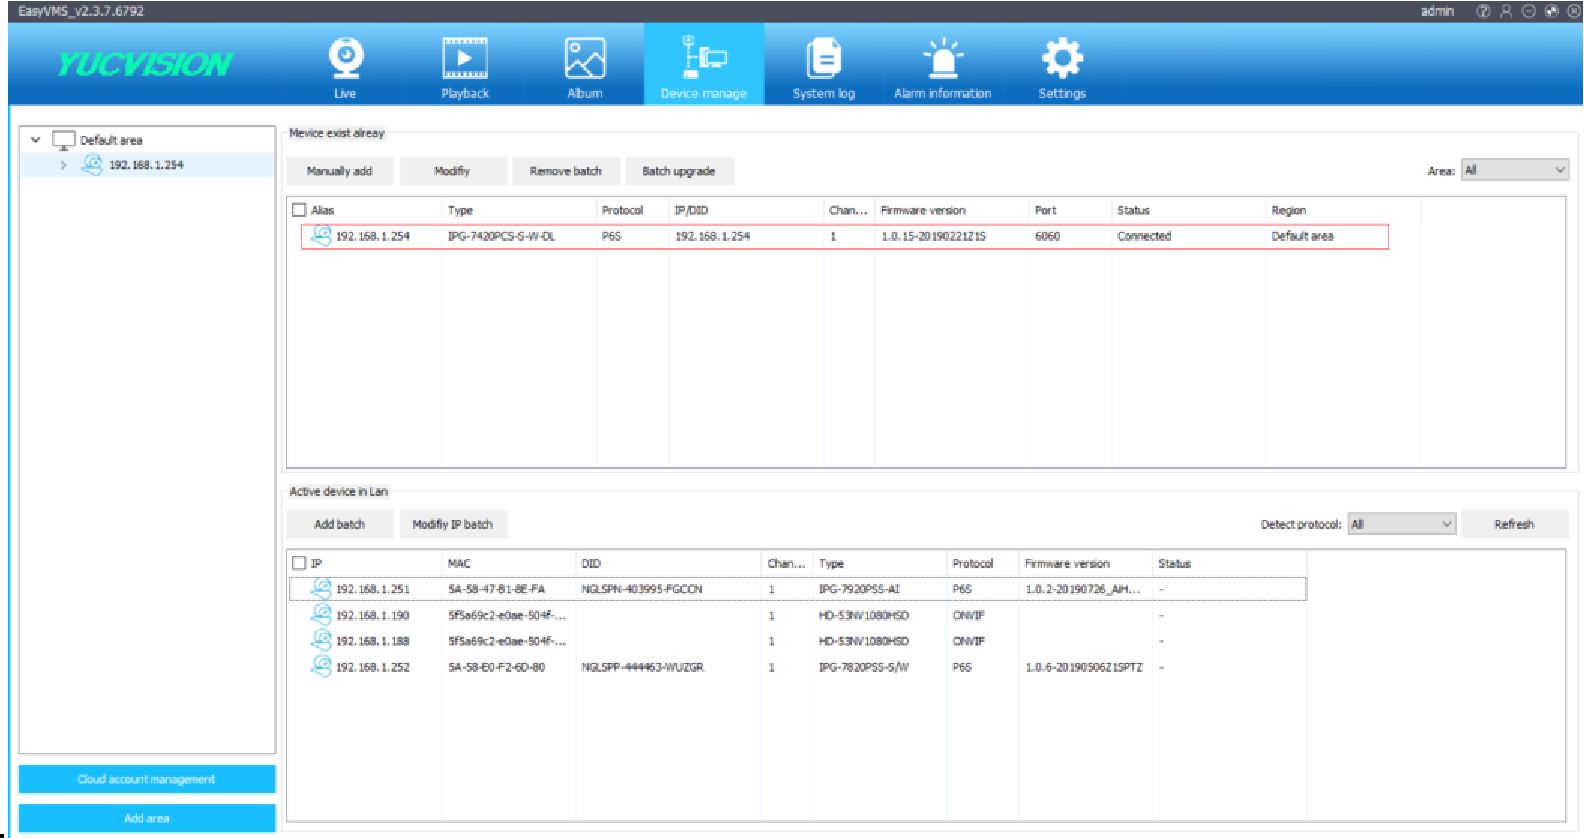
- Click “Refresh” to search for the device, then select the device in front of the device and click “Add batch” to complete
the device addition. If you use other brands of devices, you can select “Detect protocol”: ALL, the software can search out
All branded equipment.
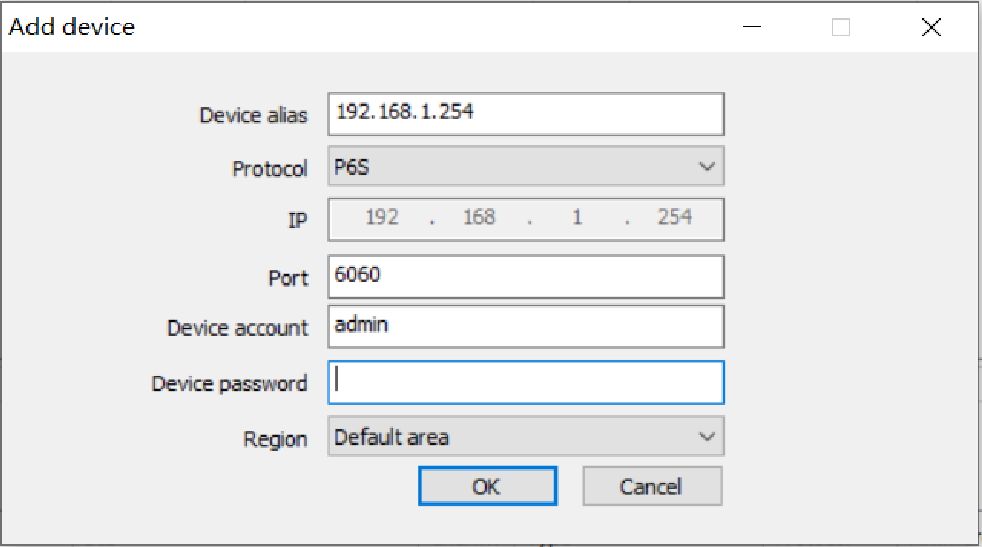
Please enter the device password (the device default password is blank), then click “OK” to complete the device addition
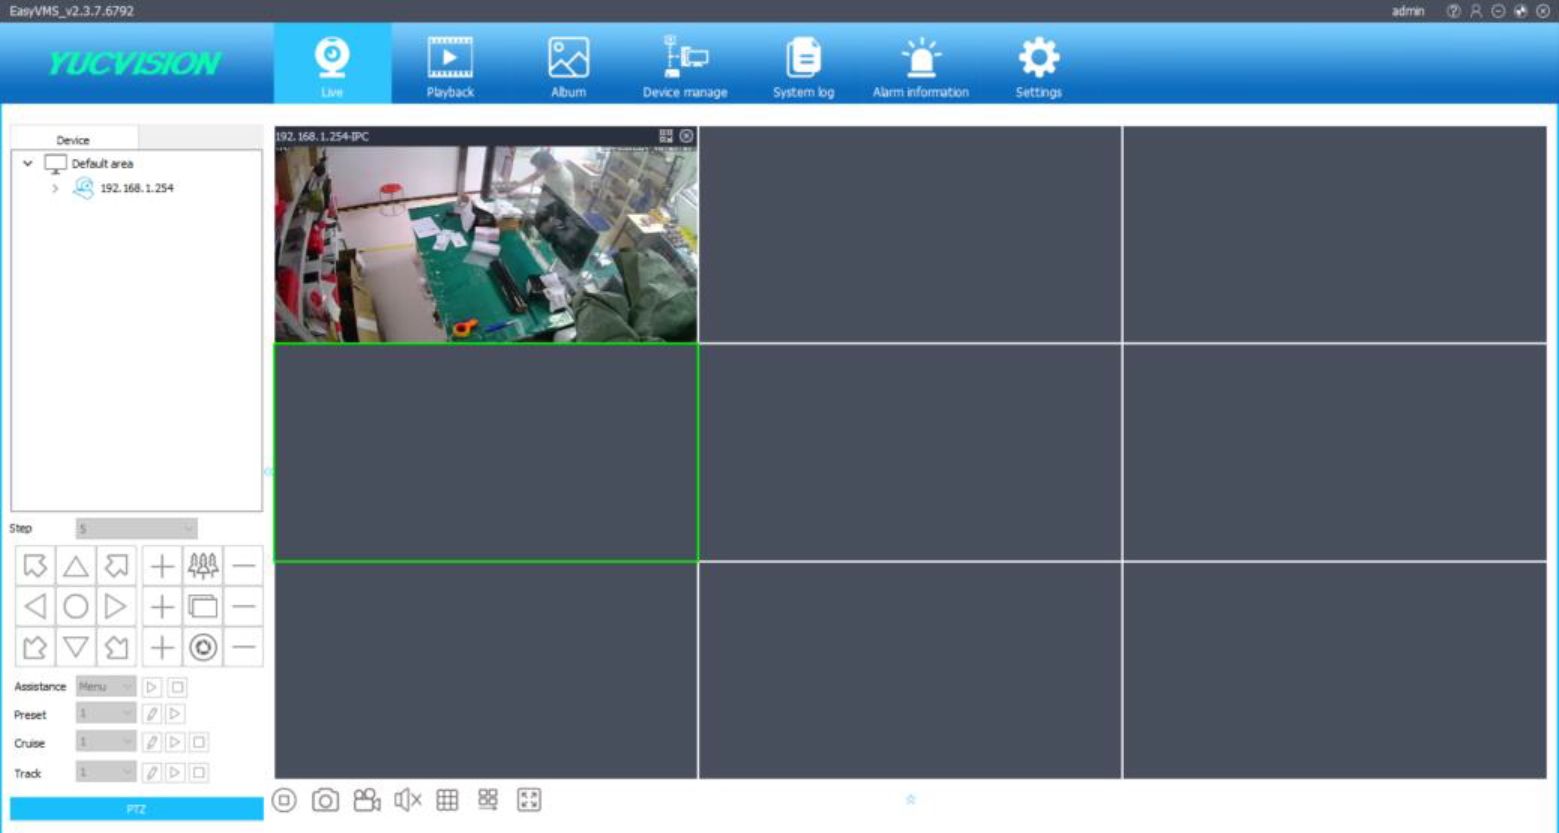
After the device is added, you can now preview the device’s video normally.
- Parameter configuration of the device:
- Clicking the right mouse button on the preview interface will bring up the drop-down menu and select “Remote Config” to
enter the device configuration interface (only devices that support P6S protocol).
Close live
Audio on
Snapshot
Start record
Picture ratio >
Full screen
Definition >
Two-way audio
Zoom
Remote Config
>
Remote Settings
x Camera Settings OSD Settings Image Settings
x Network Configuration Wired Network Settings Wireless Network Settings Port Configuration PPPOE Settings Mail Settings FTP Settings
x Codec Settings
Codec Parameters Audio Settings Record Settings
x Alarm Settings Moton
Audible alarm
v System Settings Time Settings Device Infbrmaton PTZ Settings Disk Information
User Management Timing Snapshot
v System Maintain Restore Default
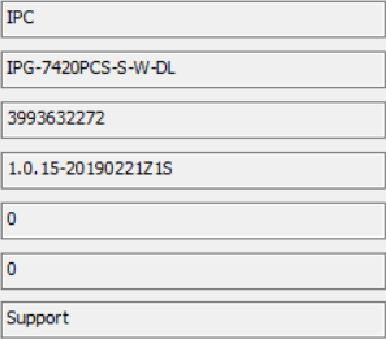
Device Name
Device Model
Serial Number
Software Version
Alarm Input
Alarm Output
Voice Call
Apply Refresh
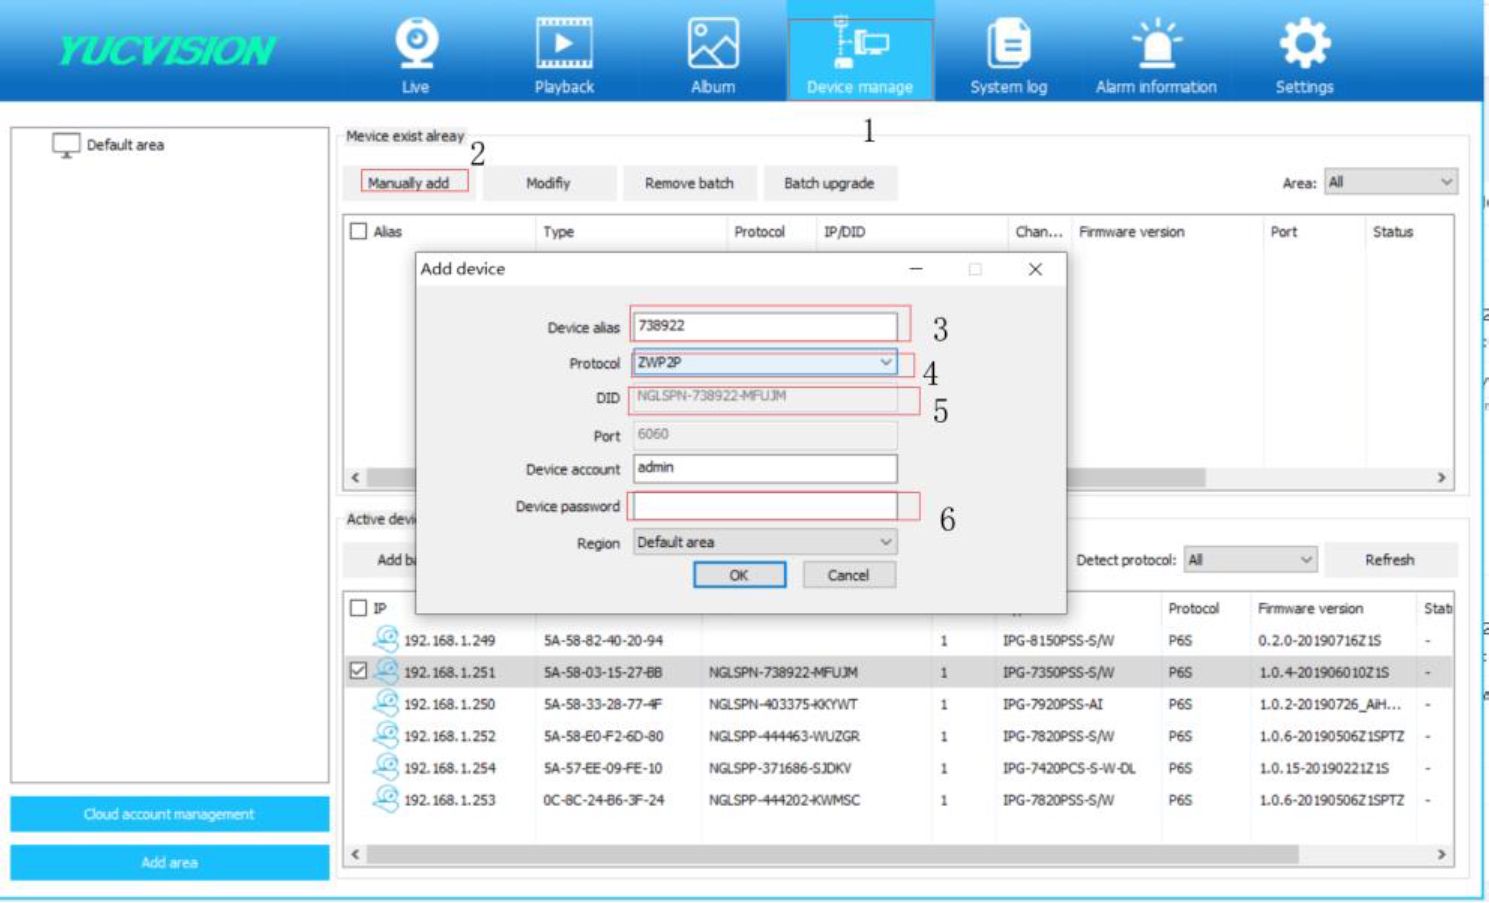
As shown in the figure above, Devices alias can customize the device name, Protocol selects ZWP2P, DID is the device’s P2P DID number, you can find it on the camera’s body, Device password is your device login password, the default password is empty. Then click OK to complete the addition of the remote device.
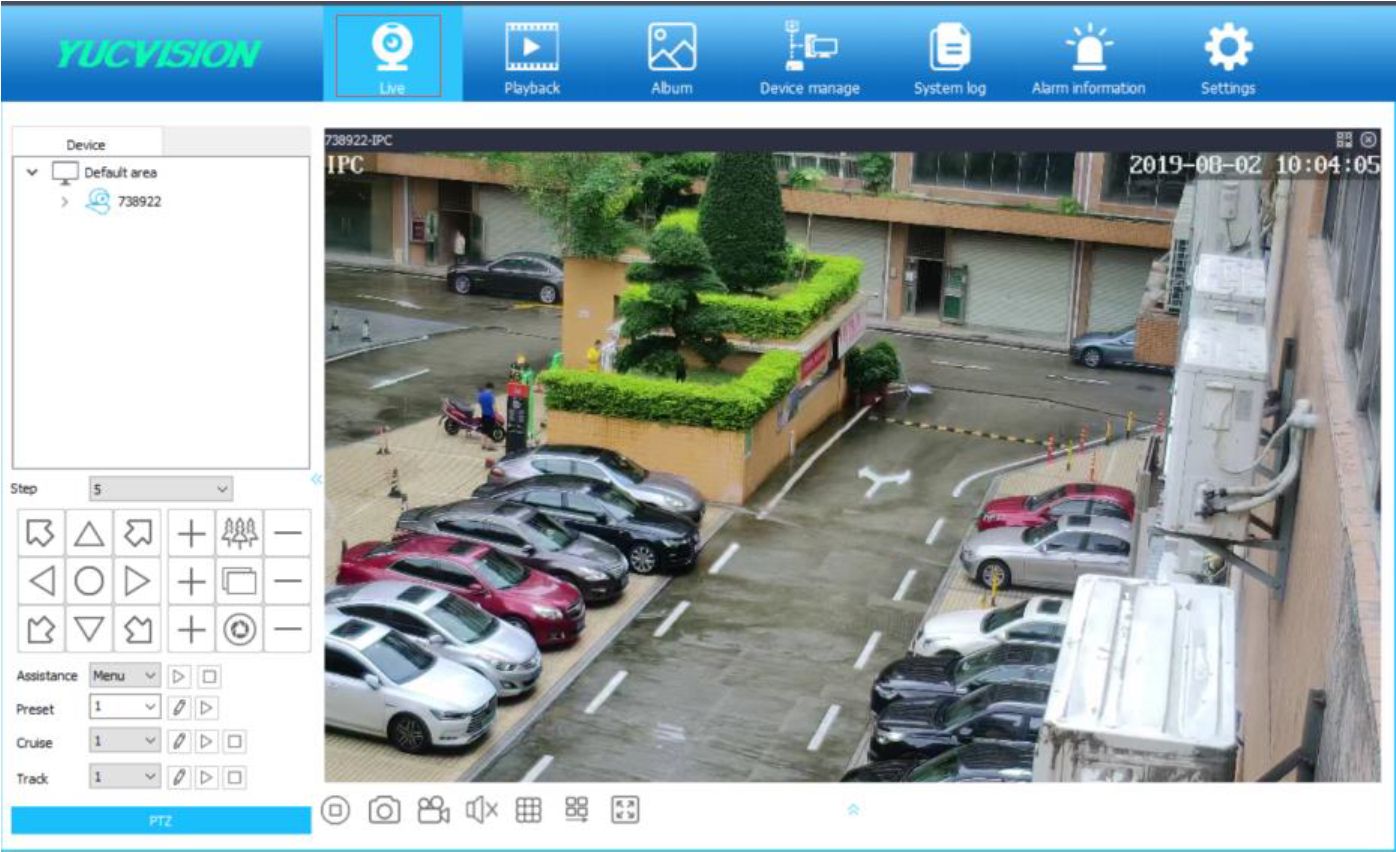
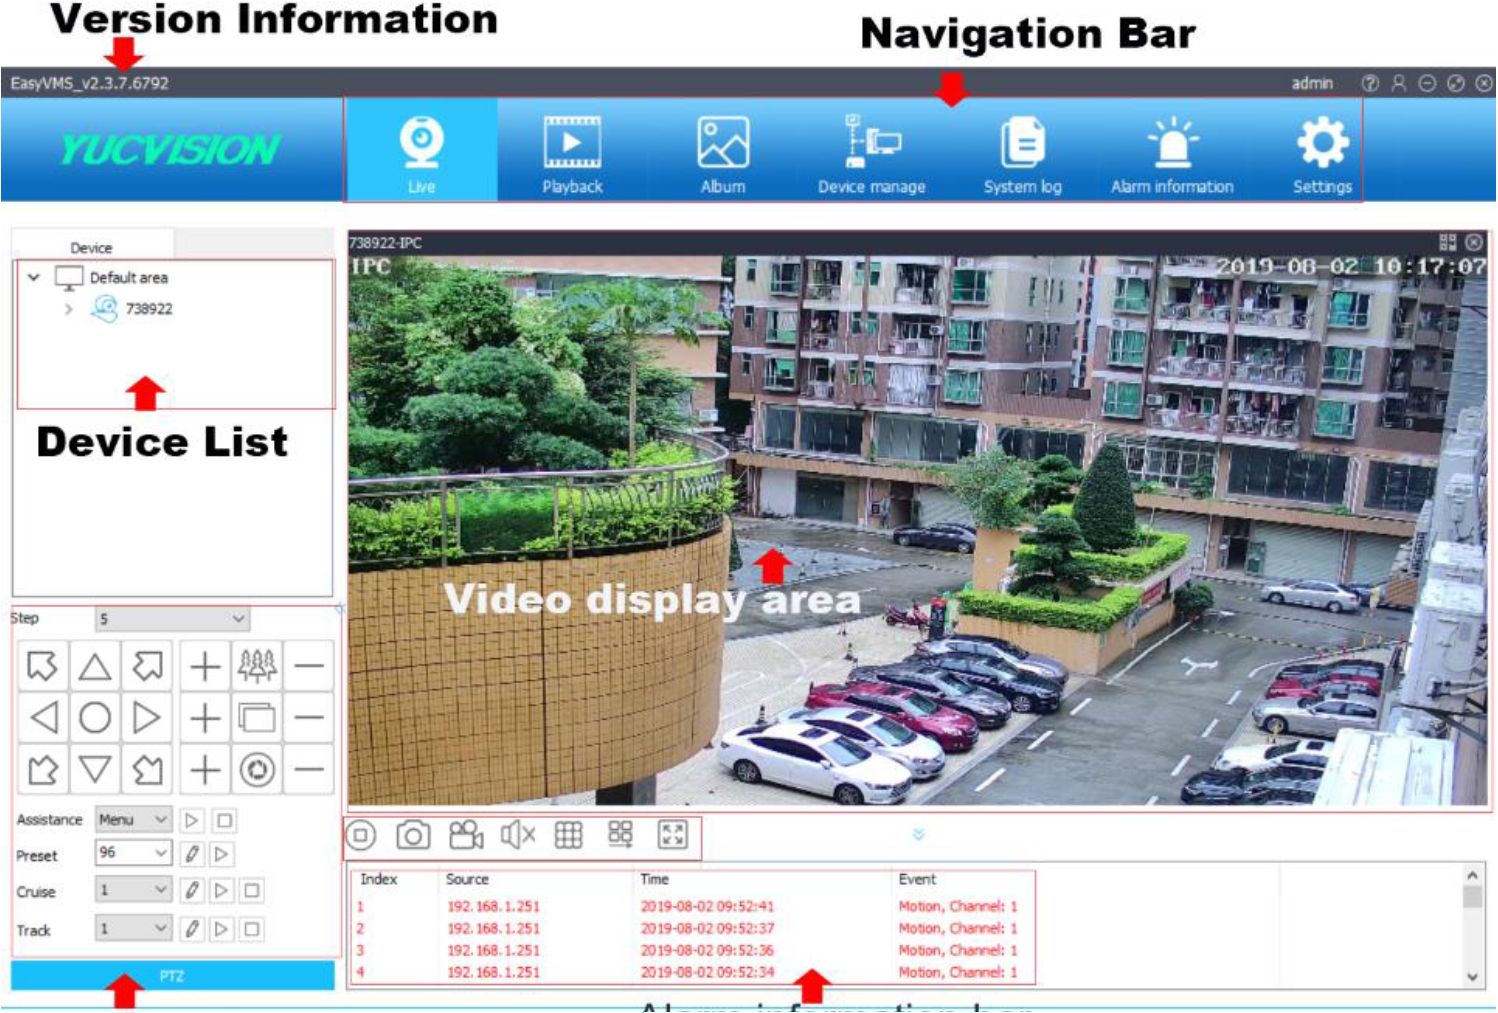
Alarm information bar
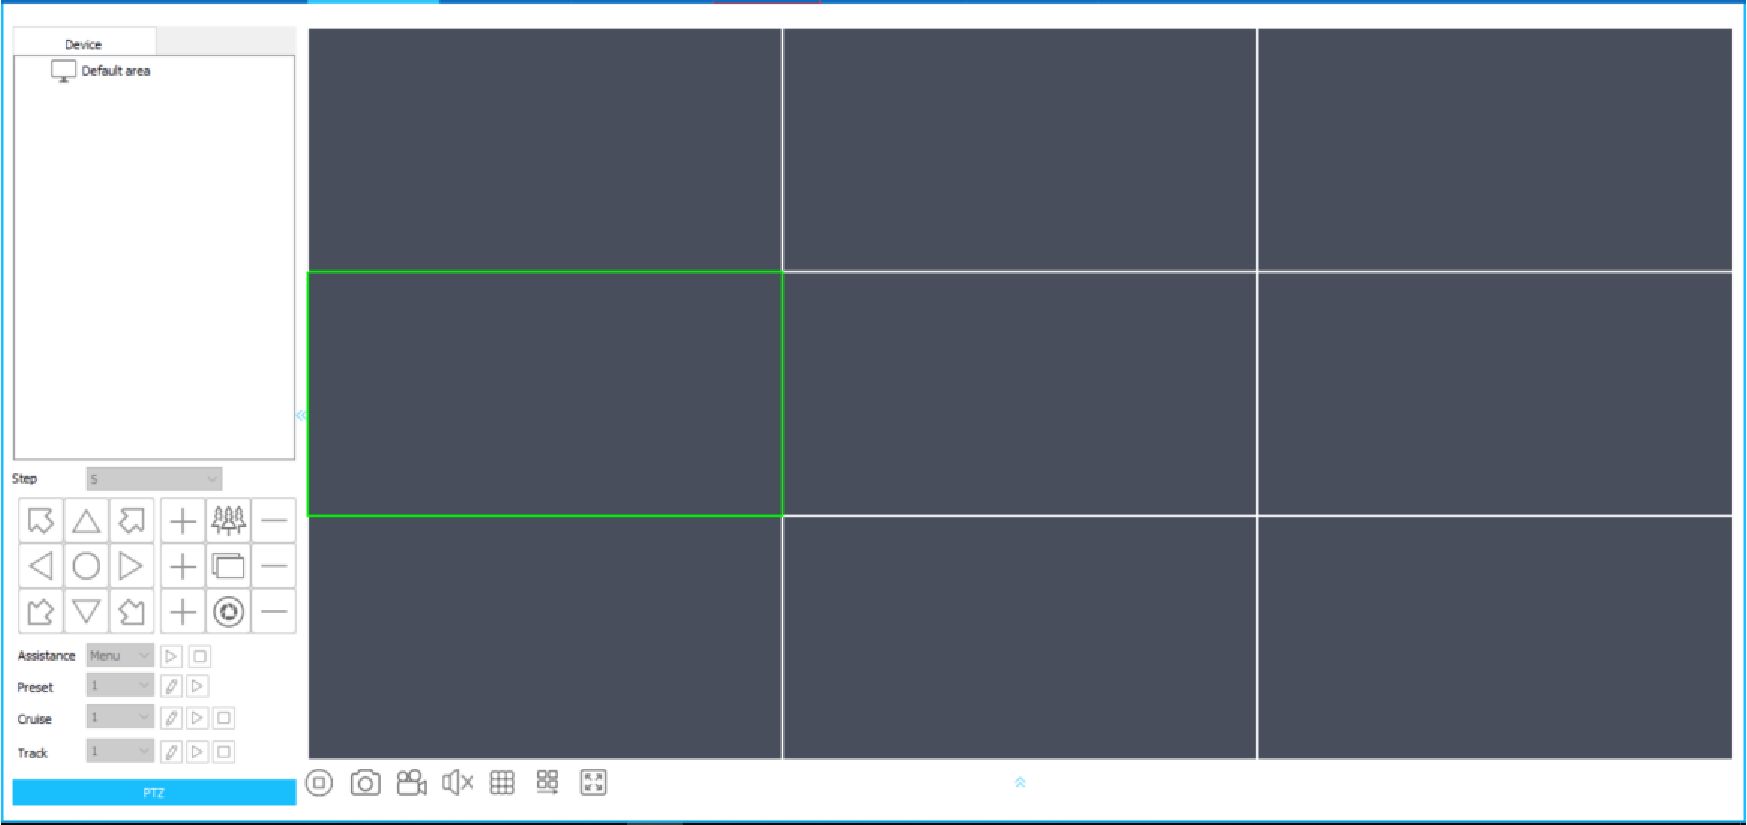
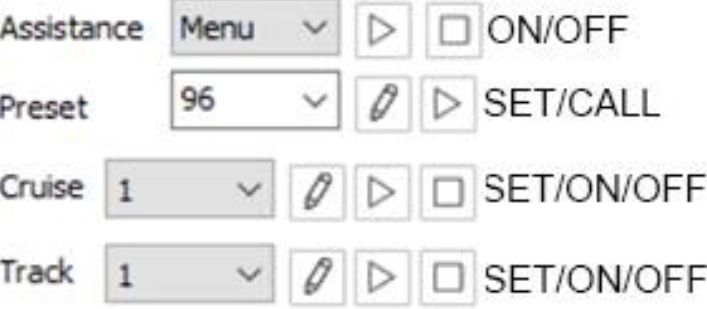
PTZ control panel
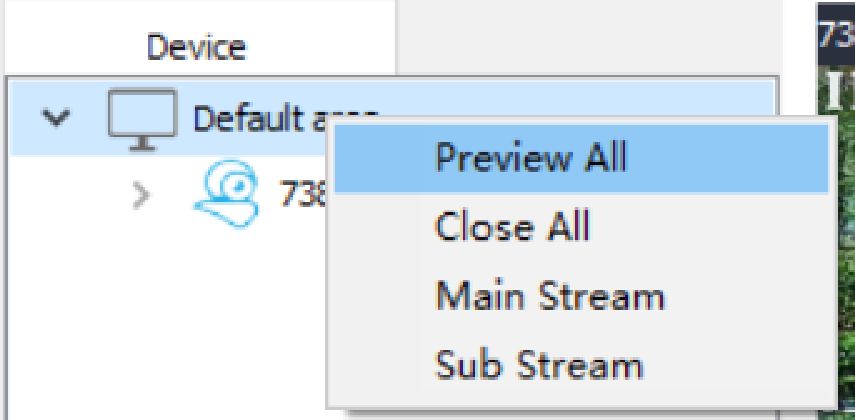
Click the right mouse button to bring up the dialog box.
Preview ALL: Preview all channel videos
Close ALL: Turn off all channel videos
Main Stream: All channels are displayed in the main stream mode
Sub Stream: All channels are displayed in substream mode
Step 5 v < Camera rotation speed adjustment
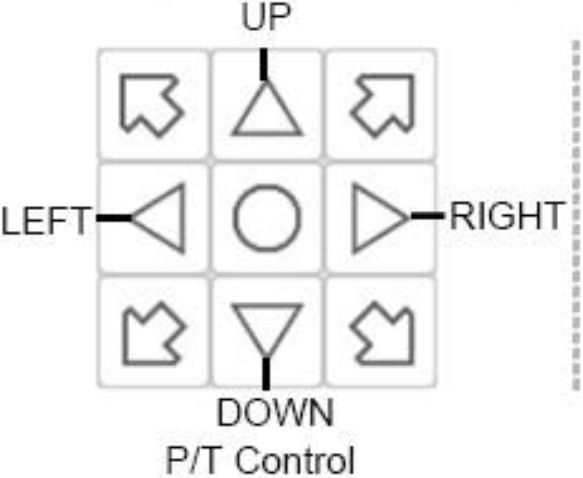
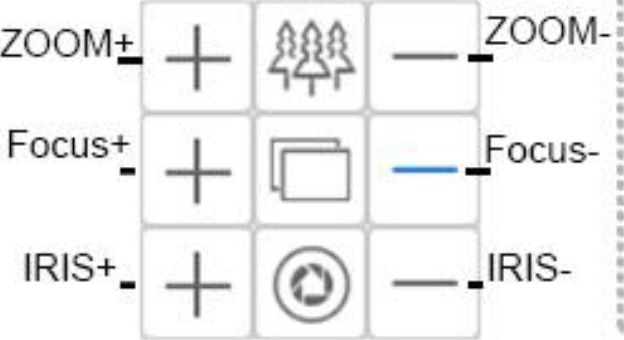
LENS Control Preset Control
Icon

is close full channels of preview.

Icon

is snapshot, capture picture to local to save.
Icon

is close full channels recording.
Icon

is close full channels audio.
Icon

is setting multiple video on screen, can setting single, 4/9/16/25/36/64 channel video for preview
Icon

is make video to full screen, press it make full screen, press ESC exit it.
- , Preview interface operation menu: Clicking the right mouse button on the preview interface will pop up a function selection dialog box, as shown below:
| Close live — | |||
| Audio on | Turn on audio | ||
| Snapshot — | Manual Snapshot | ||
| Start record — | Manual record | ||
| Picture ratio |
Orignal | — Orignal size | |
| Full scr&cn | ✓ | Auto | — Auto size |
| Full screen | |||
| Definition | _i» ✓ | HD — | — HD mode |
| Voice intercom | |||
| Two-way audio— | SD | — SD mode | |
| Zoom | Digital zoom+/~ | Clear— | — Smooth mode |
| Remote Config — | Config Camera | setting | |

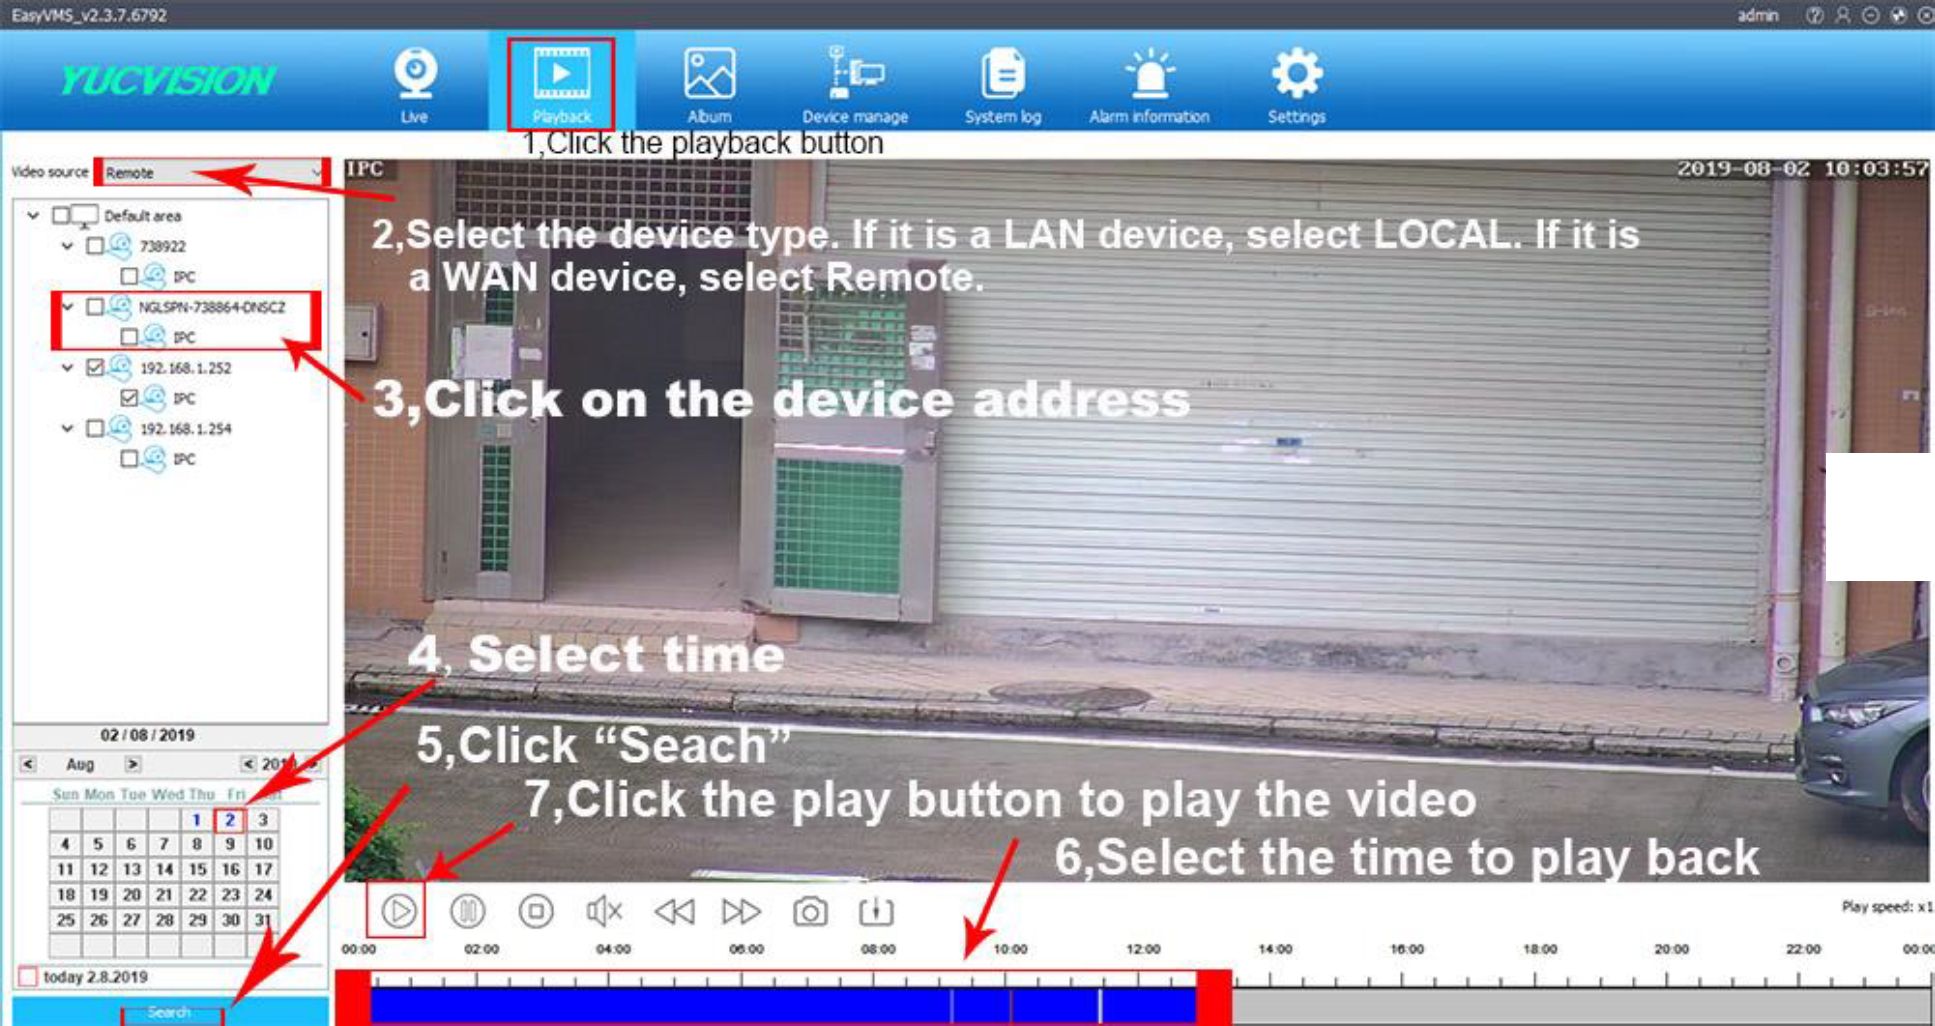
Live preview Local/remote playback J, Camera mange System operation record
Local/remote picture/video view or download
Playback icon introduction
(S) Playback
Pause
@ Stop
C(]x Sound ON/OFF
«] Slow playback, minimum support 1/4X speed [>£> Fast playback, maximum support 4X speed [Q] Manual capture image
f I ] Record files download

T_«tWW«4J»3.0r.
T_201S0e02i41Ml.pr»
T.201S08021412M prv
T_20lM*02Mlll44n
T_201$0e02141014.prv
T_201S0M214W22.|rv
T_201SM02140820pr.
T.201SOe02140n2.p™
T.M 140802:40838 or.
T.iOiWWJKMOJ.pr’»
T 20l»»WJ«03».orv
T_20140802:40023.pr>
T_201008021354 32.prv
T_201SCe02135842.prr
T_20l0080213S248flr»
T_201008021358 $8 .prv
T.JOlWWJiJSWJ.prv
T_20!8080213$5n.pr>
T_20l8080213$4l7.prv
T_20i»S0213S32:.prv
T.X100802135227.0»
r_aiKSO2:»iiXpn
T.20100802135042-0»
T.20100602134950.0»
T_20100802134858-0»
T_201SOK21J4806pr.
T_201S0e021M714.pr>
T_20100802134823.p»
T.2018080213*531.0»
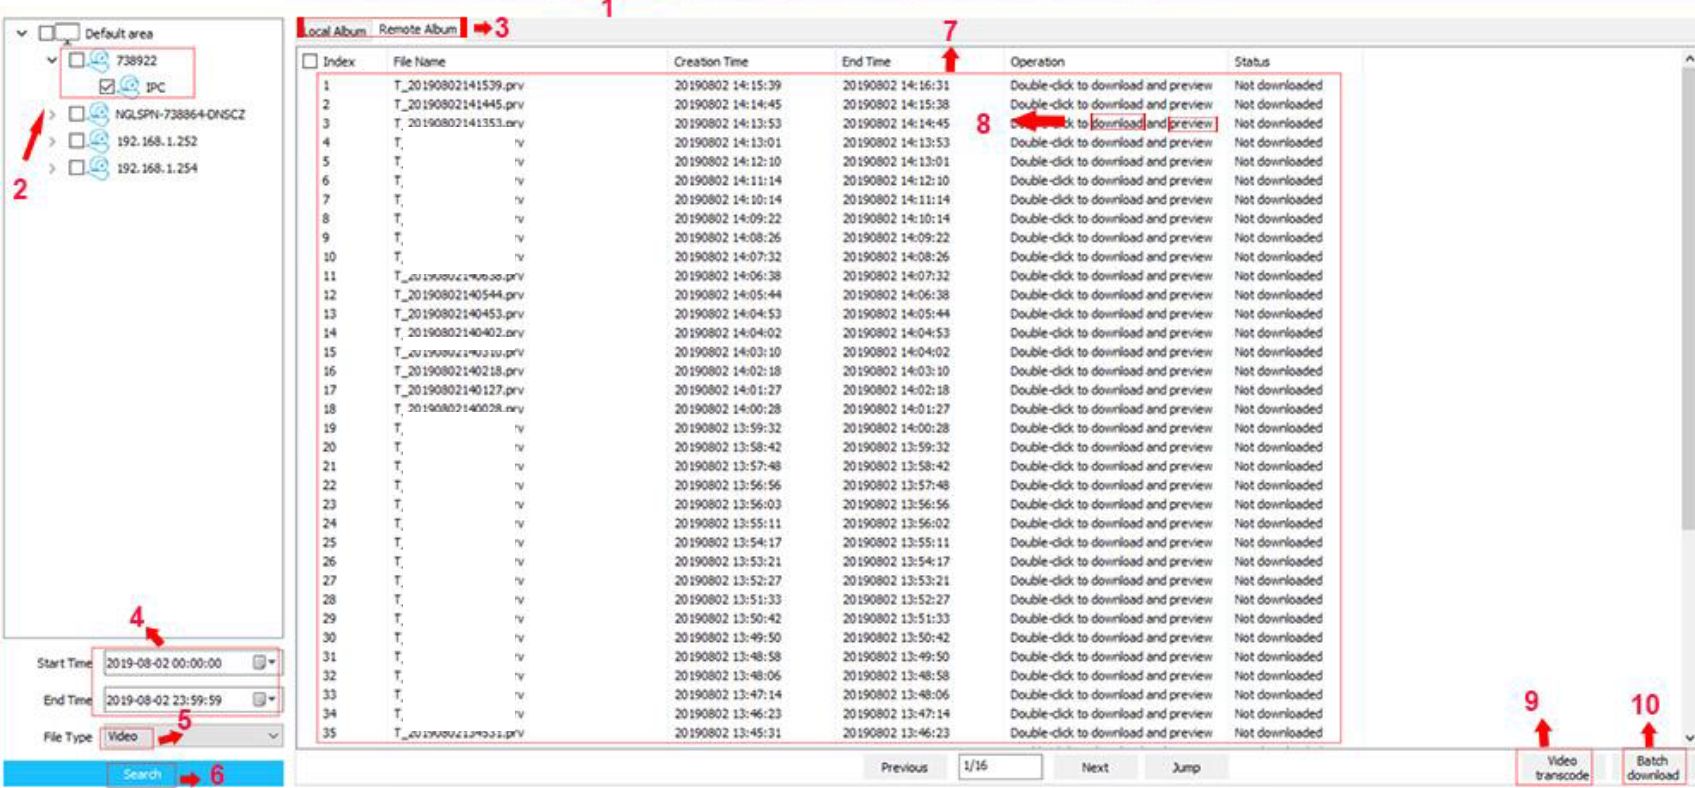
- Click the electronic “album” button to enter the electronic album interface.
- Select the device you want to operate
- Select local album/remote album (local album: picture or video on the computer side. Remote album: picture or video on
SD card)
- Select start time and End time
- Select File Type:Video/Image
- Click “Search”
- Search out Video/image file
- Double click to download/preview
- Convert video files in H.265 compressed format to video files in MP4 format. Can play on any player
- Batch selection video file download
- ,Device Manage:


1 ,Click “Device manage” button to enter the electronic Device manage interface.
- added devices List
- Manual Add device: Devices in the LAN can be added by IP address, or remote devices can be added by P2P DID number.
- Modify the device name or password (for changing the password when the password is incorrectly filled)
- Delete added devices
- Device upgrade: for camera upgrade firmware
- Details of added Device
- right click on any device, a function dialog box will pop up, including: remote device configuration, device time and computer synchronization, clear alarm information and display device QR code
- Add a LAN device: Select the device that has been searched, then click this button to add the device
- Modify the IP address of the device that has been searched
- Display LAN device
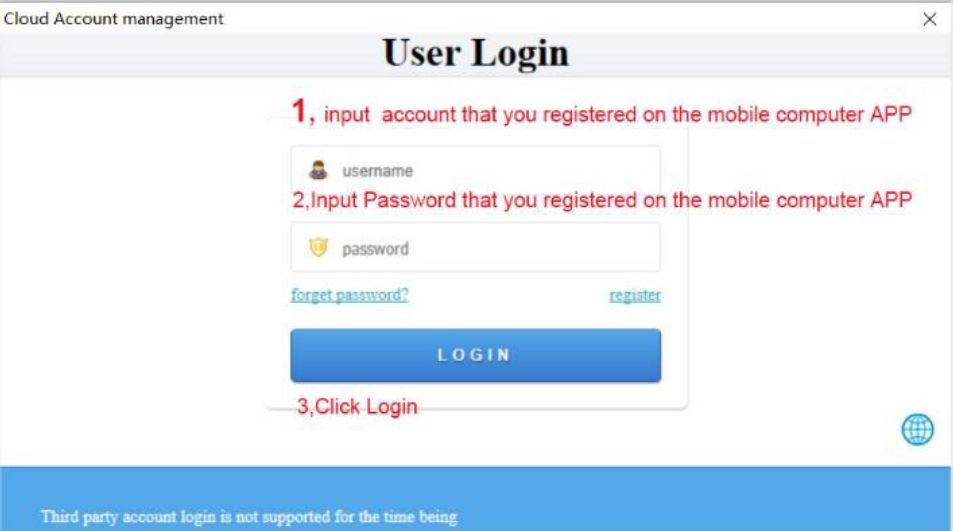
- Cloud account login button: You can log in software use the account that you registered on the mobile computer APP. All the devices on your account will be added to the computer software. Convenient for the management of the camera.
- Add area:If you have a lot of devices added to the software. You can add these devices into several areas to add. For example, in the United States, the camera is divided into an area, and the camera in the United Kingdom is divided into an area.
- ,Setting: Software system settings
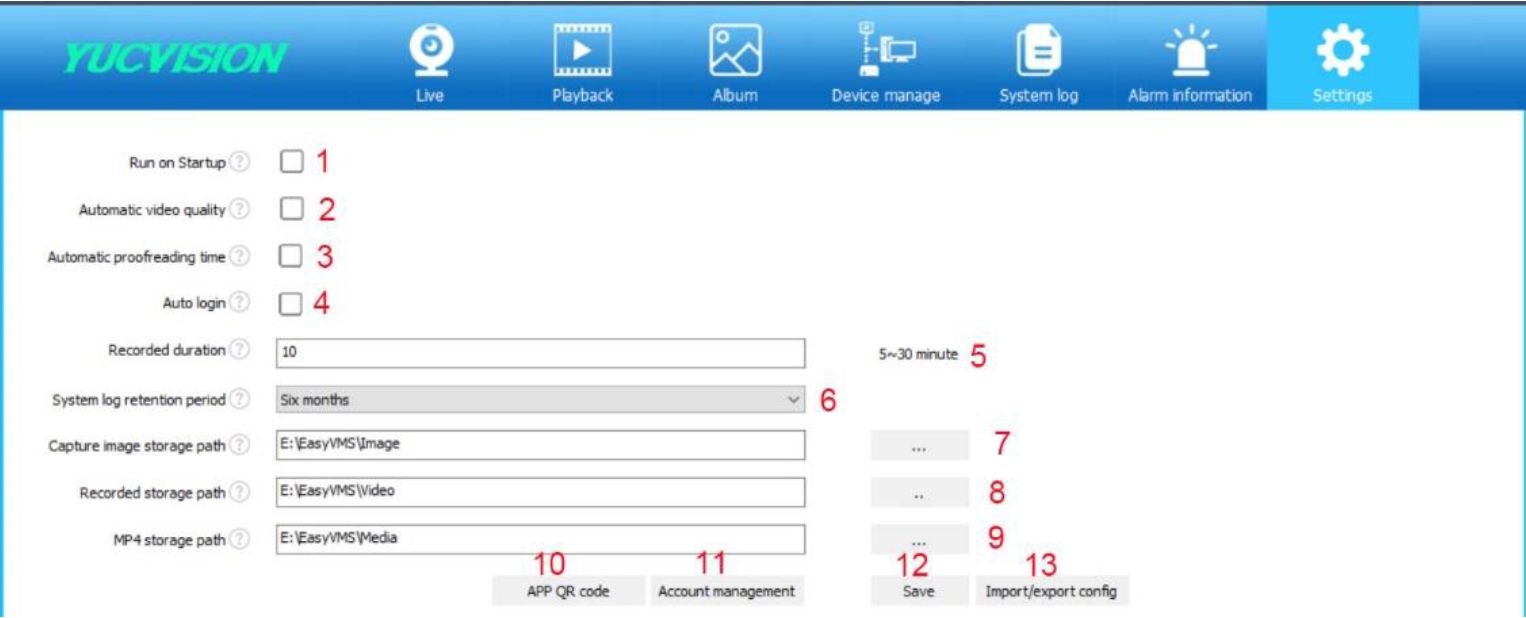
- The software will start automatically when Windows OS starts successfully.
- Automatically adjust the screen resolution (single and four-screen are HD modes, other screens are clear modes
- Automatically synchronize device time with computer time
- The software will automatically search for the ONVIF protocol device and log in to the device (try to log in automatically using the user name and password of the User Management Center)
- Length of each recording video file
- System log retention period
- Storage path of Manual capture image
- Storage path of Manual recorded
- Storage path of convert PRV format to MP4G format
- Click “APP QR Code” button to display the mobile phone APP to download the QR code.
- Account management:manage computer client software login user and password
- Save all config
- Import and export software configuration: All configuration information of the software, including all added devices.
- Remote parameter configuration:
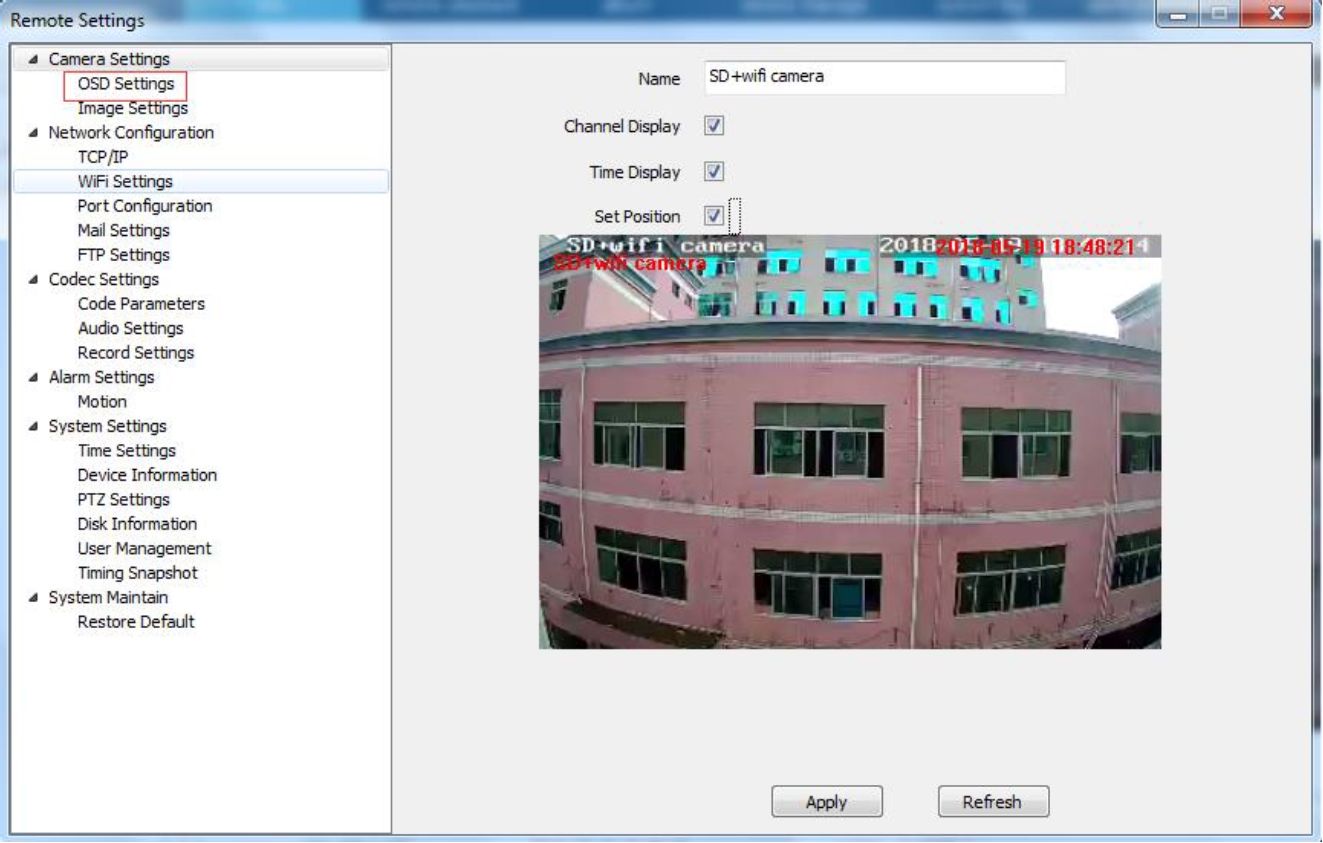
Smart Night: Normal Mode.
IR-CUT mode: auto (Passive mode), Day/Night, Auto (Active mode)
IR-CUT Sensitivity: 0-50(The higher the number, the higher the sensitivity.)
Image Mirror: close, Flip horizontal ,Flip Vertical, Flip Center

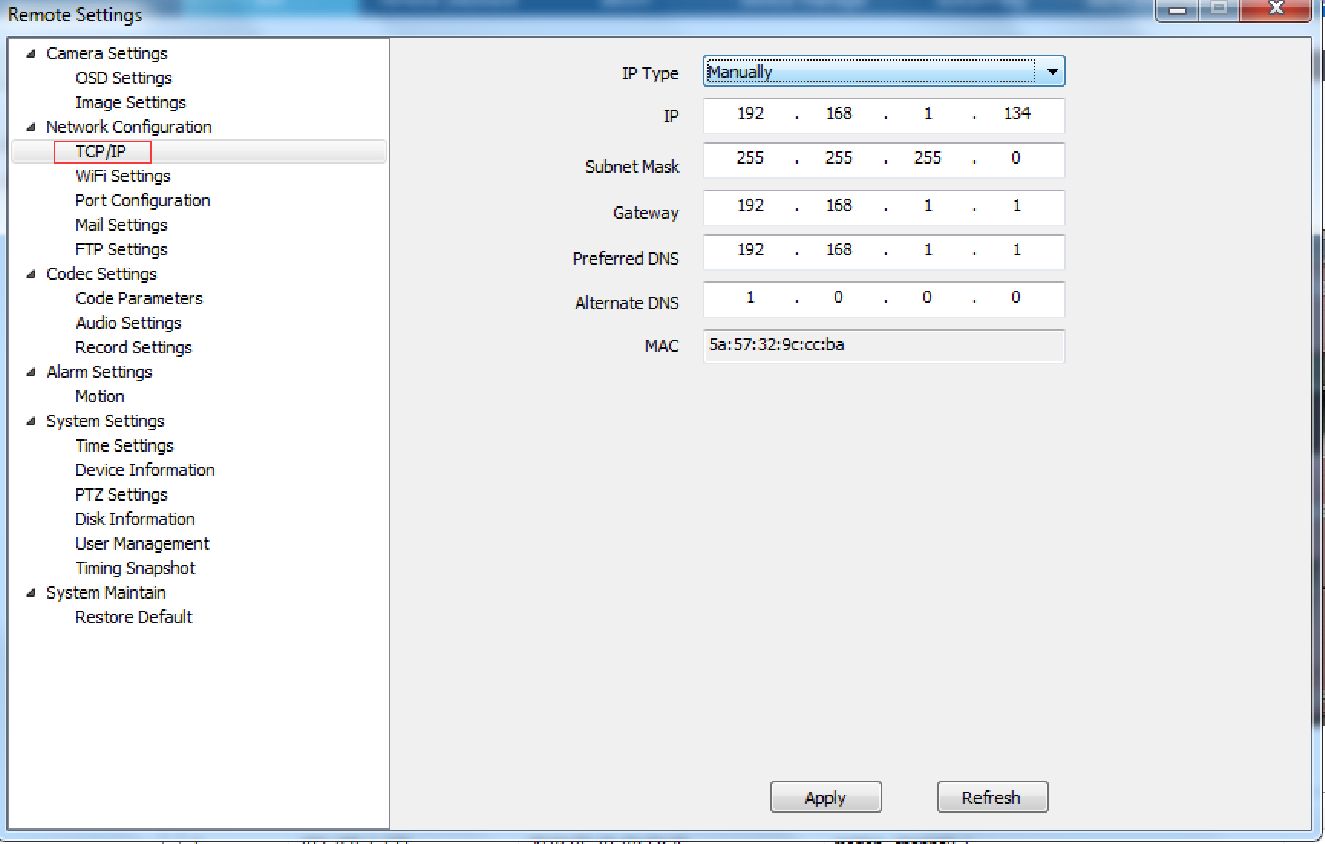
- TCP/IP Settings: You can choose the IP address type, manually and DHCP mode, and Modify the IP address parameters.
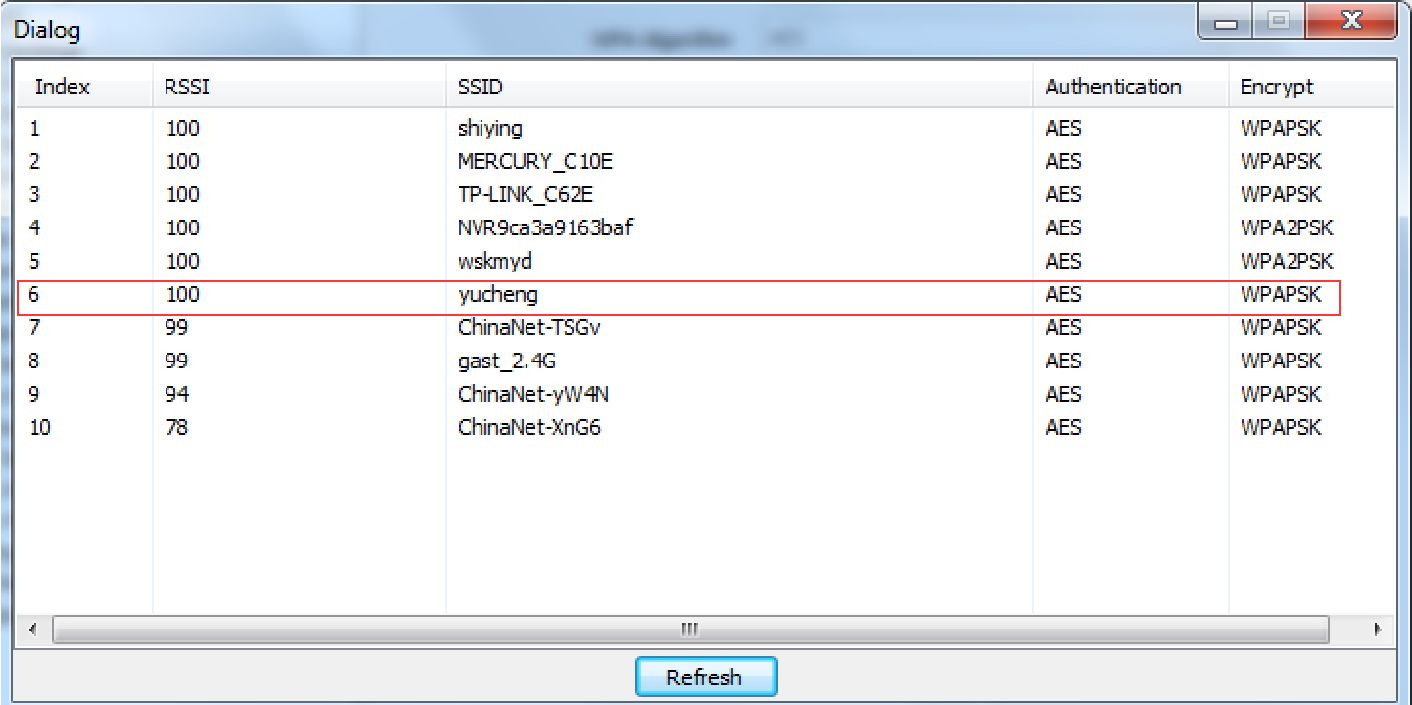
- WIFI settings: If you use the camera for the first time, and your camera connect to your router through Ethernet cable, please Click “Search” for add your WIFI setting
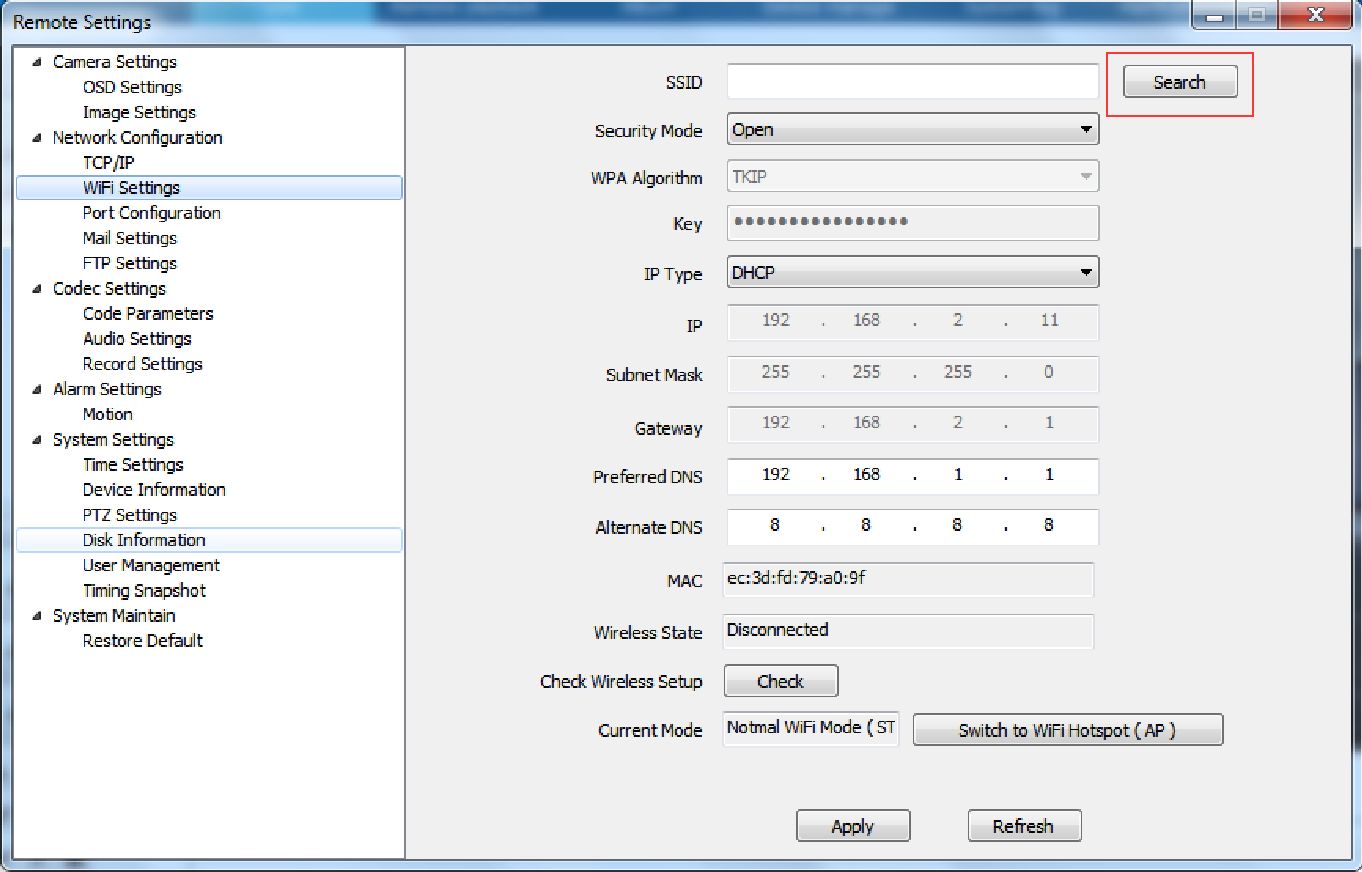
Choose your wireless router WIFI SSID
Input KEY and Check, system will auto check the Wi-Fi details, if successful, please click the app, connect to WIFI.
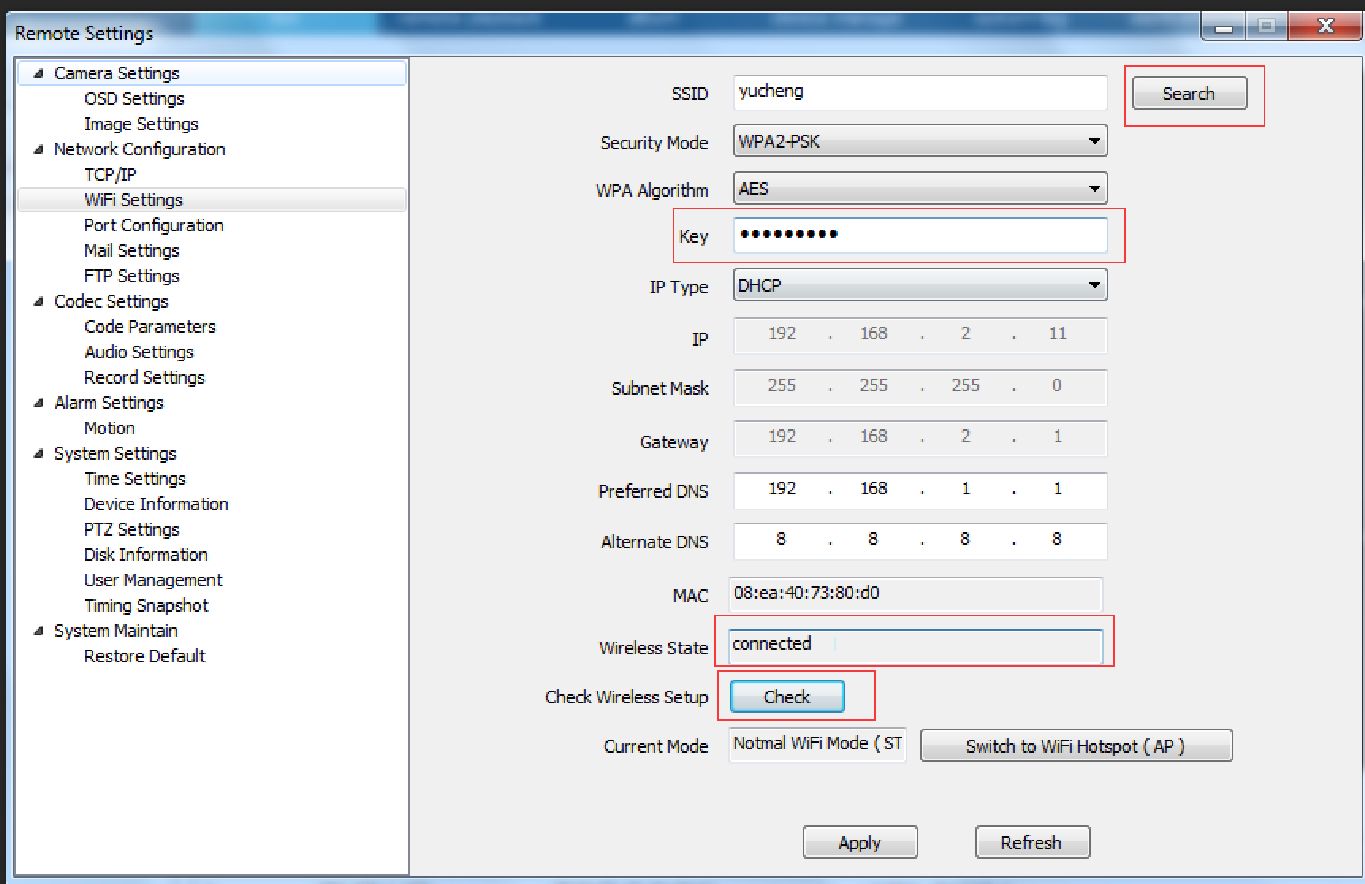

Setting WIFI successful, Now you can disconnect wired Ethernet cable. And click “apply”

Then Research your camera, at which point you search and add a camera for WIFI connections Port Configuration:
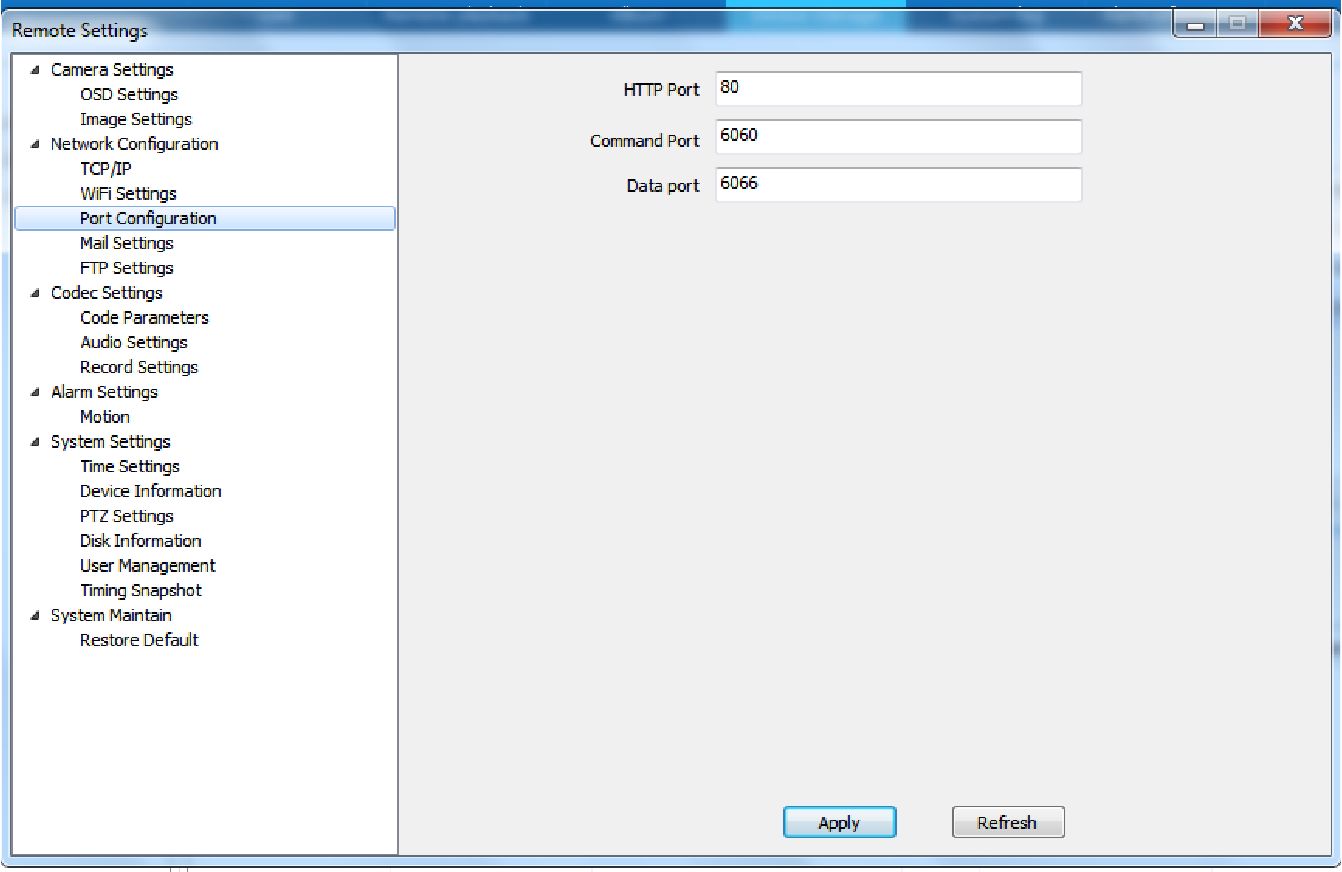
- Port Setting, HTTP/ After the signaling/data port is modified in the corresponding access software, it is necessary to manually add the modified port number, otherwise it cannot be accessed effectively (non-professionals do not recommend modifying it to avoid adding devices)
Remote Settings
v Camera Settings
OSD Settings
Image Settings
v Network Configuration
TCP/IP
WiFi Settings
Port Configuration^
Mail Settings A
FTP Settings
v Codec Settings
Code Paramet
Audio Settings
Record Settinç
v Alarm Settings
Motion
v System Settings
Time Settings
Device Inform.
PTZ Settings
Disk Informal»
User Managers
Sender Address
Mail Notification
Encryption Algorithm
SMTP Server
SMTP Port
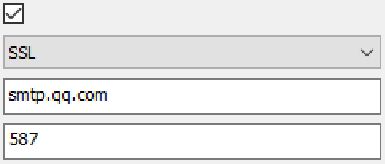
13001410667igqq.com
Sender Password

Attach Image 0
Timing Snapshot v System Maintain
Restore Default
Snap Interval 1 minute v | | Test
Apply Refresh
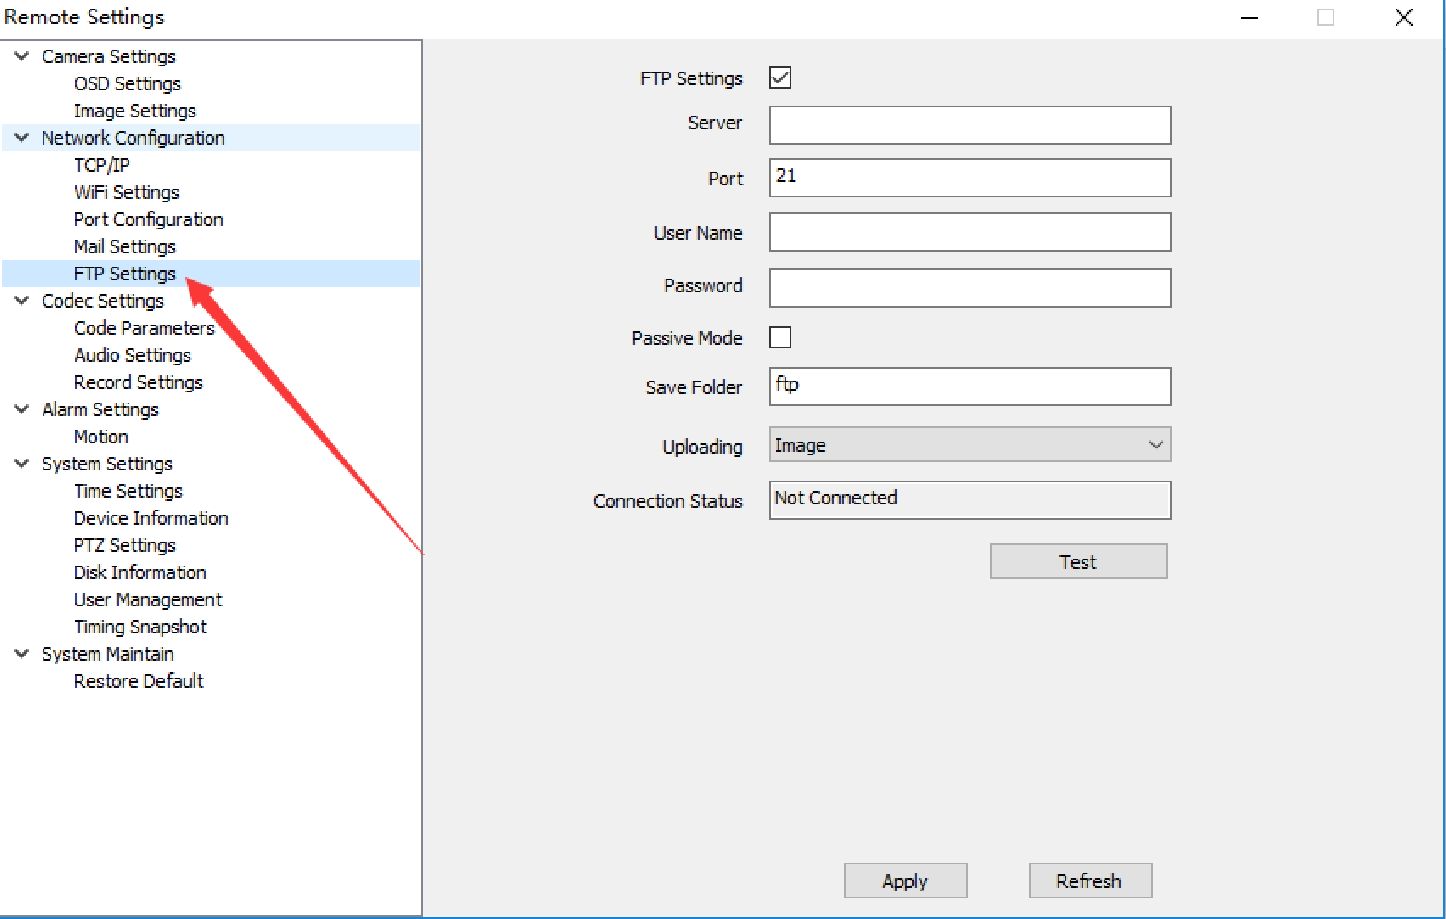
- Encoding settings:
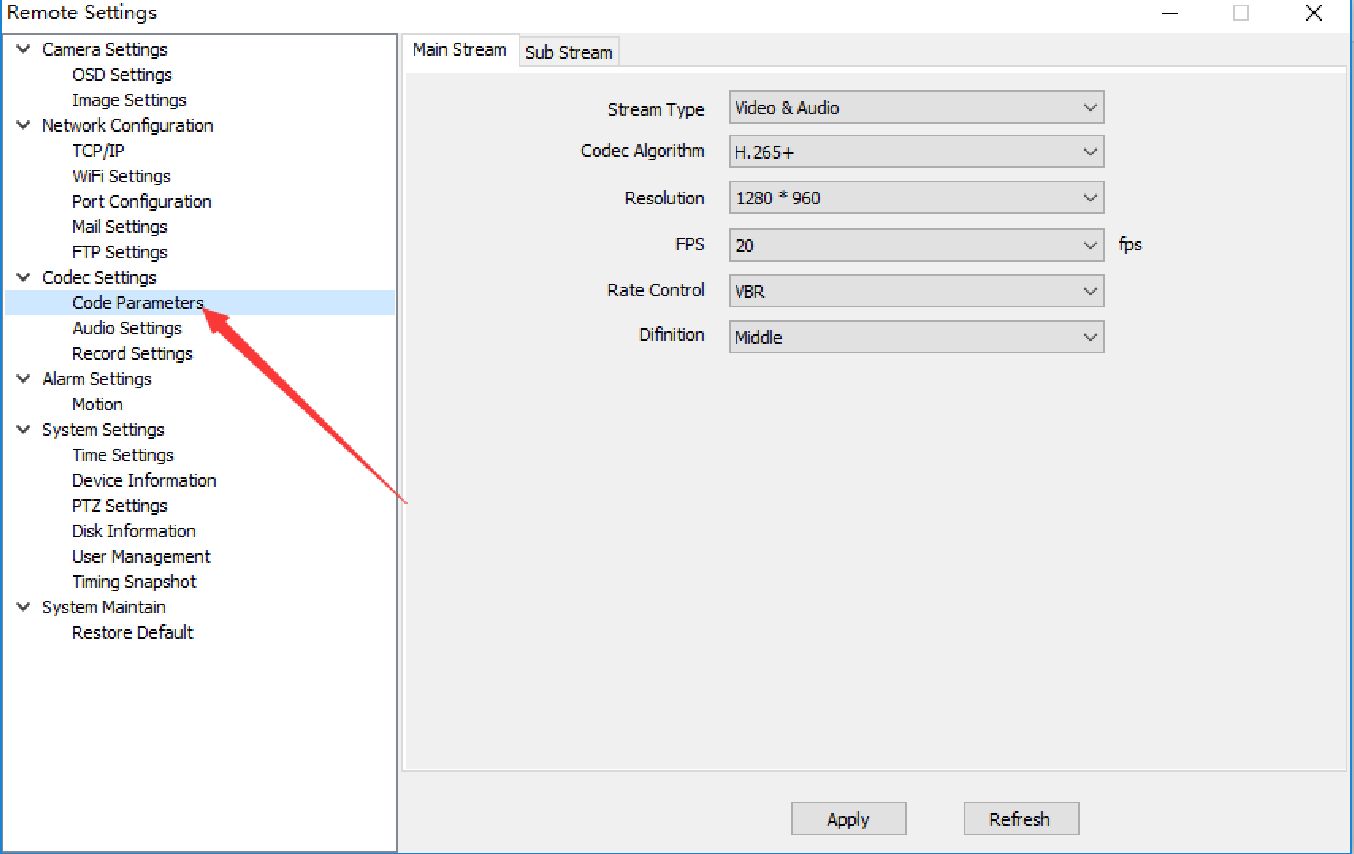
- Coding parameters: Modify the format of the video screen and the appropriate parameters, has reached the optimal effect
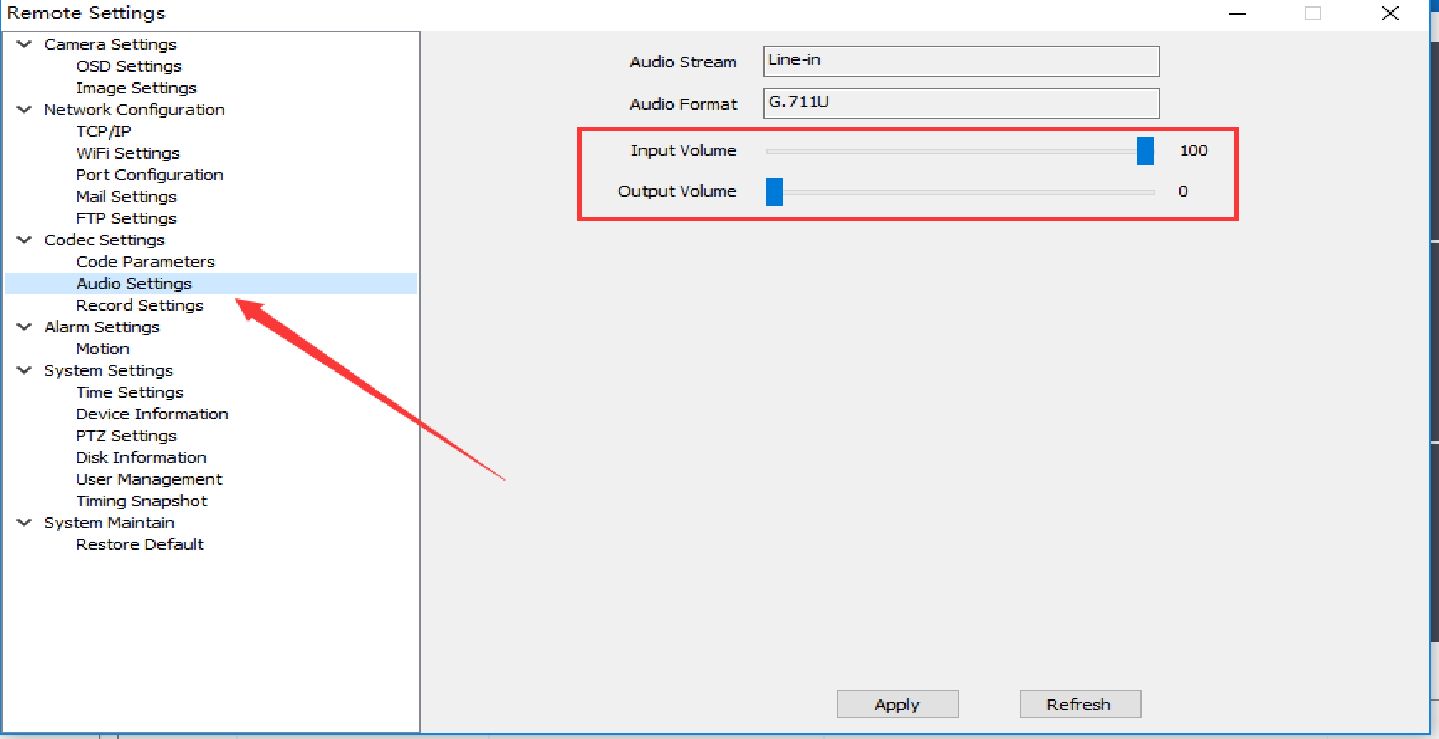
- Audio setting: The input volume refers to the size of the camera’s microphone recording. The greater the value, the louder the playback sound of the monitoring device; the output volume refers to the sound played by the camera speaker. The greater the value, the louder the camera will play.
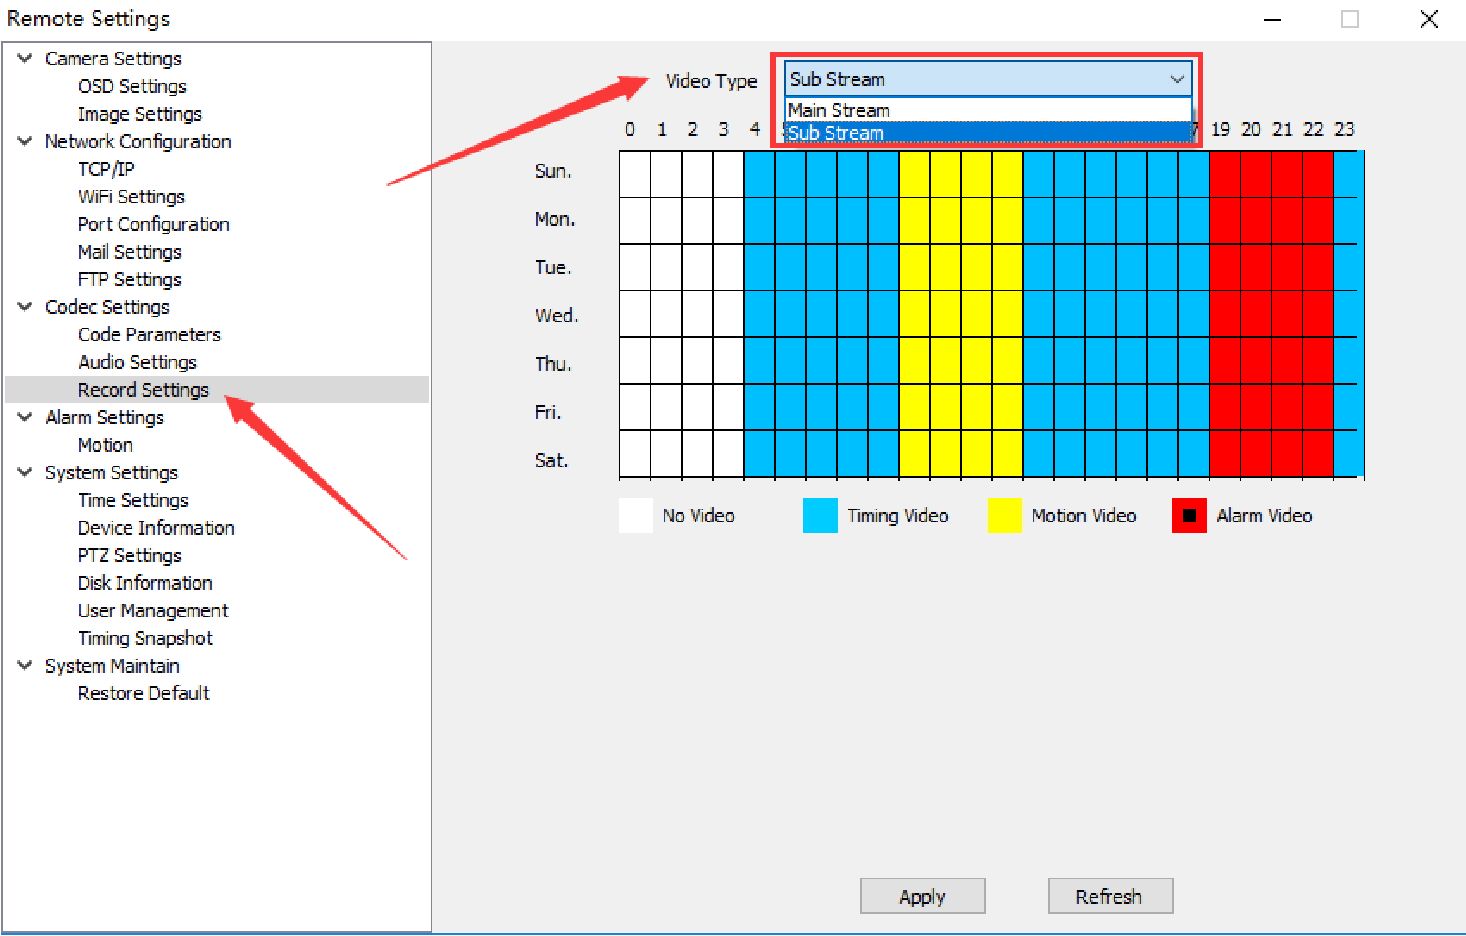
- Recording plan; 1. The main stream (HD) and sub-stream (clear) are optional for recording. HD recording is the highest
resolution recording of the device. At this time, the SD card’s recording file and the used memory capacity will become larger. Clear is the default option. 2. The recording mode will be different colors. The timing record is blue. It can be understood as the set time period recording (default is all day timer recording); the alarm recording is red, indicating that the R485 and switch alarms have detected the signal.
After the start of recording (this function is dependent on the product); moving recording is yellow, it means that when the object is detected to start recording, you need to enable motion detection in advance; disable the recording to be white, indicating that the current time is not recorded.
A, motion detection; refers to open or close the motion detection, motion detection alarm trigger method (take a picture when the alarm, by email to the specified mailbox, you must first set up a good mailbox); trigger FTP ( Capture a picture during the alarm, send the picture to the FTP terminal via the FTP server; push the button (refer to whether to receive the camera alarm reminder, the home page subscription function needs to enable the linkage push); trigger capture (in the detected When the signal is moved, a picture will be snapped.
The captured picture can be viewed on the message function of the home page; triggering the recording (the video will be recorded in different colors after the movement signal is detected); selecting the area (referring to the selected area on the screen The mobile signal will alarm, the selected area is based on the green box.)

B, Humanoid detection:
The humanoid detection function is enabled, and the alarm is triggered only when the camera detects the human form. Solved the problem of high false detection rate of motion detection. Moreover, the humanoid detection area setting supports up to 4 areas. You can set the area as you like. When someone enters the humanoid detection area, the camera starts to trigger an alarm.
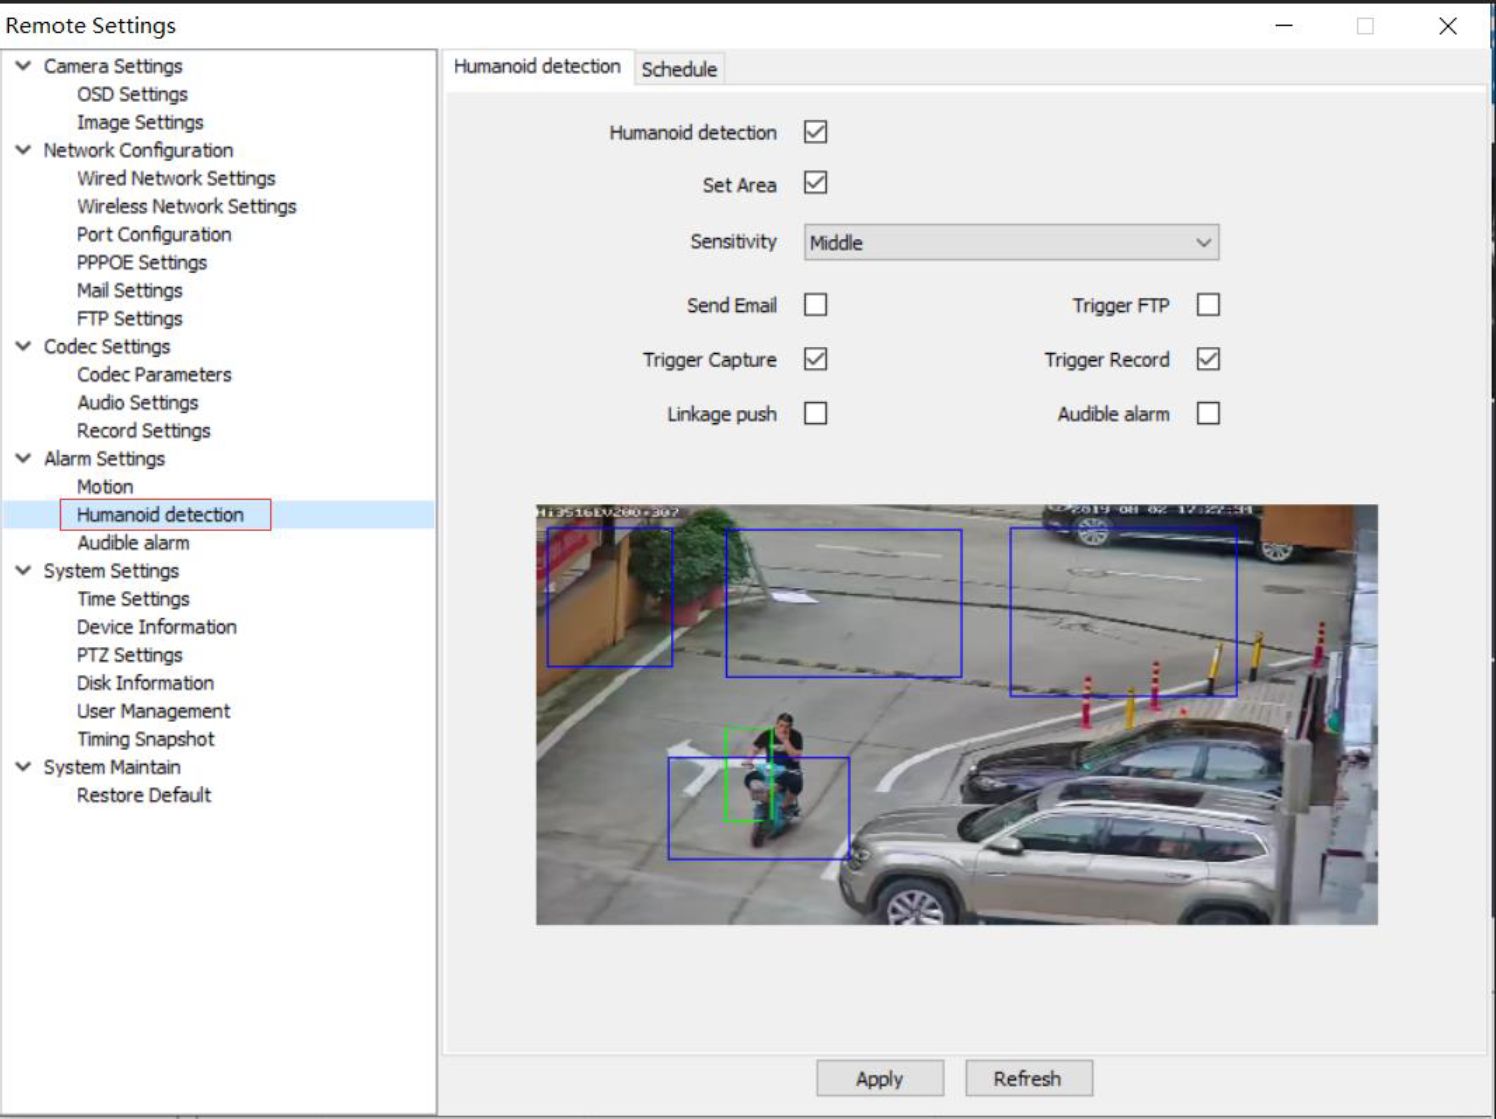
When triggering motion detection or humanoid detection, the device supports alarm sound output. If your device supports speakers, the device will output an alarm sound to alert people entering the surveillance area.
Remote Settings
v Camera Settings
OSD Settings
Image Settings
v Network Configuration
Wired Network Settings Wireless Network Settings Port Configuration PPPOE Settings
Mail Settings
FTP Settings
v Codec Settings
Codec Parameters
Audio Settings
Record Settings
v Alarm Settings
Motion
Humanoid detection
| Audible alarm |
v System Settings
Time Settings
Device Information
PTZ Settings Disk Information
User Management
Timing Snapshot
v System Maintain
Restore Default
Audible alarm 0
Sound type Custom
Delay time 5 *1 second
Volume range I 5g
Custom sound only supports APP
Apply Refresh
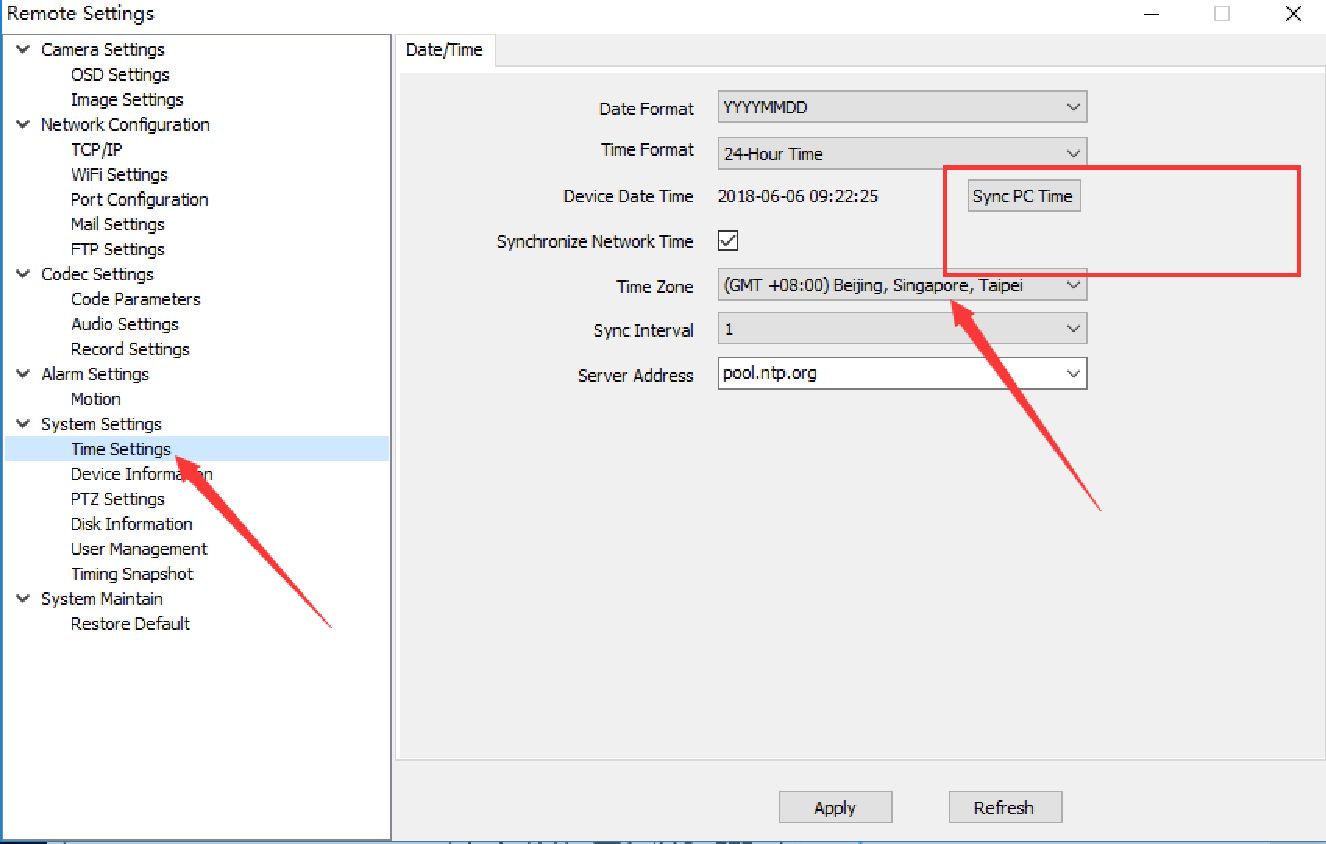
A,Time setting: According your local time setting the camera time.
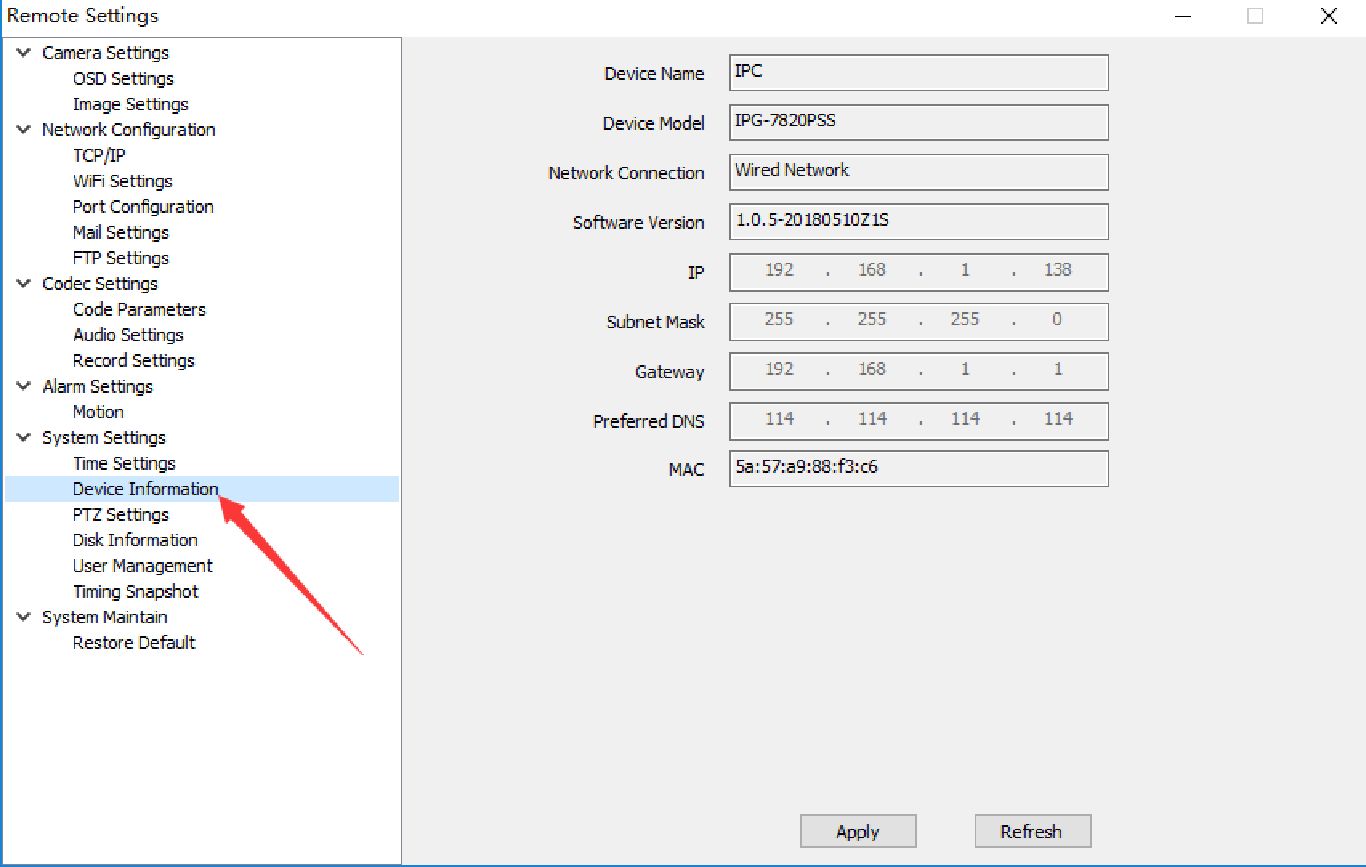
B,Device information: display the device model no., network connect type, software version and IP address.
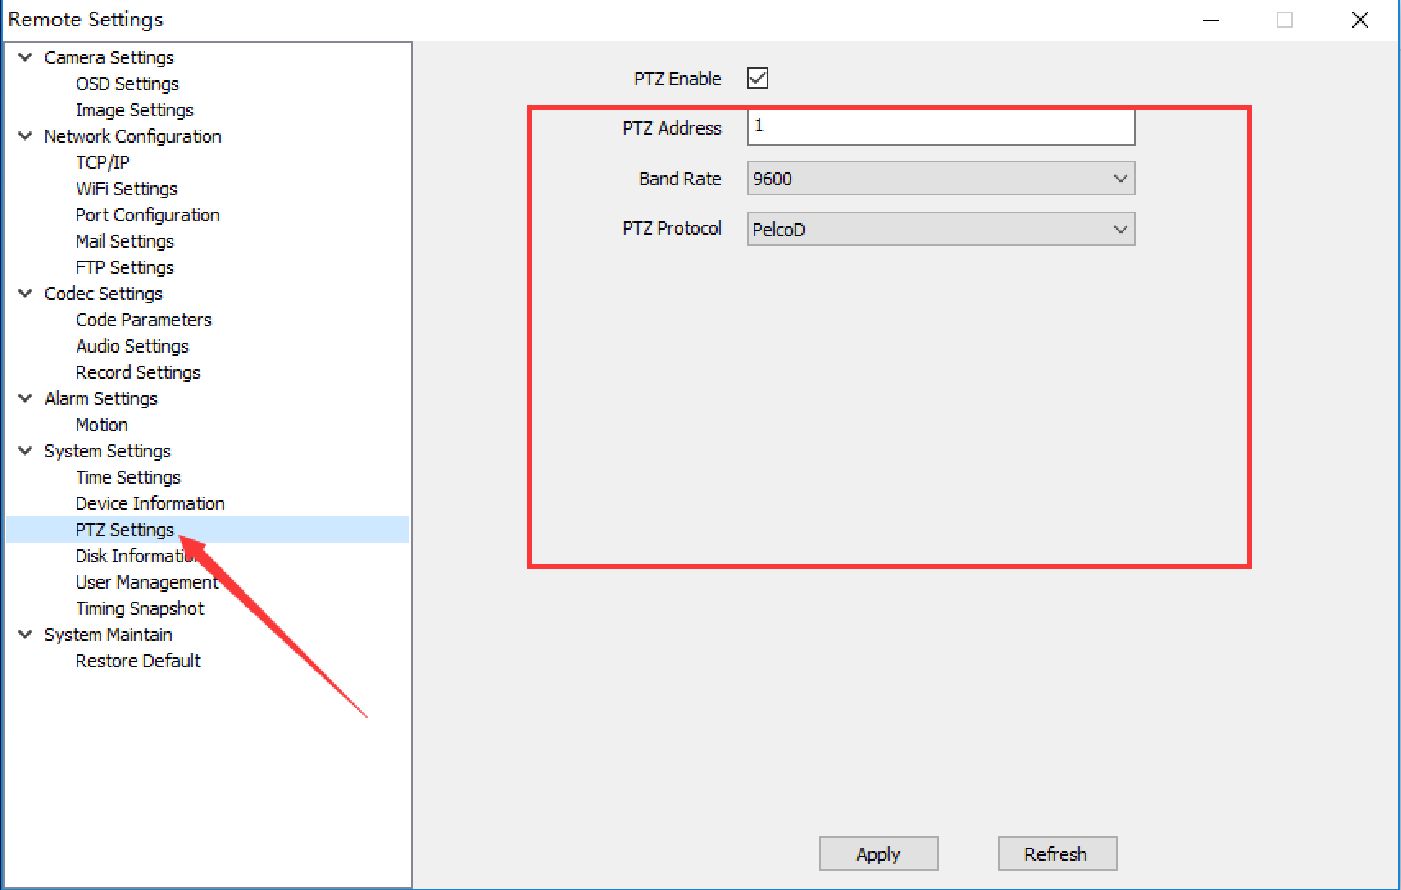
C,PTZ Setting: PTZ control setting ( camera up and down, left and right)
D,SD card information: display SD card memory, write status and snapshot, recording for memory size.

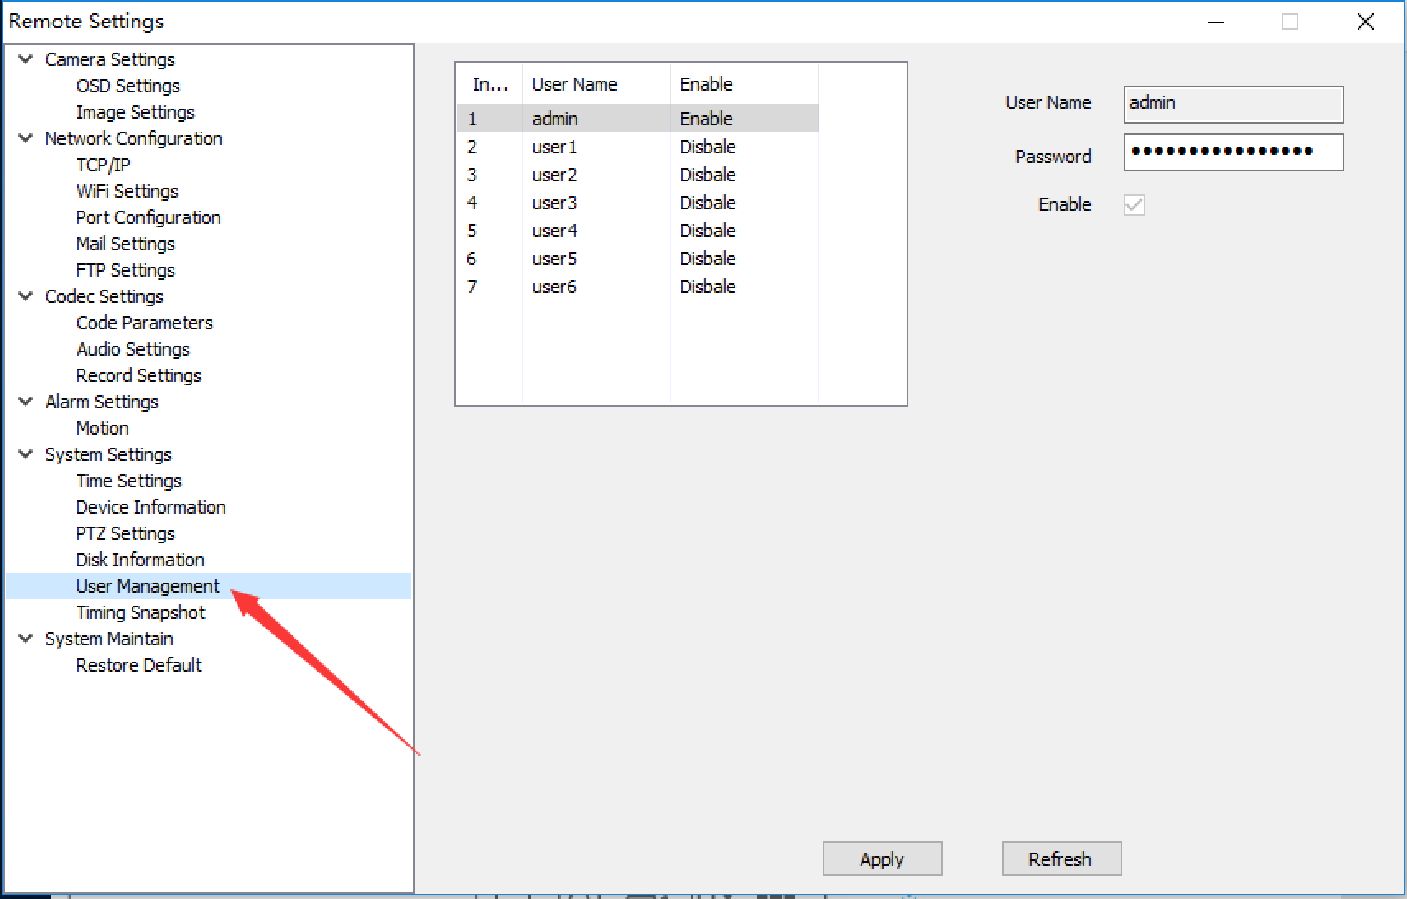
E,User Management: Setting user authority
Remote Settings
v Camera Settings
OSD Settings
Image Settings
v Network Configuration
TCP/IP
WiFi Settings
Port Configuration
Mail Settings
FTP Settings
v Codec Settings
Code Parameters
Audio Settings
Record Settings
Motion
Time Settings
Device Information
PTZ Settings
Disk Information
User Management
Timing Snapshot
System Maintain
Restore Default


![]()
Refresh
A. Restore the default; restore the default (all camera settings restored to the factory state, but will not delete the user data); restore the factory (camera fully initialized, including settings and user data will be deleted)
