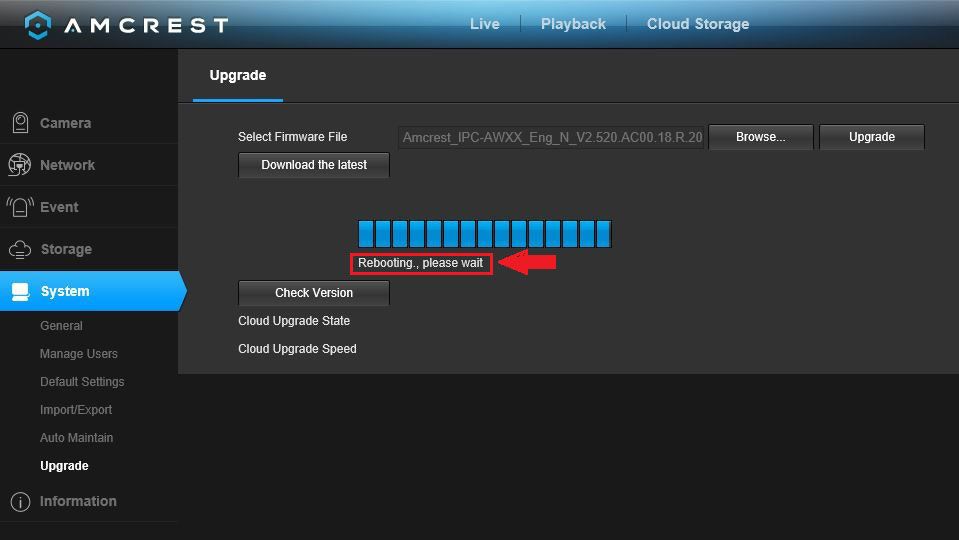
The Amcrest ACD-830B camera is equipped with a firmware upgrade function. Upgrading is needed only when an improved firmware is available. The camera should always be operating on the latest firmware version available for optimal performance. A formatted MicroSD Card is required for this process.
Note: Camera must be plugged into an external power supply when upgrading the firmware, otherwise the firmware upgrade process can be interrupted and ruin the cameras firmware.
To upgrade the firmware, follow these steps:
- Download the most recent firmware from amcrest.com/firmware-subscribe.
- Unzip the downloaded zip file from amcrest.com.
- Place the firmware file on the MicroSD card.
- Insert the MicroSD card into the camera and connect to an external power source.
- Notice the LED indicators flashing when the camera powers on.
- When flashing the firmware, the camera’s screen will be off while the LED indicators are flashing. Please wait while flashing the camera.
- The camera will power on after the firmware flashing is complete.
- Immediately format the MicroSD card within the camera’s General Settings.
Note: If the firmware file is not deleted off the MicroSD card, the camera will attempt to flash the firmware again.
- Use camera as usual and enjoy!
How To Upgrade DVR firmware
For best performance with your device it is highly recommended to operate your DVR with latest firmware version available.
If you are experiencing intermittent connectivity to the internet, general bugginess or difficulty using any features, you must make sure there is no available firmware update which would indicate you are not on the latest version.
There are 2 ways to check for your DVR firmware version:
1. Directly from the DVR on the built-in user interface.
2. On the web interface using a desktop computer or laptop.
Note: An Amcrest DVR cannot be expected to work as advertised unless it is up to date with the latest firmware.
Please always make sure you have the latest version before trying any other troubleshooting steps or contacting support.
Method 1: DVR Interface
To begin, locate and download the most recent version of firmware for your device from http://www.amcrest.com/firmware-subscribe.
Copy the firmware file onto a flash drive.
Note: The flash drive must be formatted to FAT32 or exFAT. Most flash drives are formatted to this by default.
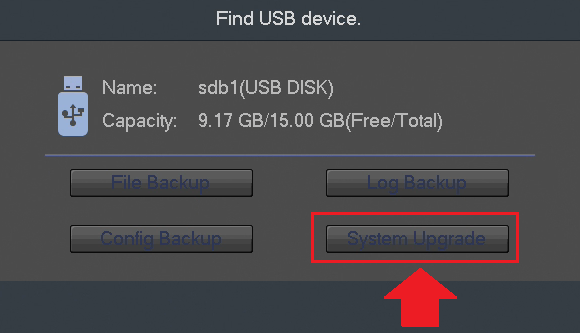
Insert the flash drive, with the firmware file on it, into the USB port located on the DVR. A “Find USB device” screen will populate. Click on the System Upgrade button to begin the firmware upgrade.
A system upgrade screen will appear, click on the Start button to locate the firmware file from your flash drive.

Select the firmware file that you downloaded and click Start.
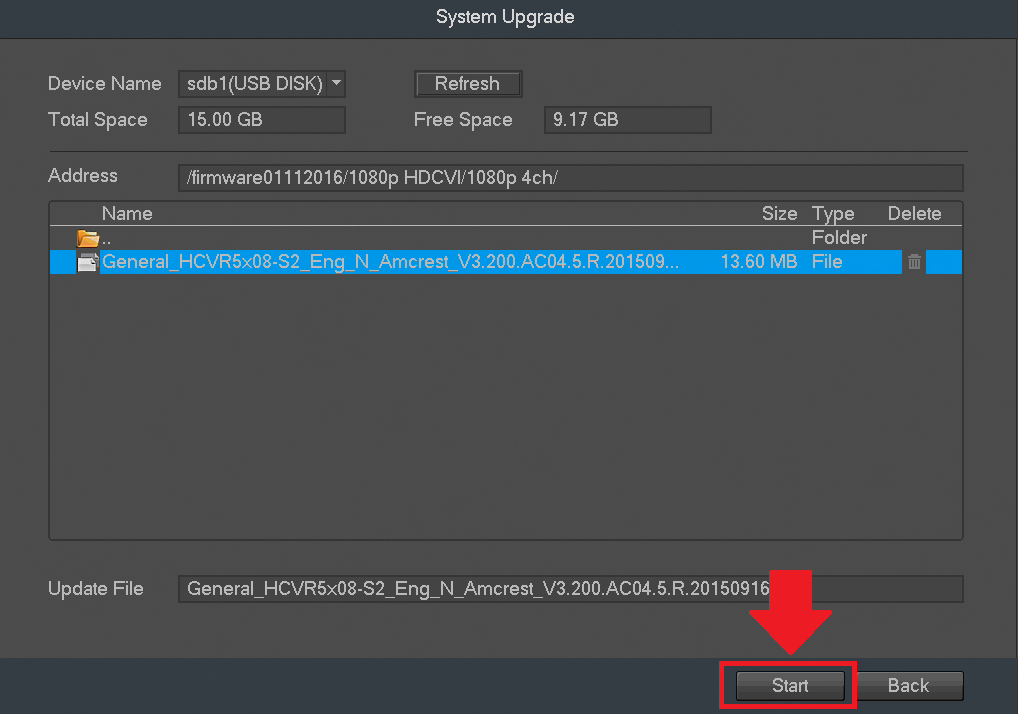
A progress bar will be shown at the bottom of the window. Once the upgrade has finished the DVR might restart on its own.
Note: Do not turn off the DVR during the upgrade process or it can damage the DVR and make it inoperable.
Once the DVR has finished the firmware upgrade process, you can then log back into your DVR. To verify the firmware progress was completed successfully, navigate to Info>>System>>Version on the main menu and verify the System Version field. This field should reflect the same .bin name as the file uploaded.
Method 2: Web Interface
First download the most recent firmware from http://www.amcrest.com/firmware-subscribe
Copy the firmware file onto a flash drive and insert the flash drive into a USB port on your computer.
Note: The flash drive must be formatted to FAT32 or exFAT. Most flash drives are formatted to this by default.
Next, login to the DVR’s web interface. For more information on how to access the web interface for your DVR click here.
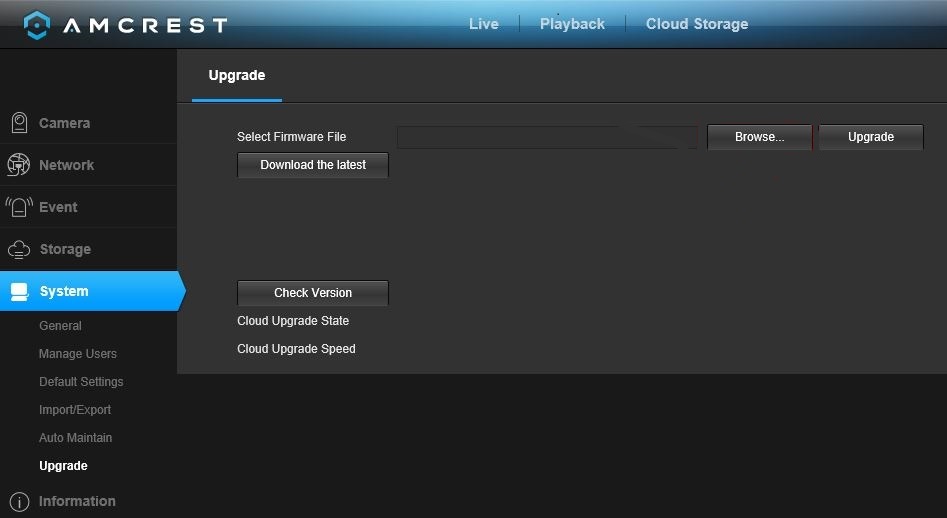
In the web interface, click the setup gear icon in the top right. Then click System on the left panel, then Upgrade below it.
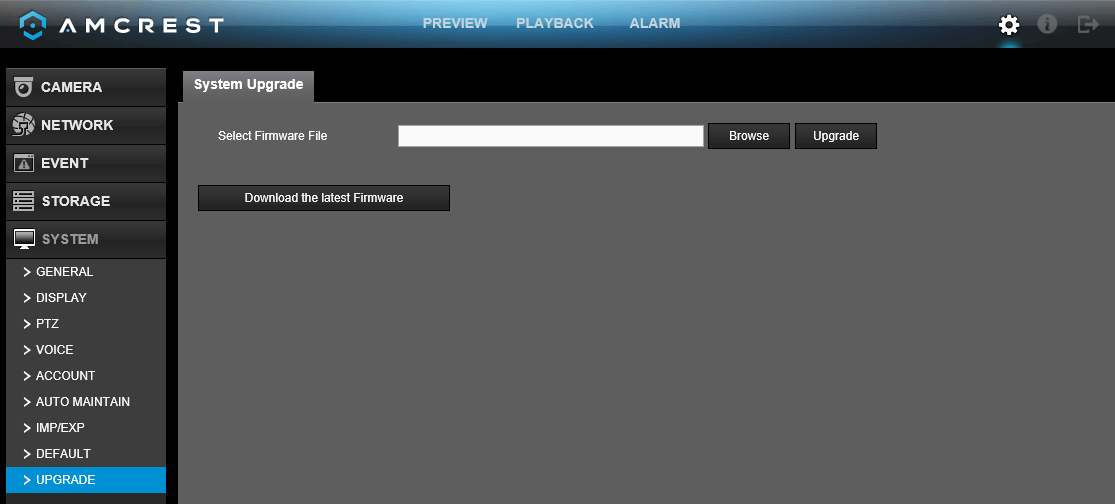
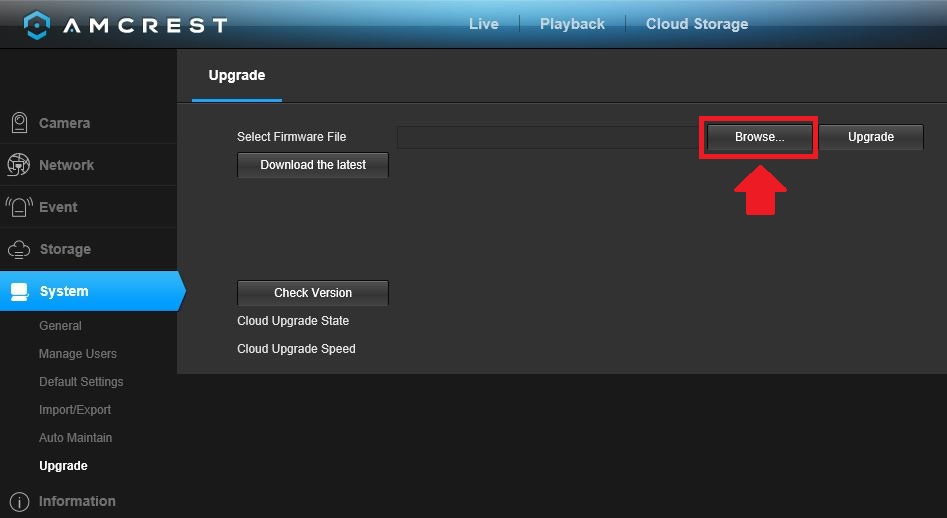
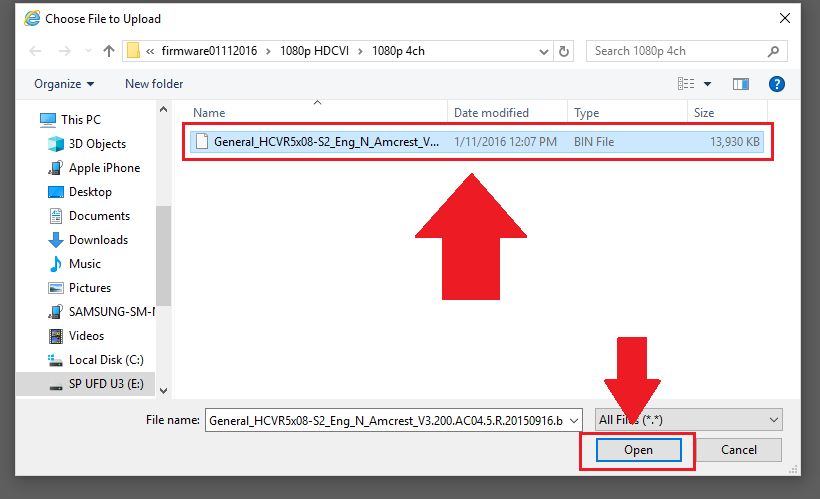
Click the Browse button and select the firmware file you downloaded. Click Open to load the file into the interface.
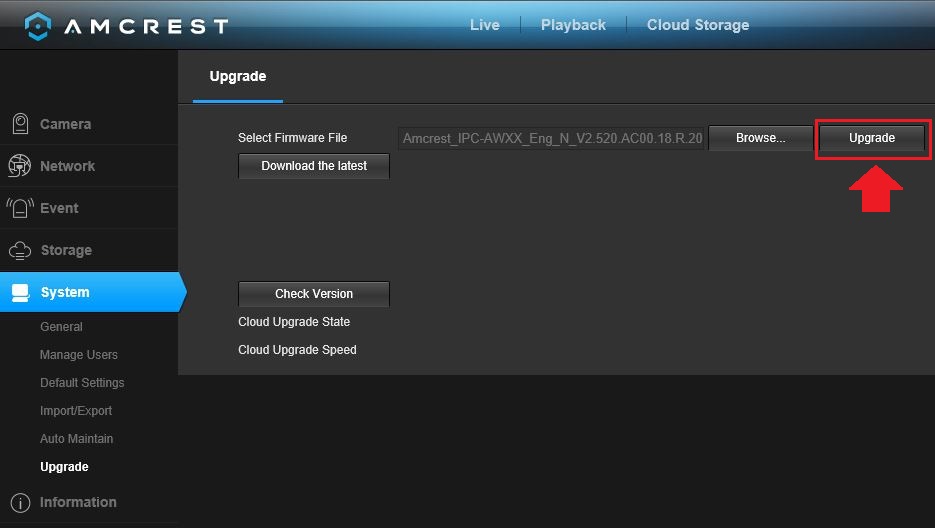
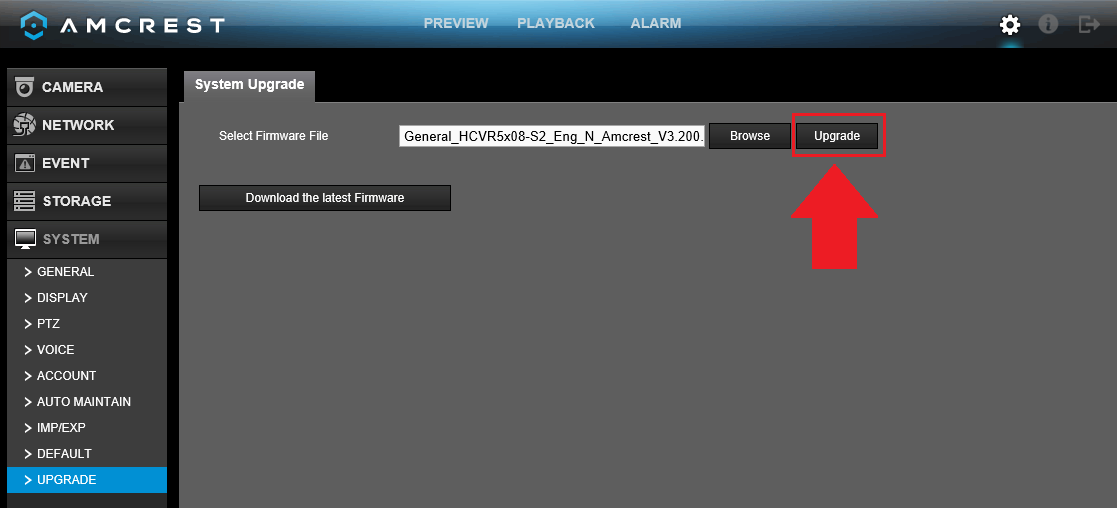
Click the Upgrade button and the upgrade process will begin.
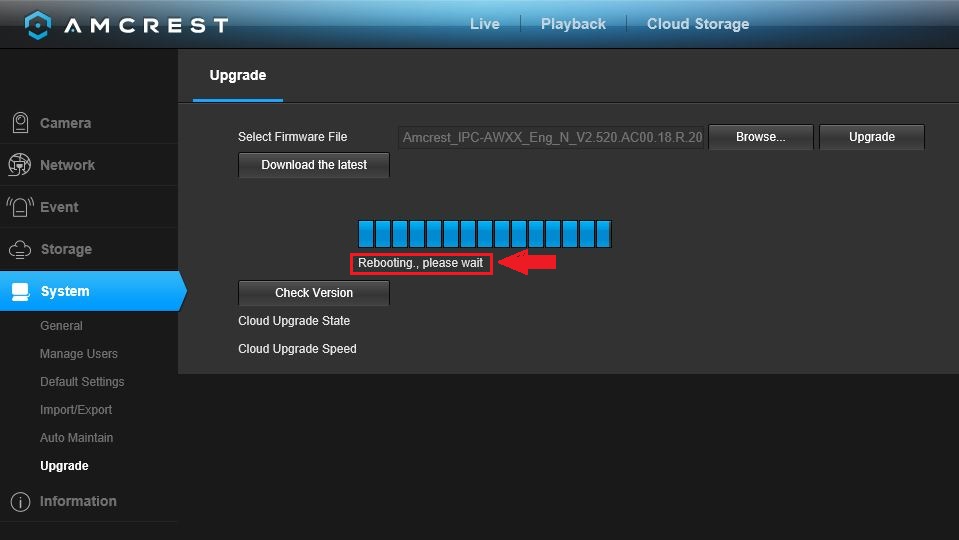
A progress bar will appear showing you the progress of the upgrade. Once the upgrade has finished the DVR might restart on its own.
Note: Do not turn off the DVR during the upgrade process or it can damage the DVR and make it inoperable.
Once the DVR has finished the firmware upgrade process, you can then log back into your DVR. To verify the firmware progress was completed successfully, click on the “i” icon on the live view screen and verify the System Version. The system version should reflect the same .bin name as the file uploaded.
How to Upgrade NVR Firmware
For the best performance with your device, operating your NVR with the latest firmware version is highly recommended.
If you are experiencing intermittent connectivity, general bugginess, or difficulty using any features, you must make sure there is no available firmware update that would indicate you are not on the latest version.
There are 2 ways to check for your NVR firmware version:
1. Directly from the NVR on the built-in user interface.
2. On the web interface using a desktop computer or laptop.
Note: An Amcrest NVR cannot be expected to work as advertised unless it is up to date with the latest firmware.
Please always make sure you have the latest version before trying any other troubleshooting steps or contacting support.
Method 1: NVR Interface
To begin, locate and download the most recent version of firmware for your device from http://www.amcrest.com/firmware.
Copy the firmware file onto a flash drive.
Note: The flash drive must be formatted to FAT32 or exFAT. Most flash drives are formatted to this by default.
Insert the flash drive, with the firmware file on it, into the USB port located on the NVR. A “Find USB device” screen will populate. Click on the System Upgrade button to begin the firmware upgrade.
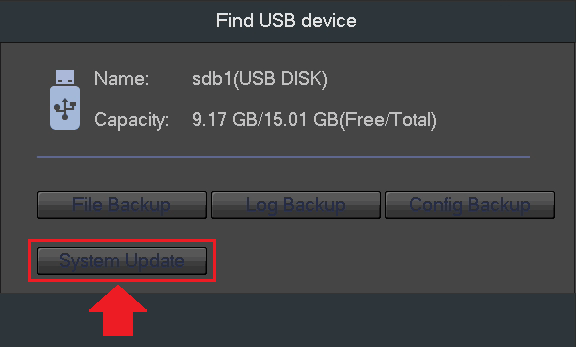
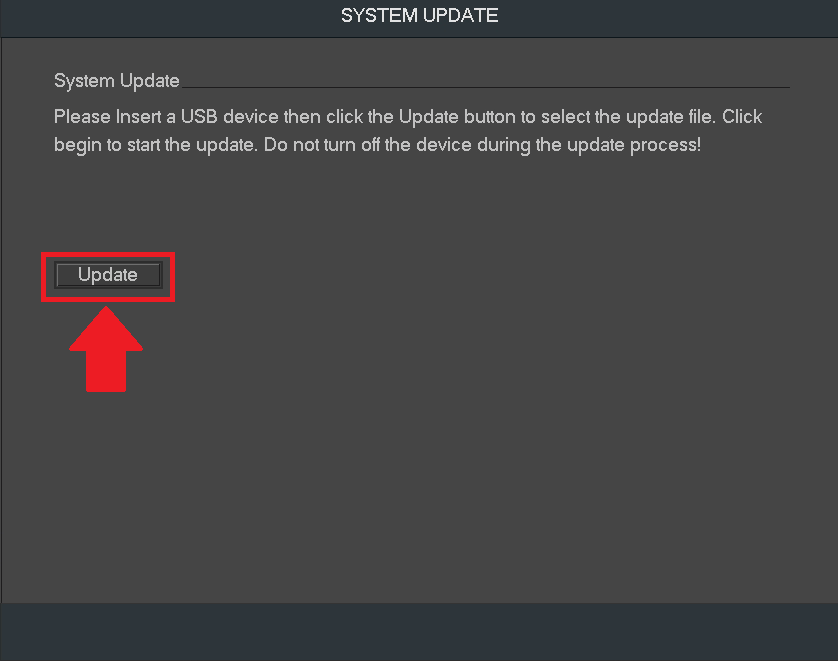
A system upgrade screen will appear, click on the Update button to locate the firmware file from your flash drive.
Select the firmware file that you downloaded and click start.
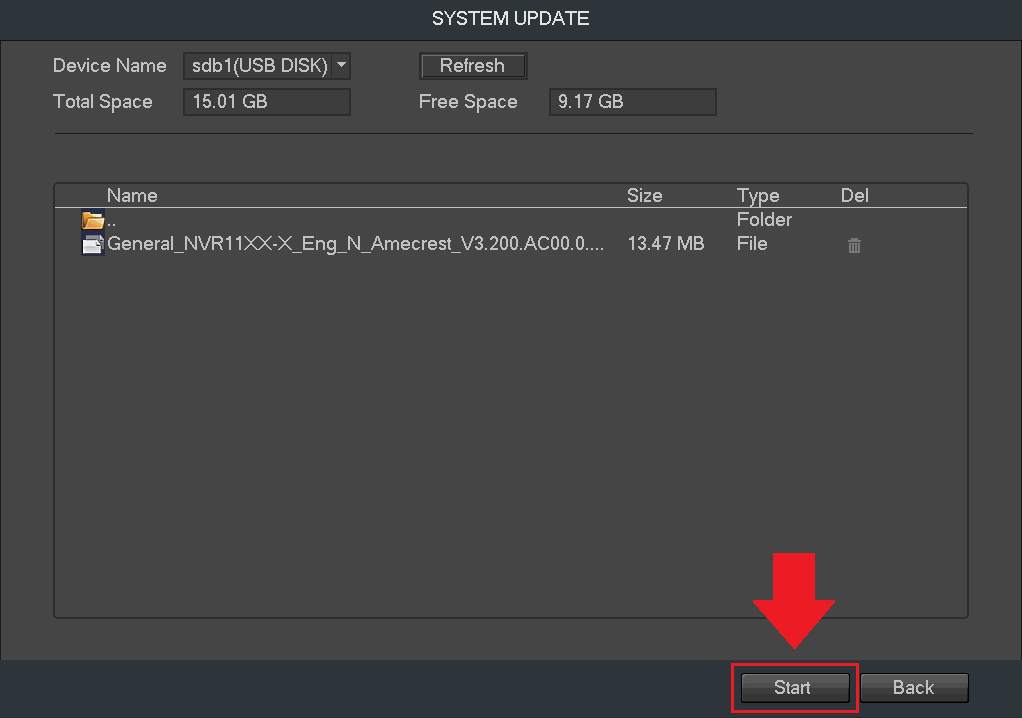
A progress bar will be shown at the bottom of the window. Once the upgrade has finished the NVR might restart on its own.
Note: Do not turn off the NVR during the upgrade process or it can damage the NVR and make it inoperable.
Method 2: Web Interface
First, download the most recent firmware fromhttp://www.amcrest.com/firmware
Copy the firmware file onto a flash drive and insert the flash drive into a USB port on your computer.
Note: The flash drive must be formatted to FAT32 or exFAT. Most flash drives are formatted to this by default.
Next, log in to NVR’s web interface. For more information on how to access the web interface for your NVR click here.
In the main Menu, click on the operation function tile and click on System Maintain, then click on the upgrade tab.

Click the browse button and select the firmware file you downloaded. Click Open to load the file into the interface.
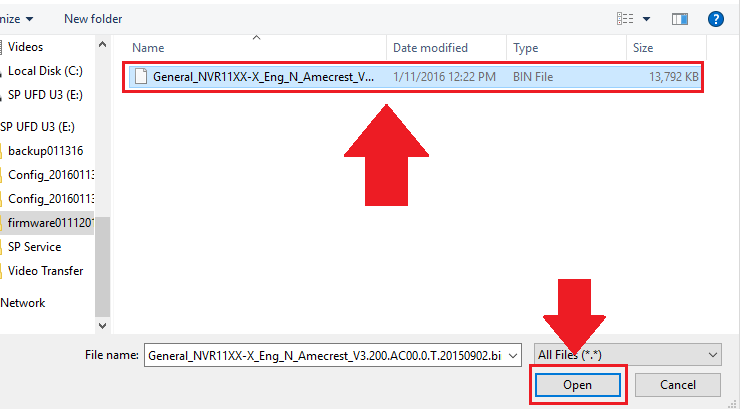
Click the System Upgrade button and the upgrade process will begin.
A progress bar will appear showing you the progress of the upgrade. Once the upgrade has finished the NVR might restart on its own.
Note: Do not turn off the NVR during the upgrade process or it can damage the NVR and make it inoperable.
Once the NVR has finished the firmware upgrade process, you can then log back into your NVR. To verify the firmware progress was completed successfully, click on the “i” icon on the live view screen and verify the System Version. The system version should reflect the same .bin name as the file uploaded.
